background image

CHAPTER 6

COPIER MANAGEMENT

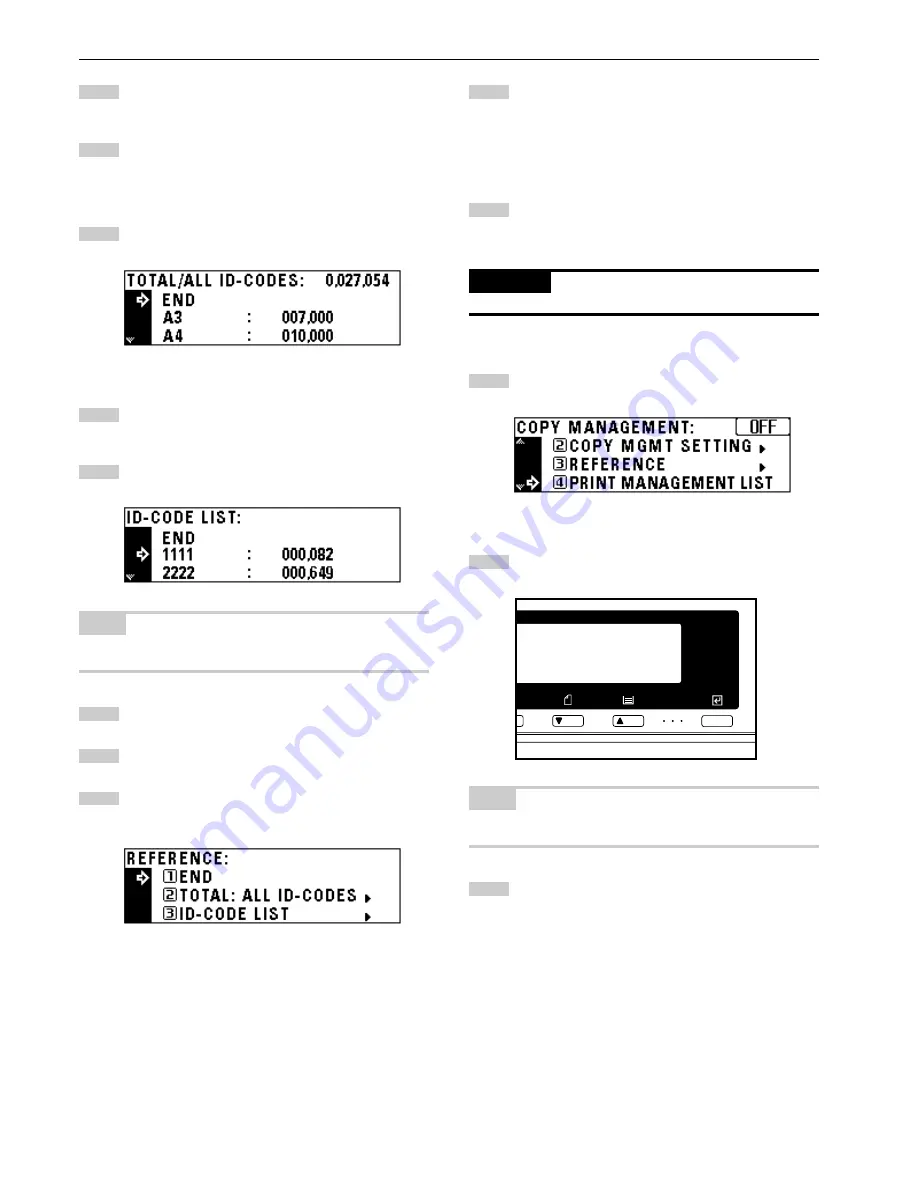
Press the enter key.
If having selected “TOTAL: ALL ID-CODES”, go to the next
step. If having selected “ID-CODE LIST”, go to step 9.

The total number of copies will appear on the message
display. The number of copies by size will appear at the
bottom. Press the cursor down key to view the number of
copies of the size other than those appearing on the
message display.

When finished viewing, press the cursor up key to select
“END”.

Press the enter key. The message display will return to the
screen in step 4.
Go to step 12.

Press the cursor down or up key to select the ID-code to be
displayed.

NOTE

• When no ID-code is registered, “– – – –” will appear and the cursor

will not move.

After finished viewing, press the cursor up to select “END”.

Press the enter key. The message display will return to the
screen in step 4.

Press the cursor up key to select “END”, and press the enter
key.
The message display will return to the screen in step 2.

Press the cursor up key to select “END”, and press the enter
key.
The message display will return to the “READY TO COPY.”
screen.

Printing copy management list

Display the copy management selection screen. (See page
6-3.)

IMPORTANT

• Make sure that A4 size paper is set in the drawer.

Press the cursor down key to select “PRINT MANAGEMENT
LIST”.

Press the enter key. Printing will start. After the list has been
printed, the display will return to the screen in step 2.

NOTE

• Select the paper to be used and press the Start key if A4 size paper

is not loaded.

Press the cursor up key to select “END”, and press the enter
key.
The message display will return to the “READY TO COPY.”
screen.

5

7

6

8

9

10

11

12

13

1

2

3

4

6-7

Summary of Contents for KM-2030

Page 1: ...INSTRUCTION HANDBOOK Please read the instruction handbook before using the copier Keep it close to the copier for easy reference The above illustration includes the optional original cover...

Page 2: ...d mark The Auto Shut off time setting becomes 15 to 120 minutes in the areas corresponding to the Swiss Energy 2000 program All rights reserved No part of this material may be reproduced or transmitte...

Page 3: ...attention to or incorrect compliance with the related points Symbols The m symbol indicates that the related section includes safety warnings Specific points of attention are indicated inside the symb...

Page 4: ...rasing blemishes from edges of copies Sheet Erase 5 6 2 Erasing blemishes from the edges and middle of copies made from books Book Erase 5 6 5 One copy from two or four originals Layout copy 5 7 1 2 U...

Page 5: ...reproductions of photo graphs Copy quality selection page 4 2 Making a margin on copies Margin mode page 5 5 Making copies with clean edges Border erase mode page 5 6 Making one copy from two or four...

Page 6: ...page 7 1 RADF Reversing Auto Document Feeder page 7 3 Drawer page 7 3 Finisher page 7 3 Duplex unit page 7 3 Job separator page 7 3 Key counter page 7 3 Printer board page 7 4 Printer network board p...

Page 7: ...acing toner CAUTION LABELS NOTE DO NOT remove these labels Label 2 High temperature inside Do not touch parts in this area because there is a danger of getting burned Label 1 High voltage inside NEVER...

Page 8: ...of situation presents a danger of personal injury or damage to the copier Avoid locations with humidity or dust and dirt If dust or dirt become attached to the power plug clean the plug to avoid the...

Page 9: ...danger of electrical shock from high voltage parts inside the copier DO NOT damage break or attempt to repair the power cord DO NOT place heavy objects on the cord pull it bend it unnecessarily or cau...

Page 10: ...2 1 CHAPTER 2 NAMES OF PARTS 1 Main body...

Page 11: ...cartridge or waste toner tank Main switch Turn ON before starting to make copies Copy store section Copied paper is stored here Ejection section Platen Set originals here for copying Place originals...

Page 12: ...right key Press to make copies at the same ratio regardless of the original size Also used to move the cursor in the message display to the right Cursor left key Press to move the cursor in the messa...

Page 13: ...ossible to change the default setting for copy exposure adjustment to auto exposure mode in the initial mode See 1 EXPOSURE MODE on page 6 11 Auto clear function About 90 seconds after copying stops t...

Page 14: ...size from 11 x 17 to 5 1 2 x 8 1 2 Metric specifications The each drawer can be set to hold paper of any desired size from A3 to A5R IMPORTANT Set the type of paper standard paper recycled paper lette...

Page 15: ...t reload the paper NOTE Before leaving the copier in disuse for a prolonged period of time remove the paper from the drawer s and seal it in its original packaging to protect from moisture 3 Loading p...

Page 16: ...aper Select key for 3 seconds The screen to set the paper size and select either the transpar ency or thick paper mode appears When using transparencies or thick paper first select the mode by pressin...

Page 17: ...ion envelopes can be set in the multi bypass NOTE The types of envelopes that can be used are COM 10 Monarch DL and C5 Up to 6 envelopes can be loaded in the multi bypass at a time Open the multi bypa...

Page 18: ...er Turn the toner cartridge release lever to the right as far as it will go The old cartridge will be unlocked Pull the old toner cartridge out toward you Tap the new toner cartridge on the top 5 or 6...

Page 19: ...e toner tank Close the opening of the waste toner tank with its seal CAUTION Do not incinerate toner and toner containers Dangerous sparks may cause burn While holding the waste toner tank release lev...

Page 20: ...e end of warm up READY TO COPY will appear on the message display NOTE If originals are set and the Start key is pressed while the copier is still warming up copying will begin as soon as warm up ends...

Page 21: ...he copy exposure adjusted automatically press the copy quality selection key and set the auto exposure mode The Auto Exp indicator will light In the auto exposure mode the brightness of the original i...

Page 22: ...tore section IMPORTANT Up to 250 sheets can be stored Note that the number of sheets that can be stored varies depending on the condition of the paper used 9 7 Setting the number of copies Use the num...

Page 23: ...change the paper size Copying will start when the Start key is pressed 1 Auto magnification selection mode The original image is enlarged reduced automatically according to the selected paper size IM...

Page 24: ...in the copier Available ratios Reduction 50 A3 A5 70 A3 A4 A4 A5 75 11 15 A4 90 Folio A4 Enlargement 106 11 15 A3 127 Folio A3 141 A4 A3 A5 A4 200 A5 A3 Set the original s Press the Preset R E key Th...

Page 25: ...rupt copying is useful if during one copy job other originals need to be copied at different settings The interrupted copy job can be resumed at the same settings as before after the rush job is finis...

Page 26: ...turns the main switch OFF O if no copying operation is performed for a certain period 15 to 240 minutes To make copies again set the main switch to the ON l position Auto shut off function The auto sh...

Page 27: ...ti bypass 1 Duplex copying from two sided originals A two sided original is copied onto both the front and back side of the paper The copy looks just like the original IMPORTANT The paper sizes that c...

Page 28: ...ORIG DUPLEX or BOOK ORIGINAL was selected the message display will be changed to the DUPLEX MODE screen 3 Duplex copying from one sided originals The one sided original is copied on both sides back a...

Page 29: ...ey Scanning of the originals will start When setting the original in the DF copying will be performed When setting the original on the platen go to the next step Replace the original and press the Sta...

Page 30: ...s copied onto a separate sheet of paper Set the original s NOTE When copying from a book set the book as illustrated Press the Duplex Split Page key to light the indicator The function selection scree...

Page 31: ...binding on the left side of the paper between 6 mm and 18 mm in 1 mm increments NOTE The initial value of margin width can be set See 0 MARGIN WIDTH on page 6 13 If the left margin is specified while...

Page 32: ...ishes from edges of copies Sheet Erase Use for erasing shadows lines etc that occur around the edges of copies made from sheet originals The border width can be selected from 6 12 and 18 mm a is the w...

Page 33: ...on the back side can be rotated 5 One copy from two or four originals Layout copy 2 or 4 originals can be combined into a single copy The borderline of each original can also be marked with a solid li...

Page 34: ...the indicator The layout copy setting screen will appear Press the cursor down or up key to select the layout copy mode In the 4 UP mode when setting originals horizontally select 4 UP Z when setting...

Page 35: ...er key Copying will start Since copying is performed after memorizing multiple originals copies can be sorted into the required number of sets even without an optional finisher NOTE If ON is set in RO...

Page 36: ...nals in the DF Press the Auto Selection key to light the indicator Press the Start key Copying will start Even when the orientation of original is different from that of paper in the drawer the image...

Page 37: ...ximum number of copies to the departments in your organization Up to 100 departments can be assigned Limits are set in units of 1 000 sheets up to a maximum of 999 000 Entering 0 enables unlimited cop...

Page 38: ...ment for printing when using the printer function of this copier Turn OFF when not using printer management This mode is not displayed when the copier is not equipped with the optional printer board T...

Page 39: ...cursor down key to highlight the maximum number of copies 2 How to display the selection screen of the copy management mode Press the Language key to light the indicator The management mode selection...

Page 40: ...ey to select END and press the enter key The message display will return to the screen in step 2 Press the cursor up key to select END and press the enter key The message display will return to the RE...

Page 41: ...the cursor up key to select YES and press the enter key To cancel the command make sure that NO has been selected and press the enter key The message display will return to the screen in step 6 NOTE...

Page 42: ...s the cursor down key to select REFERENCE Press the enter key Press the cursor down key to view the number of copies in all the departments and select TOTAL ALL ID CODES To view the number of copies b...

Page 43: ...e cursor up to select END Press the enter key The message display will return to the screen in step 4 Press the cursor up key to select END and press the enter key The message display will return to t...

Page 44: ...copier will return to the previous state Turning copy management ON OFF Display the copy management selection screen See page 6 3 NOTE Copy management ON or OFF appears in the upper right hand of the...

Page 45: ...e 4 2 Adjusts the exposure of the original when photo mode is selected in the copy quality selection page 4 2 Adjusts the exposure of the original when text mode is selected in the copy quality select...

Page 46: ...up ends or when the Clear All key is pressed Paper feed drawer 3 and 4 can be selected only when the optional drawer is installed Sets whether or not to perform sort copying page 5 9 Sets whether the...

Page 47: ...AUTO MIXED PHOTO or TEXT Press the enter key 2EXPOSURE STEPS Press the cursor down or up key to select 5 STEPS or 9 STEPS Press the enter key 2 How to set the copy default setting mode Press the Lang...

Page 48: ...key 5PHO ORI DENSITY Press the cursor right or left key to move the cursor on the exposure scale Move the cursor to the right to make copies darker and to the left to make copies lighter Press the en...

Page 49: ...n or up key to select ON or OFF Press the enter key 9COPY LIMIT Enter the maximum number of copies that can be made with the numeric keys Press the enter key 0MARGIN WIDTH Press the cursor right or le...

Page 50: ...tains special paper such as colored paper or recycled paper Drawer 3 or 4 can be selected only when the optional drawer has been installed If special paper is loaded in the drawer select the paper typ...

Page 51: ...is not used frequently See 2 AUTO SHUT OFF to release the auto shut off function Changes the display contrast when the message display is not seen clearly Changes the management code that accesses th...

Page 52: ...s as explained below NOTE displayed in each setting screen indicates the present setting value After finishing each setting the display will return to the screen in step 5 If changing other settings r...

Page 53: ...ax board and job separator must be installed to perform this setting If not this setting will not be displayed 3SPECIAL PAPER Press the cursor down or up key to select the paper feed drawer to be mark...

Page 54: ...T EJECTOR OF COPY Press the cursor down or up key to select the eject point Press the enter key NOTE The display shown in step 1 appears when the finisher is installed If the job separator is installe...

Page 55: ...or up key to select the language Press the enter key The language will be changed and the message display will return to the READY TO COPY screen 1 2 3 4 5 AUTO DRAWER SWITCH Press the cursor down or...

Page 56: ...iginals with adhesive tape or glue Originals bundled with a paper clip or staple if inevitable remove the paper clip or staple and straighten out the creases and folds before setting the originals Cli...

Page 57: ...original that cannot be set in the DF such as a book or magazine open the DF and place it on the platen Hold the DF open close handle and open the DF Before opening the DF check that no original is p...

Page 58: ...a large quantity of copies It can also sorts multiple copies into sets by shifting the eject position Paginated copies can be stapled too 5 Duplex unit If the Duplex unit is installed duplex copies c...

Page 59: ...rs on the message display 8 Printer board If the printer board is installed this copier can be used as a printer For details see the printer s instruction handbook 9 Printer network board If the netwo...

Page 60: ...ck the paper REPOSITION ORIGINAL OR SELECT OTHER PAPER DRAWER The orientation of the original and the selected paper are different Change the orientation of the original If the Start key is pressed sa...

Page 61: ...tely INSTALL FINISHER The finisher optional is not installed correctly Install it securely CHECK PAPER IN FINISHER INCOM PLETE COPIES INSIDE Unfinished copies were ejected onto the finisher optional d...

Page 62: ...as there is a danger of electrical shock CAUTION The copier s fixing unit is extremely hot Take sufficient care when working in this area as there is a danger of getting burned Do not reuse misfed pa...

Page 63: ...n the drawer left cover Remove the misfed paper using the procedure given below Open the drawer left cover Remove the misfed paper while taking care not to tear it If the paper should be torn remove a...

Page 64: ...electrical shock CAUTION The copier s fixing unit is extremely hot Take sufficient care when working in this area as there is a danger of getting burned Remove the misfed paper while taking care not...

Page 65: ...misfed original together with those removed back onto the original table and resume the copying operation 4 4 4 4 4 Misfeed in duplex unit optional If the message PAPER MISFEED OPEN DRAWER OF DUPLEX...

Page 66: ...ay Perform the corrective action corresponding to the messsage Copies come out blank Are the originals set correctly When setting originals on the platen place them face down When setting originals in...

Page 67: ...e platen and or the original cover Open the front cover and pull and push back in the cleaning shaft Copy image is askew Are the originals set correctly When setting originals on the platen align thei...

Page 68: ...loth dampened with alcohol or a mild detergent Never use thinner or other organic solvents for this purpose Cleaning the platen Lift open the original cover Wipe the platen with a soft cloth damp ened...

Page 69: ...pacity 25 sheets of A4 B4 Folio paper or 50 sheets of A4 or smaller paper 80 g m2 Copy paper Drawer and duplex unit Standard paper 64 80 g m2 Multi bypass Standard paper 60 160 g m2 special paper lett...

Page 70: ......

Page 71: ...ion can leak from the machine This machine is classified as Class 1 laser product under IEC 825 CAUTION Performance of procedures other than those specified in this manual may result in hazardous radi...

Page 72: ...equipment EN55024 Limits and methods of measurement for radio interference characteristics of information technology equipment EN55022 Class B Limits for harmonic currents emissions for equipment inpu...

Page 73: ...For best copy results and machine performance we recommend that you use only KYOCERA MITA original supplies for your KYOCERA MITA copier...

Page 74: ...3 KYOCERA MITA CORPORATION 2 28 1 chome Tamatsukuri Chuo ku Osaka 540 8585 Japan Phone 06 6764 3555 Fax 06 6764 3981 KYOCERA MITA EUROPE B V Hoeksteen 40 2132 MS Hoofddorp The Netherlands Phone 020 65...

Reviews: