


2NC/2NF/2NG/2NN/3P7/3P8/3P9
1-3-76
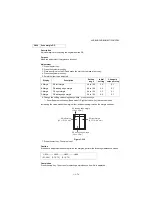
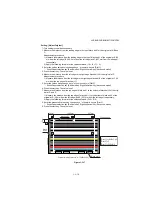
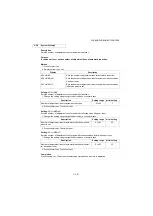
Method: [All]
1. Load A4/letter paper.
2. Press the start key to output the original for adjustment.
3. Set the output the original for adjustment and press the start key.
4. Set the output the original for adjustment on the DP face up.
5. Press the start key to scan documents.
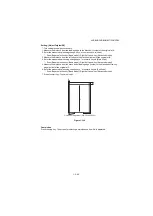
6. Press the start key. Auto adjustment of first side starts.
7. Set the output the original for adjustment on the DP face down.
8. Press the start key to scan documents.
9. Press the start key. Auto adjustment of second side starts.
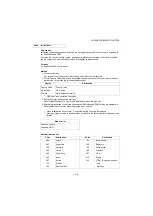
* : When automatic adjustment has normally completed, [OK] is displayed. If a problem occurs
during auto adjustment, error code is displayed and operation stops. Should this happen,
determine the details of the problem and repeat the procedure from the beginning.
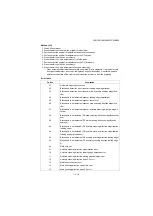
Error Codes
Codes
Description
01
Automatic adjustment success
03
Black band detection error (scanner leading edge registration)
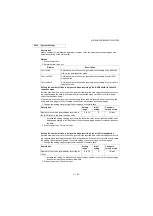
03
Black band detection error (scanner main scanning direction magnifica-
tion)
04
Black band is not detected (scanner leading edge registration)
05
Black band is not detected (scanner center line)
06
Black band is not detected (scanner main scanning direction magnifica-
tion)
07
Black band is not detected (scanner auxiliary scanning direction magnifi-
cation)
08
Black band is not detected (DP main scanning direction magnification far
end)
09
Black band is not detected (DP main scanning direction magnification
near end)
0a
Black band is not detected (DP auxiliary scanning direction magnification
leading edge)
0b
Black band is not detected (DP auxiliary scanning direction magnification
leading edge original check)
0c
Black band is not detected (DP auxiliary scanning direction trailing edge)
0d
White band is not detected (DP auxiliary scanning direction trailing edge
2)
0e
DMA time out
0f
Auxiliary scanning direction magnification error
10
Auxiliary scanning direction leading edge detection error
11
Auxiliary scanning direction trailing edge detection error
12
Auxiliary scanning direction skew 1.5 error
13
Maintenance request error
14
Main scanning direction center line error
15
Main scanning direction skew 1.5 error
Summary of Contents for DP-480
Page 6: ...This page is intentionally left blank ...
Page 12: ...This page is intentionally left blank ...
Page 18: ...2NC 2NF 2NG 2NN 3P7 3P8 3P9 This page is intentionally left blank ...
Page 54: ...2NC 2NF 2NG 2NN 3P7 3P8 3P9 1 2 24 This page is intentionally left blank ...
Page 172: ...2NC 2NF 2NG 2NN 3P7 3P8 3P9 1 3 118 This page is intentionally left blank ...
Page 278: ...2NC 2NF 2NG 2NN 3P7 3P8 3P9 2 1 4 106 This page is intentionally left blank ...
Page 434: ...2NC 2NF 2NG 2NN 3P7 3P8 3P9 2 2 44 This page is intentionally left blank ...
Page 446: ...2NC 2NF 2NG 2NN 3P7 3P8 3P9 2 3 12 This page is intentionally left blank ...
Page 455: ...Installation Guide DP 480 Document processor Installation Guide ...
Page 458: ...2 3 4 5 6 A ...
Page 459: ...3 7 8 9 B C C ...
Page 460: ...4 10 ...
Page 473: ...PF 480 300 sheet Paper feeder Installation Guide ...
Page 476: ...2 5 6 4 3 B M3x8 B M3x8 B M3x8 B M3x8 1 2 ...
Page 477: ...3 9 10 8 7 1 2 ...
Page 478: ...4 13 12 11 1 2 C ...
Page 479: ...5 15 14 E D D E D D E D D E D D ...
Page 482: ...DU 480 duplex unit Installation Guide ...
Page 484: ...1 2 3 1 A B M3x8 ...
Page 485: ...2 6 7 5 4 A A B M3x8 ...
Page 489: ...IB 33 Network interface kit Installation Guide ...
Page 490: ...2 3 1 IB 33 2013 7 303PB56710 01 A B ...
Page 491: ...6 7 5 4 2013 7 303PB56710 01 B YC2007 A ...
Page 492: ...FAX System X Installation Guide ...
Page 495: ...2 5 4 3 2 B M3x8 A YC 2003 ...
Page 496: ...3 8 9 7 6 C G G 8 9 7 6 C ...
Page 497: ...4 11 10 12 13 D D E ...
Page 499: ......
Page 500: ......


