

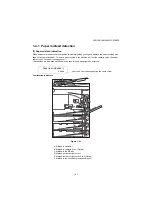


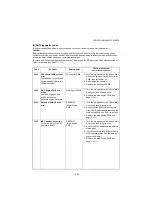


2NC/2NF/2NG/2NN/3P7/3P8/3P9
1-4-9
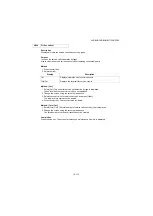
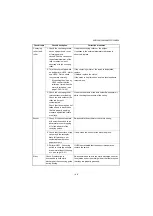
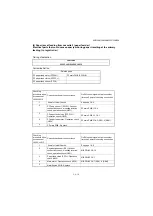
Conveying
roller, feed
roller
1. Check the conveying rollers
have no paper dusts, toner,
or foreign objects
stucked.Check a variation of
the external diameter of the
roller or abrasion is not
observed with the coveying
roller.
Clean the conveying rollers or the pollyes.
If variation in the external diameter or abrasion is
observed, replace.
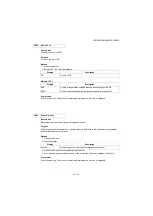
2. Turn the cover safety switch
on and perform U030 - Motor
and U032 - Clutch, check
they operate normally.
* : At checking the clutch by
U032, confirm that the
roller won't turn when the
motor is turned on. (see
page 1-3-20,1-3-22)
If the conveying motor or the clutch is inoperative,
replace.
If stained, replace the clutch.
If the clutch is kept turned on due to a tensioned wire,
reroute wires.
3. Check the conveying roller
rotates without overloading.
Check the axle holder or the
roller shaft are not
contaminated.
Check that the spring has not
fallen off and is mounted so
that it is properly applying
pressure against the rollers
or pulleys.
Clean the roller axle or the axle holder.Re-assemble it
while checking the pressure of the spring.
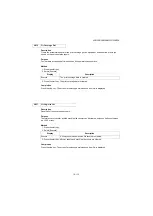
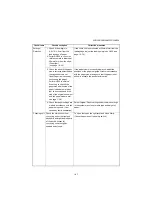
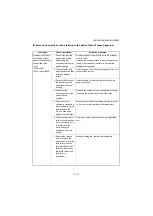
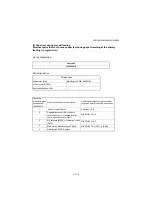
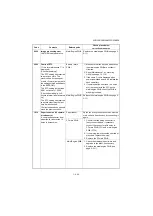
Sensor
1. Check if it does not operate
with smoothness due to an
abnormal move or dropping
off of the actuator of the
coveying switch.
Re-assemble the actuator or the return spring.
2. Check that the surface of the
sensor and the recveptor
black felt pieces are not
contaminated with toner,
paper dusts, etc.
If dirty, clean the sensor or the black felt piece.
3. Perform U031 - Conveying
switch to check the sensors
are normal without flickering,
etc. (see page1-3-21)
If U031has revealed that the sensor is inoperative,
replace the switch.
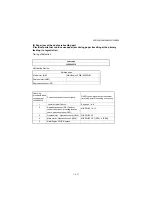
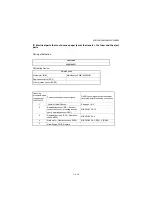
Static
Check if the location is
susceptible to build static
discharge at the conveying guide
during printing.
Re-assemble and re-wire the static discharge sheet at
the ejection unit or the metal guide at the tranfer unit so
that they are properly grounded.
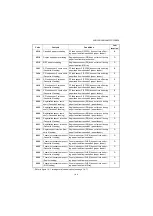
Check items
Check description
Corrective measures
Summary of Contents for DP-480
Page 6: ...This page is intentionally left blank ...
Page 12: ...This page is intentionally left blank ...
Page 18: ...2NC 2NF 2NG 2NN 3P7 3P8 3P9 This page is intentionally left blank ...
Page 54: ...2NC 2NF 2NG 2NN 3P7 3P8 3P9 1 2 24 This page is intentionally left blank ...
Page 172: ...2NC 2NF 2NG 2NN 3P7 3P8 3P9 1 3 118 This page is intentionally left blank ...
Page 278: ...2NC 2NF 2NG 2NN 3P7 3P8 3P9 2 1 4 106 This page is intentionally left blank ...
Page 434: ...2NC 2NF 2NG 2NN 3P7 3P8 3P9 2 2 44 This page is intentionally left blank ...
Page 446: ...2NC 2NF 2NG 2NN 3P7 3P8 3P9 2 3 12 This page is intentionally left blank ...
Page 455: ...Installation Guide DP 480 Document processor Installation Guide ...
Page 458: ...2 3 4 5 6 A ...
Page 459: ...3 7 8 9 B C C ...
Page 460: ...4 10 ...
Page 473: ...PF 480 300 sheet Paper feeder Installation Guide ...
Page 476: ...2 5 6 4 3 B M3x8 B M3x8 B M3x8 B M3x8 1 2 ...
Page 477: ...3 9 10 8 7 1 2 ...
Page 478: ...4 13 12 11 1 2 C ...
Page 479: ...5 15 14 E D D E D D E D D E D D ...
Page 482: ...DU 480 duplex unit Installation Guide ...
Page 484: ...1 2 3 1 A B M3x8 ...
Page 485: ...2 6 7 5 4 A A B M3x8 ...
Page 489: ...IB 33 Network interface kit Installation Guide ...
Page 490: ...2 3 1 IB 33 2013 7 303PB56710 01 A B ...
Page 491: ...6 7 5 4 2013 7 303PB56710 01 B YC2007 A ...
Page 492: ...FAX System X Installation Guide ...
Page 495: ...2 5 4 3 2 B M3x8 A YC 2003 ...
Page 496: ...3 8 9 7 6 C G G 8 9 7 6 C ...
Page 497: ...4 11 10 12 13 D D E ...
Page 499: ......
Page 500: ......


