


5
20mm
20mm
20mm
20mm
c
b
b
a
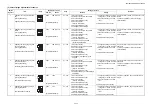
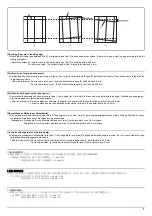
[Operation check]
1.
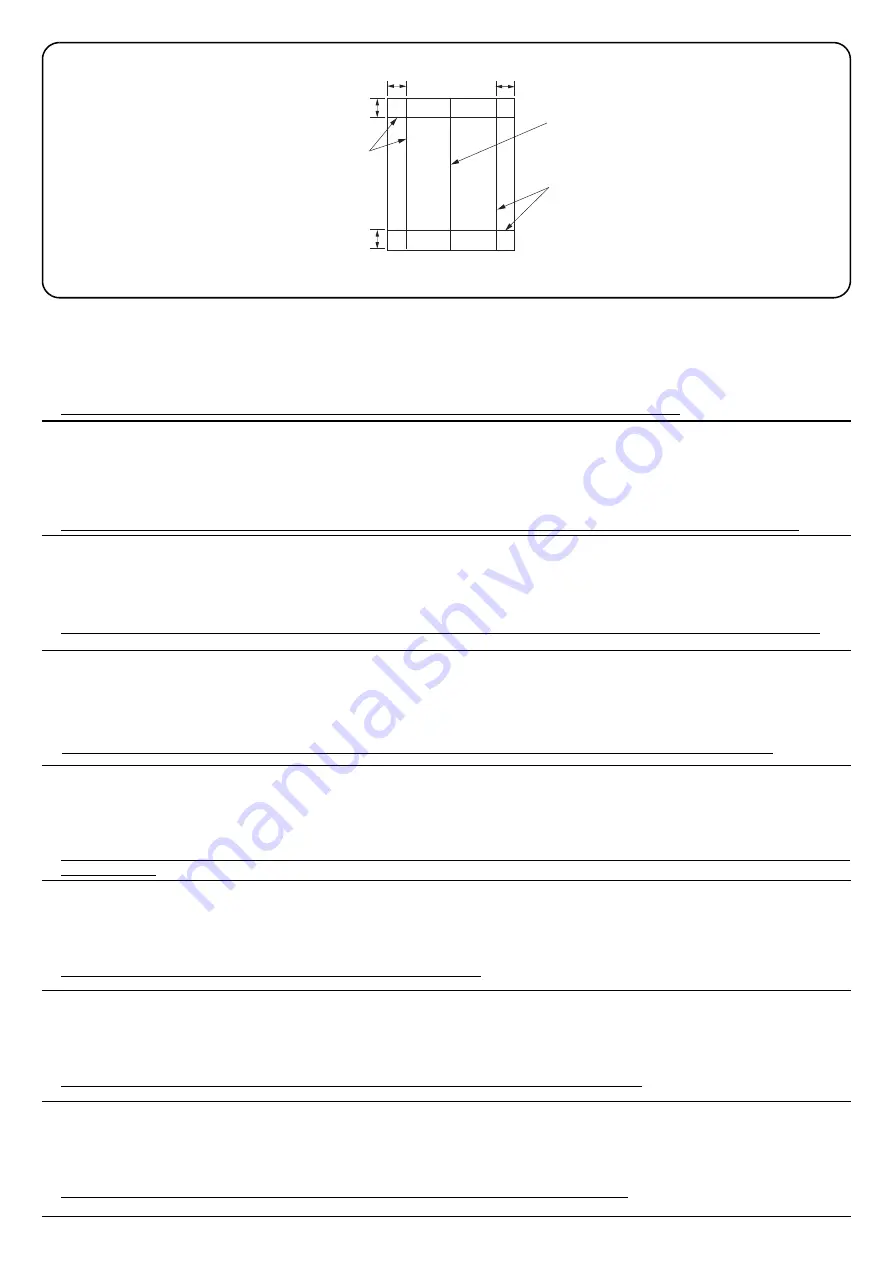
To check the machine operation, prepare original (a) where 4 lines (b) are drawn 20 mm from the edges of the A3 sheet and 1 line (c) is drawn at its
center.
2.
Connect the power plug of the MFP into the wall outlet and turn the main power switch on.
3.
Set the original (a) on the DP and perform a test copy to check the operation and the copy example.
4.
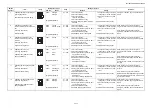
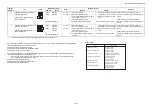
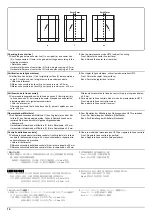
Compare original (a) with the copy example. If the gap exceeds the reference value, perform the following adjustments according to the type of the
gap.
Check images of the DP after checking and adjusting images of the MFP. For details, see the service manual.
[Vérification du fonctionnement]
1.
Pour vérifier le bon fonctionnement de l’appareil, préparer un original (a) sur lequel sont tracées 4 lignes (b) à 20 mm des bords de la feuille A3 et 1
ligne (c) en son axe.
2.
Brancher la fiche d’alimentation du MFP sur la prise murale et mettre l’appareil sous tension.
3.
Placer l’original (a) sur le DP et effectuer une copie de test pour vérifier le fonctionnement et l’exemple de copie.
4.
Comparer l’original (a) avec l’exemple de copie. Si l’écart excède la valeur de référence, effectuer les réglages suivants en fonction du type d’écart.
Vérifier les images du DP après avoir contrôlé et réglé les images du MFP. Pour plus de détails, se reporter au manuel d’entretien.
[Verifique el funcionamiento]
1.
Para comprobar el funcionamiento del aparato, prepare un original (a) que contenga 4 líneas (b) dibujadas a 20 mm de los bordes de la hoja A3 y 1 línea (c)
dibujada en el centro.
2.
Conecte el enchufe eléctrico del MFP en el tomacorriente de la pared y encienda el interruptor principal.
3.
Coloque el original (a) en el DP y haga una copia de prueba para verificar el funcionamiento y el ejemplo de copia.
4.
Compare el original (a) con el ejemplo de copia. Si la separación supera el valor de referencia, realice los siguientes ajustes según el tipo de separación.
Compruebe las imágenes del DP después de comprobar y ajustar las imágenes del MFP. Para más detalles, lea el manual de servicio.
[Funktionsprüfung]
1.
Zum Prüfen der Gerätefunktion das Original (a) vorbereiten, auf das 4 Linien (b) 20 mm von den Kanten des A3-Blattes und 1 Linie (c) in der Mitte gezeichnet
sind.
2.
Den Netzstecker am MFP in die Steckdose stecken und den Strom einschalten.
3.
Das Original (a) auf den DP legen und eine Testkopie erstellen, um die Funktion und das Kopierbeispiel zu prüfen.
4.
Das Original (a) mit dem Kopierbeispiel vergleichen. Wenn der Abstand größer als der Bezugswert ist, die folgenden Einstellungen gemäß dem Abstandstyp
durchführen.
Die Bilder des DP nach dem Prüfen und Einstellen der Bilder des MFP prüfen. Weitere Einzelheiten siehe Wartungsanleitung.
[Verifica del funzionamento]
1.
Per verificare il funzionamento della macchina, preparare l’originale (a) tirando 4 linee (b) a 20 mm dai bordi del foglio A3 e una linea (c) al centro.
2.
Inserire la spina dell’alimentazione dell’MFP nella presa a muro, quindi posizionare l’interruttore principale su On.
3.
Posizionare l’originale(a) sul DP ed eseguire una copia di prova per verificare il funzionamento e l’esempio di copia.
4.
Confrontare l’originale (a) con l’esempio di copia. Se lo scostamento supera il valore di riferimento, eseguire le seguenti regolazioni in funzione del tipo di scostamento.
Controllare le immagini del DP dopo avere effettuato i controlli e le regolazioni delle immagini sull’MFP. Per ulteriori dettagli leggere il man-
uale d’istruzioni.
[ 動作確認 ]
1.
A3 サイズ用紙の端から 20mm の位置に線 (b)4 本と、
用紙の中心に線 (c)1 本を引いた、動作確認用の原稿 (a) を用意する。
2.
MFP の電源プラグをコンセントに差し込み、主電源スイッチを ON にする。
3.
原稿 (a) を DP にセットし、テストコピーを行い、動作およびコピーサンプルを確認する。
4.
原稿 (a) とコピーサンプルを比較し、基準値以上のずれがある場合、ずれ方に応じて調整を行う。
MFP の画像確認及び調整を行ってから DP の画像確認を行うこと。
詳細はサービスマニュアルを参照のこと。
[ 动作确认 ]
1.
若要检查机器动作,准备一张 A3 原稿(a),距纸张边缘 20mm 画出 4 条线(b)并且在原稿中心画出 1 条线(c)。
2.
将 MFP 的电源插头插入墙壁插座并打开主电源。
3.
在 DP 上设定原稿(a)并进行测试复印,确认机器动作和复印样本。
4.
对比复印样本和原稿(a),如果偏移值在标准值以上时,对偏移原稿进行调整。
对 MFP 的图像确认和调整后再对 DP 的图像进行确认。详细内容请参见维修手册。
[ 작동확인 ]
1.
기계 작동 확인을 위해서 , A3 용지 선단에서 20mm 떨어진 곳에 4 개의 선 (b) 과 센터에 1 개의 선 (c) 이 그려진 원고 (a) 를 준비 .
2.
콘센트에 MFP 전원플러그를 꽂고 메인 전원 스위치를 ON 으로 합니다 .
3.
DP 상에 원고 (a) 를 준비하고 테스트 카피를 확인하여 작동 상태와 카피 샘플를 확인합니다 .
4.
원고 (a) 와 카피 샘플을 비교하여 차이가 기준치를 벗어나는 경우 , 차이 ( 틈 ) 의 형태에 따라 다음을 조정합니다 .
MFP 본체의 화상확인 및 조정을 하고나서 DP 본체의 화상확인을 할 것 . 상세는 서비스 매뉴얼을 참조할 것 .
Summary of Contents for DP-480
Page 6: ...This page is intentionally left blank ...
Page 12: ...This page is intentionally left blank ...
Page 18: ...2NC 2NF 2NG 2NN 3P7 3P8 3P9 This page is intentionally left blank ...
Page 54: ...2NC 2NF 2NG 2NN 3P7 3P8 3P9 1 2 24 This page is intentionally left blank ...
Page 172: ...2NC 2NF 2NG 2NN 3P7 3P8 3P9 1 3 118 This page is intentionally left blank ...
Page 278: ...2NC 2NF 2NG 2NN 3P7 3P8 3P9 2 1 4 106 This page is intentionally left blank ...
Page 434: ...2NC 2NF 2NG 2NN 3P7 3P8 3P9 2 2 44 This page is intentionally left blank ...
Page 446: ...2NC 2NF 2NG 2NN 3P7 3P8 3P9 2 3 12 This page is intentionally left blank ...
Page 455: ...Installation Guide DP 480 Document processor Installation Guide ...
Page 458: ...2 3 4 5 6 A ...
Page 459: ...3 7 8 9 B C C ...
Page 460: ...4 10 ...
Page 473: ...PF 480 300 sheet Paper feeder Installation Guide ...
Page 476: ...2 5 6 4 3 B M3x8 B M3x8 B M3x8 B M3x8 1 2 ...
Page 477: ...3 9 10 8 7 1 2 ...
Page 478: ...4 13 12 11 1 2 C ...
Page 479: ...5 15 14 E D D E D D E D D E D D ...
Page 482: ...DU 480 duplex unit Installation Guide ...
Page 484: ...1 2 3 1 A B M3x8 ...
Page 485: ...2 6 7 5 4 A A B M3x8 ...
Page 489: ...IB 33 Network interface kit Installation Guide ...
Page 490: ...2 3 1 IB 33 2013 7 303PB56710 01 A B ...
Page 491: ...6 7 5 4 2013 7 303PB56710 01 B YC2007 A ...
Page 492: ...FAX System X Installation Guide ...
Page 495: ...2 5 4 3 2 B M3x8 A YC 2003 ...
Page 496: ...3 8 9 7 6 C G G 8 9 7 6 C ...
Page 497: ...4 11 10 12 13 D D E ...
Page 499: ......
Page 500: ......


