


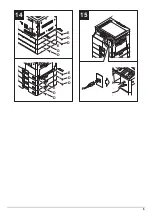
8
3
3
4
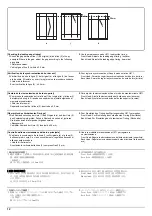
2.
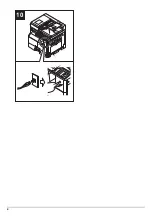
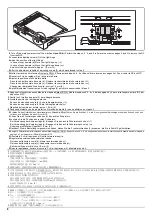
Turn off the main power switch of the machine.Open DP(A). Perform the steps 4, 5, 6, and 8 in its reverse order on pages 2 and 3 to remove the DP
from the MFP.
3.
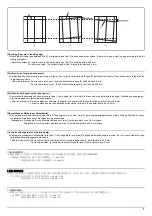
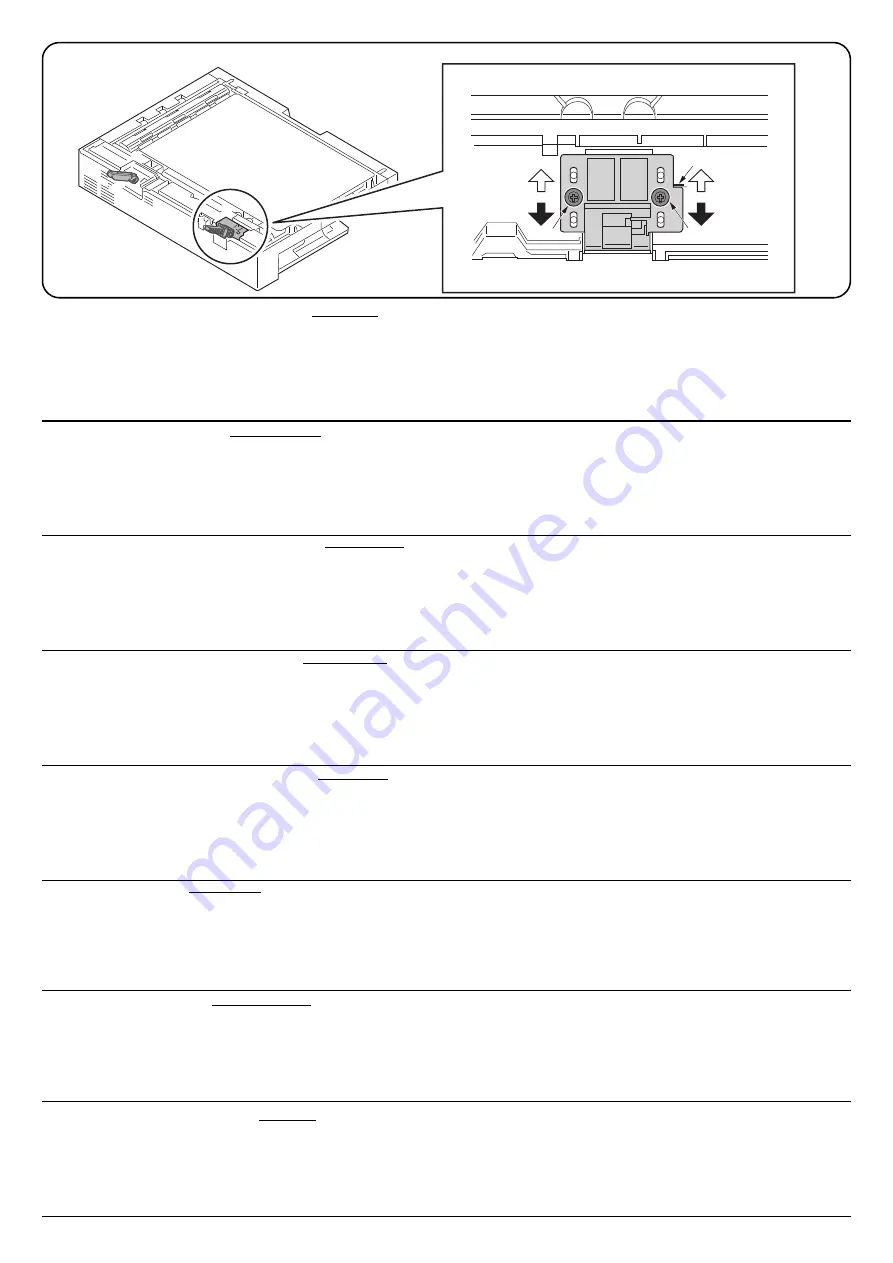
Loosen two adjusting screws (3) of the right hinge.
4.
Adjust the position of the right hinge.
In case of copy sample (d): Move the right hinge up (
).
In case of copy sample (e): Move the right hinge down (
).
Amount of change per scale: Approx. 1.0 mm (4)
5.
After the adjustment, retighten 2 adjusting screws (3) which were loosed in step 3.
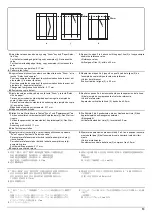
2.
Mettez la machine hors tension.Ouvrez le DP(A). Effectuez les étapes 4, 5, 6 et 8 dans l'ordre inverse aux pages 2 et 3 pour retirer le DP du MFP.
3.
Desserrez 2 vis de réglage (3) de la charnière droite.
4.
Ajustez la position de la charnière droite.
Dans le cas de l'exemple de copie (d) : Déplacer la charnière de droite vers le haut (
).
Dans le cas de l'exemple de copie (e) : Déplacer la charnière de droite vers le bas (
).
Changement par graduation d’échelle : environ 1,0 mm (4)
5.
Après l'ajustement, resserrez les 2 vis de réglage (3) qui ont été desserrées à l'étape 3.
2.
Apague el interruptor de encendido de la máquina.Abra el DP(A). Realice los pasos 4, 5, 6 y 8 de las páginas 2 y 3 pero al revés para quitar el DP del
dispositivo MFP.
3.
Suelte los 2 tornillos de ajuste (3) de la bisagra derecha.
4.
Ajuste la posición de la bisagra derecha.
En caso de muestra de copia (d): Suba la bisagra derecha (
).
En caso de muestra de copia (e): Baje la bisagra derecha (
).
Magnitud del cambio por escala: aprox. 1,0 mm (4)
5.
Después del ajuste, vuelva a apretar los 2 tornillos de ajuste (3) que se aflojaron en el paso 3.
2.
Schalten Sie das Gerät über den Hauptschalter aus.Öffnen Sie DP(A). Führen Sie die Schritte 4, 5, 6 und 8 in umgekehrter Reihenfolge wie auf den Seiten 2 und 3 bes-
chrieben aus. Entfernen Sie den DP vom MFP.
3.
Lösen Sie die 2 Justierungsschrauben (3) des rechten Scharniers.
4.
Justieren Sie die Position des rechten Scharniers.
Bei Verwendung der Kopiervorlage (d): Bewegen Sie das rechte Scharnier nach oben (
).
Bei Verwendung der Kopiervorlage (e): Bewegen Sie das rechte Scharnier nach unten (
).
Änderung pro Maßstab: Ungefähr 1,0 mm (4)
5.
Nachdem Sie die Einstellung vorgenommen haben, ziehen Sie die 2 Justierschrauben (3) wieder an, die Sie in Schritt 3 gelöst hatten.
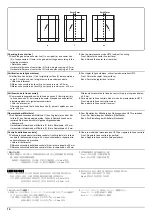
2.
Spegnere l'interruttore di alimentazione della macchina.Aprire il DP(A). Eseguire i punti 4, 5, 6 e 8 eseguendo le operazioni in ordine contrario rispetto a quanto indicato a
pagina 2 e 3 per rimuovere il DP dal dispositivo MFP.
3.
Allentare le 2 viti di regolazione (3) sulla cerniera di destra.
4.
Regolare la posizione della cerniera di destra.
Nel caso dell'esempio copia (d): Alzare la cerniera destra (
).
Nel caso dell'esempio copia (e): Abbassare la cerniera destra (
).
Entità modifica per scala: circa 1,0 mm (4)
5.
Dopo la regolazione, serrare di nuovo le 2 viti di regolazione (3), allentate al punto 3.
2.
機械の主電源スイッチを OFF にする。
DP を開く。2 ~ 3 ページの手順 4,5,6,8 の逆手順で DP を MFP から取り外す。
3.
右ヒンジの調整ビス (3)2 本を緩める。
4.
右ヒンジの位置を調整する。
コピーサンプル (d) の場合:右ヒンジを上(
)
へ動かす。
コピーサンプル (e) の場合:右ヒンジを下(
)へ動かす。
1 目盛り当たりの変化量:約 1.0mm (4)
5.
調整終了後、
手順 3 で緩めた調整ビス (3)2 本を締め付ける。
2.
关闭机器的主电源开关。打开 DP(A)。按照第 2 ~ 3 页的步骤 4、5、6 和 8 的相反顺序,把 DP 从机器上取下。
3.
拧松右铰链的 2 颗调整螺丝(3)。
4.
调整右铰链的位置。
当处于样张 (d) :将右铰链向上 (
) 移动。
当处于样张 (e) :将右铰链向下 (
) 移动。
按比例尺的更改量 :约 1.0mm (4)
5.
调整完成后,重新拧紧在步骤 3 中松开的 2 颗调整螺丝(3)。
2.
기계의 전원을 OFF 합니다 .DP(A) 를 엽니다 . 페이지 2 와 페이지 3 의 반대의 순서대로 4,5,6,8 단계를 수행하여 MFP 에서 DP 를 제거합니다 .
3.
우측 힌지에서 두 개의 조정 나사 (3) 를 느슨하게 합니다 .
4.
우측 힌지의 위치를 조정합니다 .
복사 샘플 (d) 의 경우: 우측 힌지를 위쪽 (
) 에 움직입니다 .
복사 샘플 (e) 의 경우 :우측 힌지를 아래쪽 (
) 에 움직입니다 .
눈금당 변화량:약 1.0 mm (4)
5.
조정종료 후 순서 3 에서 느슨하게 한 조정나사 (3) 2 개를 조입니다 .
Summary of Contents for DP-480
Page 6: ...This page is intentionally left blank ...
Page 12: ...This page is intentionally left blank ...
Page 18: ...2NC 2NF 2NG 2NN 3P7 3P8 3P9 This page is intentionally left blank ...
Page 54: ...2NC 2NF 2NG 2NN 3P7 3P8 3P9 1 2 24 This page is intentionally left blank ...
Page 172: ...2NC 2NF 2NG 2NN 3P7 3P8 3P9 1 3 118 This page is intentionally left blank ...
Page 278: ...2NC 2NF 2NG 2NN 3P7 3P8 3P9 2 1 4 106 This page is intentionally left blank ...
Page 434: ...2NC 2NF 2NG 2NN 3P7 3P8 3P9 2 2 44 This page is intentionally left blank ...
Page 446: ...2NC 2NF 2NG 2NN 3P7 3P8 3P9 2 3 12 This page is intentionally left blank ...
Page 455: ...Installation Guide DP 480 Document processor Installation Guide ...
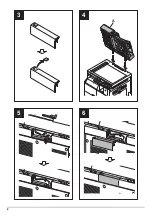
Page 458: ...2 3 4 5 6 A ...
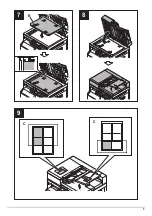
Page 459: ...3 7 8 9 B C C ...
Page 460: ...4 10 ...
Page 473: ...PF 480 300 sheet Paper feeder Installation Guide ...
Page 476: ...2 5 6 4 3 B M3x8 B M3x8 B M3x8 B M3x8 1 2 ...
Page 477: ...3 9 10 8 7 1 2 ...
Page 478: ...4 13 12 11 1 2 C ...
Page 479: ...5 15 14 E D D E D D E D D E D D ...
Page 482: ...DU 480 duplex unit Installation Guide ...
Page 484: ...1 2 3 1 A B M3x8 ...
Page 485: ...2 6 7 5 4 A A B M3x8 ...
Page 489: ...IB 33 Network interface kit Installation Guide ...
Page 490: ...2 3 1 IB 33 2013 7 303PB56710 01 A B ...
Page 491: ...6 7 5 4 2013 7 303PB56710 01 B YC2007 A ...
Page 492: ...FAX System X Installation Guide ...
Page 495: ...2 5 4 3 2 B M3x8 A YC 2003 ...
Page 496: ...3 8 9 7 6 C G G 8 9 7 6 C ...
Page 497: ...4 11 10 12 13 D D E ...
Page 499: ......
Page 500: ......


