


13
a
k
j
1
2
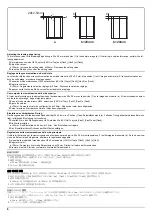
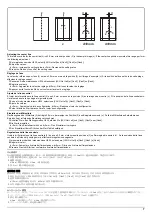
2.0mm
2
2.0mm
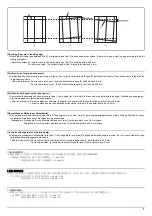
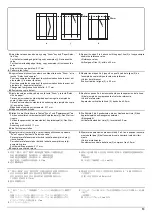
3.
Adjust the values up and down by using "Zoom" key and "Paper Selec-
tion" key.
For the faster leading edge timing, copy examples (j): Decreases the
value.
For the slower leading edge timing, copy examples (k): Increases the
value.
Amount of change per step: 0.17 mm
4.
Perform a test copy.
5.
Repeat the steps 2 to 4 above until the gap of line (2) of copy example
shows the reference value.
<Reference value>
Vertical gap of line (2): within ±2.0 mm
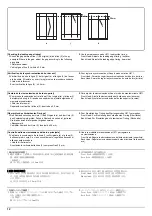
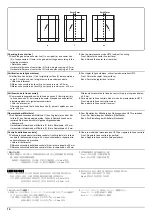
3.
Augmentez ou diminuer les valeurs en utilisant la touche " Zoom " et la
touche " Sélection du papier ".
Pour les exemples de copie dont la synchronisation du bord avant est
plus rapide (j) : diminuer la valeur.
Pour les exemples de copie dont la synchronisation du bord avant est
plus lente (k) : augmenter la valeur.
Changement par graduation d’échelle : 0,17 mm
4.
Effectuer une copie de test.
5.
Répéter les étapes 2 à 4 jusqu’à ce que l’écart de la ligne (2) de
l’exemple de copie indique la valeur de référence.
<Valeur de référence>
Écart vertical de la ligne (2) : ±2,0 mm
3.
Ajuste los valores arriba y abajo con la tecla "Zoom" y la tecla "Selec-
ción de papel".
Para una sincronización más rápida de extremo guía, ejemplos de
copia (j): disminuye el valor.
Para una sincronización más lenta de extremo guía, ejemplos de copia
(k): aumenta el valor.
Magnitud del cambio por incremento: 0,17 mm
4.
Haga una copia de prueba.
5.
Repita los pasos 2 a 4 anteriores hasta que la separación de la línea
(2) del ejemplo de copia presente el valor de referencia.
<Valor de referencia>
Separación vertical de la línea (2): dentro de ±2,0 mm
3.
Stellen Sie die Werte über die Tasten "Zoom" und "Papierauswahl" ein.
Für den schnelleren Vorderkantentakt, Kopierbeispiel (j): Den Wert ver-
ringern.
Für den langsameren Vorderkantentakt, Kopierbeispiel (k): Den Wert
erhöhen.
Änderung pro Schritt: 0,17 mm
4.
Eine Testkopie erstellen.
5.
Die Schritte 2 bis 4 wiederholen, bis der Abstand der Linie (2) des
Kopierbeispiels den Bezugswert aufweist.
<Bezugswert>
Vertikaler Abstand der Linie (2): Innerhalb ±2,0 mm
3.
Regolare i valori verso l'alto o verso il basso utilizzando il pulsante
"Zoom" oppure il pulsante "Selezione carta".
Per accelerare la fasatura del bordo di entrata, esempi di copia (j):
riduce il valore.
Per rallentare la fasatura del bordo di entrata, esempi di copia (k):
aumenta il valore.
Entità modifica per passo: 0,17 mm
4.
Eseguire una copia di prova
5.
Ripetere le operazioni sopra descritte da 2 a 4 fino a quando lo scosta-
mento della linea (2) dell’esempio di copia riporterà i valori di riferi-
mento.
<Valore di riferimento>
Scostamento verticale della linea (2) compreso fra ±2,0 mm
3.
“ 拡大 ” キーと ” 用紙選択 ” キーにより設定値を上下し調整す
る。
先端タイミングが早い場合コピーサンプル (j):設定値を下げる。
先端タイミングが遅い場合コピーサンプル (k):設定値を上げる。
1 ステップ当たりの変化量:0.17mm
4.
テストコピーを行う。
5.
コピーサンプルの線 (2) のずれが基準値内になるまで手順 2 ~ 4 を繰
り返す。
<基準値>
線 (2) の上下ずれ:±2.0mm 以内
3.
使用 " 缩小 / 放大 " 键和 " 纸张选择 " 键来上下调整设定值。
在前端定时偏快时 复印样本(j) :调低设定值
在前端定时偏慢时 复印样本(k) :调高设定值
设定值的一个调整单位变化量 :0.17mm
4.
进行测试复印。
5.
重复上述步骤 2 到 4,直至复印样本上的线(2)的偏移值达到标准值范
围内。
< 标准值 >
线(2)的上下偏移值 :±2.0mm 以内
3.
" 축소 / 확대 " 키와 " 용지선택 " 키를 사용하여 값을 조정합니다 .
선단 타이밍이 빠른 경우 벨크로 (j):설정치를 내립니다 .
선단 타이밍이 늦은 경우 벨크로 (k):설정치를 올립니다 .
1 스텝당 변화량:0.17mm
4.
벨크로를 합니다 .
5.
벨크로 선 (2) 의 차이가 기준치내가 될 때까지 2 ~ 4 를 반복합니다 .
<기준치>
선 (2) 의 상하차이:±2.0mm 이내
Summary of Contents for DP-480
Page 6: ...This page is intentionally left blank ...
Page 12: ...This page is intentionally left blank ...
Page 18: ...2NC 2NF 2NG 2NN 3P7 3P8 3P9 This page is intentionally left blank ...
Page 54: ...2NC 2NF 2NG 2NN 3P7 3P8 3P9 1 2 24 This page is intentionally left blank ...
Page 172: ...2NC 2NF 2NG 2NN 3P7 3P8 3P9 1 3 118 This page is intentionally left blank ...
Page 278: ...2NC 2NF 2NG 2NN 3P7 3P8 3P9 2 1 4 106 This page is intentionally left blank ...
Page 434: ...2NC 2NF 2NG 2NN 3P7 3P8 3P9 2 2 44 This page is intentionally left blank ...
Page 446: ...2NC 2NF 2NG 2NN 3P7 3P8 3P9 2 3 12 This page is intentionally left blank ...
Page 455: ...Installation Guide DP 480 Document processor Installation Guide ...
Page 458: ...2 3 4 5 6 A ...
Page 459: ...3 7 8 9 B C C ...
Page 460: ...4 10 ...
Page 473: ...PF 480 300 sheet Paper feeder Installation Guide ...
Page 476: ...2 5 6 4 3 B M3x8 B M3x8 B M3x8 B M3x8 1 2 ...
Page 477: ...3 9 10 8 7 1 2 ...
Page 478: ...4 13 12 11 1 2 C ...
Page 479: ...5 15 14 E D D E D D E D D E D D ...
Page 482: ...DU 480 duplex unit Installation Guide ...
Page 484: ...1 2 3 1 A B M3x8 ...
Page 485: ...2 6 7 5 4 A A B M3x8 ...
Page 489: ...IB 33 Network interface kit Installation Guide ...
Page 490: ...2 3 1 IB 33 2013 7 303PB56710 01 A B ...
Page 491: ...6 7 5 4 2013 7 303PB56710 01 B YC2007 A ...
Page 492: ...FAX System X Installation Guide ...
Page 495: ...2 5 4 3 2 B M3x8 A YC 2003 ...
Page 496: ...3 8 9 7 6 C G G 8 9 7 6 C ...
Page 497: ...4 11 10 12 13 D D E ...
Page 499: ......
Page 500: ......


