


2NC/2NF/2NG/2NN/3P7/3P8/3P9
2-3-12
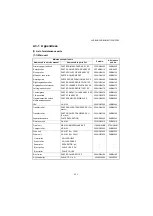
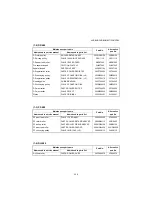
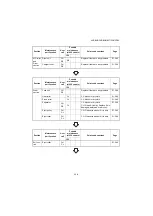
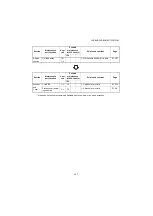
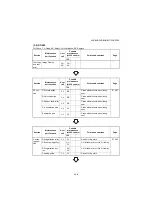
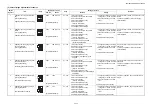
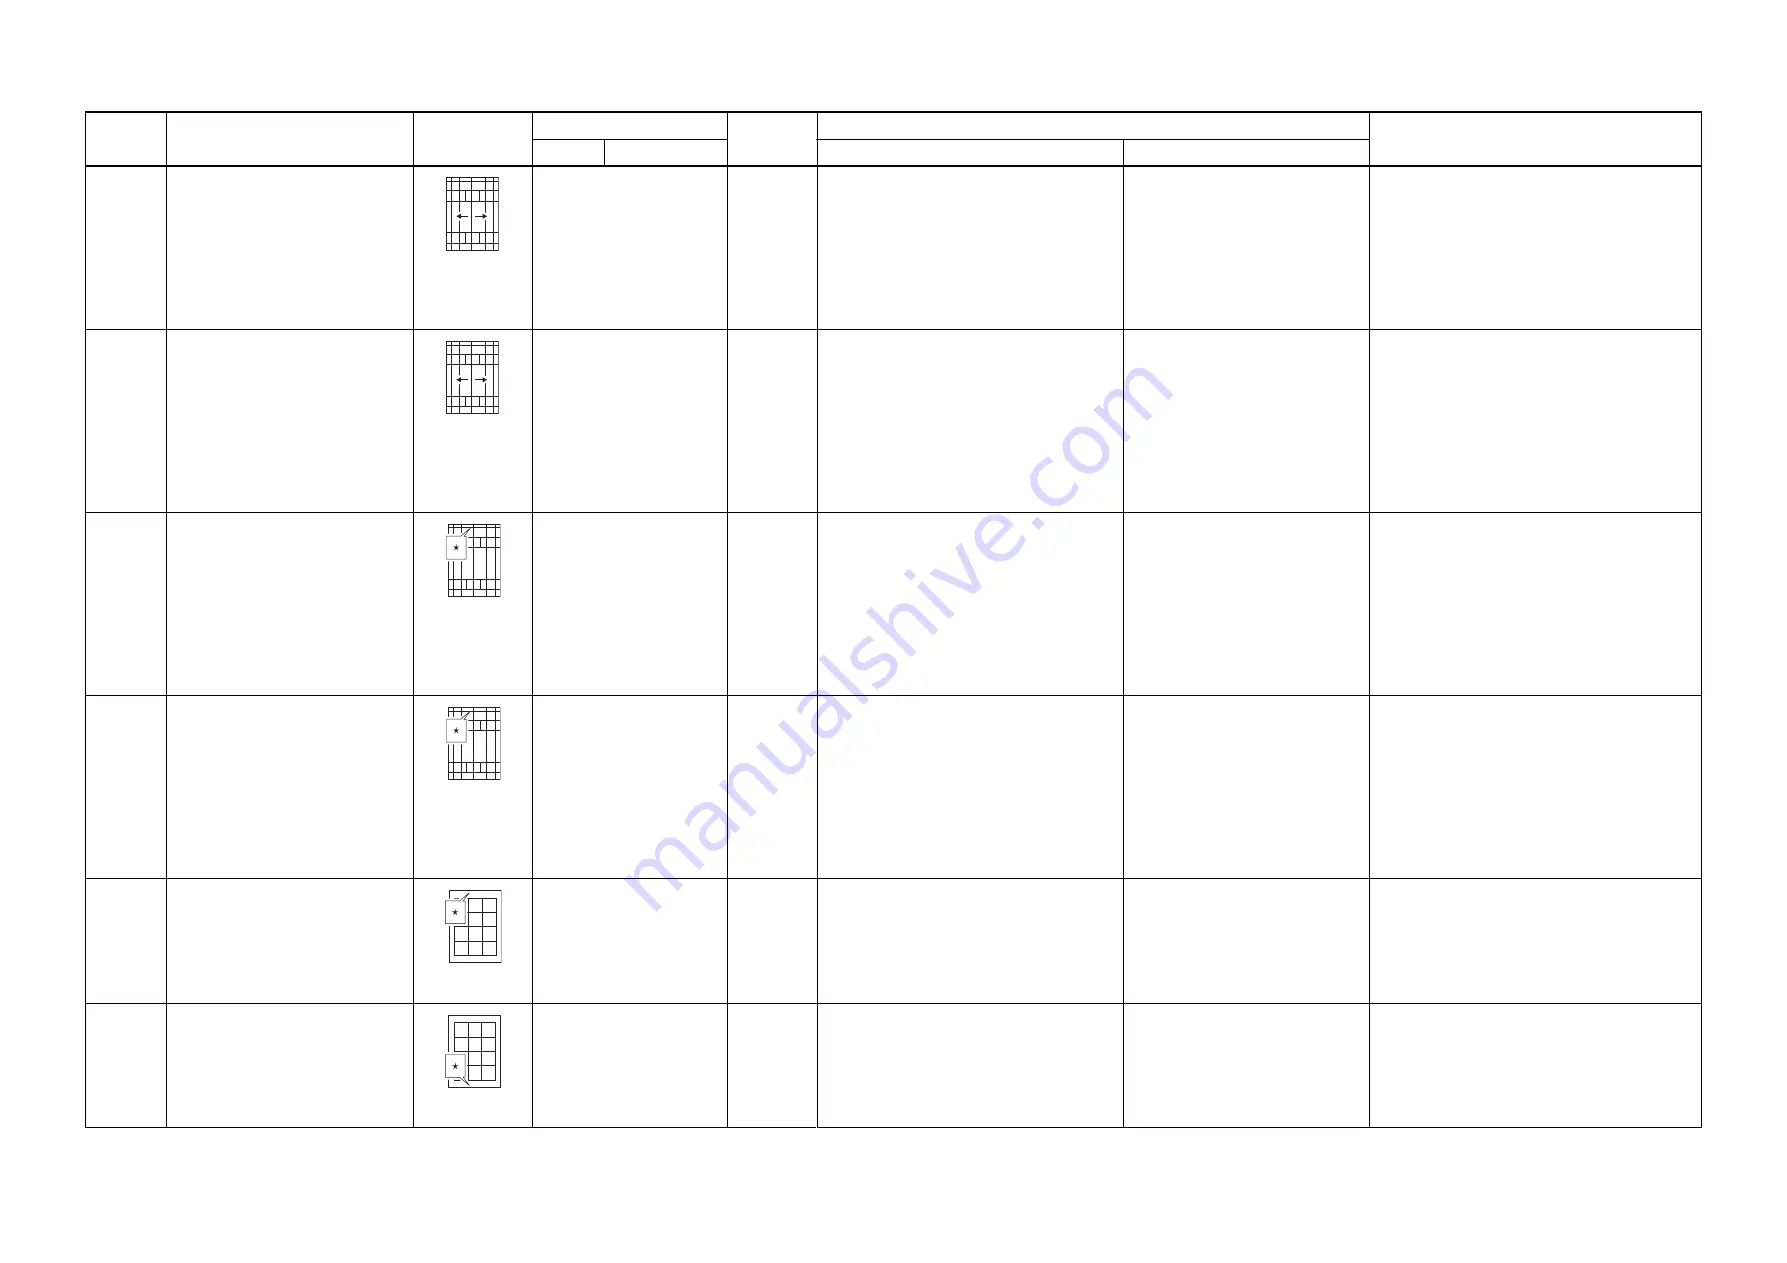
(5) Chart of image adjustment procedures
Adjust-
ing order
Item
Image
Maintenance mode
Page
Setting procedure
Remarks
Item No.
Mode
Method
Setting
1
Adjusting the center line of the MP
tray
(printing adjustment)
Adjusting the LSU print start timing
U034
LSU Out Left
1. Press the start key.
2. Select [Lsu Out Left] to be adjusted.
3. Press the start key.
4. Press the system menu key.
5. Press the start key.
(output a test pattern)
6. Press the system menu key.
7. Select [MPT] to be adjusted.
1. Change the setting value using
change keys * or numeric keys.
2. Press the start key. The value
is set.
Completion: Press the stop key.
If a preset value is raised, a picture will move to
the left.
To make an adjustment for duplex copying,
select DUPLEX.
(Original:test pattern)
2
Adjusting the center line of the cas-
settes
(printing adjustment)
Adjusting the LSU print start timing
U034
LSU Out Left
1. Press the start key.
2. Select [Lsu Out Left] to be adjusted.
3. Press the start key.
4. Press the system menu key.
5. Press the start key.
(output a test pattern)
6. Press the system menu key.
7. Select the item to be adjusted.
[Cassette1]?[Cassette7]
1. Change the setting value using
change keys * or numeric keys.
2. Press the start key. The value
is set.
Completion: Press the stop key.
If a preset value is raised, a picture will move to
the left.
To make an adjustment for duplex copying,
select DUPLEX.
(Original:test pattern)
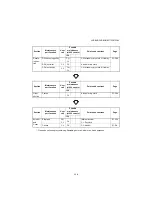
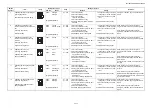
3
Adjusting the leading edge registra-
tion of the MP tray
(printing adjustment)
secondary paper feed start timing
U034
LSU Out Top
1. Press the start key.
2. Select [Lsu Out Top] to be adjusted.
3. Press the start key.
4. Press the system menu key.
5. Press the start key.
(output a test pattern)
6. Press the system menu key.
7. Select [MPT(L)] or [MPT(S)] to be
adjusted.
1. Change the setting value using
change keys * or numeric keys.
2. Press the start key. The value
is set.
Completion: Press the stop key.
If a preset value is raised, a picture will move
downward.
To make an adjustment for duplex copying,
select DUPLEX.
(Original:test pattern)
4
Adjusting the leading edge registra-
tion of the cassette
(printing adjustment)
secondary paper feed start timing
U034
LSU Out Top
1. Press the start key.
2. Select [Lsu Out Top] to be adjusted.
3. Press the start key.
4. Press the system menu key.
5. Press the start key.
(output a test pattern)
6. Press the system menu key.
7. Select [Cassette(L)] or [Caseette(S)] to
be adjusted.
1. Change the setting value using
change keys * or numeric keys.
2. Press the start key. The value
is set.
Completion: Press the stop key.
If a preset value is raised, a picture will move
downward.
To make an adjustment for duplex copying,
select DUPLEX.
(Original:test pattern)
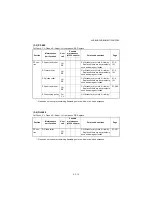
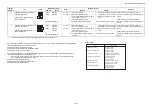
5
Adjusting the leading edge margin
(printing adjustment)
LSU illumination start timing
U402
Lead
1. Press the start key.
2. Press the system menu key.
3. Press the start key.
(output a test pattern)
4. Press the system menu key.
5. Select [Lead] to be adjusted.
1. Change the setting value using
change keys * or numeric keys.
2. Press the start key. The value
is set.
Completion: Press the stop key.
A margin will become large if a preset value is
raised.
(Original:test pattern)
6
Adjusting the trailing edge margin
(printing adjustment)
LSU illumination end timing
U402
Trail
1. Press the start key.
2. Press the system menu key.
3. Press the start key.
(output a test pattern)
4. Press the system menu key.
5. Select [Trail] to be adjusted.
1. Change the setting value using
change keys * or numeric keys.
2. Press the start key. The value
is set.
Completion: Press the stop key.
A margin will become large if a preset value is
raised.
(Original:test pattern)
Summary of Contents for DP-480
Page 6: ...This page is intentionally left blank ...
Page 12: ...This page is intentionally left blank ...
Page 18: ...2NC 2NF 2NG 2NN 3P7 3P8 3P9 This page is intentionally left blank ...
Page 54: ...2NC 2NF 2NG 2NN 3P7 3P8 3P9 1 2 24 This page is intentionally left blank ...
Page 172: ...2NC 2NF 2NG 2NN 3P7 3P8 3P9 1 3 118 This page is intentionally left blank ...
Page 278: ...2NC 2NF 2NG 2NN 3P7 3P8 3P9 2 1 4 106 This page is intentionally left blank ...
Page 434: ...2NC 2NF 2NG 2NN 3P7 3P8 3P9 2 2 44 This page is intentionally left blank ...
Page 446: ...2NC 2NF 2NG 2NN 3P7 3P8 3P9 2 3 12 This page is intentionally left blank ...
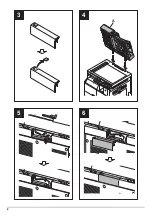
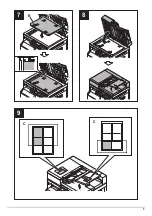
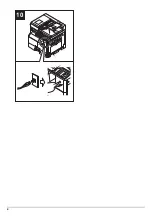
Page 455: ...Installation Guide DP 480 Document processor Installation Guide ...
Page 458: ...2 3 4 5 6 A ...
Page 459: ...3 7 8 9 B C C ...
Page 460: ...4 10 ...
Page 473: ...PF 480 300 sheet Paper feeder Installation Guide ...
Page 476: ...2 5 6 4 3 B M3x8 B M3x8 B M3x8 B M3x8 1 2 ...
Page 477: ...3 9 10 8 7 1 2 ...
Page 478: ...4 13 12 11 1 2 C ...
Page 479: ...5 15 14 E D D E D D E D D E D D ...
Page 482: ...DU 480 duplex unit Installation Guide ...
Page 484: ...1 2 3 1 A B M3x8 ...
Page 485: ...2 6 7 5 4 A A B M3x8 ...
Page 489: ...IB 33 Network interface kit Installation Guide ...
Page 490: ...2 3 1 IB 33 2013 7 303PB56710 01 A B ...
Page 491: ...6 7 5 4 2013 7 303PB56710 01 B YC2007 A ...
Page 492: ...FAX System X Installation Guide ...
Page 495: ...2 5 4 3 2 B M3x8 A YC 2003 ...
Page 496: ...3 8 9 7 6 C G G 8 9 7 6 C ...
Page 497: ...4 11 10 12 13 D D E ...
Page 499: ......
Page 500: ......


