3KH-2
1-3-33
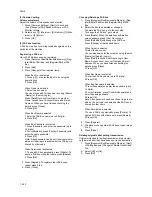
Rings
Change the number of times to let the phone ring before
answering a call as needed.
1. Press [FAX/i-FAX], [Next] of Reception and then
press [Next] of FAX. Press [Change] for the recep-
tion mode to be changed.
2. Enter the number using the [+]/[-] or numeric keys.
Setting range
[Auto (Normal)] (FAX automatic reception): 1 to 15
times
[Auto (TAD)] (FAX/Answering machine auto switch
reception): 1 to 15 times
[Auto (FAX/TEL)] (FAX/TEL auto switch reception)*:
0 to 15 times
*120 V specifications only.
3. Press [OK].
To exit from this setup, press [Close] several times
until the System Menu default screen is displayed.
Receiving mode
Select the mode appropriate for the way the machine is
used.
1. Press [FAX/i-FAX], [Next] of Reception, [Next] of
FAX and then [Change] of RX Setting.
2. Select the reception mode to be changed.
[Auto(Normal)] (FAX automatic reception)/
[Auto(FAX/TEL)] (FAX/TEL auto switch reception)/
[Auto(TAD)] (FAX/Answering machine auto switch
reception)/[Auto(DRD)] (DRD reception)*/[Manual]
(Manual reception)
*120 V specifications only.
When [Auto (DRD)] is selected, choose the pattern
of ringing.
Pattern 1 (Normal Ring)/Pattern 2 (Double Ring)/
Pattern 3 (Short-Short-Long)/Pattern 4 (Short-
Long-Short)
3. Press [OK].
To exit from this setup, press [Close] several times
until the System Menu default screen is displayed.
Reception port selection
Make one of the two phone lines a receive-only line when
the optional dual FAX is installed.
1. Press [FAX/i-FAX], [Next] of Reception and then
press [Change] of FAX. Press [Change] of Recep-
tion Port.
2. Select [Port 1] or [Port 2].
If you do not want to set up a receive-only port,
select [Off].
3. Press [OK].
To exit from this setup, press [Close] several times
until the System Menu default screen is displayed.
Operation at the receiving system in encryption com-
munication
Note: Sub address communication cannot be used.
1. Register the encryption key you have arranged with
the sending system.
2. Press [FAX/i-FAX], [Next] of Reception and
[Change] of Encryption RX.
3. Press [On], select the encryption key number and
press [OK].
4. The sending system conducts encrypted transmis-
sion. When encryption communication is conducted
normally, the machine decrypts the encrypted origi-
nals received and prints the originals.
Memory forward
When you have received a fax, you can forward the
received image to other faxes, PC, and FAX boxes.
Registration of forwarding settings (Forward all)
1. Press [FAX/i-FAX], and then [Next] of Forward Set-
ting.
2. Press [Use Requirements for All RX].
3. Press [Next] of Forward Setting.
4. Press [Change] of Forwarding Destination.
5. Set the Forwarding Destination. Select the other
party by pressing one of the following keys, and
press [OK] to add the other party to the list.
Address Book/E-mail Addr Entry/Folder Path Entry/
FAX No. Entry/i-FAX Addr Entry
6. Press [OK].
7. Perform forwarding detail settings.
File format setting
File separation setting
8. Press [OK].
9. Perform forwarding detail settings.
Print setting
Enable time setting
File name registration
10. Press [OK]. Memory forwarding is set.
To exit from this setup, press [Close] several times
until the System Menu default screen is displayed.
Registration of forwarding settings (for Each require-
ment)
Up to 100 requirements for forwarding can be registered.
1. Press [FAX/i-FAX], and then [Next] of Forward Set-
ting.
2. Press [Change Setting by Requirement].
3. Press [Add].
4. Press [Change] of Requirement Name.
5. Enter the requirement name, and press [OK].
6. Press [Change] of Requirement.
7. To forward fax reception, select [FAX] and press
[Next].
To forward i-FAX (internet faxing) reception, select
[i-FAX] and press [Next].
8. Register the forwarding requirements.
When [FAX] was selected in step 7.
Sub Address/Sender FAX Number/Port*
*This setting only appears when the optional dual
FAX is installed.
Summary of Contents for FaxSystem(M)
Page 1: ...SERVICE MANUAL Published in March 2007 843KH113 3KHSM063 Rev 3 FaxSystem M...
Page 4: ...This page is intentionally left blank...
Page 10: ...This page is intentionally left blank...
Page 12: ...3KH 2 2 2 Operation of the PWBs 2 2 1 Fax control PWB 2 2 1 2 2 2 NCU PWB 2 2 5...
Page 26: ...3KH 2 1 2 8 This page is intentionally left blank...
Page 76: ...3KH 1 5 2 This page is intentionally left blank...
Page 78: ...3KH 1 6 2 This page is intentionally left blank...
Page 80: ...3KH 2 1 2 This page is intentionally left blank...
Page 87: ......
Page 88: ......

