background image

3KH

1-4-4

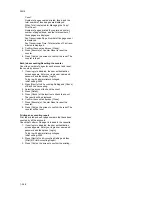
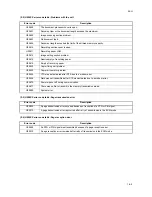
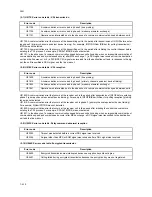
 (2-1) U004XX error code table: Interrupted phase B

Error code

Description

U00420 

A relay request was received from the host center but interrupted because of a mismatch in permit 
ID or telephone number.

U00421 

Subaddress-based relay reception was interrupted because of a mismatch in the specified subad-
dress relay box number.

U00430 

Polling request (confidential or reverse) was received but interrupted because of a mismatch in 
permit number. Or, subaddress-based bulletin board transmission request was received but inter-
rupted because of a mismatch in permit ID in the transmitting unit.

U00431 

Confidential polling transmission was interrupted because the specified confidential box No. was 
not registered. Or, an subaddress-based bulletin board transmission was interrupted because the 
specified subaddress confidential box was not registered.

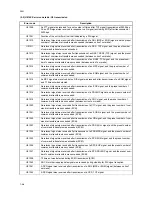
U00432 Confidential 

polling 

transmission was interrupted because of a mismatch in confidential box ID 

number. Or, an subaddress-based bulletin board transmission was interrupted because of a mis-
match in Subaddress confidential box numbers.

U00433 

Confidential polling request was received but data was not present in the confidential box. Or, sub-
address-based bulletin board transmission request was received but data was not present in the 
subaddress confidential box.

U00434 

Confidential polling request was received but interrupted because the specified confidential box 
No. was intended for encryption.

U00435 

Confidential polling request was received but interrupted because the specified confidential box 
was being accessed. Or, subaddress-based bulletin board transmission request was received but 
interrupted because the specified subaddress confidential box was being accessed.

U00440 

Confidential reception was interrupted because the specified confidential box No. was not regis-
tered. Or, subaddress-based confidential reception or subaddress-based relay reception was 
interrupted because the specified subaddress box was not registered. Or, subaddress based con-
fidential reception or subaddress relay command reception was interrupted because the specified 
subaddress box No. was being accessed.

U00441

Confidential reception was interrupted because the specified confidential box No. was intended for 
encryption.

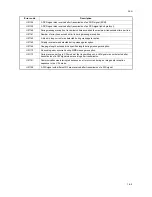
U00450 

The destination transmitter disconnected because the permit ID’s did not agree with while the des-
tination transmitter is in password-check transmission or restricted transmission.

U00460 

Encrypted reception was interrupted because the specified encryption box number was not regis-
tered. Or, encrypted reception request was received but interrupted because the specified encryp-
tion box was being accessed.

U00462 

Encrypted reception was interrupted because the encryption key for the specified encryption box 
was not registered.

Summary of Contents for FaxSystem(M)

Page 1: ...SERVICE MANUAL Published in March 2007 843KH113 3KHSM063 Rev 3 FaxSystem M...

Page 2: ...icials for details in your area for proper disposal ATTENTION IL Y A UN RISQUE D EXPLOSION SI LA BATTERIE EST REMPLACEE PAR UN MODELE DE TYPE INCORRECT METTRE AU REBUT LES BATTERIES UTILISEES SELON LE...

Page 3: ...Remarks 1 November 10 2006 CONTENTS 1 1 1 1 3 10 1 3 16 to 1 3 18 1 3 25 to 1 3 34 2 January 26 2007 CONTENTS 1 1 1 to 1 1 6 1 2 1 to 1 2 8 1 3 2 to 1 3 38 1 5 1 1 6 1 2 1 1 3 March 2 2007 1 1 1 1 3...

Page 4: ...This page is intentionally left blank...

Page 5: ...sonnel to ensure the safety of their customers their machines as well as themselves during maintenance activities Service personnel are advised to read this booklet carefully to familiarize themselves...

Page 6: ...this symbol CAUTION Bodily injury or damage to property may result from insufficient attention to or incorrect compliance with warning messages using this symbol Symbols The triangle symbol indicates...

Page 7: ...or dusty place This may cause fire or electric shock Do not install the copier near a radiator heater other heat source or near flammable material This may cause fire Allow sufficient space around the...

Page 8: ...carefully Always check that the copier is correctly connected to an outlet with a ground connection Check that the power cable covering is free of damage Check that the power plug is dust free If it i...

Page 9: ...trapped wire and missing screws Check that all the caution labels that should be present on the machine according to the instruction handbook are clean and not peeling Replace with new ones if necess...

Page 10: ...This page is intentionally left blank...

Page 11: ...User login administration 1 3 36 10 Job accounting 1 3 37 1 4 Error Codes 1 4 1 Error codes 1 4 1 1 Error code 1 4 1 2 Table of general classification 1 4 2 2 1 U004XX error code table Interrupted pha...

Page 12: ...3KH 2 2 2 Operation of the PWBs 2 2 1 Fax control PWB 2 2 1 2 2 2 NCU PWB 2 2 5...

Page 13: ...3 85 line mm 200 x 200 dpi Fine 8 dot mm x 7 7 line mm 200 x 400 dpi Super Fine 8 dot mm x 15 4 line mm 400 x 400 dpi Ultra Fine 16 dot mm x 15 4 line mm 600 x 600 dpi Printing Resolution 600 x 600 dp...

Page 14: ...ion Supplementary communication functions Manual send Address book Canceling communication Line monitor Transmission destination display Tone transmission Memory back up 2 Printing out from FAX box su...

Page 15: ...eports Send result report Receipt result report Activity report Status page Fax box list Network FAX Addition of a cover page i FAX internet faxing transmission E mail reporting of the transmission re...

Page 16: ...power off press the Power key on the operation panel 1 Operation panel 2 Main power switch 3 MP tray 4 TEL connection connector 5 Line connection connector Dual FAX option 6 Line connection connector...

Page 17: ...5 Send Key 6 Document Box key 7 Accessibility Display key 8 Print indicator 9 Send indicator 10 Receive indicator 11 Memory indicator 12 Error indicator 13 Help key 14 Logout key 15 Power key 16 Main...

Page 18: ...31 10 9 8 7 6 5 4 3 2 1 20 19 18 17 16 15 14 13 12 11 30 29 28 27 26 25 24 23 22 21 40 39 38 37 36 35 34 33 32 31 10 9 8 7 6 5 4 3 2 1 20 19 18 17 16 15 14 13 12 11 30 29 28 27 26 25 24 23 22 21 40 3...

Page 19: ...emperature and humidity abrupt ambient temperature changes and hot or cold air directed onto the machine Avoid dust and vibration Choose a surface capable of supporting the weight of the machine Place...

Page 20: ...cer 4 Modular cord 1 5 Installation guide 6 Operation guide 1 7 Plastic bag 8 Outer case 9 Barcode labels 10 Ferrite core 1 11 Plastic bag 1 12 Ferrite cores 2 13 Air padded bag 2 14 Terminal seal 15...

Page 21: ...th three digits 7 Select OEM Code enter the OEM code 000 and then press the start key 8 After initialization the entered destination OEM codes and ROM version are dis played A ROM version displays thr...

Page 22: ...are off before turning off the main power switch Unplug the power cable from the wall outlet and remove the modular code Procedure 1 Remove the screw and then the cover Figure 1 2 3 2 Insert the fax...

Page 23: ...Memory indicator are off before turning off the main power switch Unplug the power cable from the wall outlet and remove the modular code Procedure 1 Remove two screws and then remove OPT2 cover Figu...

Page 24: ...230 V New Zealand model only 4 Install the supplied ferrite core onto the modular cord Be sure to loop the cord three times through the ferrite core Keep an interval of 30 mm 10 mm between the ferrit...

Page 25: ...Enter maintenance mode run U698 and set the target port for maintenance mode to P2 see P 1 3 25 11 Run the maintenance item U600 to initialize the fax control PWB of the dual FAX see P 1 3 5 Caution...

Page 26: ...3KH 2 1 2 8 This page is intentionally left blank...

Page 27: ...nter 001 using the cursor up down keys or numeric keys and press the start key Enter the maintenance item number using the cursor up down keys or numeric keys The selected maintenance item is run Pres...

Page 28: ...direction is to be per formed Setting the automatic printing of the protocol list U615 Setting the system 6 U620 Setting the remote switching mode U625 Setting the transmission system 1 Setting the a...

Page 29: ...le equalizer Setting the G3 reception cable equalizer Setting the modem detection level U651 Setting modem 2 Modem output level DTMF output level main value DTMF output level level difference 9 120 V...

Page 30: ...r Printed Total Printed Pages Copier Printer FAX Scanned Total Scanned Pages Copier Other Paper Size A3 A4 A5 B4 B5 Ledger Folio Legal Letter Statement Other 631 11 620 0 1 0 1 69 539 0 36 0 7 0 0 0 0...

Page 31: ...P2 Optional dual FAX Method 1 Press the start key 2 Press Execute The screen for entering the destination code and OEM code is displayed The port that is addressed by U698 is displayed when the optio...

Page 32: ...e displayed A ROM version displays three kinds application boot and IPL When U698 is set to ALL the ROM version for port 1 is primarily displayed Destination code list Maintenance item No Description...

Page 33: ...eration necessary on this screen The destination code and the OEM code are displayed with the values currently set An asterisk is displayed if U698 is set to ALL and settings for ports 1 and 2 are not...

Page 34: ...before the unit switches into fax receiving mode when fax telephone auto select is enabled Method 1 Press the start key The current setting is displayed 2 Press RINGS F T 3 Change the setting using th...

Page 35: ...using the or numeric keys Increase the setting if a page received in the reduction mode is over reduced and too much trailing edge margin is left Decrease it if the received image does not include all...

Page 36: ...e value is set Setting the number of adjustment lines for automatic reduction when letter size paper is set Sets the number of adjustment lines for automatic reduction when letter size paper is set 1...

Page 37: ...ed images Purpose To set the maximum recording width and processing method when 11 width fax paper is loaded on an inch specification machine Method 1 Press the start key The current setting is displa...

Page 38: ...transmission takes too much time to complete due to too long redial interval Start 1 Press the start key The current setting is displayed in each item at port 1 2 Select the item to be set Setting the...

Page 39: ...ed Used when problems occur due to echoes at the sender 1 Select the setting 2 Press the start key The setting is set Setting the waiting period to prevent echo problems at the receiver Sets the perio...

Page 40: ...key The setting is set Setting ECM reception To be set to OFF when reduction of transmission costs is of higher priority than image quality This should not be set to OFF when connecting to the IP Inte...

Page 41: ...e machine commu nication problems including auto switching inability sometimes occur Change the setting to ignore short pro tocol transmission to prevent such problems 1 Select the setting 2 Press the...

Page 42: ...f the correction measures for transmission errors and other problems 1 Select the setting 2 Press the start key The setting is set Setting the reference for RTN signal output Sets the error line rate...

Page 43: ...is selected for remote switching This setting item will be dis played but the setting made is ineffective Sets the detection time when continuous detection is selected for remote switching This setti...

Page 44: ...tination unit a line can be disconnected Change the setting to prevent this problem 1 Change the setting using the keys 2 Press the start key The value is set Setting the T1 time out time Sets the tim...

Page 45: ...tone after receiving a call as a fax machine see figure 1 3 1 In fax telephone auto select mode change the setting when fax reception is unsuccessful or a telephone fails to receive a call 1 Change t...

Page 46: ...ets the length of the time required to determine silent status fax one of the triggers for Tc time check In the TAD mode change the setting when fax reception is unsuccessful or a telephone fails to r...

Page 47: ...t key The setting is set Setting the G3 reception cable equalizer Perform the following adjustment to make the equalizer compatible with the line characteristics 1 Select the setting 2 Press the start...

Page 48: ...8 is set to ALL and settings for ports 1 and 2 are not identical In this case the value cannot be changed 2 Select the item to be set 3 Change the setting using the or numeric keys 4 Press the start k...

Page 49: ...telephone network 1 Select the setting 2 Press the start key The setting is set Setting busy tone detection When a fax signal is sent sets whether the line is disconnected immediately after a busy to...

Page 50: ...talled regardless of the port being dis played a Port 1 error list is delivered while if the dual FAX is installed an error list containing errors at both Port 1 and 2 is delivered When FAX REPORT BAC...

Page 51: ...setting is set Completion Press the stop key The screen for selecting a maintenance item No is displayed Supplement The setting must be made after re entering maintenance mode because it will be clea...

Page 52: ...29 0 Automatic reception level adjustment V 27ter 36 7654 Coding format in transmission 3210 Coding format in reception 37 5 33600 bps V34 4 31200 bps V34 3 28800 bps V34 2 26400 bps V34 1 24000 bps V...

Page 53: ...121 7654 Dial tone busy tone detection pattern 122 7654 Busy tone detection pattern 2 Dial tone detection before dialing 1 Busy tone detection in automatic FAX TEL switching 125 76543210 Access code r...

Page 54: ...he start key Prints the fax images if the images remain in the CF 7 Select INITIALIZE CF 8 Press the start key CF is initialized 9 Turn the main power switch off and on Caution For the firmware which...

Page 55: ...art Select the item Press Common Make common setting see P 1 3 30 End Press FAX i FAX Make FAX setting and registration see P 1 3 31 Press Date Timer Make date timer settings see P 1 3 35 Press Report...

Page 56: ...ress Register To register other FAX boxes repeat steps 2 to 4 5 Press Close Changing Deleting a FAX box 1 Press Document Box Removable Memory Reg ister Edit of Edit Box and Register Edit of FAX Box 2...

Page 57: ...cal FAX name the name is printed on faxes on the receiving system The receiving side can then easily recognize where the originals are sent from 1 Press FAX i FAX Next of Transmission Next of Basic an...

Page 58: ...l times until the System Menu default screen is displayed Reception Date Time Reception Date Time function adds the reception date time sender information and number of pages on the top of each page w...

Page 59: ...on Note Sub address communication cannot be used 1 Register the encryption key you have arranged with the sending system 2 Press FAX i FAX Next of Reception and Change of Encryption RX 3 Press On sele...

Page 60: ...from this setup press Close several times until the System Menu default screen is displayed Transmission restriction Send or receive originals only when communication requirements are met Registering...

Page 61: ...xt of Result Report Setting Then press Change of FAX RX Result Report 2 Press Off not to print On to print or Error and Forward Only 3 Press OK Reporting FAX receipt result by e mail Fax receipt can a...

Page 62: ...uires destinations that have been registered as contact registration Perform the nec essary contact registration in advance 1 Press Edit Destination Register Edit of Address Book Add Group and then Ne...

Page 63: ...ters and press OK 5 Enter the account ID eight digits following 3 and 4 Setting range 0 to 99999999 6 Activate or deactivate restriction 7 Press Register to add a new account on the Account List FAX s...

Page 64: ...gin user name and password and then press Login To log in with administrator privileges Initial setting 5050 2 Press Next of Job Accounting Setting and Check of Each Job Accounting 3 Select the accoun...

Page 65: ...mmunication errors start with an E indication followed by five digits The upper three of the five digits indicate general classification of the error and its cause while the lower two indicate the det...

Page 66: ...ed before starting T 30 protocol during reception in V 34 mode refer to page 1 4 10 U018XX error code table U02000 Relay broadcast was refused by a relay station because of a mismatch in permit ID num...

Page 67: ...mission failed because the destination unit had no encrypted communication capability U044XX Communication was interrupted because of an encryption key error during encrypted transmission refer to pag...

Page 68: ...s confidential box U00434 Confidential polling request was received but interrupted because the specified confidential box No was intended for encryption U00435 Confidential polling request was receiv...

Page 69: ...g paper U00615 Empty of recording paper U00620 Copier fixing unit problem U00622 Copier drive motor problem U00655 CTS was not activated after RTS due to a modem error U00656 Data was not transmitted...

Page 70: ...evant signal was received after transmission of a PRI EOP signal and the preset number of command retransfers was exceeded U01019 No relevant signal was received after transmission of a CNC signal and...

Page 71: ...f a PPS NULL signal ECM U01054 A DCN signal was received after transmission of a PPS MPS signal ECM U01055 A DCN signal was received after transmission of a PPS EOM signal ECM U01056 A DCN signal was...

Page 72: ...PIN signal U01125 No response after transmission of a CNS signal between units of our make U01126 No response after transmission of a PPR signal ECM U01127 No response after transmission of an ERR si...

Page 73: ...on U01163 Polarity reversal was detected during message reception U01164 One page length exceeded the specified length during message reception U01170 A decoding error occurred during MMR message rece...

Page 74: ...detected U01820 A communication error that occurs at the receiver unit in the period after initiating the control channel before entering the T 30 process For example PPh ALT MPh E was not detected U...

Page 75: ...ontrol PWB software see P 1 6 1 If the problem still remains replace the fax control PWB and check for correct operation C0870 Fax control PWB to main PWB high capacity data transfer problem High capa...

Page 76: ...3KH 1 5 2 This page is intentionally left blank...

Page 77: ...lash or USB memory in a notch hole of the machine The Compact Flash must be inserted into the machine with its rear side facing up 3 Insert the power plug and turn the main power switch on Upgrading f...

Page 78: ...3KH 1 6 2 This page is intentionally left blank...

Page 79: ...modulates compresses decompresses and smoothes out image data and converts resolution of image data 2 NCU PWB NCUPWB Controls connection to the telephone line 3 Fax backup kit option Stores the intern...

Page 80: ...3KH 2 1 2 This page is intentionally left blank...

Page 81: ...EADY CPUCLK MDMRESn RESET 32bit 16bit 16bit NCU PWB Oscillator U41 5 0V 3 3V RESET IC U73 U32 DAA LINE1 LINE2 TELSEL EARTH DCCONT Analog I F U52 RESETn Speaker control RESETn U61 SDRAM U31 32MBx128Mbi...

Page 82: ...3KH 2 2 2 Figure 2 2 2 Fax control PWB silk screen diagram YC1 U11 U21 U61 U51 YC3 U33 U34 U31 U32 U41...

Page 83: ...V DC Data signal D15 A21 GND Ground A22 D12 I 5 V DC Data signal D12 A23 D10 I 5 V DC Data signal D10 A24 D8 I 5 V DC Data signal D8 A25 GND Ground A26 D5 I 5 V DC Data signal D5 A27 D3 I 5 V DC Data...

Page 84: ...ed to the NCU PWB A2 LINE1 I O Line signal A3 N C Not used A4 N C Not used A5 N C Not used A6 GND Ground A7 GND Ground A8 GND Ground A9 GND Ground A10 GND Ground A11 GND Ground A12 5VDC O 5 V DC 5 V D...

Page 85: ...rcuit Q10 DCCONT LINE1 LINE2 DC DC converter on off circuit Q48 Q49 DC DC converter circuit Q47 Off hook detection circuit photo coupler PC40 External telephone off hook detection circuit U11 Accounti...

Page 86: ...5 V DC supply A13 5VDC I 5 V DC 5 V DC supply A15 5VDC I 5 V DC 5 V DC supply B1 LINE2 I O Line signal B2 LINE2 I O Line signal B3 N C Not used B4 N C Not used B5 N C Not used B6 TELSEL I 5 V DC TELS...

Page 87: ......

Page 88: ......

Reviews: