background image

2M2/2M3

1-2-3

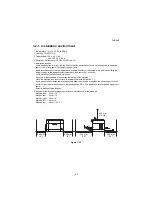
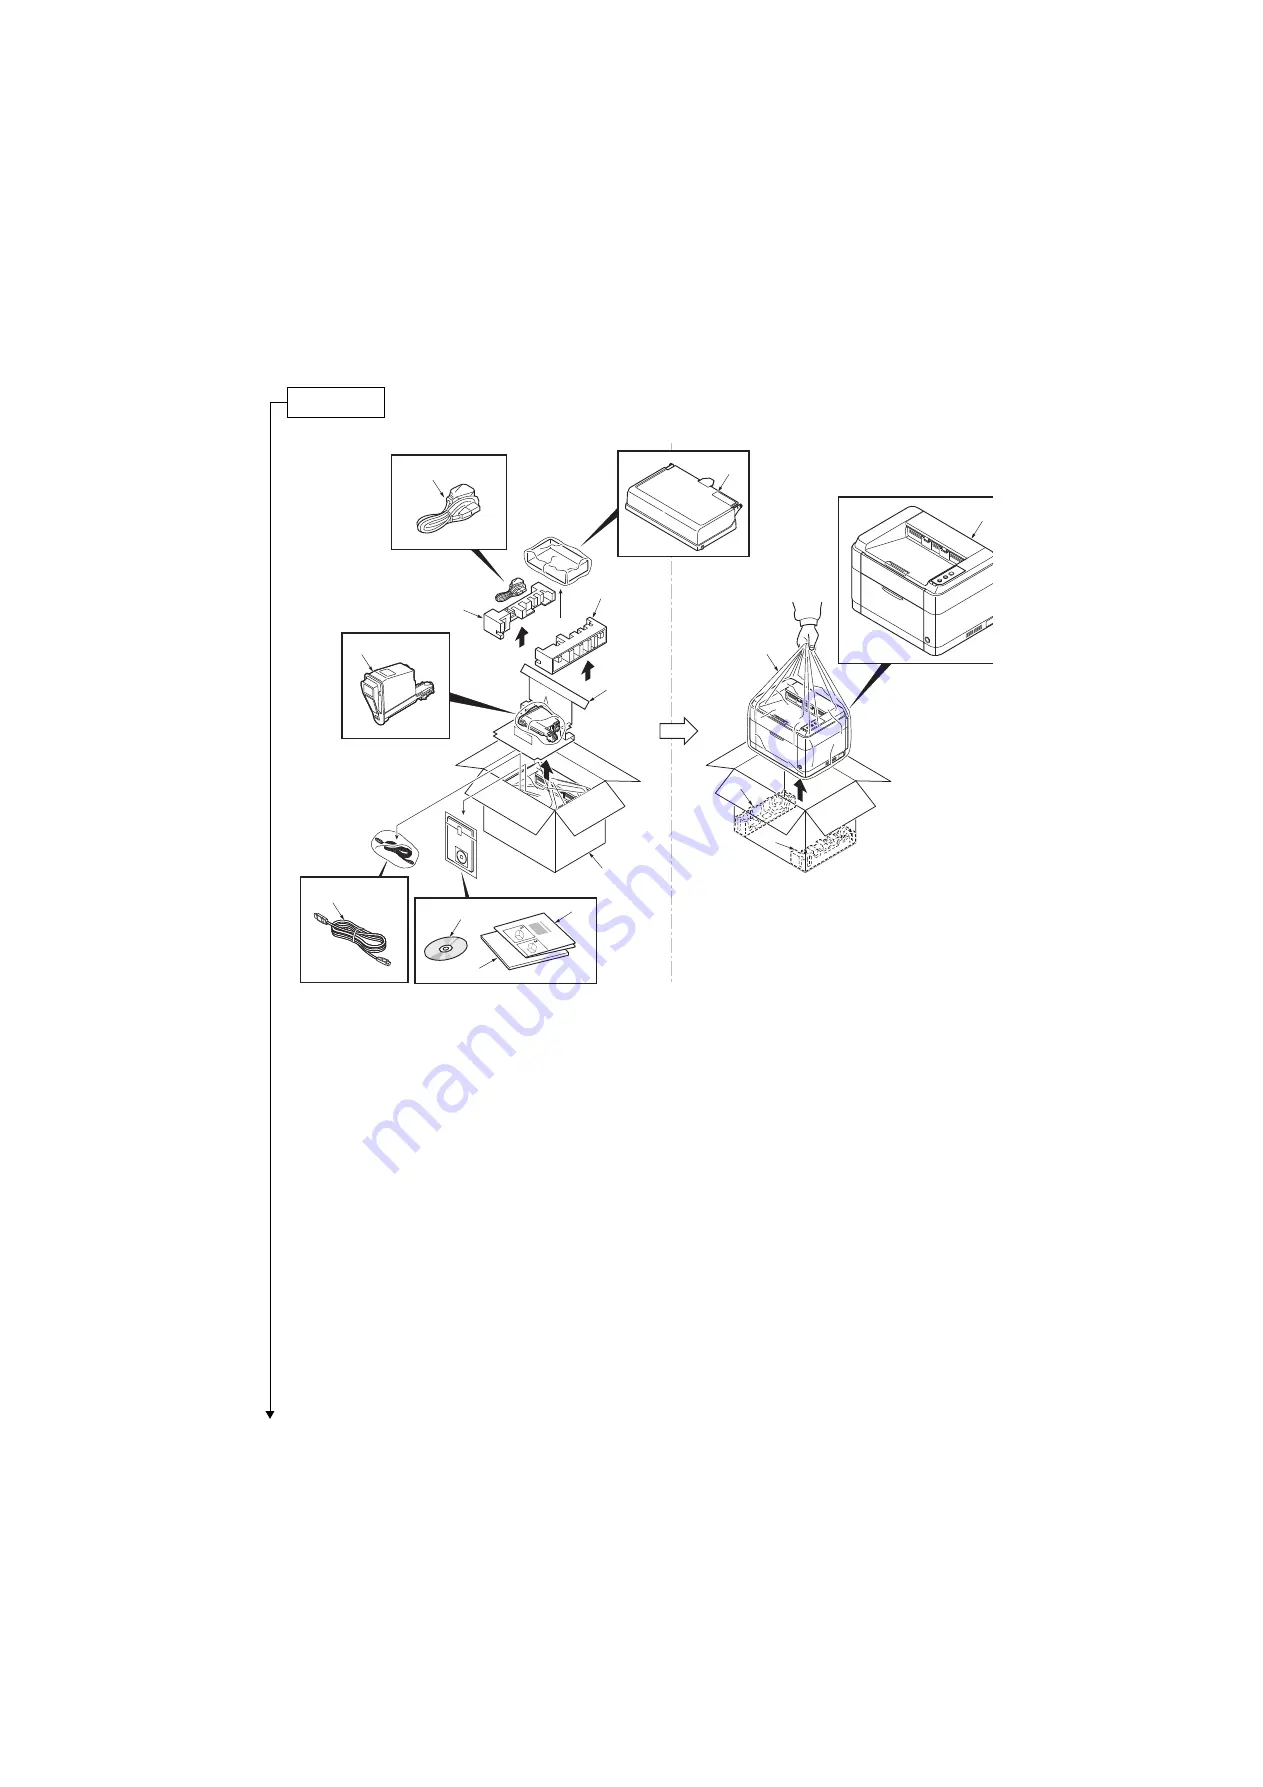
Figure 1-2-3 

*: Place the machine on a level surface.

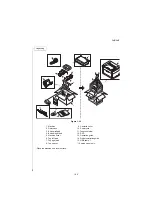
Unpacking

4

2

1

6

8

3

5

9

12

10

11

13

14

7

15

1. Machine
2. Outer case
3. Bottom left pad
4. Bottom right pad
5. Machine cover
6. Top left pad
7. Top right pad
8. Top spacer

9. Cassette cover

10. Power cord

11. Toner container

12. DVD
13. Operation guide
14. Quick installation guide
15. USB cable*1
*1:Chaina model only

Summary of Contents for FS-1040

Page 1: ...SERVICE MANUAL Published in March 2012 842M3110 2M3SM060 First Edition FS 1040 FS 1060DN ...

Page 2: ...ION SI LA BATTERIE EST REMPLACEE PAR UN MODELE DE TYPE INCORRECT METTRE AU REBUT LES BATTERIES UTILISEES SELON LES INSTRUCTIONS DONNEES Il peut être illégal de jeter les batteries dans des eaux d égout municipales Vérifiez avec les fonctionnaires municipaux de votre région pour les détails concernant des déchets solides et une mise au rebut appropriée Notation of products in the manual For the pur...

Page 3: ...Revision history Revision Date Replaced pages Remarks ...

Page 4: ...This page is intentionally left blank ...

Page 5: ...rsonnel to ensure the safety of their customers their machines as well as themselves during maintenance activities Service personnel are advised to read this booklet carefully to familiarize themselves with the warnings and precautions described here before engaging in maintenance activities ...

Page 6: ... this symbol CAUTION Bodily injury or damage to property may result from insufficient attention to or incorrect com pliance with warning messages using this symbol Symbols The triangle symbol indicates a warning including danger and caution The specific point of attention is shown inside the symbol General warning Warning of risk of electric shock Warning of high temperature indicates a prohibited...

Page 7: ...d or dusty place This may cause fire or electric shock Do not install the copier near a radiator heater other heat source or near flammable material This may cause fire Allow sufficient space around the copier to allow the ventilation grills to keep the machine as cool as possible Insufficient ventilation may cause heat buildup and poor copying performance Always handle the machine by the correct ...

Page 8: ... carefully Always check that the copier is correctly connected to an outlet with a ground connection Check that the power cable covering is free of damage Check that the power plug is dust free If it is dirty clean it to remove the risk of fire or electric shock Never attempt to disassemble the optical unit in machines using lasers Leaking laser light may damage eyesight Handle the charger section...

Page 9: ... caution labels that should be present on the machine according to the instruction handbook are clean and not peeling Replace with new ones if necessary Handle greases and solvents with care by following the instructions below Use only a small amount of solvent at a time being careful not to spill Wipe spills off completely Ventilate the room well while using grease or solvents Allow applied solve...

Page 10: ...This page is intentionally left blank ...

Page 11: ...unction 1 4 4 1 Self diagnostic function 1 4 4 2 Self diagnostic codes indication 1 4 4 3 Self diagnostic codes 1 4 6 1 4 3 Image formation problems 1 4 8 1 No image appears entirely white 1 4 9 2 No image appears entirely black 1 4 9 3 Part of image is missing 1 4 10 4 Gray background 1 4 10 5 White streaks are printed vertically 1 4 11 6 Black streaks are printed vertically 1 4 11 7 White or bla...

Page 12: ...1 Detaching and refitting the laser scanner unit 1 5 12 2 Detaching and refitting the Main motor unit 1 5 14 3 Direction of installing the principal fan motor 1 5 20 2 1 Mechanical Construction 2 1 1 Paper feed conveying section 2 1 1 1 Cassette paper feed paper conveying section 2 1 1 2 Manual feed section 25 26 ppm model only 2 1 2 2 1 2 Drum section 2 1 4 2 1 3 Developer section 2 1 5 2 1 4 Opt...

Page 13: ...he paper feed pulley and lower paper feed guide 2 4 5 6 Refitting the toner disposal box 2 4 10 7 Refitting the developer unit 2 4 11 8 Refitting the drum unit 2 4 12 9 Detaching and refitting the transfer roller 2 4 13 10 Notice after replacing maintenance kit 2 4 14 11 Procedure for only replacing Drum unit 2 4 15 12 Procedure for only replacing Developer unit 2 4 15 2 4 3 Cleaning the Printer 2...

Page 14: ...2M2 2M3 This page is intentionally left blank ...

Page 15: ...Envelope DL 16K Custom 105 148 to 216 356 mm 4 1 8 5 13 16 to 8 1 2 14 inches Manual feed tray A4 JIS ISO B5 A5 Folio Legal Letter Oficio II 215 9 330 2 mm 8 1 2 13 inches Mexican Oficio 216 340 mm Statement Execu tive A6 Envelope Monarch Enve lope 10 Envelope 9 Envelope 6 3 4 Envelope C5 Envelope DL 16K Custom 105 148 to 216 356 mm 4 1 8 5 13 16 to 8 1 2 14 inches Printing speed A4 20 sheets min ...

Page 16: ...mperature protection devices thermostat CPU ARM926EJ 390MHz memory 32 MB Maxmum 32 MB Interface USB Interface connector 1 USB Hi Speed USB Interface connector 1 USB Hi Speed Network interface 1 10 BASE T 100 BASE TX Resolution 600 600 dpi Page Description Language KPSL Operating environment Temperature 10 to 32 5 C 50 to 90 5 F Humidity 15 to 80 RH Altitude 3 500 m 11 482 8 ft or less High altitud...

Page 17: ... 10 1 Top tray 2 Paper stopper 3 Operation panel 4 Power switch 5 Front cover 6 Manual feed paper width guides 7 Manual feed tray 8 Cassette cover 9 Cassette 10 Paper width guides 11 Paper length guide 12 Fuser top cover 13 Rear cover 14 USB interface connector 15 Network interface connector 16 Power code connector ...

Page 18: ...2M2 2M3 1 1 4 2 Operation panel Figure 1 1 2 5 4 3 2 1 1 Processing indicator 2 Attention indicator 3 Go key 4 Cancel key 5 Quiet Mode key ...

Page 19: ... 1 9 11 10 2 6 5 4 8 7 12 3 Paper path Light path 1 Cassette 2 Paper feed conveying section 3 Toner container 4 Developing unit 5 Waste toner box 6 Drum charge roller 7 Drum unit 8 Transfer separation section 9 Laser scanner unit 10 Fuser section 11 Exit section 12 Top tray ...

Page 20: ...14 4 13 3 1 Cassette 2 Paper feed conveying section 3 Manual feed tray 4 Toner container 5 Developing unit 6 Waste toner box 7 Drum charge roller 8 Drum unit 9 Transfer separation section 10 Laser scanner unit 11 Fuser section 12 Feedshift exit section 13 Duplex conveying section 14 Top tray ...

Page 21: ...vironmental temperature and cool or hot direct air Avoid places subject to dust and vibrations Choose a surface capable of supporting the weight of the machine Place the machine on a level surface maximum allowance inclination 1 Avoid air borne substances that may adversely affect the machine or degrade the photoconductor such as mercury acidic of alkaline vapors inorganic gasses NOx SOx gases and...

Page 22: ...t the machine Removing the tapes Installing the cassette cover Loading paper cassette Installing the toner container Connect the USB cable Connect the Network cable 25 26 ppm model Installing the printer driver Completion of the machine installation Connect the power cord Make test printing Installing the toner ...

Page 23: ... 3 5 9 12 10 11 13 14 7 15 1 Machine 2 Outer case 3 Bottom left pad 4 Bottom right pad 5 Machine cover 6 Top left pad 7 Top right pad 8 Top spacer 9 Cassette cover 10 Power cord 11 Toner container 12 DVD 13 Operation guide 14 Quick installation guide 15 USB cable 1 1 Chaina model only ...

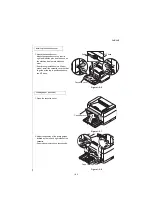
Page 24: ...2M2 2M3 1 2 4 1 Remove tape Figure 1 2 4 2 Remove two tapes Figure 1 2 5 Removing the tapes Tapes Tape Tape ...

Page 25: ...el install the cassette cover so that its guide at the top is positioned above the MF base Figure 1 2 6 1 Open the cassette cover Figure 1 2 7 2 Adjust the position of the width guides located on the left and right sides of the cassette Paper sizes are marked on the cassette Figure 1 2 8 Installing the cassette cover Cassette cover MF base Guide Loading paper cassette Cassette cover Paper width gu...

Page 26: ... the paper all the way in the cas sette until the paper touches the far inner side Ensure the side to be printed is facing up and the paper is not folded curled or damaged Figure 1 2 10 Adjust so that there is no gap between the paper length guide and the paper Figure 1 2 11 Paper length guide ...

Page 27: ...ad an amount of paper that fits under the tabs on the width guides Ensure that the loaded paper does not exceed the level indicated Figure 1 2 12 5 Close the cassette cover Figure 1 2 13 Tabs Exceed the level indicated ...

Page 28: ...ontainer at least 10 times as shown in the figure in order to distribute the toner evenly inside the container Figure 1 2 15 3 Install the toner container in the printer Push in firmly until you hear a click sound Figure 1 2 16 Installing the toner containers Front cover ...

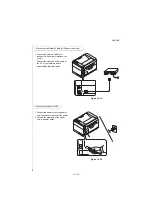
Page 29: ...cover Figure 1 2 17 1 Connect the USB cable not included to the USB interface connector Connect the other end of the USB cable to the computer s USB interface con nector China model only included Figure 1 2 18 Connecting the USB Cable ...

Page 30: ... the cable to the PC or your network device Use shielded interface cables Figure 1 2 19 1 Connect the power cord to the power cord connector at the rear of the printer 2 Connect the other end of the power cord to a power outlet Figure 1 2 20 Connecting the Network Cable 25 26 ppm model only Connecting the power code ...

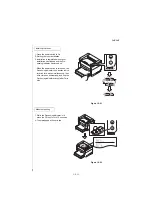
Page 31: ...hen the power switch is turned on the Processing indicator the Attention indica tor brink for a while simultaneously then either turns on alternatively and only the Processing indicator stays lit after 7 min utes Figure 1 2 21 1 While the Processing indicator is lit press the GO key for 3 to 10 seconds 2 The status page will be printed Figure 1 2 22 Installing the toner Make test printing ...

Page 32: ...2M2 2M3 1 2 12 1 Installing the Printer Driver Refer to the operation guide Installing the Printer Driver Completion of the machine installation ...

Page 33: ...us page 25 26 ppm mode only Printing a user status page Description The status page includes various printing settings and service cumulative Purpose To acquire the current printing environmental parameters and cumulative information Method 1 Press the GO key for 3 to 10 seconds 2 The status page will be printed 3 Press the GO key for 10 seconds or more The network status page will be printed 25 2...

Page 34: ...er jam self diagnostics toner replacements etc Purpose To allow machine malfunction analysis based on the frequency of paper misfeeds self diagnostic errors and replacements Method Output from operating panel 1 Press the GO key for 20 seconds or more 2 The event log will be printed Description ...

Page 35: ... 30 Seconds 30 Minutes 1 week Sleep Timer Form Feed Time Out Power Off Timer DHCPv4 Status IP Address Subnet Mask Enable 255 255 24 0 Default Gateway 10 183 48 252 10 183 53 13 Auto 100BASE TX Full Enabled KM5D0213 Print Coverage Toner Gauge A4 Letter Conversion Counters Printed Page 1000 100 10 00 12345678 11223344 00001234abcd567800001234abcd5678 0123456789012345678901234567890 01 04 01 123456 1...

Page 36: ...led 10 Error Clear Time 5 to 495 Seconds 11 Sleep Timer 1 to 240 Minutes 12 Power Off Timer 1 hour 2 hours 3 hours 4 hours 5 hours 6 hours 9 hours 12 hours 1 day 2 days 3 days 4 days 5 days 6 days 1 week 13 Form Feed Time Out 5 to 495 Seconds 14 Network 25 26 ppm model only 15 LAN Interface 16 Setting Auto 10Base Half 10Base Full 100Base Half 100Base Full 17 Current 10Base Half 10Base Full 100Base...

Page 37: ... Gauge 0 to 100 30 Print Density Default 3 1 to 5 31 Main Charger correction value Default 4 1 to 7 32 High Altitude mode Default 0 0 to 2 33 Drum unit driving time 34 Area code AREA 35 Product code PRDT 36 Outside temperature 37 Maintenance kit counter 38 Add the electrified time counter ...

Page 38: ...Code 0511 4211 0518 4211 0518 4020 0518 4020 Service Call Log 8 7 6 5 4 3 2 1 3 2 1 Count 1111111 999999 888888 777777 666666 555555 444444 1 Service Code 01 6000 01 2100 01 4000 01 6000 01 2100 01 4000 01 6000 01 2100 Maintenance Log Count Item Non genuine Toner Log 5 4 3 2 1 Count 1111111 999999 888888 777777 666666 Item 01 00 01 00 01 00 01 00 01 00 Event Log Firmware version 2M2_2000 000 000 2...

Page 39: ...less than 8 all of the diagnostics errors are logged The total page count at the time of the self diagnostics error Self diagnostic error code See page 1 4 6 Example 01 6000 01 Self diagnostic error 6000 Self diagnostic error code number 7 Mainte nance Log Count Item Remembers 1 to 8 of occurrence of replace ment If the occurrence of the previous replace ment of toner container is less than 8 all ...

Page 40: ...uine toner con tainer Non genuine toner log code 1 byte 2 categories First byte 01 Toner container Fixed Second byte 00 Black 9 Counter Log Comprised of three log counters including paper jams self diagnos tics errors a Paper jam b Self diagnostic error Indicates the log counter of paper jams depend ing on location Refer to Paper Jam Log All instances including those are not occurred are displayed...

Page 41: ...C Address LAN Interface Setting Current Not Connected 00 00 00 00 00 01 Not Connected Enabled 6 8 9 10 13 5 7 Raw Port Status 11 17 18 Enabled 12 LPD Status Enabled 14 WSD PRINT Status Enabled KM000001 Enabled Enabled 16 TCP IP Status 15 Printer Host Name IPv4 DHCPv4 Status Auto IP Not Defined Not Defined Not Defined IP Address Subnet Mask Default Gateway 19 20 21 22 23 24 1 4 3 XXXXXXXX 2 ...

Page 42: ...00Base Half 100Base Full 9 Current The present transmission standard is displayed 10 Raw Port 11 Status Enabled Disabled 12 LPD 13 Status Enabled Disabled 14 WSD PRINT 15 Status Enabled Disabled 16 TCP IP 17 Status Enabled Disabled 18 Printer Host Name KM Lower 4 figure of a MAC Address 19 IPv4 20 DHCPv4 Status Enabled Disabled 21 Auto IP Enabled Disabled 22 IP Address IP address Not Defined 23 Su...

Page 43: ...ed by the Service Package The maintenance menus include the following items 1 In the KYOCERA client tool dialog box select a device from the list 2 Click Maintenance Maintenance Menu 3 Select one or more items in the list and select the desired settings for each feature 4 You can click Cancel to return to the previous view or to select another maintenance procedure 5 When all settings are selected...

Page 44: ...es the position by 0 1mm Top Select the top margin start ing position for printing from the cassette and for duplex printing Left Select the left margin starting position for printing from the cassette and for duplex print ing Print Margin Adjustment This feature adjusts margins for print output from 0 to 10 0 if margins are not print ing correctly A higher setting makes the margin wider A lower s...

Page 45: ...n prior Open the Service Package 1 In the Maintenance Menu dialog box click Load package and then browse to find a user package file MTP If a password is required enter the pass word Figure 1 3 5 2 Select items in the list and select the desired settings for each feature Figure 1 3 6 Select the item Display Description Output report Printing the event log Set drum rank Setting the drum rank ...

Page 46: ...ollow the replacement of maintenance kit or drum unit the rank of drum is automatically set to the default 2 If the rank differs set the correct rank manually If the rank is not properly set with the drum unit it is possible that gray background may occur or the produc tivity of fine lines may be deteriorated Procedure 1 Check the rank of the drum Where the rank is found Barcode label affixed on t...

Page 47: ...ill flash rapidly A jam code is logged on the event log When the jammed paper is removed and the rear cover is closed the printer reverts to normal operation and resumes printing If paper jam has occurred with no paper jammed press GO to resume normal operation Figure 1 4 1 Paper misfeed indication A B A B C 20 21 ppm model 25 26 ppm model A Misfeed in conveying unit or duplex section B Misfeed in...

Page 48: ...er is feed from the duplex section B 4020 Registration sensor on Power up or warm up Duplex sensor DUS does not turn on in 1 0 sec onds after the registration sensor RS has turned on during paper is feed from the cassette or MF tray B 4201 Duplex sensor non arrival jam 25 26ppm model Duplex sensor DUS does not turn on in 1 0 sec onds after the registration sensor RS has turned on during paper is f...

Page 49: ...he duplex sensor during power up or warm up A 4301 Duplex sensor non arrival jam 25 26ppm model The duplex sensor DUS won t turn on in 0 6 sec ond after a certain period of time switch back has started cassette and MPF feeding B C 4311 Duplex sensor stay jam 25 26ppm model The duplex sensor DUS won t turn off in 3 0 sec ond after a certain period of time switch back has started cassette and MPF fe...

Page 50: ... two 1 State of all indicator are ON 5 0 sec And then state of all indicator are OFF 2 0 sec It expresses by this method that they are Service Call or System Error 2 It expresses Service Call number or System Error number Processing indicator blinks with a regular interval 0 8 seconds It is 1 if Attention indicator is ON when Processing indicator is ON It is 0 if Attention indicator is OFF when Pr...

Page 51: ...8 s 0 8 s 0 8 s 0 0 1 0 0 8 s 0 8 s 0 8 s 0 8 s 0 8 s 0 8 s 0 0 0 8 s 0 8 s 0 8 s 0 8 s 0 8 s 0 8 s 0 1 1 1 0 0 8 s 0 8 s 0 8 s 0 8 s 0 8 s 0 8 s 0 8 s 0 8 s 0 8 s 0 8 s 0 0 4 6 3 1 1 1 0 1 0 0000 0001 0010 0011 0100 0101 1111 1001 1000 0111 0110 Sequence of display Repeat Code conversion table Code Code Number display start Indicates the occurrence of a self diagnostics error Indicator Indicator ...

Page 52: ...place the cable main motor and Relay PWB YC4 Relay PWB and main PWB YC14 Defective drive transmission sys tem of motor Check if the gears rotate smoothly If not grease the bushes and gears Check for broken gears and replace if any Defective motor Replace the main motor Defective main PWB Replace the main PWB and check for cor rect operation see page 1 5 7 4000 Polygon motor synchronize error Polyg...

Page 53: ... including the con nectors Shorted fuser thermistor Replace the fuser unit see page 1 5 6 Defective power source PWB Replace the power source PWB see page 1 5 7 Defective main PWB Replace the main PWB and check for cor rect operation see page 1 5 7 6030 Broken fuser thermistor wire Average input AD given by the thermistor is less than 2 for 300msec Defective connec tor cable or poor contact in the...

Page 54: ... See page 1 4 10 See page 1 4 10 See page 1 4 11 6 Black streaks are printed verti cally 7 White or black streaks are printed horizon tally 8 Spots are printed 9 Printing incom plete or out of position 10 Paper is wrin kled See page 1 4 11 See page 1 4 11 See page 1 4 12 See page 1 4 12 See page 1 4 12 11 Offset occurs 12 Fusing is loose 13 Faint or blurred printing 14 Dirt on the top edge or back...

Page 55: ... 1 see page 1 5 7 Defective main PWB Replace the main PWB see page 1 5 7 No LSU laser is out put Defective connector cable or poor contact in the con nector Reinsert the connector Also check for conti nuity within the connector cable If none replace the cable APC PWB YC1 and main PWB YC5 Defective laser scanner unit Replace the laser scanner unit see page 1 5 12 Defective main PWB Replace the main...

Page 56: ... transfer roller if it is extremely dirty see page 2 4 12 Insufficient agitation of toner container Shake the toner container vertically approxi mately 10 times Paper damp Check the paper storage conditions replace the paper Print example Causes Check procedures corrective measures Main charge voltage setting The main charge voltage may be set too high Try adjusting the main charge voltage see pag...

Page 57: ...rum refresh see page 1 3 11 Flawed drum Replace the drum unit see page 2 4 11 Deformed or worn cleaning blade in the drum unit Replace the drum unit see page 2 4 11 Defective charger roller Replace the drum unit see page 2 4 14 Print example Causes Check procedures corrective measures Dirty or flawed drum Perform the drum refresh see page 1 3 11 Flawed drum Replace the drum unit see page 2 4 11 Di...

Page 58: ...Replace the high voltage PWB see page 1 5 7 Defective main PWB Replace the engine PWB see page 1 5 7 Flawed developer roller Replace the developer unit see page 2 4 10 Dirty heat roller and press roller Clean the heat roller and press roller Print example Causes Check procedures corrective measures Misadjusted leading edge reg istration Run maintenance menu to readjust the leading edge regis trati...

Page 59: ...es corrective measures Wrong types of paper Check if the paper meets specifications replace paper Flawed heat roller or press roller Replace the fuser unit see page 1 5 6 Defective pressure springs Print example Causes Check procedures corrective measures Wrong types of paper Check if the paper meets specifications replace paper Drum condensation Perform the drum refresh see page 1 3 11 Defective ...

Page 60: ...as the paper guide paper con veying paths the bottom of the drum and developing unit and the fuser unit inlet Clean these areas and parts to remove toner see page 2 4 15 Dirty transfer roller Clean the transfer roller Replace the transfer roller if it is extremely dirty see page 2 4 12 Print example Causes Check procedures corrective measures The device is installed in an altitude greater than 150...

Page 61: ...thin the connector cable If none replace the cable Main motor and relay PWB YC4 Relay PWB and main PWB YC14 2 Defective drive trans mission system Check if the rollers and gears rotate smoothly If not grease the bushes and gears Check for broken gears and replace if any 3 Defective motor Replace the main motor 4 Defective PWB Replace the relay PWB or main PWB and check for correct operation see pa...

Page 62: ...jam in the paper feed convey ing section or fuser section is indi cated when the power switch is turned on 1 A piece of paper torn from paper is caught around registration sensor or duplex sen sor Check visually and remove it if any 2 Defective sensor Replace the registration sensor or duplex sensor 8 Attention indicator is lit when the front and rear cover is closed 1 Defective connector cable or...

Page 63: ...aper width guide visually and remedy or replace if necessary 3 Multiple sheets of paper are fed at one time Check if the paper is excessively curled Change the paper Paper is loaded incorrectly Load the paper correctly Check if the separation pad is worn Replace the separation pad if it is worn see page 2 4 5 4 Paper jams Check if the paper is excessively curled Change the paper Check if the conta...

Page 64: ...RA Net client and the Status Monitor Meaning Remedy Add paper There is no paper in the paper source Load paper into the paper source The paper size and paper type set tings selected at the time of printing are different from the KYOCERA Net client settings Check the paper size and paper type set tings Add toner The toner has run out Replace with a new toner container Adding toner The printer is in...

Page 65: ...ly inserted Insert the drum unit securely Paper jam A paper jam has occurred When the jammed paper is removed and the rear cover is closed the printer reverts to normal operation and resumes printing see page 1 4 1 Replacing the Mainte nance Kit Replacement of the maintenance kit is necessary at every 100 000 images of printing Replace Maintenance Kit Toner is running out The toner is running out ...

Page 66: ...2M2 2M3 1 4 20 This page is intentionally left blank ...

Page 67: ...e hook Take care not to get the cables caught To reassemble the parts use the original screws If the types and the sizes of screws are not known refer to the PARTS LIST 2 Drum Note the following when handling or storing the drum When removing the drum unit never expose the drum surface to strong direct light Keep the drum at an ambient temperature between 20 C 4 F and 40 C 104 F and at a relative ...

Page 68: ...ws A black colored band when seen through the left side window A shiny or gold colored band when seen through the right side window The above will reveal that the toner container is a genuine Kyocera Mita branded toner container otherwise it is a counterfeit Figure 1 5 1 The brand protection seal has an incision as shown below to prohibit reuse Figure 1 5 2 Validation viewer Validation viewer Bran...

Page 69: ...vers 1 Detaching and refitting the top cover Procedure 1 Open the front cover and rear cover 2 Remove two screws Figure 1 5 3 3 Unhook the two hooks and then remove the top cover Figure 1 5 4 Screw Screw Hooks Top cover Top cover ...

Page 70: ...3 1 5 4 2 Detaching and refitting the Right cover Procedure 1 Remove the top cover see page 1 5 3 2 Unhook the five hooks and then remove the right cover Figure 1 5 5 Right cover Hook Hooks Hooks Right cover ...

Page 71: ...2M3 1 5 5 3 Detaching and refitting the Left cover Procedure 1 Remove the top cover see page 1 5 3 2 Unhook the five hooks and then remove the left cover Figure 1 5 6 Left cover Left cover Hooks Hooks Hook ...

Page 72: ...ppm model only 20 ppm model has only one connector Figure 1 5 7 3 Remove two screws and then remove the fuser unit 4 Check or replace the fuser unit and refit all the removed parts Caution Do not close the rear cover while the fuser unit is not installed oth erwise the cover open detecting lever may be damaged Figure 1 5 8 Connector 25 26 ppm model only Connector Connector Fuser heater Screw Screw...

Page 73: ...Remove connector from the fuser heater Remove the four connectors 25 26 ppm model only and the three FFC connectors from the main PWB 20 21 ppm model has only three connector Figure 1 5 9 3 Remove five screws and then remove the control unit Figure 1 5 10 FFC Connectors Connector Connector Fuser heater Connector 25 26 ppm model only Screw Screw Screws Screw Controller unit ...

Page 74: ...ectors YC12 YC13 that connected to the main PWB 6 Remove the three connectors YC101 YC102 YC103 that connected to the power source PWB Figure 1 5 11 7 Remove screw and then remove the Cable holder Figure 1 5 12 CN1 YC13 YC12 YC103 YC102 YC101 Main PWB High voltage PWB Power source PWB Screw Cable holder ...

Page 75: ...2 2M3 1 5 9 8 Remove five screws and then remove the main PWB Figure 1 5 13 9 Remove screw and then remove the high voltage PWB Figure 1 5 14 Main PWB Screw Screw Screw Screw Screw Screw High voltage PWB ...

Page 76: ...nit make sure that the cover open lever is seated above the switch actuator so that the lever can turn on the cover switch above the power PWB When performing service be sure to keep the front and rear covers opened When installing the unit be sure to open the front and rear cover Figure 1 5 16 Screw Screw Power souce PWB Power source PWB Cover switch Front cover Rear cover Cover open close lever ...

Page 77: ... 5 7 2 Unhook the two hooks and then remove the operation panel unit Figure 1 5 17 3 Unhook the two hooks and then remove the operation panel PWB 4 Check or replace the operation panel PWB and refit all the removed parts Figure 1 5 18 Hook Hook Operation panel unit Operation panel unit Operation panel PWB Hooks ...

Page 78: ...he laser scanner unit Procedure 1 Remove the top cover see page 1 5 3 2 Remove the connectors and the FFC from the main PWB Figure 1 5 19 3 Unhook the four hooks and then remove the upper LSU cover Figure 1 5 20 FFC Connector Hook Hook Hooks Upper LSU cover ...

Page 79: ... laser shutter has closed Figure 1 5 21 6 Remove four screws and then remove the laser scanner unit 7 Check or replace the laser scanner unit and refit all the removed parts Laser shutter Laser scanner unit Laser scanner unit Screw Screw Screw Screw Screw Screw Screw Screw ...

Page 80: ... Procedure 1 Remove the top cover and left cover see page 1 5 3 1 5 5 2 Remove the two screws and pull out the fuser unit halfway out Figure 1 5 23 3 Unhook the four hooks and then remove the upper LSU cover Figure 1 5 24 Fuser unit Screw Screw Hook Hook Hooks Upper LSU cover ...

Page 81: ...solenoid and unhook the harness from the guide 6 Detach the connector from the duplex solenoid and unhook the harness from the guide 25 26 ppm model only 7 Detach the spring Figure 1 5 26 Main motor Connector Relay PWB Connector Duplex solenoid 25 26 ppm model only Spring 25 26 ppm model only Connector Paper feed solenoid ...

Page 82: ...6 8 Remove four screws and then remove the drive cover Figure 1 5 27 9 Remove the gear A gear B gear C gear D and gear E Figure 1 5 28 Screw Screw Screw Screw Drive cover B A E D C Gear A Gear B Gear C Gear D Gear E ...

Page 83: ...M3 1 5 17 10 Remove the gear F gear G gear H and gear I Figure 1 5 29 11 Remove the gear J gear K and gear L 25 26 ppm model only Figure 1 5 30 F I G H Gear H Gear F Gear G Gear I J K L Gear J Gear K Gear L ...

Page 84: ...8 12 Remove the spring gear M gear N and sim Figure 1 5 31 13 Remove the three screws and remove the gear cover and gear P Figure 1 5 32 M N Gear N Gear M Spring Sim P Screw Screw Screw Gear P Gear cover Gear cover ...

Page 85: ...ure 1 5 33 15 Remove a screw and remove the duplex solenoid from the main motor unit 25 26 ppm model only To fit the main motor unit to the machine make sure not to let the pulse board hit the sensor Figure 1 5 34 Main motor Sensor Main motor unit Pulse board Screw Main motor unit Duplex solenoid ...

Page 86: ... 5 20 3 Direction of installing the principal fan motor When detaching or refitting the fan motors be careful of the airflow direction intake or exhaust Figure 1 5 35 Cooling fan motor Rating label inside Intake ...

Page 87: ... out of the cassette by the rotation of the paper feed pulley The paper conveying section conveys paper to the transfer separation section as paper feeding from the cas sette or MF tray or as paper refeeding for duplex printing 25 26 ppm model Paper by feeding is conveyed by the upper registration roller and lower registration roller to the transfer separation section The timing to start image for...

Page 88: ... the paper feed pulley same as the cassette for extracting and conveying the paper Paper is fed out of the MF tray by the rotation of the paper feed pulley Paper is automatically fed from the manual feed tray if paper is present in the tray Figure 2 1 2 Manual feed section 2 3 1 1 MF sheet 2 MF base 3 MF guide R L ...

Page 89: ...2M2 2M3 2 1 3 Figure 2 1 3 Cassette paper feed section block diagram REGIST YC8 3 OUTB YC4 2 OUTA YC4 1 FEEDSOLDRN YC3 2 YC14 RPWB RS MPWB MCS PFSOL MM ...

Page 90: ...ists of the cleaning blade and the drum screw which remove residual toner from the drum surface after transfer The eraser lamp ELPWB consists of LEDs and removes residual charge on the drum before main charging Figure 2 1 4 Drum section Figure 2 1 5 Drum section block diagram 1 2 3 4 6 5 1 Drum 2 Charger roller 3 Drum frame 4 Cleaning blade 5 Drum screw 6 Eraser lamp ELPWB MPWB HVPWB ERASER YC20 2...

Page 91: ...oner sensor TS checks whether or not toner remains in the toner container Figure 2 1 6 Developer section Figure 2 1 7 Developer section block diagram 1 4 5 6 7 3 2 8 1 Developer roller 2 Developer blade 3 Blade magnet 4 Developer screw A 5 Developer screw B 6 Developer case 7 Toner container 8 Toner sensor TS MPWB HVPWB YC13 TS YC6 2 TONER SENSOR RPWB YC14 Developer unit Developing bias output Dev...

Page 92: ...m from the laser scanner unit The laser beam is dispersed as the polygon motor PM revolves to reflect the laser beam over the drum Various lenses are housed in the laser scanner unit adjust the diameter of the laser beam and focalize it at the drum sur face Figure 2 1 8 Laser scanner section 1 2 3 4 5 6 1 Polygon motor PM 2 f θ lens 3 LSU frame 4 LSU cover 5 LSU shutter 6 LSU dust shield glass ...

Page 93: ...2M2 2M3 2 1 7 Figure 2 1 9 Laser scanner section 2 1 4 6 5 3 1 APC PWB APC PWB 2 Collimator lens 3 Cylindrical lens 4 Polygon motor PM 5 f θ lens 6 Mirror ...

Page 94: ...PWB 3 3V3 LONBN LDCONT LDENBN VIDEO VIDEON PDN GND PDPWB LSU UNIT PM YC1 1 YC1 2 YC1 3 YC1 4 YC1 5 YC1 6 YC1 7 YC1 8 24V3 GND POLONN POLORDYN POLCLK MPWB YC5 1 YC5 2 YC5 3 YC5 4 YC5 5 YC5 6 YC5 7 YC5 8 YC1 5 YC1 4 YC1 3 YC1 2 YC1 1 YC17 1 YC17 2 YC17 3 YC17 4 YC17 5 ...

Page 95: ...ted by the high voltage PWB HVPWB is applied to the transfer roller for transfer charging Paper after transfer is separated from the drum Figure 2 1 11 Secondary transfer roller section Figure 2 1 12 Transfer roller section block diagram 1 2 3 1 Transfer roller 2 Discharger brush 3 Rear transfer guide MPWB HVPWB YC13 Transfer bias Discharger brush T ...

Page 96: ...is fused by heat and pressure and fixed onto the paper because the press roller is pressed by the fuser press spring The surface temperature of heat roller and press roller are detected by the fuser thermistor FTH and controlled by the main PWB MPWB Figure 2 1 13 Fuser section 1 2 4 6 7 5 3 1 Heat roller 2 Press roller 3 Fuser heater FH 4 Fuser thermostat FTS 5 Fuser thermistor FTH 6 Separators 7 ...

Page 97: ...2M2 2M3 2 1 11 Figure 2 1 14 Fuser section block diagram FTS FH PSPWB YC102 1 YC102 3 YC103 FTH FTHERM MPWB YC15 2 YC12 ...

Page 98: ...e top tray by the rotation of the eject roller The duplex conveying section consists of conveying path which sends the paper sent from the exit section to the paper feed conveying section when duplex printing Figure 2 1 15 Duplex conveying section 3 2 1 6 5 4 7 2 1 7 25 26 ppm model 20 21 ppm model 1 Eject roller 2 Eject pulley 3 Duplex sensor 4 Actuator duplex sensor 5 Duplex roller 6 Duplex pull...

Page 99: ...2M2 2M3 2 1 13 Figure 2 1 16 Duplex conveying section block diagram DUSOL EXIT RPWB MPWB YC16 3 YC14 YC2 2 DUS DUSOLDRN ...

Page 100: ...2M2 2M3 2 1 14 This page is intentionally left blank ...

Page 101: ...PWB and Main motor toner sensor container sensor registration sensor paper feed solenoid duplex solenoid 3 Power source PWB PSPWB After full wave rectification of AC power source input switching for converting to 24 V DC for output 4 High voltage PWB HVPWB Generates main charging developer bias and transfer bias 5 Container PWB CPWB Reads the container information 6 Operation panel PWB OPWB Consis...

Page 102: ...TS PWB ASSY MAIN SP 2 Relay PWB RPWB 3 Power source PWB PSPWB 120V model PARTS SWITCHING REGULATOR 120V SP Power source PWB PSPWB 220 240V model PARTS SWITCHING REGULATOR 230V SP 4 High voltage PWB HVPWB PARTS HIGH VOLTAGE UNIT SP 5 Container PWB CPWB PARTS PWB ASSY CONTAINER CONNECT SP 6 Operation PWB OPWB PARTS PWB ASSY PANEL SP 7 APC PWB APCPWB 8 Eraser lamp PWB ELPWB PARTS PWB ASSY ERASER SP ...

Page 103: ...unt sensor MCS Detects revolution pulses of the motor 5 Duplex sensor DUS Detects a paper misfeed in the duplex section 6 Fuser thermistor FTH Measures the heat roller temperature 7 Fuser thermostat FTS Shuts off the power source to the fuser heater lamp when the heat roller reaches extremely high temperature 8 Outer temperature sensor OTEMS Detects the outside temperature 9 Power switch PSW Turns...

Page 104: ...he polygon mirror 3 Cooling fan motor FM Cools the interior of machine 4 Paper feed solenoid PFSOL Controls the paper cassette paper feed 5 Duplex solenoid DUSOL Controls the paper conveying at the duplex conveying section 6 Fuser heater lamp FH Heats the heat roller 25 26 ppm model only 1 2 4 6 5 3 Machine inside Machine left Machine right ...

Page 105: ...ation of the PWBs 2 3 1 Main PWB Figure 2 3 1 Main PWB silk screen diagram Figure 2 3 2 Main PWB U3 U13 U11 U2 U1 U8 U14 U5 YC14 YC6 YC5 YC15 YC20 YC16 YC17 YC12 YC13 YC4 YC3 1 7 1 2 1 2 1 3 1 5 1 15 1 8 1 7 1 11 8 1 1 2 3 4 ...

Page 106: ... 5 LED2 O 0 3 3 V DC LED2 On Off 6 LED3 O 0 3 3 V DC LED3 On Off 7 GND Ground YC12 1 GND Ground Connected to Power source PWB 2 GND Ground 3 24V1 I 24V DC 24 V DC power from PSPWB 4 PUSHSW I 0 3 3 V DC power SW signal 5 HEATREM O 0 3 3 V DC Heater On Off signal 6 RELAY O DC0V 24V Relay signal 7 PSSLEEPN O DC0V 24V Sleep mode signal 8 ZCROSS O 0 3 3 V DC pulse Zero cross signal 9 24V2 I 24V DC 24 V...

Page 107: ... 24V3 O 24V DC 24 V DC power to RPWB 15 24V3 O 24V DC 24 V DC power to RPWB YC15 1 3 3V3 O 3 3 V DC 3 3 V DC power to FTH Connected to fuser therm istor 2 FTHERM I Analog Fuser thermistor detection signal YC16 1 3 3VEXIT O 3 3 V DC 3 3 V DC power to DUS Connected to duplex sen sor 25 26 ppm model 2 GND Ground 3 EXIT I 0 3 3 V DC DUS On Off YC17 1 24V3 O 24V DC 24 V DC power to PM Connected to poly...

Page 108: ...2M2 2M3 2 3 4 2 3 2 Relay PWB PWB Figure 2 3 3 Relay PWB silk screen diagram Figure 2 3 4 Relay PWB YC2 YC3 YC5 YC4 YC8 YC6 YC7 YC9 2 1 2 1 2 1 2 1 1 3 2 4 3 1 1 1 NC1 E C ...

Page 109: ...1 24V3 O 24V DC 24 V DC power to FM Connected to fan motor 2 FANDRN O DC0V 24V FM On Off YC6 1 24V3 O 24V DC 24 V DC power to TS Connected to toner sensor 2 TONER SENSOR I DC0V 24V TS On Off 3 GND Ground YC7 1 3 3V3 O 3 3 V DC 3 3 V DC power to CPWB Connected to container PWB 2 SECCLK O 0 3 3 V DC pulse Clock signal 3 SECDATA I 0 3 3 V DC Data signal 4 GND Ground YC8 1 3 3V3 O 3 3 V DCREG 3 3 V DC...

Page 110: ...2M2 2M3 2 3 6 2 3 3 Power source PWB l Figure 2 3 5 Power source PWB silk screen diagram Figure 2 3 6 YC101 YC103 YC102 CSW PSW ...

Page 111: ...ted to Fuser heater lamp 2 NC Not used 3 HEATER_LIVE O 120 V AC 220 240 V AC AC power output YC103 1 24V2 O 24V DC 24 V DC power to MPWB Connected to main PWB 2 24V2 O 24V DC 24 V DC power to MPWB 3 PSSLEEPN I 0 3 3 V DC Sleep mode signal 4 ZCROSS O 0 3 3 V DC pulse Zero cross signal 5 RELAY I 0 3 3 V DC Relay signal 6 HEATREM I 0 3 3 V DC FH On Off 7 PUSHSW O 0 3 3 V DC PSW On Off 8 24V1 O 24V DC...

Page 112: ...el PWB Connector Pin Signal I O Voltage Description YC1 1 KEY1 O 0 3 3 V DC KEY1 On Off Connected to main PWB 2 KEY2 O 0 3 3 V DC KEY2 On Off 3 KEY3 O 0 3 3 V DC KEY3 On Off 4 LED1 I 0 3 3 V DC LED1 On Off 5 LED2 I 0 3 3 V DC LED2 On Off 6 LED3 I 0 3 3 V DC LED3 On Off 7 GND Ground 1 7 LED3 KEY3 YC1 KEY2 KEY1 LED2 LED1 ...

Page 113: ...t 100 000 pages MK 1110 MAINTENANCE KIT for metric 1702M75NX0 072M75NX0 Drum unit DK 1110 Developer unit DV 1110 Transfer roller PARTS ROLLER TRANSFER E SP Paper feed pulley PARTS ROLLER FEED ASSY SP Lower paper feed guide PARTS FRAME FEED BOTTOM ASSY SP Toner disposal box WT 1110 MK 1112 Maintenance kit 100 000 pages MK 1112 MAINTENANCE KIT for inch 1702M76UX0 072M76UX0 Drum unit DK 1110 Develope...

Page 114: ...power off by pressing the power switch Make sure the Processing indicator and the Attention indicator are turned off Figure 2 4 1 2 Unplug the power cable from the wall outlet Figure 2 4 2 3 Gently press on both the left and right sides of the cassette cover and pull Figure 2 4 3 Power switch Cassette cover ...

Page 115: ... Pull out the toner container Figure 2 4 5 Do not close the front cover Do not close the front cover while the toner container is not installed other wise the cover open detecting lever may be damaged Figure 2 4 6 Front cover Toner container Front cover ...

Page 116: ... 7 2 Detaching the Drum unit Procedure 1 Remove the drum unit by holding both of its ends Figure 2 4 8 3 Detaching the developer unit Procedure 1 Remove the developer unit by holding both of its ends Figure 2 4 9 Rear cover Drum unit Developer unit ...

Page 117: ...aling cap and fit the sealing cap to the old waste toner box Figure 2 4 11 5 Detaching and refitting the paper feed pulley and lower paper feed guide Procedure 1 Close the rear cover 2 Take out the paper feed replacement unit from the maintenance kit 3 Lift the unit and place it on the replace ment unit with the front side facing down Figure 2 4 12 Toner disposal box Paper feed replacement unit ...

Page 118: ...ide and slide the lower paper feed guide by holding the rib Figure 2 4 13 5 Remove the lower paper feed guide in the reverse direction of its sliding direction and pull askew and upwards Figure 2 4 14 1 2 Lib Lever Lower paper feed guide Lower paper feed guide ...

Page 119: ...oller by turning it Figure 2 4 15 7 Refitting the paper feed pulley 1 Insert the new paper feed pulley onto the right side axle of the roller holder 2 Turn the paper feed pulley 3 Turn the paper feed pulley so that its boss and the cutout on the right side roller holder mate with each other 4 Slide the left side roller holder Confirm that it is clicked in and locked Figure 2 4 16 1 2 3 4 5 6 Left ...

Page 120: ...t the right side first then the left side into the machine Insert bosses into the holes on the main unit Figure 2 4 17 9 Slide the unit leftwards while holding the rib at the lower paper feed guide Make sure the pawls are firmly latched Figure 2 4 18 Lower paper feed guide 1 2 Click ...

Page 121: ...2M2 2M3 2 4 9 10 Lift the machine from the replacement unit and move it in the place where it was originally installed Figure 2 4 19 ...

Page 122: ... Install the new toner disposal box in the printer Figure 2 4 21 7 Refitting the developer unit Procedure 1 Install the new developer unit in the machine by holding both of its ends Insert the unit along the guides on both sides Figure 2 4 22 Rear cover Toner disposal box developer unit Guide Guide ...

Page 123: ...unit Procedure 1 Install the new drum unit in the machine by holding both of its ends Insert the unit along the guides on both sides Figure 2 4 24 2 Seat the drum unit in position by pressing the knobs on its ends and remove the drum cover Figure 2 4 25 developer cover Lever Drum unit Lever Lever Drum cover ...

Page 124: ...ook then lift the transfer roller Figure 2 4 26 2 Using the reverse procedure of removing the transfer roller insert the left side first into the bush and then attach the other side Insert the hooks first into the machine and then push down it to lock Push in firmly until you hear a click sound Figure 2 4 27 3 Close the rear cover Figure 2 4 28 1 2 Transfer roller Lever 1 2 Hook ...

Page 125: ...ed on press and hold both Cancel and GO for more than 5 seconds Perform the above while the front cover is opened 3 When the Processing indicator has turned on turn power off by pressing the power switch 4 Close the front cover 5 When power is turned on by pressing the power key settings are activated During activation Processing and Attention are lit up It will take approxi mately ten minutes Do ...

Page 126: ...or only replacing Developer unit Procedure 1 Open the front cover 2 Pull out the toner container Do not close the front cover 3 Open the rear cover 4 Remove the drum unit see page P 2 4 4 5 Remove the developer unit see page P 2 4 4 6 Install the new developer unit in the printer see page P 2 4 10 7 Install the toner container in the printer Do not close the front cover 8 Install the drum unit in ...

Page 127: ...eplacement 1 Open the rear cover Figure 2 4 33 2 Use a clean lint free cloth to wipe dust and dirt off the front and rear registra tion rollers and conveying unit Take care not to touch the drum and transfer roller black during cleaning Figure 2 4 34 Rear cover Front registration rolle Rear registration roller Transfer roller Drum Conveying Unit ...

Page 128: ...ger roller 30 6 mm 1 7 32 Magnet roller Developer unit 37 7 mm 1 1 2 Lower regist roller 41 5 mm 1 5 8 Transfer roller 63 0 mm 2 1 2 Heat roller Fuser unit 56 5 mm 2 7 32 Press roller Fuser unit 24 6 mm 7 32 Upper regist roller 75 9 mm 3 Drum Drum unit First occurrence of defect ...

Page 129: ...C13 24V3 HVCLK RTHVDR MCNT TCNT MISENS GND 1 2 3 4 5 6 7 1 2 3 4 5 6 7 7 6 5 4 3 2 1 I2 C Bus I F FRAM 1 2 1 2 1 2 1 2 3 1 2 3 1 2 3 4 3 3V3 SECCLK SECDATA GND 1 2 PFSOL DUSOL 1 2 1 2 1 2 1 2 3 2 1 1 2 3 1 2 3 15 14 13 12 11 10 9 8 7 6 5 4 3 2 1 1 2 1 2 1 2 3 4 5 6 7 8 9 10 1 2 3 4 5 6 7 8 9 10 10 9 8 7 6 5 4 3 2 1 10 9 8 7 6 5 4 3 2 1 1 2 3 4 3 3V3REG GND REGIST OPWB YC1 1 2 3 4 5 6 7 3 2 1 1 2 3...

Page 130: ......

Page 131: ...2012 ...

Reviews:

Related manuals for FS-1040