background image

7-7

Document Box > Saving Documents to USB Memory (Scan to USB)

For details, refer to 

Functions for Document Box on page 7-9

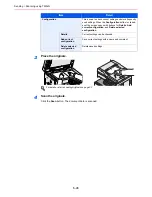
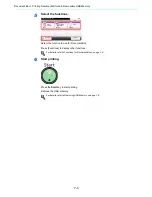
6

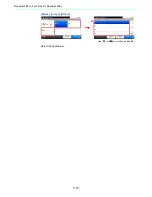
Start storing.

Press the 

Start

 key to start storing.

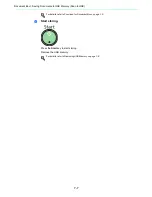
Remove the USB memory.

For details, refer to 

Removing USB Memory on page 7-8

Summary of Contents for FS-C8020MFP

Page 1: ...OPERATION GUIDE FS C8020MFP FS C8025MFP...

Page 2: ...that the supplies are our own brand In this Operation Guide FS C8020MFP is referred to as 20 ppm model and FS C8025MFP is referred to as 25 ppm model respectively Included Guides The following guides...

Page 3: ...inter functionality Network FAX Driver Operation Guide Describes how to install and use the network fax driver in order to use network fax functionality KM NET for Direct Printing Operation Guide Desc...

Page 4: ......

Page 5: ...g Necessary Cables 2 9 Connecting Cables 2 10 Connecting LAN Cable 2 10 Connecting USB Cable 2 11 Connecting the Power Cable 2 11 Power On Off 2 12 Power On 2 12 Power Off 2 12 Installing Software 2 1...

Page 6: ...utput 3 42 Collate Offset 3 43 Margin 3 45 Staple 3 48 Density 3 50 Scan Resolution 3 51 Original Image 3 52 Sharpness 3 53 Background Density Adjust 3 54 Prevent Bleed through 3 55 Zoom 3 56 File For...

Page 7: ...ination 6 33 Editing and Deleting One Touch Key 6 35 Sending Functions 6 36 Sending Size 6 37 File Separation 6 39 E mail Subject Body 6 40 FTP Encrypted TX 6 41 WSD Scan 6 42 Scanning using TWAIN 6 4...

Page 8: ...Disabling Job Accounting 9 61 Login Logout 9 62 Adding an Account 9 63 Editing and Deleting Accounts 9 65 Restricting the Use of the Machine 9 67 Counting the Number of Pages Printed 9 69 Printing an...

Page 9: ...ction 11 5 Character Entry Method 11 7 Entry Screens 11 7 Entering Characters 11 9 Paper 11 10 Basic Paper Specifications 11 11 Choosing the Appropriate Paper 11 11 Special Paper 11 14 Specifications...

Page 10: ...vi...

Page 11: ...re using this machine It copies It prints Copying with specific settings Printing Documents Stored in Removable USB Memory Print via a network What you want to do Setup Connecting Cables Network Setup...

Page 12: ...irectly It sends Send as E mail Send to Folder SMB Saving Documents to USB Memory What you want to do Setup Connecting Cables Network Setup LAN Cable Connection Plug the USB memory Editing Destination...

Page 13: ...more information on setting up and sending a FAX refer to the FAX Operation Guide It faxes Send a FAX FAX directly from a computer What you want to do Setup Connect the modular cord for the telephone...

Page 14: ...r Output page 3 42 Staple page 3 48 Color Selection page 3 59 Original Image page 3 52 EcoPrint page 4 15 Hue Adjustment page 4 16 Color Balance page 4 17 Sharpness page 3 53 Background Density Adj pa...

Page 15: ...Separation page 6 39 Scan Resolution page 3 51 Density page 3 50 Color Selection page 3 59 Original Image page 3 52 Sharpness page 3 53 Background Density Adj page 3 54 Prevent Bleed through page 3 55...

Page 16: ...ty Adj page 3 54 Prevent Bleed through page 3 55 Zoom page 3 56 Continuous Scan page 3 39 Job Finish Notice page 3 60 Add Edit Shortcut page 3 22 Print Copies page 7 3 Paper Selection page 3 41 Collat...

Page 17: ...Store Job Status page 8 5 Scheduled Job page 8 5 Print Job Log page 8 6 Send Job Log page 8 6 Store Job Log page 8 6 Scanner page 8 11 Printer page 8 12 FAX page 8 12 Removable Memory page 8 12 Toner...

Page 18: ...ort refer to Fax Operation Guide Admin Report Settings refer to Fax Operation Guide Result Report Setting page 9 6 Send Result Report page 9 6 RX Result Report refer to Fax Operation Guide Job Finish...

Page 19: ...nish page 9 9 Ready page 9 9 Warning page 9 9 Key Confirmation USB Keyboard page 9 9 FAX Speaker Volume refer to Fax Operation Guide FAX Monitor Volume refer to Fax Operation Guide Original Settings p...

Page 20: ...otation page 9 12 File Name Entry page 9 13 E mail Subject Body page 9 13 FTP Encrypted TX page 9 13 JPEG TIFF Print page 9 13 XPS Fit to Page page 9 13 Detail Settings page 9 13 Image Quality page 9...

Page 21: ...Destination page 9 16 Color TIFF Compression page 9 16 Default Screen page 9 16 Document Box Sub Address Box refer to Fax Operation Guide Job Box page 5 6 Quick Copy Job Retention page 5 8 Deletion of...

Page 22: ...unting page 9 69 Printed Pages page 9 69 Scanned Pages page 9 69 FAX TX Pages page 9 69 FAX TX Time page 9 69 Counter Reset page 9 69 Each Job Accounting page 9 69 Accounting List page 9 63 Default Se...

Page 23: ...21 IPSec page 9 22 Secure Protocol page 9 22 SSL page 9 22 IPP Security page 9 22 HTTP Security page 9 22 LDAP Security Ext Address Book page 9 22 LDAP Security User Property page 9 22 LAN Interface...

Page 24: ...me refer to Fax Operation Guide Adjustment Maintenance page 9 25 Density Adjustment page 9 25 Copy page 9 25 Send Box page 9 25 Background Density Adj page 9 25 Copy Auto page 9 25 Send Box Auto page...

Page 25: ...ment 1 3 Precautions for Use 1 3 Legal and Safety Information 1 9 Legal Information 1 9 Energy Saving Control Function 1 12 Automatic 2 Sided Copy Function 1 12 Paper Recycling 1 12 Energy Star ENERGY...

Page 26: ...indicated inside the symbol General warning Warning of high temperature The symbol indicates that the related section includes information on prohibited actions Specifics of the prohibited action are...

Page 27: ...toner box Dangerous sparks may cause burns Keep the toner container and the waste toner box out of the reach of children If toner happens to spill from the toner container or the waste toner box avoid...

Page 28: ...peration of the product by user no radiation can leak from the machine This machine is classified as Class 1 laser product under IEC EN 60825 1 2007 Caution Performance of procedures other than those...

Page 29: ...Radiological Health CDRH of the U S Food and Drug Administration FDA This act prohibits the sale of laser products in the U S without certification and applies to laser products manufactured after Aug...

Page 30: ...ser is encouraged to try to correct the interference by one or more of the following measures Reorient or relocate the receiving antenna Increase the separation between the equipment and receiver Conn...

Page 31: ...der to obtain performance of this warranty the Customer must immediately notify the Authorized Kyocera Dealer from whom the product was purchased If the Kyocera Dealer is not able to provide service w...

Page 32: ...r Copying Scanning the following items is prohibited and may be penalized by low It may not be limited to these items Do not knowingly copy scan the items that are not to be copied scanned Paper money...

Page 33: ...fDingbats are registered trademarks of International Typeface Corporation UFST MicroType fonts by Monotype Imaging Inc are installed in this machine This machine contains the NF module developed by AC...

Page 34: ...etc code not just the SSL code The SSL documentation included with this distribution is covered by the same copyright terms except that the holder is Tim Hudson tjh cryptsoft com Copyright remains Er...

Page 35: ...after notice from Monotype Imaging When this License expires or is terminated you shall either return to Monotype Imaging or destroy all copies of the Software and Typefaces and documentation as requ...

Page 36: ...p on page 2 21 Low Power Mode The device automatically enters Low Power Mode when 3 minutes have passed since the device was last used The amount of time of no activity that must pass before Low Power...

Page 37: ...and device status and how to cancel fax transmission 9 Setup Registration and User Management Explains system menu functionality related to overall machine operation job accounting and user managemen...

Page 38: ...print from Box Print Copies Paper Selection Collate Offset Duplex A4 Functions 10 10 Cancel Collate 1 sided GB0097_00 Send Send Screen Send Dest Recall Check E mail One Touch Key Address Book Ext Addr...

Page 39: ...ollowing icons are used to indicate originals and paper placement directions on the touch panel Placement direction Indicated size The size of the original paper that can be used depends on the functi...

Page 40: ...1 16 Preface About this Operation Guide...

Page 41: ...9 Connecting Cables 2 10 Connecting LAN Cable 2 10 Connecting USB Cable 2 11 Connecting the Power Cable 2 11 Power On Off 2 12 Power On 2 12 Power Off 2 12 Installing Software 2 14 Installing Printer...

Page 42: ...ames Machine 1 Document Processor 2 Platen 3 Original Size Indicator Plates 4 Slit Glass 5 Operation Panel 6 Inner Tray 7 Front Cover 8 Cassette 1 9 USB Memory Slot A1 10 Right Cover 1 11 Handles 12 J...

Page 43: ...Cloth Compartment 16 Original Loaded Indicator 17 Toner Container Black 18 Toner Container Magenta 19 Toner Container Cyan 20 Toner Container Yellow 21 Waste Toner Box 22 Paper Width Guide 23 Paper Le...

Page 44: ...s 26 Option Interface Slot 2 27 Network Interface Connector 28 USB Interface Connector A2 29 USB Port B1 30 Option Interface Slot 1 31 Scanner Lock 32 Main Power Switch 33 Handles 34 Cassette Heater S...

Page 45: ...2 5 Preparation before Use Part Names 35 Top Cover 36 Tray Extension 37 Document Finisher Tray 38 Staple Cover 39 Staple Cartridge Holder 40 Bridge Unit Cover 35 36 37 38 39 40...

Page 46: ...ll Color Scans all documents in full color Black White Scans all documents in black white Displays the Interrupt Copy screen Ends operation logs out on the Administration screen Puts the machine into...

Page 47: ...tions 10 10 Favorites Shortcut 1 Shortcut 2 Displays the status of the equipment as well as necessary operation messages Displays available functions Configures more advanced function settings Display...

Page 48: ...100BASE TX or 10BASE T Administrator s PC COMMAND CENTER Network settings Scanner default settings User and destination registration Printing Network FAX Option FAX Option MFP USB Network Network FAX...

Page 49: ...cessary cables according to the interface you use Connection Environment Function Necessary Cable Connect a LAN cable to the machine Printer Scanner Scanner TWAIN WIA LAN 10Base T 100Base TX or 1000BA...

Page 50: ...as a network printer or network scanner 1 Power Off 2 Connect the machine 1 Connect the LAN cable to the network interface located on left side of the body 2 Connect the other end of the cable to the...

Page 51: ...1 Power Off 2 Connect the machine 1 Connect the USB cable to the appropriate interface located on the left side of the body 2 Connect the other end of the cable to the PC Connecting the Power Cable C...

Page 52: ...main power switch on Power Off When not turning off the main power switch sleep Press the Power key The Power key light will go out and the Main Power indicator will light up IMPORTANT When turning o...

Page 53: ...s lit up the machine is operating Turning off the main power switch while the machine is operating may cause it to malfunction CAUTION If this machine will be left unused for an extended period e g ov...

Page 54: ...ines and installs the required software Use Custom Mode if you want to specify the printer port and select the software to be installed For details refer to Custom Installation in the Printer Driver U...

Page 55: ...on screen instructions to restart the system if required The TWAIN driver and WIA driver can be installed if the machine and computer are connected via a network You can install the WIA driver using...

Page 56: ...iver as directed by the instructions in the installation software This completes the printer driver installation Next specify the print settings If an IP or AppleTalk connection is used the settings b...

Page 57: ...1 Display the window 2 Click the IP icon for an IP connection or the AppleTalk icon for an AppleTalk connection and then enter the IP address and printer name 3 Select the options available for the ma...

Page 58: ...ontact Administrator NOTE Click Delete to delete the added machine Click Edit to change names Enter the machine name Select this machine from the list Enter the machine s IP address or host name When...

Page 59: ...ers and press the Properties 2 Configure WIA Driver NOTE The following is not necessary to register when using the machine possesses an IP address or host name that you have specified during installat...

Page 60: ...s while the machine is in Low Power Mode when using the optional fax the machine automatically wakes up and starts printing To resume perform one of the following actions The machine will be ready to...

Page 61: ...automatically switches the machine into Sleep if left idle for a preset time in the Low Power Mode The default preset time is 20 minutes for the 20 ppm model and 30 minutes for the 25 ppm model For m...

Page 62: ...etails about settings refer to the help information displayed on the touch panel To make changes after this initial configuration refer to Date Timer on page 9 23 and System on page 9 18 Date Time set...

Page 63: ...mation about the machine and COMMAND CENTER as well as their current status 2 Configure the function Select a category from the navigation bar on the left of the screen The values for each category mu...

Page 64: ...on SMTP Protocol Enables or disables SMTP protocol To use E mail this protocol must be enabled SMTP Port Number Set the SMTP Port Number or use the SMTP default port 25 SMTP Server Name Enter the SMTP...

Page 65: ...is 0 no maximum size is set Sender Address Enter the E mail address of the person responsible for the machine such as the machine administrator so that a reply or non delivery report will go to a per...

Page 66: ...2 26 Preparation before Use COMMAND CENTER Settings for E mail...

Page 67: ...18 Using Favorites 3 20 Shortcuts 3 22 Registering Shortcuts 3 22 Editing and Deleting Shortcuts 3 24 Using Shortcuts 3 25 Quick Setup Wizard 3 26 Help Screen 3 28 Canceling Jobs 3 29 Using Various F...

Page 68: ...d straighten it before loading Paper that is curled or folded may cause a jam Avoid exposing opened paper to high temperatures and high humidity as dampness can be a cause of problems Seal any remaini...

Page 69: ...uld not use inkjet printer paper or any paper with a special surface coating Such paper may cause paper jams or other faults For clearer and brighter color copies use the special color paper When usin...

Page 70: ...e loaded paper does not exceed the level indicator see the figure When loading the paper keep the side that was closest the package seal facing up The paper length and width guides must be adjusted to...

Page 71: ...Envelope C5 Envelope 10 Commercial 10 Monarch Youkei 4 Youkei 2 5 sheets Heavy paper 106 to 256 g m 10 sheets when using heavy paper with a weight of 164 g m or greater only A4 Letter or smaller shee...

Page 72: ...in the tray from a previous job before loading the paper If there is just a small amount of paper left over in the multi purpose tray and you want to add more first remove the left over paper from the...

Page 73: ...the original eject table may fall off when the document processor is opened Shadows may be produced around the edges and in the middle of open faced originals CAUTION Do not leave the document process...

Page 74: ...ed paper Originals with folds Straighten the folds before loading Failure to do so may cause the originals to jam Originals bound with clips or staples Remove the clips or staples and straighten curls...

Page 75: ...heir status are as follows Green left indicator lit Original is placed properly NOTE Ensure that loaded originals do not exceed the level indicator Exceeding the maximum level may cause the originals...

Page 76: ...ment s Serial Number The equipment s serial number is printed in the location shown in the figure NOTE You ll need the equipment s serial number when contacting your Service Representative Please chec...

Page 77: ...ck the number of pages by paper size Scanned Pages System Menu Counter System Menu Quick Setup Wizard 10 10 Language Report Counter 1 5 GB0054_00 1 2 Use or to scroll up and down Printed Pages 10 10 S...

Page 78: ...r the login user name The name can also be entered using the numeric keypad Refer to Character Entry Method on page 11 7 for details on entering characters 2 Enter the login password Press Password to...

Page 79: ...is activated When the auto panel reset function is activated When Auto Low Power Mode is activated When the machine is placed in Low Power Mode by pressing the Energy Saver key NOTE If Network Authen...

Page 80: ...called up in order and configured as you check or change each one Program mode Settings are called up immediately when you press the key to which they are registered 1 Configure the function When reg...

Page 81: ...pe Send FAX Copy Cancel 1 1 Next Add Function Type 10 10 Select how to recall the function Wizard Program Back Cancel 1 1 Next GB0763_00 GB0764_00 1 2 Add Functions 10 10 File Format Cancel 1 6 Next B...

Page 82: ...ction Type Permission Address Book Wizard Back 2 2 Save 2 GB0766_02 1 2 Destination 10 10 Address Book 1 2 OK Cancel Ext Address Book One Touch Key Address Entry E mail Add Confirmation Private 10 10...

Page 83: ...Operations Favorites 6 Register the favorite Add Confirmation Sending Job E mail 10 10 Cancel Select the item that you want to change Job Type Number Owner Name Multi Sending Admin Back 1 2 Save Auto...

Page 84: ...re ess Entry Scan to PC Addre ss Book Scan to E mail A ddress Entry Scan to E mail A ddress Book 2 GB0056_00 1 Edit 10 10 Next Cancel 1 2 01 Sending Job E mail 15 ID Card Copy 16 Paper Saving Copy 17...

Page 85: ...unction Type Permission Back 2 2 Save 2 Wizard Address Book Destination Permission 10 10 Shared Private Cancel 1 1 OK GB0305_00 GB0781_02 1 2 GB0781_02 Favorites E mail TX 10 10 Cancel Job Type Number...

Page 86: ..._00 Favorites 10 10 1 1 Select the function ID Card Copy Paper Saving Copy Scan to PC Addre ess Entry Scan to PC Addre ss Book Scan to E mail A ddress Entry Scan to E mail A ddress Book Set Combine Co...

Page 87: ...3 21 Common Operations Favorites When using the program mode Select a favorite to call up registered settings Press the Start key to start the job...

Page 88: ...ared shortcuts can be used by all machine users When using user login administration shared shortcuts can only be set by users who have logged in as administrators NOTE If you select a shortcut number...

Page 89: ...Character Entry Method on page 11 7 for details on entering characters 6 Register the shortcut Confirm the settings and press Save 10 10 Select the functions Zoom Density Duplex Paper Selection Back C...

Page 90: ...r Selection Zoom Density Duplex Combine Collate Offset 1 sided 1 sided Auto 100 Normal 0 Collate Off Functions 10 10 Favorites Shortcut 1 Shortcut 2 GB0001_04 GB0002_00 1 2 Edit 10 10 Ready to copy Fu...

Page 91: ...it Confirmation Shortcut 1 10 10 Cancel Ready to copy Full Color Name Functions Number Back 1 1 Save Zoom Shortcut 1 GB0797_00 2 1 10 10 Ready to copy Full Color Cancel 1 1 OK Delete Private Shortcut...

Page 92: ...eception Mode Dialing RX Mode Auto DRD 2 Local FAX Info Local FAX Info Local FAX Number Local FAX Info Local FAX ID Local FAX Info Print Position 3 Sound Volume Sound Volume Confirmation Speaker Volum...

Page 93: ...ttings configured so far are applied Previous Returns to the previous item Skip Advances to the next item without setting the current item Next Advances to the next screen Back Returns to the previous...

Page 94: ...tion 10 10 Ready to copy Full Color Select the cassette or multi purpose tray with the desired paper size Auto Automatically selects the appropriate paper size Cassette 1 Selects the paper in cassette...

Page 95: ...on displayed on the taskbar at the bottom right of the Windows desktop to display a dialog box for the printer 2 Click the file for which you wish to cancel printing and select Cancel from the Documen...

Page 96: ...folder where the file will be stored and press Menu and then Store File For details refer to Printing Documents Stored in Removable USB Memory on page 7 2 or Saving Documents to USB Memory Scan to USB...

Page 97: ...ins white space Margin X page 3 45 Staple in the output documents Staple X page 3 48 Adjust the density Density X page 3 50 Set the resolution at which to scan originals Scan Resolution X page 3 51 Se...

Page 98: ...al Size on page 9 9 Size Entry Enter the size Inch models Horizontal 2 to 17 in 0 01 increments Vertical 2 to 11 69 in 0 01 increments Metric models Horizontal 50 to 432 mm in 1 mm increments Vertical...

Page 99: ...10 10 A4 A4 A5 1 4 OK OK Back Cancel Ready to copy Full Color Ready to copy Full Color Original Size Auto Metric Inch Others 10 10 Cancel OK Size Entry GB0025_00 GB0026_00 Use or to scroll up and dow...

Page 100: ...nd then Original Orientation 2 Select the function Select the original orientation Copy Send Scan to USB Top Edge on Top Top Edge on Left Top Edge on Top Top Edge on Left Ready to copy Full Color Func...

Page 101: ...owing combination Folio and A4 R make sure to set Original Auto Detect to On for Folio For more information refer to Original Auto Detect on page 9 10 Up to 30 sheets can be placed in the document pro...

Page 102: ...3 36 Common Operations Using Various Functions 2 Select the function Ready to copy Full Color Mixed Size Originals Off On 10 10 Cancel OK GB0035_00...

Page 103: ...inding Top Set when using a 2 sided sheet original that will be bound at the top Book Binding Left Set when using a book original such as a magazine or book that is bound on the left Book Binding Righ...

Page 104: ...ok Original 1 sided 2 sided Book Others 10 10 Cancel OK Ready to send 2 sided Book Original 2 sided Book Original 10 10 Ready to send 2 sided Binding Left Right 2 sided Binding Top Book Binding Left 1...

Page 105: ...e Start key to start scanning Once the original has been scanned load the next original and press the Start key Use the same procedure to scan any remaining originals Copy Send Scan to USB Ready to co...

Page 106: ...ations Using Various Functions 4 Finish scanning Start copying sending or storing Job No 0003 10 10 Place the originals and press Start key Scanned Pages Cancel Job Name doc00000320101010101010 Finish...

Page 107: ...R Folio or 216 340 mm inch Select from Ledger Letter R Letter Legal Statement R Executive or Oficio II others Select from 8K 16K R 16K ISO B5 Envelope 10 Envelope 9 Envelope 6 Envelope Monarch Envelo...

Page 108: ...document finisher tray Job Separator Tray Places pages face down in the job separator tray NOTE To change default destination refer to Paper Output on page 9 13 for details Copy Print from USB Ready t...

Page 109: ...s are produced after rotating each set or page by 90 With Document Finisher Option When you use offsetting printed copies are segregated after each set of copies or after each page 1 Display the scree...

Page 110: ...B0001_01 Ready to copy Full Color Copy Copies Paper Selection Zoom Density Duplex Combine Collate Offset 1 sided 1 sided Auto 100 Normal 0 Collate Off Functions 10 10 Favorites GB0021_00 Ready to copy...

Page 111: ...Various Functions on page 3 30 display the screen 2 Press Functions and then Margin Input units Margin Width Inch Models 0 75 to 0 75 in 0 01 increments Metric Models 18 mm to 18 mm in 1 mm increment...

Page 112: ...B0038_00 Margin Margin 10 10 Ready to copy Full Color mm L R 18 18 Cancel T B 18 18 mm OK Margin Settings Margin 10 10 Cancel Ready to copy Full Color Back Page Original Orientation Back 1 1 OK Left 6...

Page 113: ...n Back Page 10 10 Ready to copy Full Color Manual Auto Cancel 1 1 OK Margin Back Page 10 10 Ready to copy Full Color mm L R 18 18 Back T B 18 18 mm OK Cancel 2 3 1 Margin Original Orientation 10 10 Re...

Page 114: ...ument finisher Original Orientation Top Edge Back Edge Original Orientation Left Top Edge Left top corner Cassette Paper Load Direction Cassette Paper Load Direction Copy Print from USB Ready to copy...

Page 115: ...r Staple Off 1 staple 2 staples 2 staples Others 10 10 Cancel OK GB0032_00 Ready to copy Full Color Staple Staple Off 10 10 1 staple Top Left 1 staple Top Right 2 staples Left 1 2 OK OK Cancel Staple...

Page 116: ...dy to copy Full Color Copy Copies Paper Selection Zoom Density Duplex Combine Collate Offset 1 sided 1 sided Auto 100 Normal 0 Collate Off Functions 10 10 Favorites Copy Scan to USB GB0001_01 GB0096_0...

Page 117: ...SB Functions 2 sided Book Original 1 sided Close 10 10 Sending Size 300x300dpi Off File Separation Scan Resolution 2 6 Same as Original Size Add Edit Shortcut Ready to send Send Dest Recall Check E ma...

Page 118: ...t for OCR This function is displayed when the color mode is Auto Color B W or Black White when sending or storing For documents to be read by OCR Copy Send Scan to USB Ready to copy Full Color Functio...

Page 119: ...creen 1 Referring to Using Various Functions on page 3 30 display the screen 2 Press Functions and then Sharpness 2 Adjust the sharpness Press 3 to 3 Blur Sharpen to adjust the sharpness Copy Send Sca...

Page 120: ...ity automatically based on the original Manual Manually adjust the density Copy Send Scan to USB Ready to copy Full Color Functions Color Balance Off Close 10 10 Off 0 Sharpness Background Density Adj...

Page 121: ...ct the function Copy Send Scan to USB Ready to copy Full Color Functions Color Balance Off Close 10 10 Off 0 Sharpness Background Density Adj 3 5 Add Edit Shortcut Prevent Bleed through Off Ready to c...

Page 122: ...e image to match the send or store size NOTE Original Size page 3 32 Sending Size page 6 37 Storing Size page 7 14 and Zoom are related to each other Send Scan to USB Ready to send Functions Backgroun...

Page 123: ...et the image quality from 1 to 5 Low Quality High Quality PDF A This setting is displayed only when PDF has been selected as the file format Set PDF A from PDF A 1a and PDF A 1b Send Scan to USB Ready...

Page 124: ...1 1 OK OK Cancel Ready to send File Format Others File Format 10 10 Cancel Ready to send Image Quality PDF A Back 1 1 OK PDF 1 Off GB0698_00 GB0145_00 2 1 File Format Image Quality 10 10 Low Quality...

Page 125: ...te and scan color documents in Full Color and black and white documents in Black and White Full Color Scan document in full color Grayscale Scan document in grayscale for smoother and finer finish Bla...

Page 126: ...Entry doc Off Priority Override 5 5 Add Edit Shortcut Ready to copy Full Color Copy Copies Paper Selection Zoom Density Duplex Combine Collate Offset 1 sided 1 sided Auto 100 Normal 0 Collate Off Fun...

Page 127: ...he logged in user This setting is displayed when using user login administration 4 Accept the destinations Press OK GB0064_00 Ready to copy Full Color Job Finish Notice Settings Address Book 10 10 Ext...

Page 128: ...Ready to copy Full Color Functions Job Finish Notice Off Close 10 10 File Name Entry doc Off Priority Override 5 5 Add Edit Shortcut Ready to copy Full Color Copy Copies Paper Selection Zoom Density...

Page 129: ...rent job was an override Priority override may not be available depending on the status of the current print job and memory usage Copy Print from USB Ready to copy Full Color Functions Job Finish Noti...

Page 130: ...3 64 Common Operations Using Various Functions...

Page 131: ...ter explains the following topics Basic Operation 4 2 Copying Functions 4 4 Zoom 4 5 Duplex 4 8 Combine 4 12 EcoPrint 4 15 Hue Adjustment 4 16 Color Balance 4 17 Saturation 4 18 Auto Image Rotation 4...

Page 132: ...e 4 4 NOTE If the touch panel is turned off press the Energy Saver key or the Power key and wait for the machine to warm up Auto Color Automatically recognizes whether a document is color or black whi...

Page 133: ...4 3 Copying Basic Operation 5 Entering the copy quantity 6 Start copying Press the Start key to start copying NOTE Press the Clear key to change the copy quantity...

Page 134: ...results Original Image X page 3 52 Save toner when printing EcoPrint X page 4 15 Make a copy after changing the appearance of the original s colors Hue Adjustment X page 4 16 Adjust colors for exampl...

Page 135: ...Auto 400 Max 200 STMT Ledger 154 STMT Legal 129 Letter Ledger 121 Legal Ledger 100 78 Legal Letter 77 Ledger Legal 64 Ledger Letter 50 Ledger STMT 25 Min Metric Models Auto 400 Max 200 A5 A3 141 A4 A3...

Page 136: ...ies Paper Selection Zoom Density Duplex Combine Collate Offset 1 sided 1 sided Auto 100 Normal 0 Collate Off Functions 10 10 Favorites GB0001_01 Ready to copy Full Color Zoom 100 Auto Standard Zoom Zo...

Page 137: ...unctions Zoom Entry Enter the magnification Zoom Zoom Entry 10 10 Ready to copy Full Color 25 400 Back OK Cancel GB0007_00 Ready to copy Full Color Zoom 100 Auto Standard Zoom Zoom Entry 10 10 Cancel...

Page 138: ...to 2 sided 2 sided 1 sided Prints 2 sided to 1 sided 2 sided 2 sided Prints 2 sided to 2 sided Book 1 sided Prints open book originals to 1 sided Book 2 sided Prints open book originals to 2 sided Bi...

Page 139: ...K Paper Letter A4 and B5 The following sizes of originals and paper are supported in Two sided to One sided and Book to One sided Original Ledger Letter R Statement R A3 A4 R A5 R B4 B5 R and 8K Paper...

Page 140: ...ding in Original Left Right 10 10 Top 1 1 OK OK Cancel Duplex Duplex Duplex 10 10 Cancel Binding in Original Back 1 1 OK 2 sided 2 sided Left Right Binding in Finishing Left Right Original Orientation...

Page 141: ...n 10 10 Ready to copy Full Color Top Edge on Left Top Edge on Top Cancel 1 1 OK Duplex Duplex Duplex 10 10 Cancel Binding in Original Back 1 1 OK 2 sided 2 sided Left Right Binding in Finishing Left R...

Page 142: ...t then Down Copies 4 originals onto each page 4 in 1 Left then Down 4 in 1 Down then Right 4 in 1 Down then Left Border Line Sets the boundary line type to a solid line dotted line or positioning mark...

Page 143: ...1 sided Auto 100 Normal 0 Collate Off Functions 10 10 Favorites GB0001_01 GB0016_00 Ready to copy Full Color Combine Off 2 in 1 4 in 1 Others 10 10 Cancel OK GB0016_00 Ready to copy Full Color Combine...

Page 144: ...e 10 10 Cancel Border Line Back 1 1 OK 2 in 1 L to R T to B None Original Orientation Top Edge on Top Ready to copy Full Color GB0017_01 GB0019_00 1 2 Combine Others Combine 10 10 Cancel Border Line B...

Page 145: ...2 Select the function Ready to copy Full Color Functions Original Image Text Photo Close 10 10 EcoPrint Off 0 Full Color Color Selection Hue Adjustment 2 5 Add Edit Shortcut Ready to copy Full Color C...

Page 146: ...ially useful on rich color images Adjust yellow to more green adjust blue to more magenta Original Adjust yellowish red to more yellow adjust bluish cyan to more blue Ready to copy Full Color Function...

Page 147: ...a Original Less Magenta Ready to copy Full Color Functions Color Balance Off Close 10 10 Off 0 Sharpness Background Density Adj 3 5 Add Edit Shortcut Prevent Bleed through Off Ready to copy Full Color...

Page 148: ...inal Grayish Vivid Results in paler color Results in more vivid color Ready to copy Full Color Functions Saturation 0 Close 10 10 Margin Off On Off Continuous Scan Auto Image Rotation 4 5 Add Edit Sho...

Page 149: ...ct the function Ready to copy Full Color Functions Saturation 0 Close 10 10 Margin Off On Off Continuous Scan Auto Image Rotation 4 5 Add Edit Shortcut Ready to copy Full Color Copy Copies Paper Selec...

Page 150: ...g ends press the Interrupt key The machine resumes the paused print jobs NOTE If the machine is left unused for 60 seconds in interrupt copy mode interrupt copying is automatically cancelled and print...

Page 151: ...nting This chapter explains the following topics Printing from Applications 5 2 Printing Data Saved on the Printer 5 6 Private Print 5 6 Proof and Hold 5 8 Automatic Delete Setting for Temporary Docum...

Page 152: ...reated on your computer once you install the printer driver from the included DVD Product Library Refer to Installing Software on page 2 14 For more information about how to configure advanced printer...

Page 153: ...document data 5 Click Print size and select the paper size to use for printing 6 Click OK button to return to the Print dialog box 3 Start printing Click OK button NOTE Click the tabs on the print set...

Page 154: ...related to finishing of printed media including binding and stapling Imaging This tab lets you configure settings related to the quality and color mode of the print results Publishing This tab lets yo...

Page 155: ...t print settings display the printer driver print settings screen and display Help using either of the methods explained below Click the button in the upper right corner of the screen and then click t...

Page 156: ...age 9 23 1 Display the screen 2 Select the creator of the document to print 3 Select the document NOTE RAM disk mode must be enabled RAM disk mode can be used when optional memory has been installed D...

Page 157: ...u wish to delete and press Delete the trash can icon NOTE The password entry screen will be displayed Enter the password using the numeric keys NOTE The password entry screen will be displayed Enter t...

Page 158: ...nter the maximum number of stored jobs You can enter any number between 0 and 50 NOTE RAM disk mode must be enabled RAM disk mode can be used when optional memory has been installed NOTE If you enter...

Page 159: ...ox Job Box Removable Memory Polling Box 10 10 1 1 GB0051_00 GB0650_00 Job Box 10 10 Document Box Proof and Hold Private Print Cancel 1 1 Next 3 1 2 GB0652_00 Job Box Proof and Hold 10 10 Document Box...

Page 160: ...rinter To delete Select the document you wish to delete and press Delete the trash can icon Job Box Proof and Hold 10 10 Document Box doc 100831170814 doc 100831170850 Back Print Menu 1 1 Cancel doc 1...

Page 161: ...ours 1 day Documents are deleted after 1 day 1 week Documents are deleted after 1 week NOTE This function is valid for documents saved after the function is set Regardless of this function setting tem...

Page 162: ...5 12 Printing Printing Data Saved on the Printer...

Page 163: ...y One Touch Key 6 17 Entering a New E mail Address 6 18 Specifying a New PC Folder 6 19 Checking and Editing Destinations 6 22 Sending to Different Types of Destinations Multi Sending 6 23 Registering...

Page 164: ...ent Register the destination in the Address Book or One Touch keys Create a share folder in the destination computer when a folder SMB FTP is selected as the destination Consult your network administr...

Page 165: ...refer to Specifying Destination on page 6 15 NOTE If the touch panel is turned off press the Energy Saver key or the Power key and wait for the machine to warm up Auto Color Automatically recognizes w...

Page 166: ...lay the sending functions to use For details refer to Sending Functions on page 6 36 6 Start sending Press the Start key to start sending Send Dest Recall Check E mail One Touch Key Address Book Ext A...

Page 167: ...ight click My Computer and select Properties The System Properties dialog box appears Click the Computer Name tab in the window that appears 2 Check the computer name Check the computer name in the wi...

Page 168: ...r logging onto Windows 1 Display the window From the Start menu select All Programs or Programs Accessories and then Command Prompt The Command Prompt window appears 2 Check the domain name and user n...

Page 169: ...n In Windows XP right click the scannerdata folder and select Sharing and Security or Sharing NOTE If there is a workgroup in System Properties configure the settings below to limit folder access to a...

Page 170: ...are this folder and click the Permissions button 2 3 Enter the user name in the text box Click the Location button and select the desired location To select the search target click a location to selec...

Page 171: ...screen 6 In Windows XP click the Security tab and then click the Add button 7 Proceed in the same way as in step 3 to add a user to Group or user names 8 Select the added user select the Modify and R...

Page 172: ...you checked pc001 and then click Search 2 Click pc001 scannerdata that appears in the search results In Windows XP double click the computer pc001 that appears in the search results 2 Check the folder...

Page 173: ...sharing 1 From the Start menu select Control Panel System and Security and Allow a program through Windows Firewall 2 Select the File and Printer Sharing checkbox 2 Add a port 1 From the Start menu se...

Page 174: ...6 12 Sending Preparation for Sending a Document to a PC 2 3 4 5 1 2...

Page 175: ...6 13 Sending Preparation for Sending a Document to a PC 6 Select Specific local ports and enter 139 7 8 Make sure all checkboxes are selected 2 3 1 1 2 1 2...

Page 176: ...Center and then Check Firewall Status or Windows Firewall If the User Account Control dialog box appears click the Continue button 2 Click the Exceptions tab and then the Add port button 3 Specify Add...

Page 177: ...d destinations are indicated by a checkmark in the check box NOTE When the optional fax kit has been installed you can specify the fax destination Enter the other party s number using the numeric keyp...

Page 178: ...eckbox to clear the check mark GB0426_00 Address Book All 10 10 002 Back OK Cancel Menu 1 1 003 004 001 Ready to send Sales department 1 Sales department 1 Support department Support department 012345...

Page 179: ...efer to Checking and Editing Destinations on page 6 22 NOTE For more information on adding One Touch keys refer to Adding a Destination on One Touch Key on page 6 33 GB0055_00 Send Dest Recall Check E...

Page 180: ...es can be specified You can register the entered email address in the Address Book by pressing Menu and then Add to Address Book You can also replace the information for a previously registered destin...

Page 181: ...Shared Folder on page 6 7 for details on how to share a folder Be sure that SMB Protocol or FTP in the COMMAND CENTER is On For details refer to the KYOCERA COMMAND CENTER Operation Guide Item Data t...

Page 182: ...dd to Address Book Login User Name User name to access the PC Domain name User name For example abcdnet james smith User name Domain name For example james smith abcdnet Up to 64 characters Login Pass...

Page 183: ...ccept the destinations Destinations can be changed later Refer to Checking and Editing Destinations on page 6 22 GB0128_00 Folder Confirmation abc 10 10 Cancel Ready to send Path Port Login User Name...

Page 184: ...st BBB bbb abc com Check E mail One Touch Key Address Book Ext Address Book FAX Folder Functions 10 10 1 2 Favorites Check 10 10 Ready to send BBB AAA Menu 1 1 End bbb abc com abcdefg Deletes the sele...

Page 185: ...uires the optional fax kit No of broadcast items E mail Up to 100 Folders SMP FTP Total of 5 SMB and FTP FAX Up to 100 Also depending on the settings you can send and print at the same time Procedures...

Page 186: ...ew destination 3 Select the registration method NOTE If user login administration is enabled you can only edit destinations in the Address Book by logging in with administrator privileges Contact addr...

Page 187: ...the lowest available number 6 Enter the destination Select the type of destination to register For details on FAX refer to FAX Operation Guide E mail Address Enter the E mail address Up to 128 charact...

Page 188: ...entry 3 The Folder FTP Address 1 Enter Host Name Path Port Login User Name and Login Password For more information refer to Specifying a New PC Folder on page 6 19 SMB 10 10 Ready to send Path Port Lo...

Page 189: ...entry 3 7 Register the destination Menu Connection Test 10 10 Close 1 1 FTP 10 10 Ready to send Path Port Login User Name Host Name 21 1 2 abc abc abc GB0709_03 GB0696_00 2 1 3 FTP 10 10 Ready to send...

Page 190: ...n is enabled you can only edit destinations in the Address Book by logging in with administrator privileges Designations in the group can also be registered in the system menu Send Dest Recall Check E...

Page 191: ...e selected destinations are indicated by a checkmark in the check box You can specify a destination by address number by pressing the Quick No Search key GB0057_16 1 2 Address Number 10 10 Ready to se...

Page 192: ...he check mark Menu Narrow Down 10 10 Search Name Search No Sort Name 1 2 GB0396_00 Address Book Contact 10 10 Ready to send 1 2 001 Sales department 1 0123456 001 Sales department 1 abc 002 Support de...

Page 193: ...E mail One Touch Key Address Book Ext Address Book FAX Folder Functions 10 10 1 2 Favorites Ready to send Address Book All 10 10 Ready to send 1 1 001 001 002 002 Back OK Menu Cancel Sales department...

Page 194: ...Sales department 1 1 1 0123456 Support department 0234567 Edit Confirm Support department 10 10 Ready to send Address Number Member Name Auto 1 1 Member 2 GB0787_00 GB0114_04 1 3 2 4 Edit Confirm Sup...

Page 195: ...ssing the Quick No Search key System Menu Counter System Menu Send 10 10 Document Box FAX Address Book One Touch 3 5 Address Book 10 10 System Menu Counter One Touch Key Back 1 1 Address Book Defaults...

Page 196: ...n entering characters 5 Register the destination Address Book All 10 10 System Menu Counter Sales department 1 Menu 1 2 Next 0123456 Sales department 1 abc Support department 0234567 Support departmen...

Page 197: ...k One Touch 3 5 Address Book 10 10 System Menu Counter One Touch Key Back 1 1 Address Book Defaults Print List Address Book One Touch GB0411_00 GB0054_02 2 3 1 Use or to scroll up and down 10 10 Edit...

Page 198: ...Color Selection X page 3 59 Select original image type for best results Original Image X page 3 52 Emphasize the outline of texts or lines Blur the image outline Sharpness X page 3 53 Darken or light...

Page 199: ...agaki Original Size and the size you wish to send as are the same different Original Size Specify as necessary Specify as necessary Sending Size Select Same as Original Select the required size Zoom S...

Page 200: ...or Others Select the desired size Sending Size Metric 10 10 Ready to send A4 A5 A6 A3 Back Cancel 1 3 OK Ready to send Sending Size Same as Original Size Metric Inch Others 10 10 Cancel OK GB0071_00...

Page 201: ..._001 pdf abc_002 pdf is attached to the end of the file name Functions 2 sided Book Original 1 sided Close 10 10 Sending Size 300x300dpi Off File Separation Scan Resolution 2 6 Same as Original Size A...

Page 202: ...and the body can include up to 500 characters Functions Continuous Scan Off Close 10 10 File Name Entry Off Off E mail Subject Body Job Finish Notice 5 6 doc Add Edit Shortcut Ready to send Send Dest...

Page 203: ...Secure Protocol settings For details refer to Secure Protocol on page 9 22 Functions FTP Encrypted TX Close 10 10 FAX Delayed Transmission Off Off FAX Direct Transmission FAX Polling RX 6 6 Off Add E...

Page 204: ...llation screen When Your devices are ready to use is displayed on the screen the installation is completed Using WSD 1 Press the Send key 2 Place the originals For details refer to Loading Originals o...

Page 205: ...Scan Functions 10 10 2 2 Favorites Ready to send GB0055_01 Send Dest Recall Check E mail One Touch Key Address Book Ext Address Book FAX Folder Functions 10 10 1 2 Favorites Ready to send GB0055_00 1...

Page 206: ...44 Sending WSD Scan Procedure from Your Computer 1 2 Use the software installed on the computer to send the images GB0648_00 WSD Scan 10 10 Ready to send From Operation Panel From Computer Cancel 1 1...

Page 207: ...ows NOTE For selecting the machine see the Operation Guide or Help for each application software Item Detail Original Configurations Original Size Select the scan size of the original Original Orienta...

Page 208: ...s is used to check current settings and store frequently used settings When the Configuration button is clicked a setting screen opens with buttons for Details Add current configuration and Delete sel...

Page 209: ...cs Printing Documents Stored in Removable USB Memory 7 2 Saving Documents to USB Memory Scan to USB 7 5 Removing USB Memory 7 8 Functions for Document Box 7 9 Duplex 7 10 Encrypted PDF Password 7 11 J...

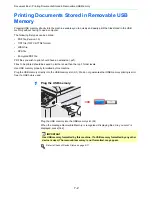
Page 210: ...nsion pdf Files to be printed should be saved no further down than the top 3 folder levels Use USB memory properly formatted by this machine Plug the USB memory directly into the USB memory slot A1 We...

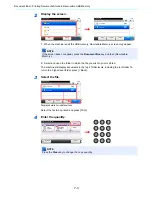
Page 211: ...and press Print 4 Enter the quantity NOTE If the screen does not appear press the Document Box key and then Removable Memory NOTE Press the Clear key to change the copy quantity GB0089_00 Removable Me...

Page 212: ...ns to display other functions For details refer to Functions for Document Box on page 7 9 6 Start printing Press the Start key to start printing Remove the USB memory For details refer to Removing USB...

Page 213: ...t 1 Place the originals For details refer to Loading Originals on page 3 7 2 Plug the USB memory Plug the USB memory into the USB memory slot A1 When the message Removable Memory is recognized Display...

Page 214: ...nt Box key and then Removable Memory NOTE Up to 100 documents and folders can be displayed for each directory If the number of documents and folders in a directory exceeds 100 you will be unable to sa...

Page 215: ...Documents to USB Memory Scan to USB For details refer to Functions for Document Box on page 7 9 6 Start storing Press the Start key to start storing Remove the USB memory For details refer to Removing...

Page 216: ...er to Check of Device Status on page 8 11 IMPORTANT Be sure to follow the proper procedure to avoid damaging the data or USB memory NOTE USB memory can also be removed after checking the status of the...

Page 217: ...t to Page X page 7 13 What do you want to do Reference Page Select the file format for images being stored File Format X page 3 57 Automatically scan 2 sided originals 2 sided Book Original X page 3 3...

Page 218: ...e 7 2 display the screen 2 2 Select the function 2 sided Print a 2 sided document so that the sheets are aligned properly for binding on the left or right 2 sided Print a 2 sided document so that the...

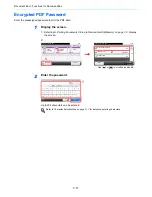
Page 219: ...password Up to 256 characters can be entered Refer to Character Entry Method on page 11 7 for details on entering characters Ready to print from Box Functions Encrypted PDF Password Off Close 10 10 J...

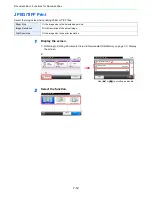
Page 220: ...ion Print at resolution of the actual image Print Resolution Fit the image size to the print resolution Ready to print from Box Functions Encrypted PDF Password Off Close 10 10 JPEG TIFF Print Paper S...

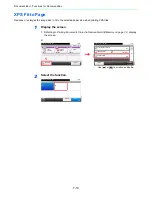
Page 221: ...on page 7 2 display the screen 2 2 Select the function Ready to print from Box Functions Encrypted PDF Password Off Close 10 10 JPEG TIFF Print Paper Size Off XPS Fit to Page 2 2 Add Edit Shortcut Rea...

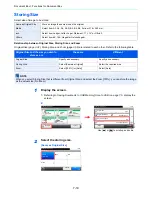
Page 222: ...Original Size and the size you wish to store as are the same different Original Size Specify as necessary Specify as necessary Storing Size Select Same as Original Select the required size Zoom Select...

Page 223: ...or Others Select the desired size Storing Size Metric 10 10 Ready to store in Box A4 A5 A6 A3 Back Cancel 1 3 OK Ready to store in Box Storing Size Same as Original Size Metric Inch Others 10 10 Cance...

Page 224: ...7 16 Document Box Functions for Document Box...

Page 225: ...ils of the Status Screens 8 3 Checking Job History 8 6 Sending the Log History 8 7 Setting the Destination 8 8 Automatic Log History Transmission 8 9 Manual Log History Transmission 8 9 Setting E mail...

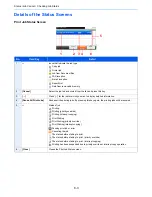
Page 226: ...b Status Screen on page 8 3 Send Job Status screen on page 8 4 Store Job Status screen on page 8 5 and Scheduled Job screen on page 8 5 Print Job Status Copy Printer Printing from Document Box FAX rec...

Page 227: ...pressing this key again the printing jobs will be resumed 5 Status of job Printing Printing priority override Printing interrupt copying Print Waiting Print Waiting priority override Print Waiting in...

Page 228: ...fax job you wish to send immediately and then press Menu followed by Priority Override 3 Cancel Select the job you want to cancel from the list and press this key 4 Press for the job for which you wis...

Page 229: ...inals 5 Close Closes the Store Job Status screen No Display Key Details 1 Icons that indicate the job type Sending Job FAX 2 Menu Pressing this key displays Start Now Select the job you wish to send i...

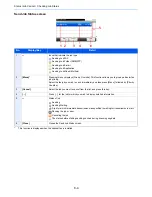
Page 230: ...page 8 7 Print Job Log Copy Printer FAX reception E mail reception Printing from Document Box Job Report List Printing data from removable memory Send Job Log FAX Folder SMB FTP E mail Application Mi...

Page 231: ...ubject on page 8 10 NOTE If user login administration is enabled you can only change the settings by logging in with administrator privileges System Menu Counter System Menu Quick Setup Wizard 10 10 L...

Page 232: ...81_00 Send Log History 10 10 System Menu Counter Auto Sending Back 1 1 Off Destination E mail Report Sending Log History Job Log Subject 1 2 Add Address Book 10 10 System Menu Counter AAA Menu 1 1 OK...

Page 233: ...smission You can also send the log history to the specified destinations manually 1 Display the screen Referring to Sending the Log History on page 8 7 display the screen 2 Send the log history GB0578...

Page 234: ...Referring to Sending the Log History on page 8 7 display the screen 2 2 Enter an E mail subject Up to 60 characters can be entered Refer to Character Entry Method on page 11 7 for details on entering...

Page 235: ...processor or the error information paper jam opened cover etc is displayed Status Job Cancel Status Print Job Log 10 10 Send Job Log Store Job Log Scanner Pause All Print Jobs 2 4 Waiting GB0052_01 2...

Page 236: ...emovable Memory The usage and capacity of the external media connected to this machine are displayed Press Menu and then Format to format external media Press Remove Memory to safely remove the extern...

Page 237: ...e paper in the multi purpose tray is shown by two levels as 100 and 0 If there is no paper in either cassette the paper status will be shown as No Paper Status Job Cancel Status Printer 10 10 FAX Tone...

Page 238: ...8 14 Status Job Cancel Checking the Remaining Amount of Toner and Paper Staple Status You can check the status of staples GB0195_00 Staple OK 10 10 Status Job Cancel Staple 1 1 End...

Page 239: ...33 User Login Settings 9 34 Enabling Disabling User Login Administration 9 35 Local User Authorization 9 41 Adding a User 9 37 Editing and Deleting Users 9 43 Simple Login 9 46 Group Authorization 9 5...

Page 240: ...0 11 00 Samoa 11 00 Universal Coordinated Time 11 10 00 Hawaii 1 24 Cancel OK System Menu Counter Date Timer Date Time 10 10 2010 10 10 10 10 Date Format DD MM YYYY On 09 00 Osaka Sapporo Tokyo Time Z...

Page 241: ...defaults for available settings such as copying and sending Setting the frequently used values as defaults makes subsequent jobs easier IMPORTANT If you want to enable the changed defaults immediately...

Page 242: ...e interface with external devices such as USB hosts or optional interfaces 9 22 Security Level The Security Level setting is primarily a menu option used by service personnel for maintenance work Ther...

Page 243: ...ais Espa ol Italiano Nederlands Portugu s Item Description Status Page Prints the status page allowing you to check the information including current settings available memory space and optional equi...

Page 244: ...aintenance purpose Accounting Report Prints the accounting report allowing you to check the accounts that have been registered on the machine Item Description Send Result Report Automatically print a...

Page 245: ...that is entered at login Up to 64 characters can be entered Access Level Displays the user s access level Account Name Displays the account to which the user belongs E mail Address Changes the user s...

Page 246: ...t settings shown below are selected the media indicated for each setting cannot be selected Rough Heavy 3 Bond Heavy 3 Thick Extra Heavy Custom 1 to 8 Heavy3 or Extra Heavy Refer to Media Type Setting...

Page 247: ...Value Off On FAX Reception Only NOTE FAX Reception Only is displayed when the optional fax is installed Ready Emit a sound when the warm up is completed Value Off On Warning Emit a sound when errors...

Page 248: ...Setting Select weight for each media type For Custom 1 8 settings for duplex printing and media type name can be changed For details refer to Media Type Setting on page 9 11 Default Paper Source Sele...

Page 249: ...Extra Heavy Weight g m 64 g m or less 60 g m to 75 g m 76 g m to 90 g m 91 g m to 105 g m 106 g m to 128 g m 129 g m to 163 g m 164 g m and more Transpar encies Plain Y Y Y default Y N N N N Transpar...

Page 250: ...300dpi 200 400dpi Super Fine 200 200dpi Fine 200 100dpi Normal Color Selection Copy Select the default copying color mode setting Value Auto Color Full Color Black White Color Select Send Store Select...

Page 251: ...JPEG TIFF Print Select the image size resolution when printing JPEG or TIFF file Value Paper Size Image Resolution Print Resolution XPS Fit to Page Set the default value for the XPS fit to page functi...

Page 252: ...during printing Value Ignore Printing continues without stapling Display Error Error message to cancel printing is displayed NOTE This function requires the optional document finisher Paper Mismatch E...

Page 253: ...rent zoom and the size of the original Same as Original Size Select paper that matches the size of the original regardless the zoom If you want to enable the changed defaults immediately move to the f...

Page 254: ...ation Address Book Ext Address Book One Touch Item Description Emulation Select the emulation for operating this machine by commands oriented to other types of printers Value PCL6 KPDL KPDL Auto KPDL...

Page 255: ...the line feed code character code 0AH Value LF Only LF and CR Ignore LF CR Action Set the character return action when the machine receives the character return code character code 0DH Value CR Only...

Page 256: ...anging the setting restart the system or turn the machine OFF and then ON IPv4 Settings Set up TCP IP IPv4 to connect to the network The IPv4 setting is available when selecting On for TCP IP DHCP Sel...

Page 257: ...TCP IP IPv6 The manual setting is available when selecting On for IPv6 Value IP Address Manual numbers 128 bit in total separated by colons Prefix Length 0 to 128 Default Gateway NOTE Default Gateway...

Page 258: ...using SMB When selecting On set the SMB default Port Number Use the SMB default port 139 For Windows Vista use 445 Value Off On Port 1 65535 LDAP Select whether or not to use LDAP Value Off On SNMP S...

Page 259: ...e Off On After changing the setting restart the system or turn the machine OFF and then ON Item Description WSD Print Select whether or not to use WSD Print Value Off On After changing the setting res...

Page 260: ...etup is available when SSL is On Value HTTP HTTPS HTTPS Only LDAP Security Ext Address Book Select the type of encryption according to the type of security employed by the LDAP server This setup is av...

Page 261: ...ty Normal Copy Priority After changing the setting restart the system or turn the machine OFF and then ON Item Description Date Time Set the date and time for the location where you use the machine If...

Page 262: ...ror after a set amount of time elapses For details refer to Responding to Error Messages on page 10 13 Value Off On Low Power Timer Set amount of time before entering the Low Power mode Value 1 to 240...

Page 263: ...er saving level during printing Adjustment can be made in 5 levels Value 1 to 5 Auto Color Correction This setting allows you to adjust the detection level used by the machine to determine whether the...

Page 264: ...eaking with white lines Takes about 120 seconds Press Start to perform Drum Refresh NOTE Drum Refresh cannot be performed while printing Execute Drum Refresh after the printing is done Calibration Adj...

Page 265: ...paper is loaded into a cassette IMPORTANT Before performing color registration be sure to perform Calibration see page 9 26 If color drift remains perform color registration By performing color regist...

Page 266: ...6 7 8 9 MH F MV 9 8 6 4 2 0 B D F H 7 5 3 1 A C E G I I H G F E D C B A 0 1 2 3 4 5 6 7 8 9 MH R I H G F E D C B A 0 1 2 3 4 5 6 7 8 9 CH F CV 9 8 6 4 2 0 B D F H 7 5 3 1 A C E G I I H G F E D C B A...

Page 267: ...ou cannot use the numeric keys to enter these values 5 Repeat steps 3 and 4 to enter the registration values for each chart 6 Press Start after all values have been entered Color registration begins 7...

Page 268: ...unter System Menu 10 10 Adjustment Maintenance 5 5 2 Correcting Black Line 10 10 System Menu Counter Display Brightness Back 2 4 Off Adjustment Maintenance Color Registration Tone Curve Adjustment 3 3...

Page 269: ...is the 0 position registration for that color is not required For the illustration B is the appropriate value From charts V 1 to V 5 read only the values from V 3 center 2 GB0641_00 Normal 10 10 Syst...

Page 270: ...cannot use the numeric keys to enter these values 5 Repeat steps 3 and 4 to enter the registration values for each chart 6 Press Start after all values have been entered Color registration begins 7 P...

Page 271: ...these steps for the first user login administration For details about the configuration method refer to User Login Settings on page 9 34 1 Enable user login administration 2 Add a user 3 Log out 4 The...

Page 272: ...g in with administrator privileges Refer to Adding a User on page 9 37 for the default login user name and password 1 GB0054_03 System Menu Counter System Menu User Login Job Accounting 10 10 Printer...

Page 273: ...ine Network Authentication User authentication based on Authentication Server Use a user property stored in Authentication Server to access the network authentication login page System Menu Counter Us...

Page 274: ...not login because of the setting of the machine login with any administrator registered in the local user list and correct the settings If the server type is Kerberos only domain names entered in uppe...

Page 275: ...the use of the machine by user Local user authorization must be enabled to use this function see page 9 41 The following restriction items are available Printer Select whether or not to reject usage...

Page 276: ...Authentication Simple login settings User Login Job Acco User Login Setting Local User Authorization Off GB0435_00 10 10 System Menu Counter Admin Menu 1 1 End Admin DeviceAdmin 2500 User Login S Loca...

Page 277: ...A Back 1 2 Save Others 1 2 3 GB0446_00 GB0603_00 Add Confirmation User A 10 10 Cancel Select the item that you want to change Login User Name Login Password Account Name User Name User A Back 1 2 Save...

Page 278: ...ge 10 10 System Menu Counter Default Screen Shortcut 1 1 End English Copy Shared Shortcut 2 Local Authorization Off 10 10 System Menu Counter Printer Full Color Copy Copy Full Color Printer Off Off Ca...

Page 279: ...deleting users see page 9 43 1 Display the screen 1 Referring to User Login Settings on page 9 34 display the screen 2 2 Select On User Login 10 10 System Menu Counter Local User List Back 1 1 Local...

Page 280: ...Menu Counter Default Screen Shortcut 1 1 End English Copy Shared Shortcut GB0749_00 GB0744_00 My Panel Language 10 10 System Menu Counter Deutsch English Cancel 1 3 OK Fran ais Espa ol 1 2 Use or to...

Page 281: ...n User Name User Login 10 10 System Menu Counter Local User List Back 1 1 Local Authentication Simple login settings User Login Job Acco User Login Setting Local User Authorization Off GB0435_00 10 10...

Page 282: ...r Name User A Cancel 1 2 Save Account Name Others GB0441_00 GB0603_00 1 Account Name 10 10 System Menu Counter Others Menu 1 1 OK Cancel 2 Displays details for individual account names Allows you to s...

Page 283: ...nd then Delete User User A 10 10 System Menu Counter E mail Address Access Level My Panel Administrator Cancel 2 2 Save Local Authorization Local Authorization Off 10 10 System Menu Counter Printer Fu...

Page 284: ...n to be registered 1 Display the screen 1 Referring to User Login Settings on page 9 34 display the screen Name Set the user name to display on the Simple Login screen User Select which registered use...

Page 285: ...10 10 System Menu Counter Simple Login Setup Back 1 1 On User Login Job Acc Simple Login Settings 2 GB0710_01 10 10 Menu System Menu Counter 00 03 06 01 04 07 02 05 08 1 3 Simple login settings Simple...

Page 286: ...Keyboard Login User Name Back Next Cancel System Menu Counter Add Network User 10 10 Keyboard Login Password Keyboard Login User Name Back Next Cancel abc System Menu Counter GB0704_00 GB0057_31 2 3...

Page 287: ...n Icon Name User A Off Back 1 1 Save Male 1 System Menu Counter 1 2 Password Login 10 10 System Menu Counter On Off Cancel 1 1 OK GB0645_00 GB0736_00 Add Confirmation User A 10 10 Cancel User Password...

Page 288: ...User Authorization Off 2 GB0710_01 1 GB0712_01 10 10 Menu System Menu Counter 0 0 03 01 04 07 02 05 08 1 1 Simple login settings Simple Login Setup End User A User D User B User E User C 06 None None...

Page 289: ...Icon 1 1 Cancel Save User A User A Off Male 1 Icon 10 10 System Menu Counter Female 2 Basket Trumpet Male 1 Cancel Soccer Piano Car Male 2 Tennis Guitar Bicycle Female 1 1 2 OK GB0739_00 GB0828_01 1 2...

Page 290: ...95 Group Name Enter the name displayed on the group list up to 32 characters Access Level Select Administrator or User for group access privileges Printer Select whether or not to reject usage of prin...

Page 291: ...f user properties If you are using Windows Server 2000 2003 check ADSIEdit ADSIEdit is a support tool in cluded on the installation CD or DVD for Windows Server OS under SUPPORT TOOLS This item is dis...

Page 292: ...evel Printer Group ID Group 01 Administrator Back 1 3 Save Off Cancel GB0460_00 Group ID 10 10 1 4294967295 Cancel OK System Menu Counter 2 3 1 GB0454_00 Add Confirmation 1234567890 10 10 System Menu...

Page 293: ...nter 10 10 System Menu Counter Reject Usage Off Cancel 1 1 OK Add Confirmation 1234567890 10 10 System Menu Counter Group Name Access Level Printer Group ID Group 01 Administrator Back 1 3 Save Off Ca...

Page 294: ...me 1 If using Active Directory of Windows displayName of Attribute may be used as Name 1 Enter the LDAP Attribute to obtain the user name to be displayed from the LDAP server up to 32 characters Name...

Page 295: ...ame Back 1 2 OK Abc GB0692_02 1 GB0439_01 2 3 Obtain NW User LDAP Server Information 10 10 Cancel System Menu Counter Port Name 1 Name 2 Server Name 389 displayName Back 1 2 OK Abc GB0692_02 GB0057_35...

Page 296: ...e of an identical account ID Tracking the print volume for each account and for all accounts combined Restricting the print counter in one page increments up to 9 999 999 copies Resetting the print co...

Page 297: ...9 59 Setup Registration and User Management Job Accounting 4 Other users login for operations GB0725_00 10 10 Login Check Counter Enter the account ID Enter the account ID...

Page 298: ...only change the settings by logging in with administrator privileges Refer to Adding a User on page 9 37 for the default login user name and password GB0054_03 System Menu Counter System Menu User Lo...

Page 299: ...he display returns to the System Menu default screen logout is automatically executed and the screen to enter the Account ID appears To continue the operation enter the Account ID GB0461_00 Job Accoun...

Page 300: ...2 If the user has already registered the account information the account ID entry would be skipped Refer to Adding a User on page 9 37 Logout When the operations are complete press the Logout key to r...

Page 301: ...any as eight digits between 0 and 99999999 Restriction This Prohibits printing scanning or restricts the number of sheets to load Refer to Restricting the Use of the Machine on page 9 67 NOTE Any acco...

Page 302: ...Counter 0 99999999 Cancel OK Add Confirmation Section 01 10 10 Cancel System Menu Counter Account ID Print Total Account Name 00000001 Back 1 2 Save Off Print Full Color Off GB0480_00 1 3 2 GB0476_00...

Page 303: ...m Menu Counter Default Setting Back 2 2 User Login Job Job Accounting Settings GB0461_01 Use or to scroll up and down Job Accounti Accounting List 10 10 System Menu Counter Sales department End Menu 1...

Page 304: ...1 Section 01 10 10 System Menu Counter Account ID Print Full Color Account Name 00000001 Cancel 1 2 Save Off Print Total Off GB0478_00 GB0474_00 1 2 GB0478_01 Account Section 01 Off 10 10 System Menu...

Page 305: ...ll color and black and white copying Copy Full Color Limits the number of pages used for full color copying Printer Total Limits the total number of pages used for color and black and white printing P...

Page 306: ...d Confirmation Section 01 10 10 Cancel System Menu Counter Account ID Print Total Account Name 00000001 Back 1 2 Save Off Print Full Color Off GB0480_01 Use or to scroll up and down Add Confirmation 1...

Page 307: ...he pages used for black and white and full color printing as well as the total pages used You can use by Paper Size to check the number of pages used in the paper size set in Count by Paper Size on pa...

Page 308: ...Copy Total Printer B W Copy B W 222 333 1 3 End 111 Account Sales department 10 10 System Menu Counter Scanned Pages FAX TX Pages FAX TX Time Printed Pages 0 1 1 End 0 00 00 Counter Reset GB0463_00 G...

Page 309: ...copying and printing Total number of pages used for black and white copying and printing When Individual is selected for Copier Printer Count Copy Total number of pages used for copying Total number...

Page 310: ...and User Management Job Accounting 3 Print reports GB0461_02 Job Accounting 10 10 System Menu Counter Print Accounting Report Back 1 2 On Total Job Accounting Each Job Accounting User Login Job Job A...

Page 311: ...er the total of both or each of copying and printing individually The selection may influence restriction on the count and count method Refer to Restricting the Use of the Machine on page 9 67 Countin...

Page 312: ...9 and Printing an Accounting Report on page 9 71 You can also count page use by specifying paper size and media type for example count the number of pages printed in color using A4 paper If All Media...

Page 313: ...low the procedure when the Account ID is unknown 1 Display the screen 2 Select the function GB0054_03 System Menu Counter System Menu User Login Job Accounting 10 10 Printer System Date Timer 4 5 2 Us...

Page 314: ...9 76 Setup Registration and User Management Job Accounting...

Page 315: ...Document Processor 10 6 Solving Malfunctions 10 8 Responding to Error Messages 10 13 Clearing Paper Jams 10 23 Jam Location Indicators 10 23 Multi Purpose Tray 10 24 Inside the Right Cover 1 10 24 Ca...

Page 316: ...ere represent the yellow toner container 1 Remove the old toner container 1 2 3 CAUTION Do not attempt to incinerate the toner container or the waste toner box Dangerous sparks may cause burns NOTE Re...

Page 317: ...10 3 Troubleshooting Toner Container Replacement 2 Prepare the new toner container 1 2 3 3 Install the new toner container 1 2 CLICK...

Page 318: ...g Waste Toner Box Replacement Waste Toner Box Replacement When the touch panel displays Check waste toner box replace the waste toner box 1 Remove the old waste toner box 1 2 2 Install the new waste t...

Page 319: ...the original position open the staple cover and remove the cartridge holder 2 Remove the empty staple cartridge 3 Insert the new staple cartridge 4 Re install the staple cartridge holder The staple ca...

Page 320: ...d detergent Document Processor If black streaks or dirt appears in copies when using the document processor clean the slit glass with the supplied cleaning cloth 1 Wipe the slit glass Caution For safe...

Page 321: ...10 7 Troubleshooting Cleaning 2 Wipe the white guide...

Page 322: ...tor plates 3 7 When placing originals in the document processor place them face up 3 9 Check that the application software is correctly operated Printouts are too light Is the paper damp Replace the p...

Page 323: ...so contact your service representative Paper often jams Is the paper loaded correctly Load the paper correctly 3 2 Change the orientation in which the paper is positioned 1 15 3 3 3 7 Is the paper of...

Page 324: ...Super when sending an image 3 51 Printouts have lines Is the slit glass dirty Clean the slit glass 10 6 Run Laser Scanner Cleaning 9 26 Dirt on the top edge or back of the paper Check interior of the...

Page 325: ...em Menu Counter key Adjustment Maintenance Service Setting DEV CLN and then press Start Irregular horizontal lines appear in the image Press the System Menu Counter key Adjustment Maintenance Service...

Page 326: ...nd access privileges under the folder properties 6 7 Has the SMB protocol been set to On Set the SMB protocol setting to On 2 23 Has the Host Name been entered properly Check the name of the computer...

Page 327: ...he multi purpose tray Is the paper of the selected size loaded in the multi purpose tray Load paper Press Paper Selection to select the other paper source Press Continue to print on the paper in the c...

Page 328: ...Did you select a paper size type that cannot be stapled Press Paper Selection to select the available paper Press Continue to print without using Staple function Cassette failure Contact your Service...

Page 329: ...nance Service Setting and then Reset Disable Function Mode Press Execute to perform Reset Disable Function Mode Finisher tray is full of paper Is the acceptable storage capacity exceeded for the docum...

Page 330: ...f time elapses Is the acceptable printing count restricted by Job Accounting exceeded The printing count exceeded the acceptable count restricted by Job Accounting Cannot print any more This job is ca...

Page 331: ...umes automatically after a set amount of time elapses Unable to continue the job as the memory is used up Press Continue to print the scanned pages The print job cannot be processed completely Press C...

Page 332: ...able memory that can be written to An error occurred in the removable memory The job stopped Press End The possible error codes and their descriptions are as follows 01 The amount of data that can be...

Page 333: ...the document finisher run out of staples If the staples are depleted the machine will stop and the location of staple depletion will be indicated on the touch panel Leave the machine on and follow the...

Page 334: ...e Warning low memory Job cannot be started Try again later Code Error Corrective Actions Reference Page 1101 Failed to send the e mail Check the host name of the SMTP server on the COMMAND CENTER 2 24...

Page 335: ...iled to send the e mail Check the sender address of SMTP on the COMMAND CENTER 2 24 1131 Failed to send via FTP Select On of the secure protocol settings on the COMMAND CENTER 2 24 1132 Failed to send...

Page 336: ...is not operating properly 2204 Failed to send the e mail Check the e mail size limit of the SMTP settings on the COMMAND CENTER 2 24 3101 Failed to send the e mail Check the authentication methods of...

Page 337: ...eference Page 1 Clear the paper jammed in the multi purpose tray 10 24 2 Clear the paper jammed in right cover 1 10 24 3 Clear the paper jammed in cassette 1 10 25 4 Clear the paper jammed in right co...

Page 338: ...below to clear paper jams in the multi purpose tray Inside the Right Cover 1 Follow the steps below to clear paper jams inside the right cover 1 1 2 Caution The fixing unit is extremely hot Take suff...

Page 339: ...5 Troubleshooting Clearing Paper Jams 3 Cassette 1 Follow the steps below to clear paper jams in cassette 1 Inside the Right Cover 3 Follow the steps below to clear paper jams inside the right cover 3...

Page 340: ...hooting Clearing Paper Jams Cassette 2 or 3 Follow the steps below to clear paper jams in cassette 2 or 3 Optional Document Finisher Follow the steps below to clear paper jams in the optional document...

Page 341: ...ng Clearing Paper Jams Optional Document Finisher Staple Jam Follow the steps below to clear staple jams in the optional document finisher 1 2 3 Bridge Unit Follow the steps below to clear paper jams...

Page 342: ...10 28 Troubleshooting Clearing Paper Jams Document Processor Follow the steps below to clear paper jams in the document processor 1 2 3...

Page 343: ...Ethernet Board 11 5 USB Keyboard 11 5 Optional Function 11 5 Character Entry Method 11 7 Paper 11 10 Basic Paper Specifications 11 11 Choosing the Appropriate Paper 11 11 Special Paper 11 14 Specifica...

Page 344: ...pment Overview of Optional Equipment The following optional equipment is available for the machine Document Finisher Paper Feeder double cassette Paper Feeder single cassette FAX Kit Expansion Memory...

Page 345: ...receive is enabled Also it is possible to use it as a network fax by using it with a computer For further details refer to Fax Kit Operation Guide Expansion Memory To expand the printer memory for mor...

Page 346: ...from the machine Then carefully push out the two socket clamps Ease the memory module out of the socket to remove Verifying the Expanded Memory To verify that the memory module is working properly te...

Page 347: ...isted below are installed on this machine You can use these applications for a limited period on a trial basis UG 33 ThinPrint This application can only be activated in Europe This application allows...

Page 348: ...application as a trial select Trial IMPORTANT If you change the date time while using an application you will no longer be able to use the application System Optional Function 10 10 System Menu Count...

Page 349: ...d characters 2 Keyboard Press the character to enter 3 ABC Symbol Select the characters that are entered To enter symbols or numbers select Symbol 4 A a a A Press to switch between upper case and lowe...

Page 350: ...e Letter Entry Screen Number Symbol Entry Screen No Display Key Description 13 S T To enter a number or symbol not shown in the keyboard press the cursor key and scroll the screen to view other number...

Page 351: ...from lower case to upper case letters press a A To shift from upper case to lower case letters press A a 2 Enter A 1 To enter numbers or symbols press ABC to display Symbol 3 Register the characters...

Page 352: ...r 60 to 256 g m Letter R Letter Statement R Executive A4 R A4 A5 R A6 R B5 R B5 B6 R Folio 16K R 16K Other sizes Portrait 3 7 8 to 11 5 8 or 98 to 297 mm Landscape 5 7 8 to 17 or 148 to 432 mm 100 80...

Page 353: ...ially delicate Use of paper in any of these conditions will not only deliver poor copies but may also cause jams and shorten the useful life of the machine Choose paper with a smooth and even surface...

Page 354: ...to be supplied at once accidentally and may also cause blurring or other printing problems if the toner fails to adhere correctly Thickness Avoid using paper that is too thick or thin Signs that pape...

Page 355: ...re paper where it is exposed to heat sunlight or dampness Other Paper Specifications Porosity The density of the paper fibers Stiffness Paper must be stiff enough or it may buckle in the machine causi...

Page 356: ...on and quality of special paper Thus special paper is more likely than regular paper to cause printing problems Before purchasing special paper in volume try testing a sample to ensure the print quali...

Page 357: ...by the force applied in the machine The carrier sheet bears the top sheet until the label is used This composition of labels may cause more problems The label surface must be covered completely with...

Page 358: ...amage may be caused if the paper covering the adhesive comes off in the machine Do not use envelopes with certain special features For example do not use envelopes with a grommet for winding a string...

Page 359: ...y or medium quality paper is coated with special agents that improve ink adhesion by making the paper surface smoother These agents are used either to coat both sides of the paper or just one side The...

Page 360: ...stom 1 to 8 Paper Size Cassette Ledger Letter R Letter Legal Statement R Oficio II A3 A4 R A4 A5 R B4 B5 R B5 Folio 216 340 mm 8K 16K R 16K Multi Purpose Tray Maximum Ledger A3 Minimum Statement R A6...

Page 361: ...25 sheets min 25 sheets min Letter R A4 R 14 sheets min 14 sheets min 17 sheets min 17 sheets min Ledger A3 8 sheets min 10 sheets min 9 sheets min 13 sheets min Legal B4 9 sheets min 10 sheets min 10...

Page 362: ...s or less Resolution 600 600 dpi Operating System Windows XP Windows Server 2003 Windows Vista Windows 7 Windows Server 2008 Apple Macintosh OS X Page Description Language PRESCRIBE Emulations PCL6 PC...

Page 363: ...cription Paper Supply Method Friction Feed No Sheets 500 80 g m 1 cassette Paper Size Ledger Letter R Letter Legal Statement R Oficio II A3 A4 R A4 A5 R B4 B5 R B5 Folio 216 340 mm 8K 16K R 16K Suppor...

Page 364: ...olio 216 340 mm 8K 250 sheets Letter Letter R Executive R Statement R A4 A4 R B5 B5 R A5 R 16K 500 sheets Supported Paper Weight 52 to 256 g m Stapling 90 g m or less Maximum Sheets for Stapling Ledge...

Page 365: ...is used allows devices to automatically recognize each other without an IP address being specified or DNS server being set Bonjour also sends and receives network packets by UDP port 5353 If a firewal...

Page 366: ...the strongest without any other colors Gray levels are displayed in numerical levels that is white and black only for 1 bit 256 gray levels including white and black for 8 bits and 65 536 gray levels...

Page 367: ...m the server in which the mail is stored on the Internet or an intranet PostScript A page description language developed by Adobe Systems It enables flexible font functions and highly functional graph...

Page 368: ...g to Off TCP IP Transmission Control Protocol Internet Protocol TCP IP is a suite of protocols designed to define the way computers and other devices communicate with each other over a network TCP IP...

Page 369: ...gistration 9 25 Color Selection 3 59 Color Toner Empty Action 9 14 Combine 4 12 2 in 1 4 12 4 in 1 4 12 Border Line 4 12 COMMAND CENTER 2 23 Connecting LAN Cable 2 10 Power Cable 2 11 USB Cable 2 11 C...

Page 370: ...sion Protocol Detail 9 20 FTP Encrypted TX 6 41 FTP Server Reception Protocol Detail 9 20 G Glossary 11 23 GPL LGPL 1 9 Grayscale 3 59 11 24 H Handles 2 2 2 4 Help 11 24 Help Screen 3 28 Host Name 9 1...

Page 371: ...11 5 Optional Memory 9 23 Option Interface 2 4 Original Image 3 52 Original Loaded Indicator 2 3 Original Orientation 3 34 Originals Custom Original Size 9 9 Loading Originals 3 7 Original Auto Detect...

Page 372: ...olor TIFF Compression 9 16 Default Screen 9 16 Dest Check before Send 9 15 Entry Check for New Dest 9 15 Send and Forward 9 16 Sharpness 3 53 Shortcuts Editing and Deleting 3 24 Registering 3 22 Using...

Page 373: ...9 37 Editing and Deleting 9 43 Enabling Disabling 9 35 Group Authorization 9 52 Local User Authorization 9 41 My Panel 9 42 Obtain Network User Property 9 56 Simple Login 9 46 User Property 9 7 W Was...

Page 374: ...Index 6...

Page 375: ......

Page 376: ...Brazil...

Page 377: ......

Page 378: ...Rev 2 2011 7 2K0KMEN002...

Reviews: