2JZ/2JX/2JV/2H7-1
1-2-16
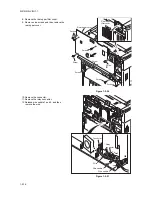
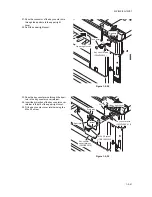
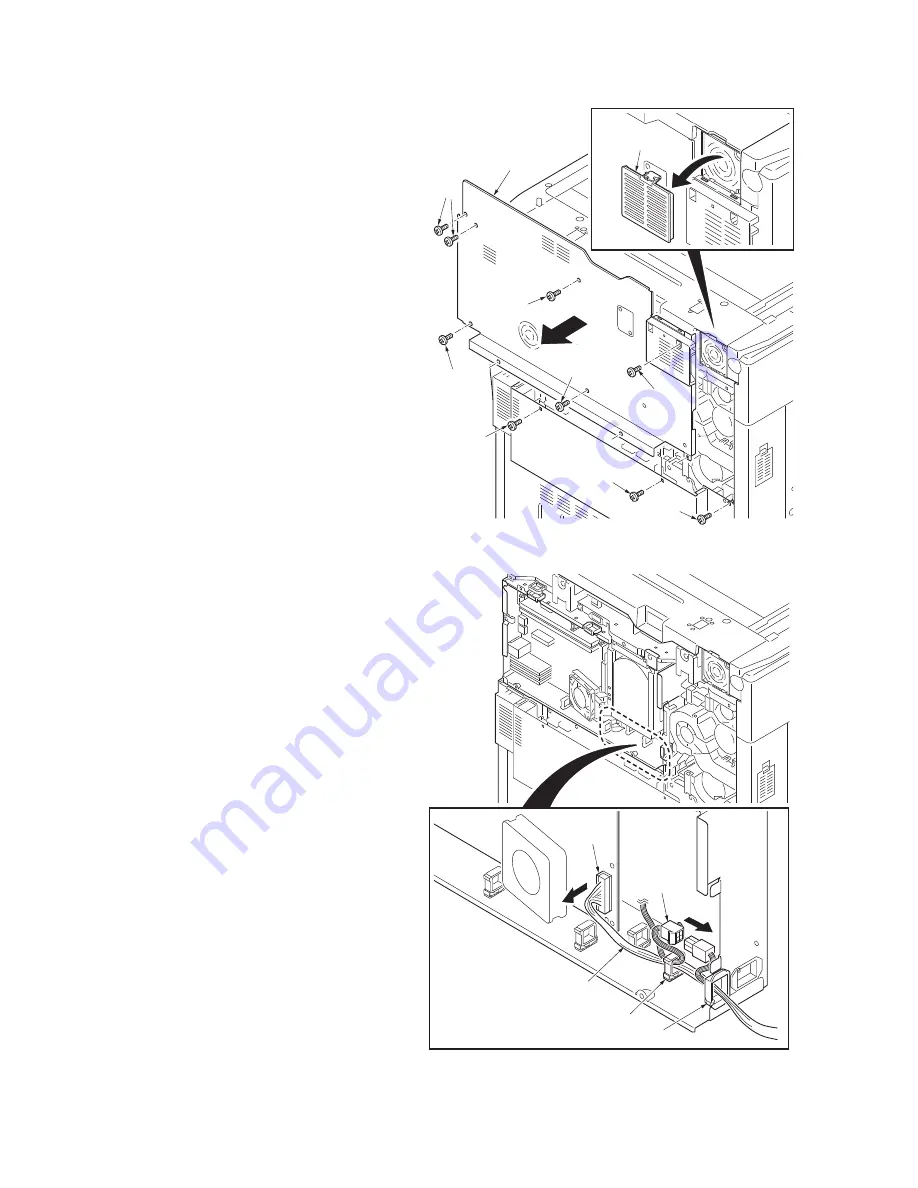
8. Remove the rear upper filter cover.
9. Remove nine screws and then remove the
rear upper cover.
Figure 1-2-20
10. Remove the connector.
11. Remove the relay connector.
12. Release wire saddle 1 and 2, and then
remove the wire.
Figure 1-2-21
Rear upper
filter cover
Screws
Screw
Screw
Screw
Screw
Screw
Screw
Screw
Rear upper cover
Relay
connector
Connector
Wire saddle 1
Wire saddle 2
Wire
Summary of Contents for TASKalfa 250ci
Page 4: ...This page is intentionally left blank ...
Page 10: ...This page is intentionally left blank ...
Page 14: ...2JZ 2JX 2JV 2H7 This page is intentionally left blank ...
Page 296: ...2JZ 2JX 2JV 2H7 1 4 78 This page is intentionally left blank ...
Page 348: ...2JZ 2JX 2JV 2H7 1 5 52 This page is intentionally left blank ...
Page 354: ...2JZ 2JX 2JV 2H7 1 6 6 This page is intentionally left blank ...
Page 378: ...2JZ 2JX 2JV 2H7 2 1 24 This page is intentionally left blank ...
Page 388: ...2JZ 2JX 2JV 2H7 2 2 10 This page is intentionally left blank ...
Page 390: ...2JZ 2JX 2JV 2H7 1 2 3 2 Power source PWB ...
Page 395: ...2JZ 2JX 2JV 2H7 1 2 3 7 Engine PWB ...
Page 412: ...2JZ 2JX 2JV 2H7 1 2 3 24 Main PWB ...
Page 430: ...2JZ 2JX 2JV 2H7 1 2 3 42 Feed PWB 40 40 50 40 ppm model Feed PWB 25 25 30 30 ppm model ...
Page 450: ...2JZ 2JX 2JV 2H7 2 4 8 ...
Page 493: ...INSTALLATION GUIDE FOR PAPER FEEDER ...
Page 503: ...INSTALLATION GUIDE FOR 3000 SHEETS PAPER FEEDER ...
Page 558: ...INSTALLATION GUIDE FOR CENTER FOLDING UNIT ...
Page 572: ...INSTALLATION GUIDE FOR MAILBOX ...
Page 580: ...INSTALLATION GUIDE FOR HOLE PUNCH UNIT ...
Page 592: ...INSTALLATION GUIDE FOR JOB SEPARATOR ...
Page 602: ...INSTALLATION GUIDE FOR FAX System ...
Page 619: ...INSTALLATION GUIDE FOR DT 710 ...
Page 622: ...INSTALLATION GUIDE FOR DUCT UNIT ...
Page 625: ......
Page 626: ......

