background image

9.INSTALLATION MAINTENANCE

Repairing Client Software    177

9 INSTALLATION MAINTENANCE

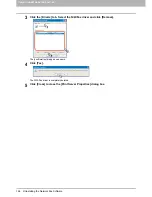
5

Select [Repair] and click [Next].

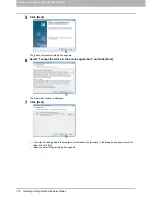
6

Click [Install].

Repairing files starts.

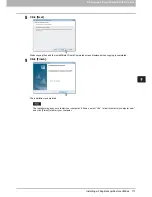
7

Click [Finish] to close the wizard.

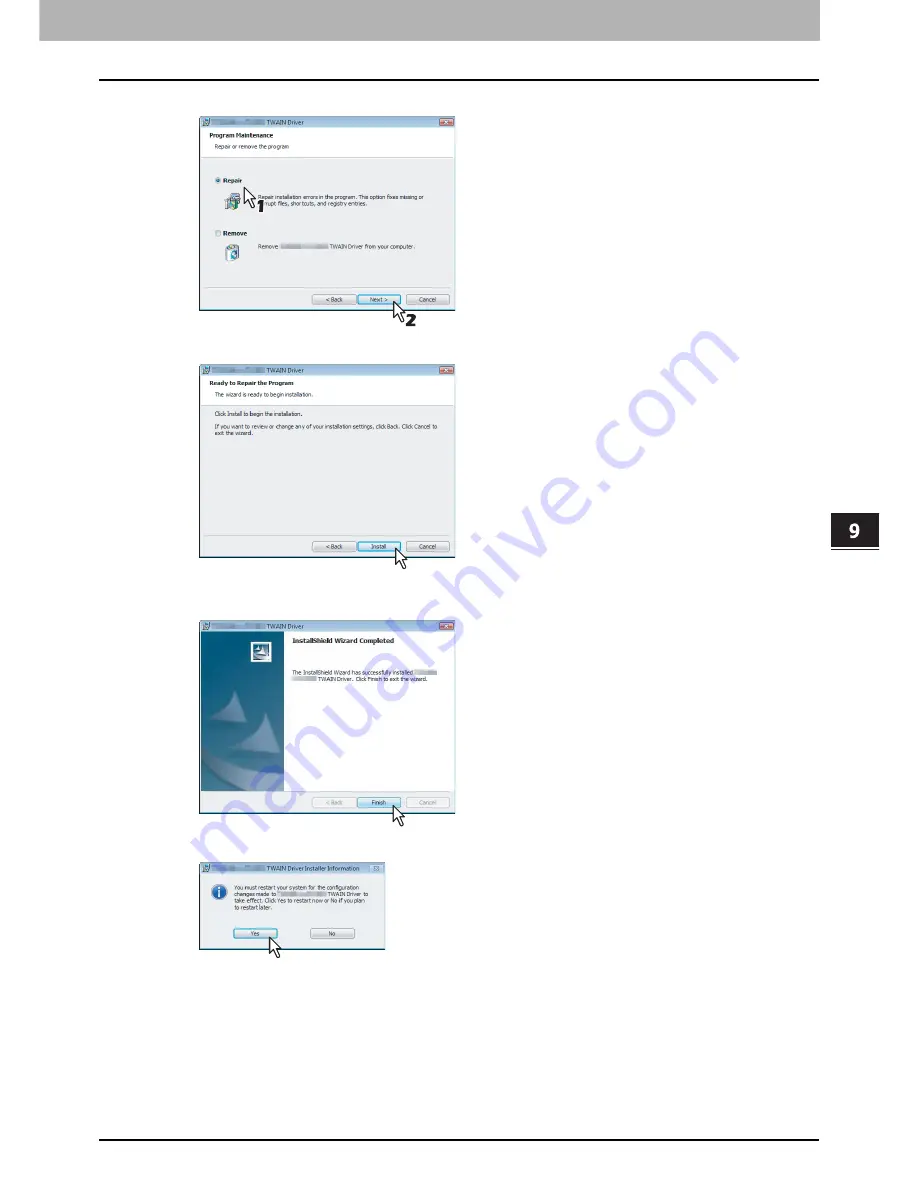
8

The installer ask you to restart your computer. Click [Yes] to restart your computer. 

Summary of Contents for TASKalfa 550c

Page 1: ...MULTIFUNCTIONAL DIGITAL SYSTEMS Software Installation Guide ...

Page 2: ... 2009 KYOCERA MITA CORPORATION All rights reserved ...

Page 3: ...osoft Windows Server 2003 Operating System y The official name of Windows Server 2008 is Microsoft Windows Server 2008 Operating System y Microsoft Windows Windows NT and the brand names and product names of other Microsoft products are trademarks of Microsoft Corporation in the US and other countries y Apple AppleTalk Macintosh Mac Mac OS Safari TrueType and LaserWriter are trademarks of Apple In...

Page 4: ......

Page 5: ...r drivers 32 System requirements 32 About installation procedure 32 Installing the Printer Drivers 34 Other Installations 48 USB printing 48 Point and Print 56 IPP printing 57 Novell iPrint 70 Web Service Print 71 Uninstalling Printer Drivers 76 Windows Vista Server 2008 76 Windows 2000 XP Server 2003 78 Chapter 4 INSTALLING PRINTER DRIVERS FOR MACINTOSH About the Installation 80 About client soft...

Page 6: ...Uninstalling Scan Driver and Utilities 147 Chapter 7 INSTALLING NETWORK FAX UTILITIES Before Installation 150 Type of network fax utilities 150 System requirements 150 Installing Network Fax Utilities 151 Installing Web Service Print 156 Web Service Print 156 Uninstalling the Network Fax Software 161 Deleting the N W Fax driver 161 Deleting AddressBook Viewer 165 Chapter 8 INSTALLING e Filing BACK...

Page 7: ...lient CD ROM 6 For Windows 6 For Macintosh 7 For UNIX Linux 7 Contents of Installer 8 Precautions for using Firewall Software 9 Downloading Software from COMMAND CENTER 10 Setting up the NetWare in NDS mode 15 Setting up the NetWare in NDPS mode 16 Setting up the NetWare in iPrint mode 20 ...

Page 8: ...2008 for each language version by Add Printer Wizard or Plug and Play y Client Utilities CD ROM Client Drivers XPS XP_VISTA_X64 language This includes the setup files to install the XPS printer driver on the Windows XP Vista Server 2003 Server 2008 64 bit edition for each language version by Add Printer Wizard or Plug and Play The XPS printer driver can be installed on Windows Vista Server 2008 co...

Page 9: ...the Tar file for Solaris v2 6 2 7 7 8 8 9 HP UX filter y Client Utilities CD ROM Admin HP UXFilter Usa This includes the Tar file for HP UX ver 10 20 11 x and HP UX64 ver 11 31 AIX filter y Client Utilities CD ROM Admin AIXFilter Usa This includes the Tar file for AIX 4 3 3 Linux filter y Client Utilities CD ROM Admin LinuxFilter Usa This includes the Tar file for Red Hat 7 x 8 x 9 x Red Hat Enter...

Page 10: ...to your hard disk Remote Scan driver This software allows you to perform scanning the originals set in the equipment remotely from a client computer and acquire the image into the TWAIN compliant application WIA driver This software allows you to perform scanning the originals set in the equipment remotely from a client computer and acquire the image into the WIA compliant application N W Fax driv...

Page 11: ...ommunications and the execution files are given as follows Use this information for the exception setting of the firewall software Individual installer setup exe Launcher installer Setup exe Printer driver N W FAX driver printui exe File Downloader ESFileDL exe AddressBook Viewer ABVExe exe for 32 bit edition ABVExe6 exe for 64 bit edition Backup Restore Utility ESeFBKRT exe y For a TWAIN driver R...

Page 12: ...Windows Server 2003 that the Service Pack is installed the installation from COMMAND CENTER cannot be performed In that case please install the software in the other method y For instructions on how to upload the software in the equipment please refer to the COMMAND CENTER Guide Downloading installer for Windows from COMMAND CENTER 1 In COMMAND CENTER click the Install Software link at the bottom ...

Page 13: ...tains the installer for AddressBook Viewer for Windows 64 bit edition OSs Drivers contains the printer drivers and N W Fax driver FD contains the installer for File Downloader RS contains the installer for Remote Scan driver XPS contains the installer for XPS printer driver NWFAX contains the installer for N W Fax driver PCL6 contains the installer for PLC6 printer driver PS3 contains the installe...

Page 14: ...ND CENTER 3 Click the File Name link that you want to download HS_Series dmg gz Click this link to download the PPD file for Mac OS X 10 2 4 to Mac OS X 10 5 x 4 Download the PPD file of your Mac OS version on your desktop by following the prompts ...

Page 15: ...lick the Install Software link at the bottom of the screen The Install Client Software page opens 2 Click the Unix Filters link The software components list is displayed 3 Click the UNIX Linux filter link that you want to install 4 Download the UNIX Linux tar file containing the UNIX Linux filters on your desktop by following the prompts ...

Page 16: ...vell printing services y NetWare 6 0 6 5 NDS mode over IPX SPX only y NetWare 6 0 6 5 NDPS mode y NetWare 6 0 6 5 iPrint mode This chapter provides an overview of how to set up this equipment as a Novell Network Printer Print Server or NDPS Printer Agent For more detailed information refer to your Novell documentation ...

Page 17: ...t menu and select Create The New Object dialog box appears 8 In the Class of new object list select Printer and click OK The Create Printer dialog box appears 9 Enter the printer name select the Define additional properties check box and click Create 10 Display the Assignments window and click Add The Select Object dialog box appears 11 Select a created queue and click OK 12 Display the Configurat...

Page 18: ...s for this equipment and for any computers that will print to it when used in the TCP IP network y In the equipment setup enable TCP IP and enter the IP address Subnet mask and Gateway address for this equipment when used in the TCP IP network Setting up the NDPS with NetWare Administrator 1 In NetWare Administrator select the container object to create the printer and click the Object menu and se...

Page 19: ...ge y To install the PS3 printer driver locate CD ROM drive Client Drivers PS W2K_XP_VISTA language When using 64 bit edition of each Windows XP Vista Server 2003 Server 2008 select the following folder To install the PCL6 printer driver locate CD ROM drive Client Drivers PCL6 XP_VISTA_X64 language To install the PS3 printer driver locate CD ROM drive Client Drivers PS XP_VISTA_X64 language 15 Clic...

Page 20: ...onfigure Port Handler for Printer Agent dialog box select Novell LPR Printer Gateway SNMP or Remote LPR on IP and click Next 2 Enter the IP address of this equipment in the Host Address box and click Finish It takes about 60 seconds to load the Printer Agent After it finishes loading the Printer Agent the Select Printer Drivers dialog box appears 3 Select the printer drivers to be installed in the...

Page 21: ...ct Printer Drivers dialog box appears The NDS queue must be created 3 Select the printer drivers to be installed in the Printer Drivers list at each OS tab and click Continue The Information dialog box appears 4 Click OK It takes about 60 seconds to complete the creation of the NDPS Printer object 5 Double click the NDPS Printer object that you created The NDPS Printer dialog box appears 6 Click N...

Page 22: ...nt P 20 Installing iPrint 2 Enabling the DNS on the Printer Services Manager P 20 Enabling DNS on the Printer Services Manager 3 Enabling iPrint service P 21 Enabling iPrint Service Installing iPrint 1 Click Novell in the GUI screen of NetWare and select Install 2 Click Add If the iPrint NDPS is displayed in the list iPrint has already been installed during the installation of NetWare In that case...

Page 23: ...rnet Explorer 6 SP1 or later Recommended Netscape 7 1 or later Mozilla 1 4 or later 1 Enter the URL https IP address 2200 in the address bar of your browser and click the iManager link for the NetWare server under eDirectory iManager 2 Enter the user name and password to log in to iManager 3 Click iPrint in the Contents Panel and click Manage Printer 4 Select the printer that you created for the e...

Page 24: ...1 OVERVIEW 22 Setting up NetWare Print Server ...

Page 25: ...1 OVERVIEW Setting up NetWare Print Server 23 1 OVERVIEW ...

Page 26: ...1 OVERVIEW 24 Setting up NetWare Print Server ...

Page 27: ...1 OVERVIEW Setting up NetWare Print Server 25 1 OVERVIEW ...

Page 28: ...1 OVERVIEW 26 Setting up NetWare Print Server ...

Page 29: ...2 RECOMMENDED INSTALLATION This section describes about the recommended installation of the Installer Procedure for Recommended Installation 28 ...

Page 30: ...privilege can perform this For users without the administrator privilege installation is possible by performing the following procedure and having the administrator privilege temporarily Double click Open folder to view files in the AutoPlay menu Open the Setup folder right click Setup exe and then select Run as administrator Enter the administrator s password of the client computer to operate wit...

Page 31: ...ewer and File Downloader are installed Click Browse and when the Browse for folder dialog box appears select a folder and click OK If the following message appears click Continue to proceed with the operation 5 Configure the printer port and click OK For instructions on how to configure the printer port please see the procedure after the step 6 in the following section P 34 Installing the Printer ...

Page 32: ...hen the installation is complete click Finish The main menu window is displayed The Installer may ask you to restart your computer If it does select Yes I want to restart my computer now and click Finish to restart your computer 8 Click Exit When a message Do you want to close HS Series software Installer appears asking whether to finish the installation click Yes Before using the printer driver f...

Page 33: ...e Installation 32 Type of printer drivers 32 System requirements 32 About installation procedure 32 Installing the Printer Drivers 34 Other Installations 48 USB printing 48 Point and Print 56 IPP printing 57 Novell iPrint 70 Web Service Print 71 Uninstalling Printer Drivers 76 Windows Vista Server 2008 76 Windows 2000 XP Server 2003 78 ...

Page 34: ...he following is required y Display resolution 1024 x 768 dots or more y Display color High Color 16bit or higher is recommended y CPU Pentium 133 MHz minimum Pentium 266 MHz or faster recommended y Memory The required memory size for OS y OS Windows 2000 Service Pack 4 Windows XP Service Pack 1 Service Pack 2 Service Pack 3 Windows Vista Service Pack 1 Windows Server 2003 Service Pack 1 Service Pa...

Page 35: ...able the IPP Print Service and must be connected to the Internet Ask your administrator if the IPP Print Service is enabled Novell printing When this equipment is configured to manage printing with NetWare 5 1 6 0 6 5 over TCP IP or IPX SPX you can print through the NetWare print server from Windows 2000 Windows XP and Windows Server 2003 In this case install the printer driver and set up the SMB ...

Page 36: ...ta Server 2003 Server 2008 y Only users with the administrator privilege can perform this For users without the administrator privilege installation is possible by performing the following procedure and having the administrator privilege temporarily Double click Open folder to view files in the AutoPlay menu Open the Setup folder right click Setup exe and then select Run as administrator Enter the...

Page 37: ...ista Server 2008 computers or those of Windows XP SP2 Windows Server 2003 SP1 or later versions with XPS Essentials Pack installed y If the following message appears click Continue to proceed with the operation 5 Configure the printer port The procedure for configuring the printer port varies depending on the connection Please go to the steps suited to your connection P 36 Raw TCP LPR printing P 4...

Page 38: ...tor to make sure of the following This equipment is connected to the network and turned on The TCP IP setting is correct on this equipment and your computer 6 Select Local Port check box and select LPT1 in the box Then click OK The installation starts y If the following message appears click Yes to set the indicated printer driver to be the default printer driver or click No to not change the defa...

Page 39: ... complete click Finish The main menu window is displayed The Installer may ask you to restart your computer If it does select Yes I want to restart my computer now and click Finish to restart your computer 8 Click Exit When a message Do you want to close HS Series software Installer appears asking whether to finish the installation click Yes ...

Page 40: ...select Control Panel and click Printer under Hardware and Sound to open the Printers folder y If you are using the Windows 2000 click Start select Settings and click Printers to open the Printers folder y If you are using the Windows XP 2003 Server click Start and click Printers and Faxes to open the Printers and Faxes folder ...

Page 41: ...operties in the File menu y When you have logged into Windows Vista Server 2008 with a user account other than Administrator skip to step 11 according to the following procedure Right click on a printer driver and select Run as administrator Properties Enter the administrator s password and click OK 11 Click the Ports tab and click Add Port The Printer Ports dialog box appears 12 Select Standard T...

Page 42: ...is equipment provided from DNS or WINS in the Printer Name or IP Address box y Enter the IPv6 address in the Printer Name or IP Address box when the MFP is connected in an IPv6 network y In the Port Name box the port name is automatically entered according to the IP address or DNS name entered in the Printer Name or IP Address box When installing on Windows 2000 XP Server 2003 IP_ is added in fron...

Page 43: ... y The screen below will be displayed on Windows 2000 XP Server 2003 Select Standard and click Next y The screen below will be displayed on Windows Vista Server 2008 Select Standard and click Next 15 Click Finish The screen returns to the Printer Ports dialog box 16 Click Close to close the Printer Ports dialog box ...

Page 44: ... checked in the Print to the following port s list When the LPD Print setting is enabled you can also configure LPR printing When you want to configure LPR printing follow the procedure below Click Configure Port Select LPR at the Protocol group enter print in the Queue Name box at the LPR Settings group and then click OK ...

Page 45: ... 2000 Windows XP Windows Vista Windows Server 2003 or Windows Server 2008 as a print server it is recommended to set up for printing via Windows print server 6 When the equipment is automatically found in the network the Devices on Network option is selected and the devices found are displayed in the list Select the equipment that you want to connect and click OK The installation starts y Finding ...

Page 46: ...ick Browse for the Network path or Queue name Finding devices may take long depending on your OS or network environment The Browse for Folder dialog box appears Locate this equipment in your network select the print queue and click OK Do not select pcl6 or ps3 queue These queues only accept the print job in each emulation If you install several printer drivers and specify one of these queues the p...

Page 47: ...ask you to restart your computer If it does select Yes I want to restart my computer now and click Finish to restart your computer 8 Click Exit When a message appears asking whether to finish the installation click OK Before using the printer driver for printing please configure the installed options of the equipment and department code if required on the printer driver Please refer to the Printin...

Page 48: ...quired 6 Enter the queue name in the Network path or Queue name box and click OK For NDS NDPS mode Example Root Org Context dept1 queue name mfp_queue Org mfp_queue dept1 For Bindery mode Example NetWare file server name Nwsrv queue name mfp_queue Nwsrv mfp_queue The queue for this equipment should be set up by an administrator If you do not know the queue for this equipment ask your administrator...

Page 49: ... is complete click Finish The main menu window is displayed The Installer may ask you to restart your computer If it does select Yes I want to restart my computer now and click Finish to restart your computer 8 Click Exit When a message appears asking whether to finish the installation click OK Before using the printer driver for printing please configure the installed options of the equipment and...

Page 50: ...epending on the version of Windows used P 48 Windows Vista Server 2008 P 51 Windows XP Server 2003 P 53 Windows 2000 y Use a USB2 0 Hi Speed certified cable USB cable supporting the USB2 0 Hi Speed mode 480 Mbps of transfer speed certified by the USB Implementers Forum y Connect the equipment with a PC directly by the USB cable When it is connected with a PC via a USB hub the equipment may not be ...

Page 51: ... INSTALLING PRINTER DRIVERS FOR WINDOWS 5 Click Don t search online 6 Insert the Client Utilities CD ROM into the CD ROM drive When inserting the Client Utilities CD ROM the installer may automatically start Click Exit to exit the installer and continue the operation ...

Page 52: ...Client Utilities CD ROM Client Drivers PS W2K_XP_VISTA language XPS printer driver Client Utilities CD ROM Client Drivers XPS W2K_XP_VISTA language When using Windows Vista Server 2008 64 bit edition select the following folder PCL6 printer driver Client Utilities CD ROM Client Drivers PCL6 XP_VISTA_X64 language PS3 printer driver Client Utilities CD ROM Client Drivers PS XP_VISTA_X64 language XPS...

Page 53: ...ilege You must log into Windows as a user who has the Administrators privilege when using Windows XP Server 2003 1 Power on this equipment and your computer 2 Connect the USB cable to this equipment and your computer The Found New Hardware Wizard dialog box appears 3 Select Install from a list or specific location Advanced and click Next 4 Select Search for the best driver in these locations and s...

Page 54: ...nter driver locate CD ROM drive Client Drivers XPS W2K_XP_VISTA language When using Windows XP 64 bit edition or Windows Server 2003 64 bit edition select the following folder To install the PCL6 printer driver locate CD ROM drive Client Drivers PCL6 XP_VISTA_X64 language To install the PS3 printer driver locate CD ROM drive Client Drivers PS XP_VISTA_X64 language To install the XPS printer driver...

Page 55: ...epartment code if required on the printer driver Please refer to the Printing Guide for the instructions Windows 2000 Installing the printer driver for USB printing by Plug and Play You must log into Windows as a user who has the Administrators or Power Users privilege when using Windows 2000 1 Power on this equipment and your computer 2 Connect the USB cable to this equipment and your computer Th...

Page 56: ... start Click Exit to exit the installer and continue the operation 6 Select only Specify a location check box and click Next 7 Click Browse The Locate File dialog box appears 8 Locate the directory where the printer driver for Windows 2000 is located select a inf file and click Open y To install the PCL6 printer driver locate CD ROM drive Client Drivers PCL6 W2K_XP_VISTA language y To install the ...

Page 57: ... Click OK 10 Click Next It starts copying files 11 Click Finish 12 The installation is completed Before using the printer driver for printing please configure the installed options of the equipment and department code if required on the printer driver Please refer to the Printing Guide for the instructions ...

Page 58: ...rators or Power Users privilege In case of Windows XP Vista Server 2003 Server 2008 only users with the administrator privilege can perform it For users without the administrator privilege on Windows Vista Server 2008 installation is possible by entering the administrator s password in the dialog box for changing a user account at the time of installation and having the administrator privilege tem...

Page 59: ...ng please configure the installed options of the equipment and department code if required on the printer driver Please refer to the Printing Guide for the instructions IPP printing This section describes how to set up the printer drivers for IPP printing which is available for Internet connection To set up the printer drivers for IPP printing install the printer drivers by Add Printer Wizard Befo...

Page 60: ...e installation is possible by entering the administrator s password in the dialog box for changing a user account at the time of installation and having the administrator privilege temporarily y The certificate must be installed on both MFP and Windows Vista to perform IPP SSL printing from Windows Vista For instructions on how to install the certificate please refer to COMMAND CENTER Guide 1 Clic...

Page 61: ...ING PRINTER DRIVERS FOR WINDOWS 2 Click Add a printer The Add Printer dialog box appears 3 Select Add a network wireless or Bluetooth printer in Choose a local or network printer screen 4 Select The Printer that I want isn t listed in Searching for available printers screen ...

Page 62: ...fp 05212774 http Mfp 05212774 631 Print y When you connect from the Internet enter the FQDN of this equipment provided from DNS instead of IP address Example URL mfp_05212774 km com http mfp_05212774 km com 631 Print P for Print in the IPP URL must be capitalized When you are using on Windows Vista Server 2008 the IPP port can be created by entering print non capitalized in the IPP URL but the pri...

Page 63: ...x to enter a user name and password appears If this dialog box appears enter the user name and password and click OK For user name and password please ask your administrator 7 Click Have Disk The Install From Disk dialog box appears 8 Click Browse The Locate File dialog box appears 9 Insert the Client Utilities CD ROM into the CD ROM drive When inserting the Client Utilities CD ROM the installer m...

Page 64: ...bit edition select the following folder To install the PCL6 printer driver locate CD ROM drive Client Drivers PCL6 XP_VISTA_X64 language To install the PS3 printer driver locate CD ROM drive Client Drivers PS XP_VISTA_X64 language 11 Click OK 12 Select the printer driver and click OK If any other printer driver s had already been installed on your computer the Default Printer screen is displayed C...

Page 65: ...ed select whether to share the equipment with other users on your network and then click Next Change the share name or enter the location and comments as required 14 Click Finish 15 The printer driver is installed Before using the printer driver for printing please configure the installed options of the equipment and department code if required on the printer driver Please refer to the Printing Gu...

Page 66: ...Windows Server 2003 is used You must log into Windows as a user who has the Administrators or Power Users privilege 1 Click Start and click Printers and Faxes to open the Printers and Faxes folder If you are using the Windows 2000 click Start select Settings and click Printers to open the Printers folder 2 Click the Add a printer in the Printer Tasks menu y When using the Windows 2000 double click...

Page 67: ...3 INSTALLING PRINTER DRIVERS FOR WINDOWS Other Installations 65 3 INSTALLING PRINTER DRIVERS FOR WINDOWS 3 Click Next 4 Select A network printer or a printer attached to another computer and click Next ...

Page 68: ...mfp_05212774 km com http mfp_05212774 km com 631 Print P for Print in the IPP URL must be capitalized When you are using on Windows 2000 XP Server 2003 the IPP port can be created by entering print non capitalized in the IPP URL but the print job cannot be sent to the equipment In that case delete the IPP port and then create the IPP port correctly again y If the IPP Port80 Enabled option is enabl...

Page 69: ...ry where the printer driver for your Windows version is located select the inf file and click Open y To install the PCL6 printer driver for Windows 2000 XP Server 2003 locate CD ROM drive Client Drivers PCL6 W2K_XP_VISTA language y To install the PS3 printer driver for Windows 2000 XP Server 2003 locate CD ROM drive Client Drivers PS W2K_XP_VISTA language When using Windows XP Server 2003 64 bit e...

Page 70: ... the Default Printer screen is displayed Continue to next step y If no printer driver had been installed on your computer the complete screen is displayed Skip to step 14 If the same printer driver has been installed the following dialog box appears If it appears select Replace existing driver and click Next 13 Select whether using this printer as a default printer and click Next ...

Page 71: ...ER DRIVERS FOR WINDOWS 14 Click Finish 15 The printer driver is installed Before using the printer driver for printing please configure the installed options of the equipment and department code if required on the printer driver Please refer to the Printing Guide for the instructions ...

Page 72: ...he SSL security is enabled on the NetWare server Installing the printer driver for Novell iPrint To install the printer driver for Novell iPrint on the client computer download and install the iPrint Client and printer driver from the NetWare server 1 Start the your web browser and enter the following URL in the address bar http IP address or DNS for NDPS Manager ipp y If you do not know the IP ad...

Page 73: ...rk y You must log into Windows as a user who has the Administrators privilege y Web Services Print is the function of Windows Vista y A driver for Web Services Scanning is automatically installed as well as the client software y Once the printer driver is installed from the Client Utilities CD ROM you will no longer need the CD ROM for the installation of the Web Service Print because the printer ...

Page 74: ...count control dialog box appears y If the User account control is disabled the Network discovery and file sharing screen is displayed Go to Step 4 3 Click Continue in the User account control dialog box The Network discovery and file sharing screen is displayed 4 Click Yes turn on network discovery and file sharing for all public networks Connected computers and icons of the multifunction devices ...

Page 75: ...the User account control is disabled Found New Hardware is displayed on the task bar Go to Step 8 6 Click PnPX Device Association on the task bar The User account control dialog box appears 7 Click Continue in the User account control dialog box Found New Hardware is displayed on the task bar You can check the installing status by clicking Installing device driver software on the lower right hand ...

Page 76: ...ox appears 11 Click Don t search online 12 Click Browse my computer for driver software advanced 13 Set the Client Utilities CD ROM to the CD ROM drive click Browse to specify the position of the CD ROM drive and then click Next When inserting the Client Utilities CD ROM the installer may automatically start Click Exit to exit the installer and continue the operation ...

Page 77: ...STALLING PRINTER DRIVERS FOR WINDOWS 14 Select the printer driver each language to be installed and then click Next When the Windows Security dialog box is displayed click Install this driver software anyway to continue the installation 15 The installation is completed ...

Page 78: ... Deleting printer drivers 1 Open the Printers folder right click on the printer to be deleted and select delete from the menu displayed 2 The following message appears click Yes 3 Right click in the blank area in the Printers window and click Run as administrator and then Server Properties in the menu displayed The User Account Permission dialog box appears 4 Click Continue The Print Server Proper...

Page 79: ... WINDOWS 6 Select Remove driver and driver package and click OK The Print Server Properties dialog box appears 7 Click Yes The Driver package information collected message is displayed 8 Click Delete The Driver package deleted message is displayed 9 Click OK 10 Close the Print Server Properties dialog box ...

Page 80: ... Printers folder or Printers and Faxes folder right click on the printer to be deleted and select Delete from the menu displayed 2 The following message appears click Yes 3 Click the File menu and select Server Properties The Print Server Properties dialog box appears 4 Select the Drivers tab Select the printer drivers that you want to delete and click Remove The Print Server Properties dialog box...

Page 81: ...out client software for Macintosh 80 Planning for installation 80 Installing the Printer on Mac OS X 10 2 4 to Mac OS X 10 5 x 81 Installing the Macintosh PPD file 81 Configuring the printer on Mac OS X 10 5 x 84 Configuring the printer on Mac OS X 10 4 x 93 Configuring the printer on Mac OS X 10 2 4 to Mac OS X 10 3 x 10² Uninstalling the Macintosh PPD File 112 ...

Page 82: ...ion file The Macintosh PPD PostScript Printer Description file contains information about controller specific features Information within the PPD file for Mac OS X works in conjunction with the Print Center Mac OS X 10 2 4 to 10 2 8 or Printer Setup Utility Mac OS X 10 3 x to Mac OS X 10 5 x on Mac OS X 10 2 4 to Mac OS X 10 5 x Planning for installation System requirements To install the printer ...

Page 83: ...Mac OS X The following describes an installation on Mac OS X 10 5 x The procedure is the same when Mac OS X 10 2 4 to 10 5 x is used 1 Insert the Client Utilities CD ROM into the CD ROM drive and open the MacPPD OSX folder 2 Copy the GZIP file HS_Series dmg gz to the desktop 3 Double click the GZIP file on the desktop y The Disk Image file HS_Series dmg is extracted on the desktop y If the install...

Page 84: ...lick Continue 8 Click Agree The Select a Destination window is displayed 9 The Select a Destination dialog box appears by clicking Change Install Location Select the boot disk for Mac OS X and click Continue The Standard Install window is displayed 10 Click Install or Upgrade The Authenticate dialog box appears ...

Page 85: ...When you install the PPD file to Mac OS X 10 2 4 to 10 2 8 the Authenticate dialog box does not appear in this step 12 Click Close to close the installer window 13 Delete the GZIP files and Installer files created on the desktop 14 Continue the procedure for configuring the printer P 84 Configuring the printer on Mac OS X 10 5 x P 93 Configuring the printer on Mac OS X 10 4 x P 102 Configuring the...

Page 86: ... computer are connected over TCP IP network you can perform LPR printing from Macintosh computer y AppleTalk printing When this equipment and your computer are connected over AppleTalk network you can perform AppleTalk printing from Macintosh computer y IPP printing When this equipment and your computer are connected over TCP IP network you can perform IPP printing from Macintosh computer y Bonjou...

Page 87: ...f the correct PPD is not automatically selected select Select a driver to use and select the PPD file displayed in the list 4 Click Add The Installable Options window appears 5 Set the following options y Finisher Not Installed Select this if a finisher is not installed Multi Position Stapler Select this when the Finisher or Saddle Stitch Finisher is installed Multi Position Stapler and Hole Punch...

Page 88: ...is installed LCF is not available for some countries or regions y External LCF Not Installed Select this when no external LCF is installed Installed Select this when the external LCF is installed 6 Click Continue The printer is added to the Printer List Configuring Macintosh AppleTalk printing 1 Open System Preferences and click Print Fax 2 Click ...

Page 89: ... options y Finisher Not Installed Select this if a finisher is not installed Multi Position Stapler Select this when the Finisher or Saddle Stitch Finisher is installed Multi Position Stapler and Hole Punch Select this when the Finisher or Saddle Stitch Finisher and Hole Punch unit are installed Even if you select Not Installed for the Finisher option during print settings The finisher options suc...

Page 90: ...r on Mac OS X 10 2 4 to Mac OS X 10 5 x 6 Click Continue The printer is added to the Printer List Configuring Macintosh IPP printing When you want to setup IPP print queue in the Mac OS X follow the procedures below 1 Open System Preferences and click Print Fax 2 Click ...

Page 91: ...x If the correct PPD is not automatically selected select Select a driver to use and select the PPD file displayed in the list 4 Click Add y The Installable Options window appears 5 Set the following options y Finisher Not Installed Select this if a finisher is not installed Multi Position Stapler Select this when the Finisher or Saddle Stitch Finisher is installed Multi Position Stapler and Hole ...

Page 92: ... is installed LCF is not available for some countries or regions y External LCF Not Installed Select this when no external LCF is installed Installed Select this when the external LCF is installed 6 Click Continue The printer is added to the Printer List Configuring Macintosh Bonjour printing 1 Open System Preferences and click Print Fax 2 Click ...

Page 93: ...options y Finisher Not Installed Select this if a finisher is not installed Multi Position Stapler Select this when the Finisher or Saddle Stitch Finisher is installed Multi Position Stapler and Hole Punch Select this when the Finisher or Saddle Stitch Finisher and Hole Punch unit are installed Even if you select Not Installed for the Finisher option during print settings The finisher options such...

Page 94: ...4 INSTALLING PRINTER DRIVERS FOR MACINTOSH 92 Installing the Printer on Mac OS X 10 2 4 to Mac OS X 10 5 x 6 Click Continue The printer is added to the Printer List ...

Page 95: ...over TCP IP network you can perform LPR printing from Macintosh computer y AppleTalk printing When this equipment and your computer are connected over AppleTalk network you can perform AppleTalk printing from Macintosh computer y IPP printing When this equipment and your computer are connected over TCP IP network you can perform IPP printing from Macintosh computer y Bonjour printing When this equ...

Page 96: ...ot automatically selected select HS Series in the Print Using box and select the PPD file displayed in the list 4 Click Add The Installable Options window appears 5 Set the following options y Finisher Not Installed Select this if a finisher is not installed Multi Position Stapler Select this when the Finisher or Saddle Stitch Finisher is installed Multi Position Stapler and Hole Punch Select this...

Page 97: ...available for some countries or regions y External LCF Not Installed Select this when no external LCF is installed Installed Select this when the external LCF is installed 6 Click Continue The printer is added to the Printer List Configuring Macintosh AppleTalk printing 1 Start the Printer Setup Utility located in the Applications Utilities folder in the Boot Disk The Printer List dialog box appea...

Page 98: ...ed in the Address box is automatically displayed y When you select the equipment in the list the correct PPD file is automatically selected in the Print Using box If the correct PPD is not automatically selected select HS Series in the Print Using box and select the PPD file displayed in the list 4 Click Add The Determining Installable Options window appears 5 Click Configure while the window is d...

Page 99: ...and Hole Punch unit are installed Even if you select Not Installed for the Finisher option during print settings The finisher options such as stapling and hole punching can be selected If you select the finisher options for printing but the finisher is not installed finisher settings will be ignored and printing will be performed correctly y Drawers LCF Select this when the LCF is installed LCF is...

Page 100: ...rinter and specify the items as described below Protocol Internet Printing Protocol IPP Address IP address or DNS name of this equipment Queue Print Name Any Name Location Any Name Print Using HS Series or UK y In the Name box the name that is entered in the Address box is automatically displayed y When you enter the IP address or DNS name of this equipment in the Address box the correct PPD file ...

Page 101: ...ecify as followings Device Internet Printing Protocol using HTTP Device Name Any Name Device URI http IP address 443 Print Printer Model HS Series PPD HS Series or UK 4 Click Add The Installable Options window appears 5 Set the following options y Finisher Not Installed Select this if a finisher is not installed Multi Position Stapler Select this when the Finisher or Saddle Stitch Finisher is inst...

Page 102: ...Utility located in the Applications Utilities folder in the Boot Disk The Printer List dialog box appears 2 Click Add 3 Click Default Browser and select the equipment of the Bonjour connection displayed in the list y In the Name box the device name that you selected in the list is automatically displayed y When you select the equipment in the list the correct PPD file is automatically selected in ...

Page 103: ... or Saddle Stitch Finisher and Hole Punch unit are installed Even if you select Not Installed for the Finisher option during print settings The finisher options such as stapling and hole punching can be selected If you select the finisher options for printing but the finisher is not installed finisher settings will be ignored and printing will be performed correctly y Drawers LCF Select this when ...

Page 104: ...ur computer are connected over AppleTalk network you can perform AppleTalk printing from Macintosh computer y IPP printing When this equipment and your computer are connected over TCP IP network you can perform IPP printing from Macintosh computer y Bonjour printing When this equipment and your computer are connected over TCP IP network you can perform Bonjour printing from Macintosh computer Conf...

Page 105: ...r Type LPD LPR Printer s Address IP address or DNS name of this equipment Queue Name print Printer Model HS Series PPD HS Series or UK y For Mac OS X 10 2 4 to 10 2 8 the Printer Type drop down list box is not displayed y For Mac OS X 10 2 4 to 10 2 8 please uncheck the Use default queue on server box 4 Click Add The printer is added to the Printer List 5 Continue the procedure to configure the in...

Page 106: ...t the Print Center for Mac OS X 10 2 4 to 10 2 8 or Printer Setup Utility for Mac OS X 10 3 x located in the Applications Utilities folder in the Boot Disk Mac OS X 10 2 4 to 10 2 8 Mac OS X 10 3 x The Printer List dialog box appears 2 Click Add 3 Select AppleTalk in the drop down list box and select the zone name that this equipment is located Then select the equipment displayed in the list If th...

Page 107: ... Mac OS X 10 5 x 10⁵ 4 INSTALLING PRINTER DRIVERS FOR MACINTOSH 4 Select HS Series at the Printer Model box and select the PPD file 5 Click Add The printer is added to the Printer List 6 Continue the procedure to configure the installable options P 110 Configuring the installable options ...

Page 108: ...n Mac OS X 10 3 x The procedure is the same when Mac OS X 10 2 4 to 10 2 8 is used 1 Start the Print Center for Mac OS X 10 2 4 to 10 2 8 or Printer Setup Utility for Mac OS X 10 3 x located in the Applications Utilities folder in the Boot Disk Mac OS X 10 2 4 to 10 2 8 Mac OS X 10 3 x The Printer List dialog box appears 2 Press and hold the option key in the keyboard and click Add in the Printer ...

Page 109: ...ate registered to this equipment while SSL for HTTP network service is enabled access to the COMMAND CENTER is refused In this case temporarily disable SSL for HTTP network service on the control panel and then access the COMMAND CENTER Then enable SSL again For HTTP network service refer to the COMMAND CENTER Guide For instructions on how to set it on the control panel refer to the MFP Management...

Page 110: ...re is the same when Mac OS X 10 2 4 to 10 2 8 is used 1 Start the Print Center for Mac OS X 10 2 4 to 10 2 8 or Printer Setup Utility for Mac OS X 10 3 x located in the Applications Utilities folder in the Boot Disk Mac OS X 10 2 4 to 10 2 8 Mac OS X 10 3 x The Printer List dialog box appears 2 Click Add This is mandatory to show all the advanced print options in the drop down list box in the Prin...

Page 111: ... correct PPD file is automatically selected If the correct PPD is not automatically selected select HS Series in the Printer Model drop down menu and select the PPD file displayed in the list In Mac OS X 10 2 4 to 10 3 x the Bonjour is named as Rendezvous 4 Select HS Series at the Printer Model drop down list box and select the PPD file 5 Click Add The printer is added to the Printer List 6 Contin...

Page 112: ...nstallable Options window is displayed 3 Set the following options y Finisher Not Installed Select this if a finisher is not installed Multi Position Stapler Select this when the Finisher or Saddle Stitch Finisher is installed Multi Position Stapler and Hole Punch Select this when the Finisher or Saddle Stitch Finisher and Hole Punch unit are installed Even if you select Not Installed for the Fini...

Page 113: ...TALLING PRINTER DRIVERS FOR MACINTOSH y Drawers LCF Select this when the LCF is installed LCF is not available for some countries or regions y External LCF Not Installed Select this when no external LCF is installed Installed Select this when the external LCF is installed 4 Click Apply Changes and close the window ...

Page 114: ... the Macintosh PPD File In order to uninstall the Macintosh PPD file delete the PPD file in the following folder Library Printers PPDs Contents Resources language lproj HS_Series gz Library Printers HS_Series filter Library Printers HS_Series Icons Library Printers HS_Series PDEs Library Receipts ...

Page 115: ...4 INSTALLING PRINTER DRIVERS FOR MACINTOSH Uninstalling the Macintosh PPD File 113 ...

Page 116: ......

Page 117: ... how to install the client software on UNIX Linux Setting Up the UNIX Linux Filters 116 About UNIX Linux filters 116 System requirements 116 Configuring UNIX Linux printing using UNIX Linux filters 117 Setting Up the CUPS 125 About CUPS 125 Configuring UNIX Linux printing using CUPS 126 ...

Page 118: ...oloradd This file is a shell script that is used to create a printer description This file will be installed in opt HS_Series tap bin A symbolic link will be installed in the bin directory that will point to the actual location of this file kycolorrm This file is a shell script that is used to remove a printer description This file will be installed in opt HS_Series tap bin A symbolic link will be...

Page 119: ...tilities CD ROM into the CD ROM drive 2 Log on to the root account 3 Enter the following command and check the output y For Solaris uname Output on screen should be SunOS y For HP UX uname Output on screen should be HP UX y For IBM AIX uname Output on screen should be AIX y For Linux uname Output on screen should be Linux y For OpenUNIX uname Output on screen should be OpenUNIX If the output is no...

Page 120: ...host name or IP address y This command creates a print queue using the system s lpadmin command It also creates a configuration file that has the destination IP address or host name Use the configuration file to change print queue parameters y The lpadmin command saves a printer interface file as the print queue name and the configuration file is stored in a file named queue name conf The interfac...

Page 121: ...sr lib lp model net_kycolor 9 Enter the following command accept queue name 10 Enter the following command enable queue name Creating a print queue manually on HP UX 1 Log on to the root account 2 Open your UNIX Linux editor 3 Create the following file etc lp interface queue name conf 4 Add a line as below in the queue name conf dest IP address 5 Save the file 6 Enter the following command chmod x...

Page 122: ... IP address 7 Save the file 8 Enter the following command mkque q queue name a s_statfilter usr lib lpd bsdshort a up TRUE a host IP address a rq print 9 Enter the following command mkquedev q queue name ddev_ queue name a backend opt HS_Series tap bin kycolorBackend 10 Enter the following command cp usr lib lpd pio predef net_kycolor opt HS_Series tap filter queue name Creating a print queue manu...

Page 123: ...following command opt HS_Series tap bin printconf_import a queue name IP_ADDRESS rm opt HS_Series tap bin flag_ queue name 12 Restart your lpd Creating a print queue manually on OpenUNIX 1 Log on to the root account 2 Open your UNIX Linux editor 3 Create the following file usr spool lp admins lp interfaces queue name conf 4 Add a line as below in the queue name conf dest IP address 5 Save the file...

Page 124: ...lp admins lp interfaces y For example to change the default orientation to Landscape add the following line orient LANDSCAPE Deleting the print queue There are two ways to delete the print queue one is deleting a print queue using kycolorrm and the other is deleting a print queue manually without using kycolorrm P 122 Deleting a print queue using kycolorrm P 122 Deleting a Print Queue Manually Del...

Page 125: ... following command rm etc lp interface queue name conf 7 If 0 was outputted on the screen in step 3 turn the scheduler ON Enter the following command usr sbin lpsched dev null 2 1 Deleting a print queue manually on IBM AIX 1 Log on to the root account 2 Enter the following command rm opt HS_Series tap filter queue name 3 Enter the following command rm opt HS_Series tap filter queue name conf 4 Ent...

Page 126: ...g command opt HS_Series tap bin printconf_import d queue name rm opt HS_Series tap bin flag_ queue name 7 Restart your lpd Deleting a print queue manually on OpenUNIX 1 Log on to the root account 2 Enter the following command lpadmin x queue name 3 Enter the following command rm usr spool lp admins lp interfaces queue name conf ...

Page 127: ...use a PostScript Printer Description PPD file not a printer driver to configure the printing The PPD file is included in this package Development Environment The provided CUPS printer driver is supported on the following UNIX Linux workstation y Red Hat 8 0 CUPS 1 1 18 Implementation Method This driver consists of a PPD file that works in conjunction with an interface like XPP KPrinter etc It can ...

Page 128: ... share cups model HS_Series directory or enter the following command cp HS_CUPS gz usr share cups model HS_Series A GZIP file is included in the Admin CUPS Usa folder in the CD ROM 4 Enter the following command service lpd stop If lpd is already stopped Failed will be displayed y When using the Red Hat Linux continue to the next step y When using other than the Red Hat Linux skip to step 10 5 When...

Page 129: ...page is displayed 12 Click Add Printer The Admin page is displayed 13 Enter the printer name location and description of the printer in each box and click Continue If a new printer name is a duplicate of a name already in the printer list the new printer will replace the original printer 14 Select LPD LPR Host or Printer at the Device box and click Continue ...

Page 130: ...P address Print in the Device URI box and click Continue Make sure to capitalize the P in Print for the device URI 16 Select HS Series at the Make list and click Continue If you do not see HS Series in the Make list restart CUPS 17 Select the PPD in the Model list and click Continue ...

Page 131: ...vileges 2 Enter the following command cd usr lib cups backend 3 Enter the following command ln s ipp https 4 Restart the CUPS Service in Linux y IPP SSL certificates in the etc cups directory should be created 1 Enter the following command mkdir ssl folder in etc cups 2 Enter the following command openssl req new x509 keyout etc cups ssl server key out etc cups ssl server crt days 365 nodes The ab...

Page 132: ...ontinue to the next step y When using other than the Red Hat Linux skip to step 10 5 When using the Red Hat Linux enter the following command usr bin redhat switch printer The redhat switch printer dialog box appears 6 Select CUPS and click OK The information dialog box appears 7 Click OK 8 Enter the following command service cups start If the CUPS has already been started stop the CUPS service on...

Page 133: ... IP address 631 Print Model Driver HS Series When IPP SSL is enabled specify as followings Device Internet Printing Protocol https Device URI https IP address 443 Print Using CUPS Client print commands lp lpr etc with e option the connection can be encrypted and printing can be done in the above configured printer 12 Confirm that the message notifying that the new printer has been properly added a...

Page 134: ... Configuring print options You can set the print options that are applied to the print jobs using CUPS Print option configuration 1 Click the Manage Printers link on the startup page The Printer page is displayed 2 Select this equipment and then click Configure Printer ...

Page 135: ...klet Outer Margin 0 to 72 in unit of 6 points Select the outer margin Booklet Paper Size None Off Letter A4 Legal Statement Ledger Folio A3 A5 B4 B5 Computer 13 LG 8 5 SQ 8K 16K Select a paper size for the booklet Each two pages are printed on both sides of a sheet which is then folded The booklet size will be the half size of the paper size that you specify Left to Right Page Layout Right to Left...

Page 136: ...er automatically applies proper image quality for selected job type Pure Black and Gray Black Auto Black Text Black Text and Graphic Black Text Graphic and Image Black and Gray Auto Black and Gray Text Black and Gray Text and Graphic Black and Gray Text Graphic and Image Select whether printing the black and gray scale contents in a document using the black toner Continue button Determines the sel...

Page 137: ...e hole punch option Stapling Off Upper Left Portrait Upper Right Landscape Middle Left Portrait Middle Top Landscape Lower Left Portrait Upper Left Landscape Upper Right Portrait Lower Right Landscape Middle Right Portrait Middle Bottom Landscape Lower Right Portrait Lower Left Landscape Middle Top Portrait Middle Right Landscape Middle Bottom Portrait Middle Left Landscape Saddle Stitch Portrait ...

Page 138: ...ecial 1 Back Special 2 Special 2 Back Select the paper source Continue button Determines the selected items Option Value Alternative Value Description Drawers LCF Select an optional drawer Finisher Not Installed Multi Position Stapler Multi Position Stapler and Hole Punch Select a finishing option External LCF Not Installed Installed Select an External LCF option Continue button Determines the sel...

Page 139: ...inue button Determines the selected items Option Value Alternative Value Description Starting Banner none Select whether to print banner pages before printing documents If you want to print them select a banner type classified Classified information confidential Confidential information secret Secret information standard Standard information topsecret Top secret unclassified Unclassified informati...

Page 140: ... DRIVERS FOR UNIX Linux 138 Setting Up the CUPS 1 Click the Manage Printers link on the startup page The Printer page is displayed 2 Click Modify Printer 3 Modify the location and description in each box and click Continue ...

Page 141: ...e printer that you create perform the following procedure Uninstalling printer 1 Click the Manage Printers link on the startup page The Printer page is displayed 2 Click Delete Printer y When a message appears asking to remove the printer click Continue y The printer is deleted 3 Delete the PPD file from the usr share cups model HS_Series directory ...

Page 142: ......

Page 143: ...is section describes about installing the scan driver and scan utilities Before Installation 142 Type of scan driver and utilities 142 System requirements 142 Installing Scan Driver and Utilities 143 Uninstalling Scan Driver and Utilities 147 ...

Page 144: ... The scan driver and utilities are available for following environments y Display resolution 1024 x 768 dots or more y Display color High Color 16bit or higher is recommended y CPU Pentium 133 MHz minimum Pentium 266 MHz or faster recommended y OS Windows 2000 Service Pack 4 Windows XP Service Pack 1 Service Pack 2 Service Pack 3 Windows Vista Service Pack 1 Windows Server 2003 Service Pack 1 Serv...

Page 145: ...inistrators privilege when using Windows XP Vista Server 2003 Server 2008 y Only users with the administrator privilege can perform this For users without the administrator privilege installation is possible by performing the following procedure and having the administrator privilege temporarily Double click Open folder to view files in the AutoPlay menu Open the Setup folder right click Setup exe...

Page 146: ...lder dialog box appears select a folder and click OK y The installation starts 5 When the installation is complete click Finish The main menu window is displayed The Installer may ask you to restart your computer If it does select Yes I want to restart my computer now and click Finish to restart your computer 6 Click Exit When a message Do you want to close HS Series software Installer appears ask...

Page 147: ...rk on the Start menu 2 Select this equipment and right click its name Then click Install The Found New Hardware dialog box is displayed 3 Click Locate and install driver software The confirmation dialog box is displayed A dialog box that prompts you to insert a disc may appear after the procedure above In this case click I don t have the disc Show me other options and continue the procedure ...

Page 148: ...the Client Utilities CD ROM to the CD ROM drive of your computer Then click Browse to specify a directory for WIA driver Then click Next If your OS is 32 bit edition Client Utilities CD ROM Client WIA VISTA 32 ENG If your OS is 64 bit edition Client Utilities CD ROM Client WIA VISTA 64 ENG The installation starts 6 Follow the instructions shown on the monitor and then finish the installation ...

Page 149: ...tion in Control Panel For instructions on how to uninstall them refer to the following section P 174 Uninstalling Client Software Uninstalling WIA driver When you uninstall WIA driver from Windows Vista or Windows Server 2008 follow steps 1 and 2 of the installation procedure Start menu Network select this equipment Then right click its name and click Uninstall Then the uninstallation is performed...

Page 150: ......

Page 151: ...x utilities Before Installation 150 Type of network fax utilities 150 System requirements 150 Installing Network Fax Utilities 151 Installing Web Service Print 156 Web Service Print 156 Uninstalling the Network Fax Software 161 Deleting the N W Fax driver 161 Deleting AddressBook Viewer 165 ...

Page 152: ...Book Viewer you can easily add or modify fax recipient names fax numbers and Internet Fax address e mail address to the Address Book This utility allows you to manage recipients of the fax select and display fax recipients from the Address Book as well as recipient fax numbers and other contact information Additionally AddressBook Viewer allows you to import or export address book data to or from ...

Page 153: ...tors privilege when using Windows XP Vista Server 2003 Server 2008 y Only users with the administrator privilege can perform this on Windows Vista For users without the administrator privilege installation on Windows Vista is possible by performing the following procedure and having the administrator privilege temporarily Double click Open folder to view files in the AutoPlay menu Open the Setup f...

Page 154: ...can change the folder where these programs are installed Click Browse and when the Browse For Folder dialog box appears select a folder and click OK The procedure after here describes about the instruction for an SMB connection If you want to configure the N W Fax driver using a Raw TCP LPR connection please see the following section P 36 Raw TCP LPR printing ...

Page 155: ... that you want to connect and click OK The installation starts y Finding devices may take long depending on your OS or network environment y If the following message appears click Install this driver software anyway to proceed with the installation When the equipment is not automatically found in the network the Message dialog box appears In that case follow the procedure below to select the netwo...

Page 156: ...t The Browse for Folder dialog box appears Locate this equipment in your network select the print queue and click OK Do not select pcl6 or ps3 queue These queues only accept the print job in each emulation If you install several printer drivers and specify one of these queues the print job may not be printed properly due to mismatch of the emulations between the print job and queue Click OK ...

Page 157: ...n the installation is complete click Finish The main menu window is displayed The Installer may ask you to restart your computer If it does select Yes I want to restart my computer now and click Finish to restart your computer 7 Click Exit When a message appears asking whether to finish the installation click OK ...

Page 158: ...y You must log into Windows as a user who has the Administrators privilege y Web Services Print is the function of Windows Vista y A driver for Web Services Scanning is automatically installed as well as the client software y Once the N W Fax driver is installed from the Client Utilities CD ROM you will no longer need the CD ROM for the installation of the Web Service Print because the N W Fax dri...

Page 159: ...haring y The User account control dialog box appears y If the User account control is disabled the Network discovery and file sharing screen is displayed Go to Step 4 3 Click Continue in the User account control dialog box The Network discovery and file sharing screen is displayed 4 Click Yes turn on network discovery and file sharing for all public networks Connected computers and icons of the mu...

Page 160: ...ion is displayed on the task bar y If the User account control is disabled Found New Hardware is displayed on the task bar Go to Step 8 6 Click PnPX Device Association on the task bar The User account control dialog box appears 7 Click Continue in the User account control dialog box Found New Hardware is displayed on the task bar You can check the installing status by clicking Installing device dr...

Page 161: ...ccount control dialog box appears If the user account control is enabled the Installing device driver dialog box is displayed Click Continue to continue the installation 10 Click Continue in the User account control dialog box The Found New Hardware Unknown Device dialog box appears 11 Click Don t search online 12 Click Browse my computer for driver software advanced ...

Page 162: ...d then click Next When inserting the Client Utilities CD ROM the installer may automatically start Click Exit to exit the installer and continue the operation 14 Select the N W Fax driver each language to be installed and then click Next When the Windows Security dialog box is displayed click Install this driversoftware anyway to continue the installation 15 The installation is completed ...

Page 163: ...ax driver differs depending on the version of Windows being used P 161 Windows Vista Server 2008 P 163 Windows 2000 XP Server2003 Windows Vista Server 2008 Deleting N W Fax driver 1 Select Start Control Panel Hardware and Sound and click Printer right click on the printer to be deleted and select Delete from the menu displayed 2 The following message appears click Yes 3 Right click in the blank ar...

Page 164: ...rinter drivers to be deleted Then click Remove The Remove Driver And Package dialog box appears 6 Select Remove driver and driver package and click OK The Print Server Properties dialog box appears 7 Click Yes The Remove Driver Package message is displayed 8 Click Delete The Driver package deleted message is displayed ...

Page 165: ...eting N W Fax driver The following describes an installation on Windows XP The procedure is the same when other versions of Windows are used 1 Open the Printers folder or Printers and Faxes folder right click on the printer to be deleted and select Delete from the menu displayed The following message appears click Yes 2 Click the File menu and select Server Properties The Print Server Properties d...

Page 166: ...lling the Network Fax Software 3 Click the Drivers tab Select the N W Fax driver and click Remove The confirmation dialog box appears 4 Click Yes The N W Fax driver is completely deleted 5 Click Close to close the Print Server Properties dialog box ...

Page 167: ...are 165 7 INSTALLING NETWORK FAX UTILITIES Deleting AddressBook Viewer You can uninstall AddressBook Viewer using Add or Remove Programs function in Control Panel For instructions on how to uninstall them refer to the following section P 174 Uninstalling Client Software ...

Page 168: ......

Page 169: ...E UTILITIES This section describes about installing the e Filing Backup Restore utilities Before Installation 168 System requirements 168 Installing e Filing Backup Restore Utilities 169 Uninstalling e Filing Backup Restore Utilities 172 ...

Page 170: ...ed memory size for OS y OS Windows 2000 Service Pack 4 Windows XP Service Pack 1 Service Pack2 Service Pack 3 Windows Vista Service Pack 1 Windows Server 2003 Service Pack 1 Service Pack 2 Windows Server 2008 Service Pack 1 y Required software Microsoft Internet Explorer 5 5 Service Pack 2 or later Internet Explorer 7 0 or later when IPv6 is used Microsoft Internet Explorer is enabled to access th...

Page 171: ...003 y Only users with the administrator privilege can perform this For users without the administrator privilege installation on Windows Vista is possible by performing the following procedure and having the administrator privilege temporarily Double click Open folder to view files in the AutoPlay menu Open the Admin e FilingUtility folder right click Setup exe and then select Run as administrator...

Page 172: ...se Agreement dialog box appears 6 Select I accept the terms in the license agreement and click Next The main menu window is displayed 7 Click Next y If you want to change where the programs are installed click Browse In the dialog box appears select the folder and click OK y Ready to Install Program dialog box appears ...

Page 173: ...RESTORE UTILITIES 8 Click Next Starts copying files and the InstallShield Wizard Completed screen displayed when copying is completed 9 Click Finish The installation is completed The Installer may ask you to restart your computer If it does select Yes I want to restart my computer now and click Finish to restart your computer ...

Page 174: ... Restore Utilities Uninstalling e Filing Backup Restore Utilities You can uninstall e Filing Backup Restore utilities using Add or Remove Programs function in Control Panel For instructions on how to uninstall them refer to the following section P 174 Uninstalling Client Software ...

Page 175: ...9 INSTALLATION MAINTENANCE This section describes how to uninstall and repair the client software using the setup program Uninstalling Client Software 174 Repairing Client Software 176 ...

Page 176: ...stalling Printer Drivers P 161 Deleting the N W Fax driver Uninstalling client software The following describes an uninstallation on Windows Vista The procedure is the same when other versions of Windows are used 1 Select Start Control Panel Programs and click Uninstall a program y The Uninstall or change a Program dialog box appears y When using Windows 2000 XP Server 2003 open Control Panel and ...

Page 177: ...ck Yes The User Account Control dialog box appears 4 Click Allow 5 Click Yes to delete the setting files Deleting files starts If you want to re install the client software later click No to remain the setting files You can restore the data and settings when you re install the client software ...

Page 178: ...ase uninstall the client software and then install again to repair the client software 1 Insert the Client Utilities CD ROM into the CD ROM drive y When inserting the Client Utilities CD ROM the Auto Play menu appears Click Open folder to view files to open the software folder 2 Open the software folder that you want to repair and double click the setup exe icon y To repair TWAIN Driver locate CD ...

Page 179: ...g Client Software 177 9 INSTALLATION MAINTENANCE 5 Select Repair and click Next 6 Click Install Repairing files starts 7 Click Finish to close the wizard 8 The installer ask you to restart your computer Click Yes to restart your computer ...

Page 180: ......

Page 181: ...Driver 8 150 NetWare in iPrint Mode 20 NetWare in NDPS Mode 16 NetWare in NDS Mode 15 Novell iPrint 33 Novell Printing 33 P PostScript 6 PPD 7 Printer Drivers 6 8 32 R Raw TCP LPR Printing 32 Remote Scan Driver 8 142 S SMB environment 151 SMB Printing 33 System Requirements Mac OS 80 UNIX Linux 116 Windows 32 T TWAIN Driver 8 142 U Uninstalling 76 161 USB Connection 32 USB printing 48 W Web Servic...

Page 182: ...180 INDEX ...

Page 183: ......

Page 184: ...First edition 2009 5 ...

Reviews: