


9
29
29
A
30
29
30
29
28
28
a
a
b
P
A
P
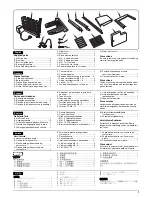
25
27
26
27
25
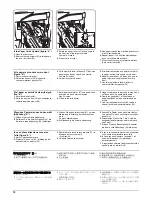
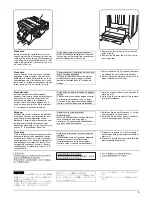
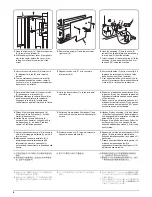
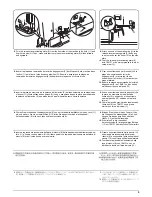
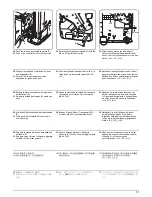
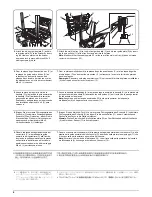
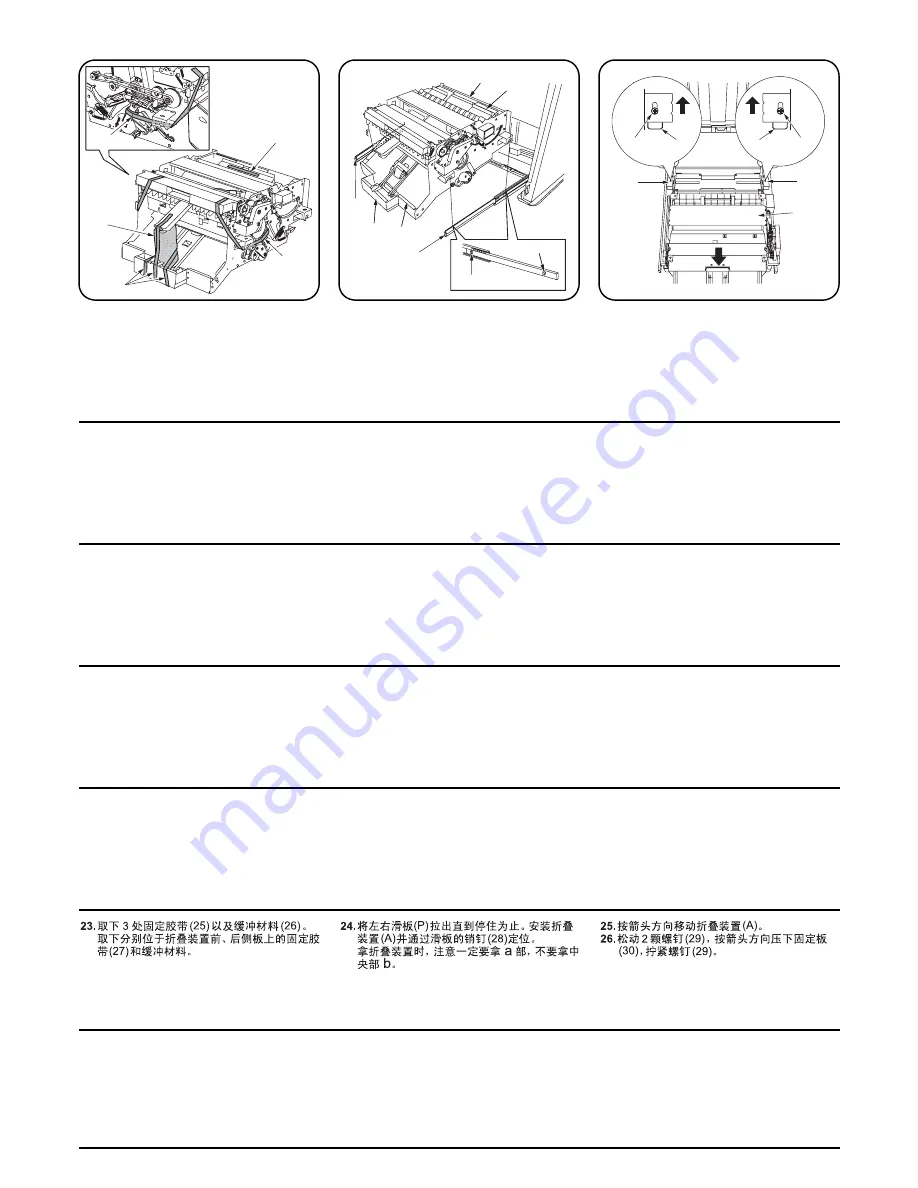
23.
Enlevez les trois bandes de fixation (25) et le
matériau d’emballage (26).
Enlevez la bande de fixation (27) et le
matériau d’emballage situés sur les
panneaux latéraux avant et arrière de l’unité
pour pages centrales dépliables.
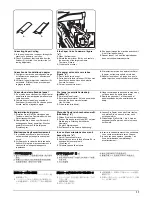
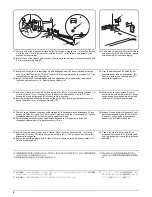
24.
Tirer sur les règles gauche et droite (P)
jusqu’à leur arrêt. Fixer l’unité pour pages
centrales dépliables (A) sur les pinces (28)
des règles.
Tenir l’unité par le point “a” indiqué sur
l’illustration. Ne pas la tenir par le point “b”
au centre de l’unité.
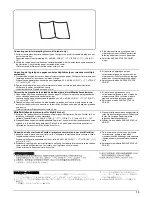
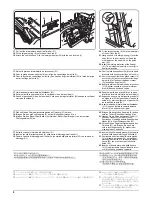
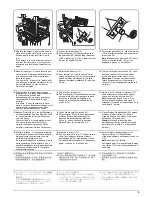
25.
Déplacer l’unité pour pages centrales
dépliables (A) dans le sens de la flèche.
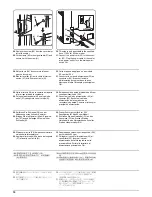
26.
Relâcher les deux vis (29) et pousser la
butée (30) dans le sens de la flèche puis
resserrer les vis (29).
23.
Quite las tres cintas de fijación (25) y el
material de amortiguamiento (26).
Quite la cinta de fijación (27) y los materiales
de amortiguamiento de las placas lateral
frontal y posterior central de la unidad de
plegado.
24.
Hale los deslizadores izquierdo y derecho
(P) hasta su extension máxima. Anexe la
unidad de plegado (A) a los pernos (28) de
los deslizadores.
Sujete la unidad de plegado por “a” indicado
en el gráfico. No la sujete por “b” ubicado en
el centro de la unidad.
25.
Deslice la unidad de plegado (A) hacia la
dirección de la flecha.
26.
Afloje los dos tornillos (29) y empuje el
retenedor (30) en la dirección de la flecha y
vuelva a apretar los tornillos (29).
23.
Entfernen Sie die drei Arretierklebebänder
(25) und das Polstermaterial (26).
Entfernen Sie das Arretierklebeband (27)
und das Polstermaterial an den vorderen
und hinteren Seitenplatten der
Mittelfalteinheit.
24.
Ziehen Sie die linken und rechten Schieber
(P) bis zum Anschlag heraus. Installieren Sie
die Mittelfalteinheit (A), die Positionierung
erfolgt über die Stifte (28) der Schieber.
Fassen Sie die Mittelfalt-Einheit wie in der
Abbildung dargestellt an “a” an. Fassen Sie
sie nicht an “b” in der Mitte der Einheit an.
25.
Schieben Sie die Mittelfalt-Einheit (A) in
Pfeilrichtung.
26.
Lösen Sie die zwei Schrauben (29), und
schieben Sie den Halter (30) in Pfeilrichtung.
Ziehen Sie dann die Schrauben (29) wieder
fest.
23.
Rimuovere i tre nastri di fissaggio (25) e il
materiale di imbottitura (26).
Rimuovere il nastro di fissaggio (27) e i
materiali di imbottitura presenti sulle piastre
laterali posteriore e anteriore dell’unità per
piegatura centrale.
24.
Spingere verso l’esterno i cursori destro e
sinistro (P), fino al loro arresto. Fissare
l’unità per piegatura centrale (A) sui piedini
(28) dei cursori.
Tenere l’unità per piegatura centrale per il
punto “a” indicato nell’illustrazione. Non
tenerla per il punto “b” al centro dell’unità.
25.
Far scivolare l’unità per piegatura centrale
(A) in direzione della freccia.
26.
Allentare le due viti (29) e spingere il fermo
(30) in direzione della freccia, quindi
stringere nuovamente le viti (29).
23.
イラストの固定テープ ( 2 5 ) 3 本、緩衝材
( 2 6 ) 1 個を外す。
中折りユニットの前・後側板の固定テープ
( 2 7 ) 及び緩衝材を外す。
24.
左右のスライダ ( P ) を最後まで引いて各ス
ライダのピン ( 2 8 ) に合わせて中折りユ
ニット ( A ) を取り付ける。
中折りユニットを持つときは、必ず a の部分
を持つようにすること。中央部の b は、
持た
ないように注意する。
25.
矢印の方向に中折りユニット ( A ) をずら
す。
26.
ビス ( 2 9 ) 2 本を緩めて固定板 ( 3 0 ) を矢
印の方向に押し込んで、ビス ( 2 9 ) を締め
付ける。
23.
Remove the three fixing tapes (25) and the
cushioning material (26).
Remove the fixing tape (27) and cushioning
materials provided on the centerfold unit’s
front and rear side plates.
24.
Pull the left and right sliders (P) out until they
stop. Install the centerfold unit (A) positioning
to the pins (28) of the sliders.
Hold the centerfold unit by “a” indicated in
the illustration. Do not hold it by “b” at the
center of the unit.
25.
Slide the centerfold unit (A) in the direction of
the arrow.
26.
Loosen the two screws (29) to push the
retainer (30) in the direction of the arrow and
retighten the screws (29).
Summary of Contents for TASKalfa 620
Page 1: ...SERVICE MANUAL Published in August 2009 842KP112 2KPSM062 Rev 2 TASKalfa 620 820 ...
Page 4: ...This page is intentionally left blank ...
Page 10: ...This page is intentionally left blank ...
Page 144: ...2KN 2KP 1 3 106 This page is intentionally left blank ...
Page 308: ...2KN 2KP 1 5 88 This page is intentionally left blank ...
Page 412: ...2KN 2KP 2 3 60 This page is intentionally left blank ...
Page 435: ...1 1 INSTALLATION GUIDE INSTALLATION GUIDE FOR SIDE FEEDER ...
Page 442: ...INSTALLATION GUIDE FOR LARGE SIZE SIDE FEEDER ...
Page 460: ...INSTALLATION GUIDE FOR DOCUMENT FINISHER ...
Page 475: ...INSTALLATION GUIDE FOR CENTERFOLD UNIT ...
Page 490: ...INSTALLATION GUIDE FOR MULTI JOB TRAY ...
Page 501: ...INSTALLATION GUIDE FOR PUNCH UNIT ...
Page 512: ...INSTALLATION GUIDE FOR STOPPER GUIDE ...
Page 515: ...INSTALLATION GUIDE FOR PRINTING SYSTEM ...
Page 518: ...INSTALLATION GUIDE FOR SCAN SYSTEM ...
Page 520: ......
Page 521: ......


