background image

OPERATION GUIDE

TASKalfa

6500i

8000i

Summary of Contents for TASKalfa 6500i

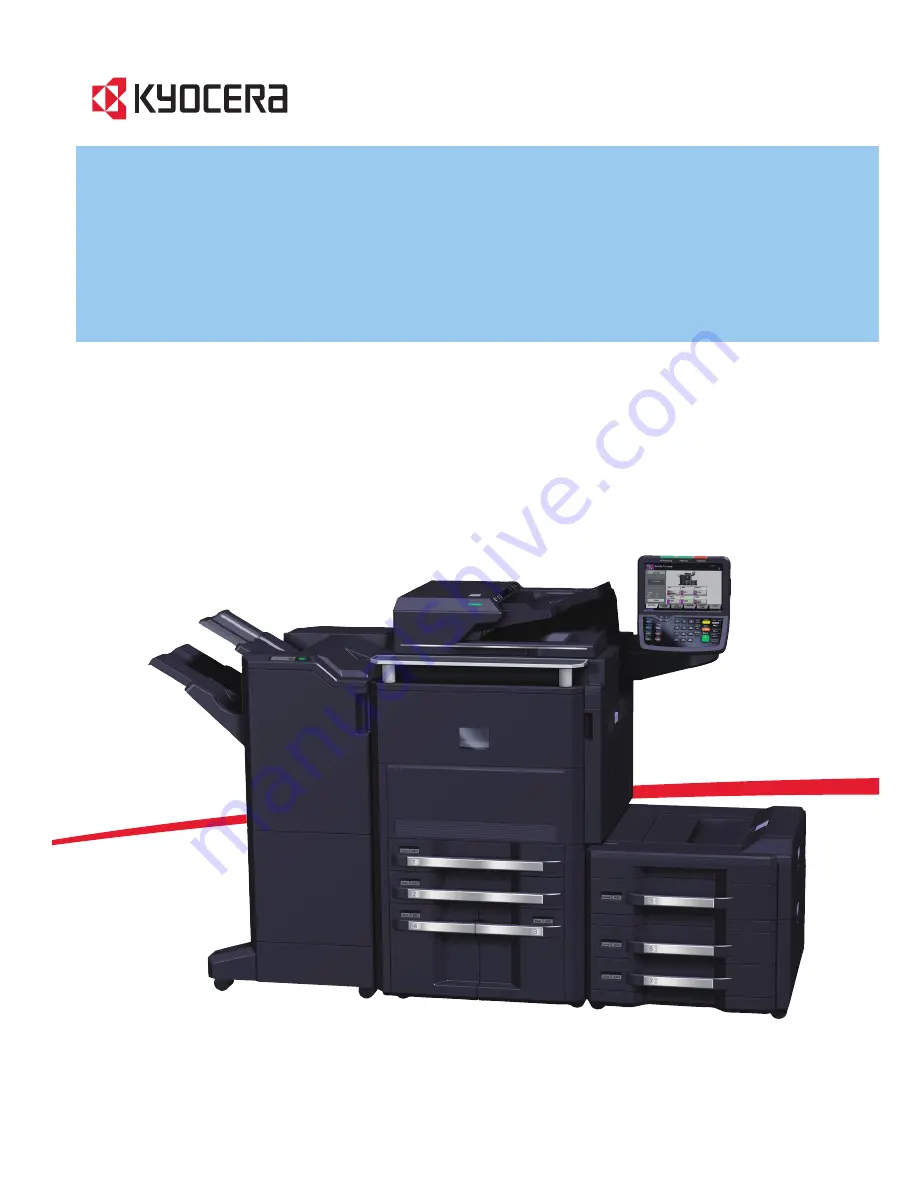
Page 1: ...OPERATION GUIDE TASKalfa 6500i 8000i ...

Page 2: ...pectively Included Guides The following guides are supplied with the machine Refer to them as necessary Quick Guide Describes the procedures for frequently used operations Safety Guide Provides safety and cautionary information for the installation and use of the machine Be sure to read this guide before using the machine Safety Guide 6500i 8000i Describes the machine installation space cautionary...

Page 3: ...required action are indicated inside the symbol Please contact your service representative to order a replacement if the safety warnings in this Operation Guide are illegible or if the guide itself is missing fee required NOTE An original which resembles a bank note closely may not be copied properly in some rare cases because this machine is equipped with a counterfeiting prevention function WARN...

Page 4: ...gle 2 12 Switching the Language for Display Language 2 13 Setting Date and Time 2 14 Network Setup LAN Cable Connection 2 15 Installing Software 2 18 Command Center RX Settings for E mail 2 26 Loading Paper 2 29 Loading Originals 2 46 3 Basic Operation Login Logout 3 2 Enter key and Quick No Search key 3 4 Touch Panel Display 3 5 Original Preview 3 6 Copying 3 7 Sending 3 22 Confirmation Screen of...

Page 5: ... Rotation 4 38 Negative Image 4 38 Mirror Image 4 39 Job Finish Notice 4 40 File Name Entry 4 42 Priority Override 4 42 Repeat Copy 4 43 DP Read Action 4 44 5 Printing Printing Printing from Applications 5 2 Using a Job Box 5 6 6 Sending Functions Original Size 6 2 Sending Size 6 4 Zoom 6 6 Centering 6 7 Mixed Size Originals 6 8 2 sided Book Original 6 11 Original Orientation 6 12 File Format 6 14...

Page 6: ...cking Job Status 8 2 Checking Job History 8 9 Pause and Resumption of Jobs 8 11 Canceling of Jobs 8 11 Priority Override for Waiting Jobs 8 12 Reordering Print Jobs 8 12 Checking the Remaining Amount of Toner and Paper Paper Supplies 8 13 Device Communication 8 14 9 Default Setting System Menu Common Settings 9 2 Copy 9 40 Send 9 43 Document Box Removable Memory 9 52 Printer 9 54 Report 9 61 Adjus...

Page 7: ...gular Maintenance 11 2 Cleaning 11 11 12 Troubleshooting Solving Malfunctions 12 2 Responding when Error Messages 12 7 Clearing Paper Jams 12 21 Appendix Optional Equipment Appendix 2 Character Entry Method Appendix 8 Paper Appendix 11 Specifications Appendix 19 Glossary Appendix 26 Index Index 1 ...

Page 8: ...ure to read Legal and Safety Information before using this machine Administrator tasks It copies It prints Copying with specific settings Printing Documents Stored in Removable USB Memory Print via a network Connecting Cables Network Setup LAN Cable Connection Install the printer driver on your computer 1 What you want to do Setup Loading Paper 2 29 Copying Functions 4 1 Printing Documents Stored ...

Page 9: ...e destination computer Plug in the USB memory 1 If the destination is not stored in the address book you can send by entering the address directly Setup Send as E mail Send to Folder SMB Saving Documents to USB Memory What you want to do Sending 3 22 Sending Functions 6 1 Operation Saving Documents to USB Memory Scan to USB 7 24 Edit Destination Address Book Adding One Touch Keys 9 77 1 Placing Or...

Page 10: ... Telephone Line Inch version only Network Setup LAN Cable Connection Install the Network FAX Driver on your computer 1 1 For more information refer to the Network FAX Driver Operation Guide 2 If the destination is not stored in the address book you can send the FAX by entering the address directly Setup What you want to do Using the Address Book 3 17 on the FAX System V Operation Guide Loading Pap...

Page 11: ...unch Staple page 3 18 Punch page 3 20 Paper Output page 4 13 Image Quality Density page 3 8 Original Image page 3 9 EcoPrint page 4 33 Sharpness page 4 34 Background Density Adj page 4 35 Prevent Bleed thru page 4 36 Layout Edit Zoom page 3 10 Combine page 4 14 Margin Centering page 4 16 Border Erase page 4 18 Booklet page 4 20 Duplex page 3 12 Cover page 4 22 Form Overlay page 4 23 Page page 4 24...

Page 12: ... Fax Operation Guide i FAX Addr Entry refer to Fax Operation Guide WSD Scan page 6 30 Org Sending Data Format Original Size page 6 2 Mixed Size Originals page 6 8 2 sided Book Original page 6 11 Original Orientation page 6 12 Sending Size page 6 4 File Format page 6 14 File Separation page 6 15 Long Original refer to Fax Operation Guide Color Image Quality Density page 6 19 Original Image page 6 1...

Page 13: ...g RX refer to Fax Operation Guide Send and Print page 6 36 Send and Store page 6 36 FTP Encrypted TX page 6 37 Text Stamp page 6 38 Bates Stamp page 6 39 Program page 3 55 Custom Box Store File Functions Original Size page 6 2 Mixed Size Originals page 6 8 2 sided Book Original page 6 11 Original Orientation page 6 12 Storing Size page 7 4 Prevent Bleed thru page 6 25 Density page 6 19 Original Im...

Page 14: ...Centering page 4 16 Booklet page 4 20 Duplex page 3 12 Cover page 4 22 Form Overlay page 7 9 Page page 4 24 Job Finish Notice page 4 40 File Name Entry page 4 42 Delete after Printed page 7 2 Priority Override page 4 42 EcoPrint page 4 33 Zoom page 6 6 Fold page 4 11 Text Stamp page 4 30 Bates Stamp page 4 31 Image Quality Density page 3 8 Original Image page 3 9 Sharpness page 4 34 Background Den...

Page 15: ...y refer to Fax Operation Guide FTP Encrypted TX page 6 37 Delete after Transmitted page 7 8 Zoom page 6 6 File Separation page 6 15 Text Stamp page 6 38 Bates Stamp page 6 39 Color Image Quality Density page 6 19 Original Image page 6 18 Resolution page 6 20 Color Selection page 6 23 Sharpness page 6 21 Background Density Adj page 6 22 Prevent Bleed thru page 6 25 Join page 7 11 Move Copy page 7 1...

Page 16: ... 19 Original Image page 6 18 Scan Resolution page 6 20 Color Selection page 6 23 Sharpness page 6 21 Background Density Adj page 6 22 Zoom page 6 6 Centering page 6 7 Border Erase page 6 26 Continuous Scan page 6 24 Job Finish Notice page 6 35 File Name Entry page 6 28 File Format page 6 14 Text Stamp page 6 38 Bates Stamp page 6 39 Print Functions Paper Selection page 4 3 Collate Offset page 3 14...

Page 17: ...2 Default Screen page 9 3 Sound Buzzer page 9 4 FAX Speaker Volume refer to Fax Operation Guide FAX Monitor Volume refer to Fax Operation Guide Keyboard Layout page Appendix 8 Original Paper Settings Custom Original Size page 9 4 Custom Paper Size page 9 5 Cassette Setting page 9 6 MP Tray Setting page 9 7 Media Type Setting page 9 8 Default Paper Source page 9 9 Original Auto Detect page 9 10 Med...

Page 18: ...ge Copy page 9 17 Org Image Send Store page 9 17 Scan Resolution page 9 18 FAX TX Resolution refer to Fax Operation Guide Color Selection page 9 18 File Format page 9 18 File Separation page 9 19 Backgrnd Density Copy page 9 19 BackgrndDens Send Store page 9 20 Prevent Bleed thru Copy page 9 20 Prevent Bleed Send Store page 9 20 Zoom page 9 21 Border Erase Default page 9 21 Border Erase to Back Pa...

Page 19: ...ection page 9 40 Auto Paper Selection page 9 41 Auto Priority page 9 41 Reserve Next Priority page 9 42 Preset Limit page 9 42 Quick Setup Registration page 9 42 Send Quick Setup Registration page 9 43 Dest Check before Send page 9 43 Entry Check for New Dest page 9 44 Color Type page 9 44 Default Screen page 9 45 Send and Forward page 9 45 Document Box Removable Memory Custom Box page 9 52 FAX Bo...

Page 20: ... page 9 59 Job Name page 9 59 User Name page 9 60 Paper Feed Mode page 9 60 KIR page 9 60 System Network Host Name page 9 90 TCP IP Setting TCP IP page 9 90 IPv4 page 9 91 IPv6 page 9 92 Protocol Detail page 9 94 NetWare page 9 95 AppleTalk page 9 95 WSD Scan page 9 96 WSD Print page 9 96 Enhanced WSD page 9 96 Enhanced WSD SSL page 9 97 Secure Protocol SSL page 9 97 IPP Security page 9 98 HTTP Se...

Page 21: ...cument Guard page 9 103 Data Security page 9 105 Optional Function page 9 107 Date Timer Date Time page 9 72 Date Format page 9 72 Time Zone page 9 73 Auto Panel Reset page 9 73 Auto Sleep page 9 74 Auto Error Clear page 9 75 Low Power Timer page 9 74 Panel Reset Timer page 9 73 Sleep Timer page 9 75 Interrupt Clear Timer page 9 76 Error Job Skip page 9 76 Error Clear Timer page 9 75 Adjustment Ma...

Page 22: ...end Result Report page 9 62 FAX RX Result Report refer to Fax Operation Guide Job Finish Notice Setting refer to Fax Operation Guide Sending Log History Auto Sending page 9 63 Send Log History page 9 64 Destination page 9 63 Job Log Subject page 9 64 Edit Destination Address Book page 9 77 One Touch Key page 9 81 Print List refer to Fax Operation Guide Address Book Defaults Sort page 9 83 Narrow D...

Page 23: ...ob Accounting Setting Job Accounting page 10 20 Print Accounting Report page 10 32 Total Job Accounting page 10 29 Each Job Accounting page 10 29 Accounting List page 10 22 Default Setting Apply Limit page 10 26 Copy Printer Count page 10 24 Default Counter Limit page 10 26 Count by Paper Size page 10 30 Unknown ID Job page 10 10 User Property page 10 9 Application page 9 107 Internet page 9 84 ...

Page 24: ...mperature Adjust the room temperature or Warning for low temperature Adjust the room temperature To use the machine under optimum conditions adjust the temperature and the humidity of your room if the message is displayed Avoid locations near a window or with exposure to direct sunlight Avoid locations with vibrations Avoid locations with drastic temperature fluctuations Avoid locations with direc...

Page 25: ...ning tenderness contact a physician If toner does happen to get on your skin wash with soap and water Do not attempt to force open or destroy the toner container or the waste toner box Other precautions Return the exhausted toner container and waste toner box to your dealer or service representative The collected toner container and waste toner box will be recycled or disposed in accordance with t...

Page 26: ...on of the product by user no radiation can leak from the machine This machine is classified as Class 1 laser product under IEC EN 60825 1 2007 Caution Performance of procedures other than those specified in this manual may result in hazardous radiation exposure These labels are attached to the laser scanner unit inside the machine and are not in a user access area The label shown below is attached...

Page 27: ...ical Health CDRH of the U S Food and Drug Administration FDA This act prohibits the sale of laser products in the U S without certification and applies to laser products manufactured after Aug 1 1976 The label shown below indicates compliance with the CDRH regulations and must be attached to laser products marketed in the United States On this machine the label is on the right 3 Optical unit When ...

Page 28: ...n the user is encouraged to try to correct the interference by one or more of the following measures Reorient or relocate the receiving antenna Increase the separation between the equipment and receiver Connect the equipment into an outlet on a circuit different from that to which the receiver is connected Consult the dealer or an experienced radio TV technician for help The use of a non shielded ...

Page 29: ...to obtain performance of this warranty the Customer must immediately notify the Authorized Kyocera Dealer from whom the product was purchased If the Kyocera Dealer is not able to provide service write to Kyocera at the address below for the name and address of the Authorized Kyocera Dealer in your area or check Kyocera s website at http www kyoceramita com This warranty does not cover MFPs or acce...

Page 30: ...k note Securities Stamp Passport Certificate Local laws and regulations may prohibit or restrict copying scanning of other items not mentioned above EN ISO 7779 Maschinenlärminformations Verordnung 3 GPSGV 06 01 2004 Der höchste Schalldruckpegel beträgt 70 dB A oder weniger gemäß EN ISO 7779 EK1 ITB 2000 Das Gerät ist nicht für die Benutzung im unmittelbaren Gesichtsfeld am Bildschirmarbeitsplatz ...

Page 31: ...chine This chapter provides information on the following topics Legal Information xxx Regarding Trade Names xxx Energy Saving Control Function xxxvii Automatic 2 Sided Copy Function xxxvii Paper Recycling xxxvii Energy Star ENERGY STAR Program xxxvii About this Operation Guide xxxviii ...

Page 32: ...ntries TypeBankG B TypeBankM M and Typebank OCR are trademarks of TypeBank All European language fonts installed in this machine are used under licensing agreement with Monotype Imaging Inc Helvetica Palatino and Times are registered trademarks of Linotype GmbH ITC Avant Garde Gothic ITC Bookman ITC ZapfChancery and ITC ZapfDingbats are registered trademarks of International Typeface Corporation U...

Page 33: ...Toolkit http www openssl org 4 The names OpenSSL Toolkit and OpenSSL Project must not be used to endorse or promote products derived from this software without prior written permission For written permission please contact openssl core openssl org 5 Products derived from this software may not be called OpenSSL nor may OpenSSL appear in their names without prior written permission of the OpenSSL Pr...

Page 34: ...the following disclaimer in the documentation and or other materials provided with the distribution 3 All advertising materials mentioning features or use of this software must display the following acknowledgment This product includes cryptographic software written by Eric Young eay cryptsoft com The word cryptographic can be left out if the rouines from the library being used are not cryptograph...

Page 35: ...oy all copies of the Software and Typefaces and documentation as requested 6 You agree that you will not modify alter disassemble decrypt reverse engineer or decompile the Software 7 Monotype Imaging warrants that for ninety 90 days after delivery the Software will perform in accordance with Monotype Imaging published specifications and the diskette will be free from defects in material and workma...

Page 36: ...EVER CAUSED AND ON ANY THEORY OF LIABILITY WHETHER IN CONTRACT STRICT LIABILITY OR TORT INCLUDING NEGLIGENCE OR OTHERWISE ARISING IN ANY WAY OUT OF THE USE OF THIS SOFTWARE EVEN IF ADVISED OF THE POSSIBILITY OF SUCH DAMAGE Apache License Version 2 0 Apache License Version 2 0 January 2004 http www apache org licenses TERMS AND CONDITIONS FOR USE REPRODUCTION AND DISTRIBUTION 1 Definitions License ...

Page 37: ... perpetual worldwide non exclusive no charge royalty free irrevocable except as stated in this section patent license to make have made use offer to sell sell import and otherwise transfer the Work where such license applies only to those patent claims licensable by such Contributor that are necessarily infringed by their Contribution s alone or by combination of their Contribution s with the Work...

Page 38: ...cluding any direct indirect special incidental or consequential damages of any character arising as a result of this License or out of the use or inability to use the Work including but not limited to damages for loss of goodwill work stoppage computer failure or malfunction or any and all other commercial damages or losses even if such Contributor has been advised of the possibility of such damag...

Page 39: ...atically enters Sleep when 60 minutes have passed since the device was last used The amount of time of no activity that must pass before Sleep is activated may be lengthened For more information see Sleep and Auto Sleep on page 2 12 Automatic 2 Sided Copy Function This device includes 2 sided copying as a standard function For example by copying two 1 sided originals onto a single sheet of paper a...

Page 40: ... Provides a basic guide to using document boxes Chapter 8 Status Job Cancel Explains how to check the job status and job history and how to cancel jobs being printed or waiting to print Also explains how to check the remaining paper and device status and how to cancel fax transmission Chapter 9 Default Setting System Menu Describes the System Menu options for general machine operation Chapter 10 M...

Page 41: ...nel Ready to copy is displayed Used to emphasize a key word phrase or references to additional information For more information refer to Sleep and Auto Sleep on page 2 9 Note Indicates supplemental information or operations for reference NOTE Important Indicates items that are required or prohibited so as to avoid problems IMPORTANT Caution Indicates what must be observed to prevent injury or mach...

Page 42: ...icate originals and paper placement directions on the touch panel Placement direction Indicated size The size of the original paper that can be used depends on the function and source tray For further details refer to the page detailing that function or source tray Vertical direction A4 B5 A5 B6 A6 16K Letter Statement For the originals paper dimension A is longer than B Horizontal direction A4 R ...

Page 43: ...1 1 1 Part Names This chapter identifies the machine parts and operation panel keys Operation Panel 1 2 Machine 1 4 ...

Page 44: ... Box screen Displays the Program screen Blinks during printing fax sending and receiving scan send and print data receiving Displays help guidance Displays the Status Job Cancel screen Displays the FAX screen Blinks while the machine is accessing the hard disk fax memory or USB memory general purpose item Lights or blinks when an error occurs and a job is stopped Ends operation logs out on the Adm...

Page 45: ... progress Starts copying and scanning operations and processing for setting operations Finalizes numeric key entry and finalizes screen during setting of functions Operates linked with the on screen OK Recalls already registered destinations and programs for sending Clears entered numbers and characters Numeric keys Enter numbers and symbols Displays number of sheets printed and number of pages sc...

Page 46: ...on 4 Document Processor 5 Operation Panel 6 Cassette 1 to 7 5 to 7 are Options 6 a Cassette 1 6 b Cassette 2 6 c Cassette 3 6 d Cassette 4 6 e Cassette 5 6 f Cassette 6 6 g Cassette 7 6 h Cassette 5 6 i Cassette 6 6 j Cassette 7 1 2 3 5 4 6 6 i 6 j 6 e 6 f 6 g 6 b 6 a 6 c 6 c 6 h ...

Page 47: ...t A2 9 USB Interface Connector B1 10 Option Interface 11 Original Size Indicator Plates 12 Platen 13 Slit Glass 14 Clip Holder 15 Toner Container Black 16 Lower Left Tray Option 17 Upper Left Tray Option 18 Handles 19 Waste Toner Box 20 Release button 21 Cleaning Brush 22 Toner Container Release Lever ...

Page 48: ...dth Adjusting Tab 26 USB Port A1 27 Right Tray 28 Right Cover 1 29 Right Cover 1 Lever 30 Right Cover 2 Lever 31 Right Cover 2 32 Paper Width Guide 33 Support Tray Section of the Multi Purpose Tray 34 Multi Purpose Tray 35 Handle 36 Right Cover 4 37 Right Cover 4 Lever 38 Right Cover 3 39 Right Cover 3 Lever 40 Main Power Switch ...

Page 49: ...onnection Method and Preparing Cables 2 3 Connecting Cables 2 5 Power On Off 2 9 Low Power Mode and Auto Low Power Mode 2 11 Sleep and Auto Sleep 2 12 Adjusting the Operation Panel Angle 2 12 Switching the Language for Display Language 2 13 Setting Date and Time 2 14 Network Setup LAN Cable Connection 2 15 Installing Software 2 18 Command Center RX Settings for E mail 2 26 Loading Paper 2 29 Loadi...

Page 50: ... documents are contained in the included DVD Product Library Refer to them as necessary Documents Operation Guide This Guide FAX Operation Guide Card Authentication Kit B Operation Guide Data Security Kit E Operation Guide Command Center RX Operation Guide Printer Driver User Guide Network FAX Driver Operation Guide KM NET for Direct Printing Operation Guide KMnet Viewer User Guide File Management...

Page 51: ... Option Send FTP Sends the scanned image as a data file on the FTP Send E mail Sends the image data of scanned originals to the desired recipient as a file attached to an E mail message Send SMB Saves the scanned image as a data file on your PC MFP FAX Administrator s PC Command Center RX Network settings Scanner default settings User and destination registration Network FAX Option TWAIN Scanning ...

Page 52: ...erface you use Available Standard Interfaces Function Interface Necessary Cable Printer Scanner Network FAX Function available when using optional fax kit For details on Network FAX refer to the Fax System V Operation Guide Network interface LAN 10BASE T or 100BASE TX 1000BASE T Shielded Printer USB interface USB2 0 compatible cable Hi Speed USB compliant Max 5 0 m Shielded ...

Page 53: ... machine 1 When the machine is powered up first press the Power key on the operation panel Check that the Power indicator the processing indicator and the memory indicator are off After this turn off the main power switch 2 Remove the covers from the machine in order from the top Make sure that lamps other than this lamp are off ...

Page 54: ...eft side of the body 4 Insert the cord into the groove 5 Attach the covers in order from the bottom taking care not to pinch the cord 6 Connect the other end of the cable to the hub 7 Power on the machine and configure the network For details refer to Network Setup LAN Cable Connection on page 2 15 ...

Page 55: ...en the machine is powered up first press the Power key on the operation panel Check that the Power indicator the processing indicator and the memory indicator are off After this turn off the main power switch 2 Remove the covers from the machine in order from the top Make sure that lamps other than this lamp are off ...

Page 56: ...ach the covers in order from the bottom taking care not to pinch the cord 6 Connect the other end of the cable to the PC Connecting the Power Cable Connect one end of the supplied power cable to the machine and the other end to a power outlet IMPORTANT Only use the power cable that comes with the machine 120 V specification model uses two supplied power cables ...

Page 57: ...ver and turn the main power switch on NOTE If the optional Data Security Kit is installed a message might display indicating the security function is being activated and time may be taken to start up when the power is turned on IMPORTANT When turning off the main power switch do not turn on the main power switch again immediately Wait more than 5 seconds and then turn on the main power switch ...

Page 58: ...lit or blinking Turning off the main power switch while the hard disk is operating may cause damage In case of not using the machine for an extended period of time CAUTION If this machine will be left unused for an extended period e g overnight turn it off at the main power switch If the machine will not be used for an even longer period of time e g vacation remove the power plug from the outlet a...

Page 59: ...ng Also when fax data arrives while the machine is in Low Power Mode when using the optional fax the machine automatically wakes up and starts printing To resume perform one of the following actions The machine will be ready within 30 seconds Press any key on the operation panel Open the document processor Place originals in the document processor Note that ambient environmental conditions such as...

Page 60: ... unlit When using the optional fax received fax data is printed out while the operation panel also remains unlit To resume press the Power key The machine will be ready within 30 seconds Note that ambient environmental conditions such as ventilation may cause the machine to respond more slowly Auto Sleep Auto Sleep automatically switches the machine into Sleep if left idle for a preset time in the...

Page 61: ...uage 1 Press the System Menu key 2 Press Common Settings and then Change of Language 3 Press the key for the language you want to use 4 Press OK The touch panel language will be changed Common Settings Language Set the language to use for the touch panel display Status Cancel OK English Deutsch Français Nederlands Ɋɭɫɫɤɢɣ Português Español Italiano 10 10 2010 10 10 ...

Page 62: ... time difference before setting the date and time If you change Date Time setting trial functions will be unavailable For details refer to Optional Function on page 9 107 1 Press the System Menu key 2 Press Date Timer and then Change of Time Zone 3 Select the region NOTE Press or to view the next region 4 Press Off or On of Summer Time and press OK NOTE If you select a region that does not utilize...

Page 63: ...CP IP IPv4 Setup by Entering IP Addresses Set up TCP IP IPv4 to connect to the Windows network Set the IP addresses subnet masks and gateway addresses The default settings are TCP IP Protocol On DHCP On Bonjour Off Auto IP On NOTE Prior to the IP address entries obtain permission from the network administrator Use the procedure below 1 Press the System Menu key 2 Press System Next of Network and t...

Page 64: ...e procedure below 1 Press the System Menu key 2 Press System Next of Network and then Next of TCP IP Setting 3 Press Change of TCP IP 4 Press On and then press OK 5 Press Change of IPv4 6 Press DHCP 7 Press On or Off of DHCP and then press OK 8 After changing the setting restart the network from the system menu or turn the machine OFF and then ON For detailed information on restarting the network ...

Page 65: ...IP 4 Press On and then press OK 5 Press Change of IPv4 6 Press Auto IP 7 Press On or Off of Auto IP and then press OK 8 After changing the setting restart the network from the system menu or turn the machine OFF and then ON For detailed information on restarting the network refer to Restart Network on page 9 101 AppleTalk Setup Select the Apple Talk network connection The default setting is On Ref...

Page 66: ...fax functionality The WIA driver cannot be installed on Windows XP If you are connecting this machine to a Windows PC follow the next steps to install the software The example shows you how to connect your machine to a Windows 7 PC Installing Printer Driver in Windows NOTE If the Welcome to the Found New Hardware Wizard dialog box displays select Cancel If the autorun screen is displayed click Run...

Page 67: ...Click Install Software 4 Click Express Mode 5 Select the print system to be installed and click Next NOTE If the print system detection window appears and the installer fails to detect the machine verify that it is connected to the computer via a network or USB cable and that it is turned on and click Reload ...

Page 68: ...r has been installed successfully Click Finish This completes the printer driver installation procedure Follow the on screen instructions to restart the system if required The TWAIN driver and WIA driver can be installed if the machine and computer are connected via a network You can install the WIA driver using Custom Mode If you are installing the TWAIN driver or WIA driver continue by configuri...

Page 69: ...o Printer on page 9 54 If connecting by Bonjour enable Bonjour in the machine s network settings For details refer to Bonjour Settings on page 2 16 In the Authenticate screen enter the name and password used to log in to the operating system 1 Insert the DVD Double click the Kyocera icon 2 Double click either OS X 10 2 and 10 3 Only OS X 10 4 Only or OS X 10 4 or higher depending on your Mac OS ve...

Page 70: ... connected 5 Open System Preferences and click Print Fax 6 Click the plus symbol 7 Click the IP icon for an IP connection or the AppleTalk icon for an AppleTalk connection and then enter the IP address and printer name Click Add NOTE When using a Bonjour connection select Default and click the item that appears in Printer Name The driver with the same name as the machine automatically appears in D...

Page 71: ...Preparation before Use 2 23 2 8 Select the options available for the machine and click Continue 9 The selected machine is added ...

Page 72: ... Box 5 Enter the machine s IP address or host name in the Scanner Address NOTE When the machine s IP address is unknown contact the Administrator 6 When using SSL select the checkbox beside SSL 7 When user login administration is enabled select the checkbox beside Authentication and enter a Login User Name up to 64 characters and Password up to 64 characters To use job accounting select the checkb...

Page 73: ... Cameras screen appears 2 Select the same name as this machine from WIA Drivers and click Properties 3 Enter the machine name or the host name 4 When using SSL select the checkbox beside SSL 5 When user login administration is enabled select the checkbox beside Authentication and enter a Login User Name up to 64 characters and Password up to 64 characters When job accounting is enabled select the ...

Page 74: ...s an administrator of the machine The default factory settings are set as shown below Login User Name Admin Login Password Admin The procedure for accessing Command Center RX is explained below 1 Launch your Web browser 2 In the Address or Location bar enter the machine s IP address e g http 10 183 51 41 The web page displays basic information about the machine and Command Center RX as well as the...

Page 75: ...his machine as E mail attachments check the following The network environment used to connect this machine to the mail server A full time connection via a LAN is recommended SMTP Settings Use Command Center RX to register the IP address or host name of the SMTP server If limits have been set on the size of E mail messages it may not be possible to send very large E mails The procedure for specifyi...

Page 76: ...tion The maximum length of the login password is 64 characters SMTP Security Enables or disables the SMTP Security When this protocol is enabled either SSL TLS or STARTTLS must be selected To enable SMTP security the SMTP port may have to be changed according to the server settings Typically 465 for SSL TLS and 25 or 587 for STARTTLS are well known SMTP ports POP before SMTP Timeout Set the amount...

Page 77: ...The number of sheets that can be held varies depending on your environment You should not use inkjet printer paper or any paper with a special surface coating Such paper may cause paper jams or other faults Cassette Name Page Standard Cassette 1 Cassette 2 Standard cassettes1 and 2 2 31 Cassette 3 Cassette 4 Standard cassettes3 and 4 2 34 Multi Purpose Tray Multi Purpose Tray 2 38 Option Cassette ...

Page 78: ...apled or clipped together This may damage the machine or cause poor image quality Avoid exposing opened paper to high temperatures and high humidity as dampness can be a cause of problems Seal any remaining paper after loading in the multi purpose tray or cassettes back in the paper storage bag If the machine will not be used for a prolonged period protect all paper from humidity by removing it fr...

Page 79: ... settings Refer to Specifying Paper Size and Media Type for the Cassettes on page 2 42 Media Type Setting on page 9 8 The cassettes can hold paper with weights up to 256 g m2 If you are using a paper weight between 106 and 256 g m2 set the media type to Thick and set the weight of the paper you are using Do not load thick paper that is heavier than 256 g m2 in the cassettes Use the multi purpose t...

Page 80: ...he paper length and width guides rest securely against the paper If there is a gap readjust the guides to fit the paper IMPORTANT Before loading the paper be sure that it is not curled or folded Paper that is curled or folded may cause paper jams Ensure that the loaded paper does not exceed the level indicator see illustration on the left When loading the paper keep the side that was closest to th...

Page 81: ...old the sheet in half and use with the side you want to display as the front side 7 Gently push the cassette back in NOTE If the machine will not be used for a prolonged period protect all paper from humidity by removing it from the cassettes and sealing it in the paper storage bag 8 Select the media type plain recycled etc loaded in the cassette Refer to Specifying Paper Size and Media Type for t...

Page 82: ...on page 9 8 The cassettes can hold paper with weights up to 256 g m2 If you are using a paper weight between 106 and 256 g m2 set the media type to Thick and set the weight of the paper you are using Do not load thick paper that is heavier than 256 g m2 in the cassettes Use the multi purpose tray for paper that is heavier than 256 g m2 1 Pull the cassette out toward you until it stops 2 Rotate the...

Page 83: ...er Size Guide B into the slot marked A4 on the bottom of the cassette and lock the hook it will make a click sound Gently try moving the Paper Size Guide B to verify that it is fixed B5 Open the Paper Size Guide B as shown insert into the slot marked B5 on the bottom of the cassette and lock the hook it will make a click sound Gently try moving the Paper Size Guide B to verify that it is fixed Let...

Page 84: ...oading the paper keep the print side facing up 7 Insert the indication on the sheet so as to match the size and type of paper to be placed The indication is printed on both sides of the sheet NOTE Fold the sheet in half and use with the side you want to display as the front side 8 Gently push the cassette back in NOTE If the machine will not be used for a prolonged period protect all paper from hu...

Page 85: ...the cassette After loading paper gently push the cassette back in NOTE The default paper size setting is A4 If you need the paper size changed to B5 or Letter contact your service representative IMPORTANT Before loading the paper be sure that it is not curled or folded Paper that is curled or folded may cause paper jams Ensure that the loaded paper does not exceed the level indicator see illustrat...

Page 86: ...u are using The capacity of the multi purpose tray is as follows A4 or smaller plain paper 80 g m2 recycled paper or color paper 150 sheets 64 g m2 plain paper 165 sheets B4 or larger plain paper 80 g m2 recycled paper or color paper 50 sheets 64 g m2 plain paper 55 sheets Hagaki 30 sheets OHP film 10 sheets Envelope DL Envelope C4 Envelope C5 Envelope 10 Commercial 10 Envelope 9 Commercial 9 Enve...

Page 87: ... is curled When loading paper into the multi purpose tray check that there is no paper left over in the tray from a previous job before loading the paper If there is just a small amount of paper left over in the multi purpose tray and you want to add more first remove the left over paper from the tray and include it with the new paper before loading the paper back into the tray If there is a gap b...

Page 88: ...pen the multi purpose tray 2 Adjust the paper width guides to the width of the envelope Acceptable Envelope Size Monarch 3 7 8 7 1 2 Envelope 10 Commercial 10 4 1 8 9 1 2 Envelope 9 Commercial 9 3 7 8 8 7 8 Envelope 6 Commercial 6 3 5 8 6 1 2 Envelope DL 110 220 mm Envelope C4 229 324 mm Envelope C5 162 229 mm Youkei 2 162 114 mm Youkei 4 235 105 mm ...

Page 89: ...E When you load envelopes in the multi purpose tray select the envelope type by referring to Specifying Paper Size and Media Type for the Multi Purpose Tray MP Tray Setting on page 2 44 When you load envelopes or cardstock in the multi purpose tray Load envelopes with the print side facing down e g When printing the address Open the flap Landscape form envelopes Portrait form envelopes Cardstock H...

Page 90: ...ize is automatically detected and selected Select whether the paper is in Metric size or in Inch size Standard Sizes 1 Only A4 Letter and B5 can be specified in cassettes 6 and 7 when cassettes 3 and 4 and the optional Large Capacity Side Feeder 500 1 500 sheet x 2 are used Select from the standard sizes Selectable paper sizes are as follows Inch models Ledger Legal Letter Letter R Statement R 12 ...

Page 91: ...t To select the paper size press Standard Sizes 1 or Standard Sizes 2 and select the paper size 5 Press OK The previous screen reappears 6 Press Change of Media Type and select the media type Then press OK Common Settings Paper Size Set cassette paper size Standard Sizes 1 Auto Status A3 A4 Standard Sizes 2 A4 A5 B4 B5 B5 Cancel OK 216x340mm 10 10 2010 10 10 Common Settings Media Type Select type ...

Page 92: ...zes are as follows Inch models A3 B4 A4 A4 R B5 B5 R A5 R B6 R A6 R Folio 8K 16K 16K R Metric models Ledger Legal Letter Letter R Statement R 12 18 Oficio II Executive 8K 16K 16K R Others Select from special standard sizes and custom sizes Selectable paper sizes are as follows ISO B5 Envelope 10 Commercial 10 Envelope 9 Commercial 9 Envelope 6 Commercial 6 3 4 Envelope Monarch Envelope DL Envelope...

Page 93: ...s 5 Press Change of Media Type and select the media type Then press OK Common Settings Paper Size Set the multi purpose tray paper size Standard Sizes 1 Auto Standard Sizes 2 Others Size Entry A3 A4 A4 A5 A6 B4 B5 B5 Status Cancel OK B6 216x340mm 10 10 2010 10 10 Common Settings Paper Size Set the multi purpose tray paper size Standard Sizes 1 X 148 432 297 Auto Status Keys Y 98 297 210 Keys Stand...

Page 94: ...riginal eject table Originals left on the original table or on the original eject table may fall off when the document processor is opened When placing books or magazines on the machine do so with the document processor in the open position Shadows may be produced around the edges and in the middle of open faced originals 2 Place the original Put the scanning side facedown and align it flush again...

Page 95: ...eparation before Use 2 47 2 Original size indicator plates Inch models Metric models 3 Close the document processor CAUTION Do not leave the document processor open as there is a danger of personal injury ...

Page 96: ...OHP film Carbon paper Originals with very slippery surfaces Originals with adhesive tape or glue Wet originals Originals with correction fluid which is not dried Irregularly shaped non rectangular originals Originals with cut out sections Crumpled paper Originals with folds Straighten the folds before loading Failure to do so may cause the originals to jam Originals bound with clips or staples Rem...

Page 97: ...s far as it will go The original placement indicator will be lit NOTE For details on Original Orientation refer to When placing originals on the document processor on page 4 9 IMPORTANT Confirm that the original width guides exactly fit the originals If there is a gap readjust the original width guides The gap may cause the originals to jam Ensure that loaded originals do not exceed the level indi...

Page 98: ...indicator The original placement indicator is lit or unlit depending on how originals are placed Indications and their status are as follows Green lit Original is placed properly Green blinking Original is not placed properly Remove and place again ...

Page 99: ... 3 7 Sending 3 22 Confirmation Screen of Destinations 3 28 Preparation for sending a document to a PC 3 29 Specifying Destination 3 39 Using the Document Box 3 42 Canceling Jobs 3 51 Quick Setup Screen 3 52 Program 3 55 Registering Shortcuts Copy Send and Document Box Settings 3 57 Using the Internet Browser 3 58 Using Weekly Timer 3 60 Checking Counter 3 61 Help Screen 3 61 ...

Page 100: ...hown appears during operations press Login User Name Press Keys to enter the login data using the numeric keys 2 Enter the login user name and press OK NOTE Refer to the Character Entry Method on Appendix 8 for details on entering characters 3 Press Login Password Press Keys to enter the login data using the numeric keys 4 Enter the password and press OK 5 Check the login user name and password ar...

Page 101: ... Logout key to return to the login user name login password entry screen Users are automatically logged out in the following circumstances When the machine is put to Sleep by pressing the Power key When the Auto Sleep function is activated When the auto panel reset function is activated When Auto Low Power Mode is activated When the machine is placed in Low Power Mode by pressing the Energy Saver ...

Page 102: ...anel The use of the Quick No Search key is explained below using an example in which a speed dial number is specified and used to select a destination For more information on speed dialing refer to Specifying Destination on page 3 39 1 Press the Quick No Search key or No in the basic send screen 2 In the number entry screen use the numeric keys to enter the speed dial number 3 If you entered a spe...

Page 103: ...y is grayed out and cannot be selected Cannot be used in combination with a feature that is already selected Use prohibited by user control Preview has been pressed Refer to Original Preview on page 3 6 Cannot be used because an option is not installed Example When a finisher is not installed Staple Punch does not appear Duplex Copy Image Copies Image Quality Org Paper Finishing Quick Setup Layout...

Page 104: ... the new settings NOTE If you scan a multi page original only the first page is previewed 5 If there is no problem with the preview image press the Start key Copying begins Copies Image Quality Org Paper Finishing Quick Setup Layout Edit Advanced Setup Status Shortcut 1 Shortcut 4 Shortcut 3 Shortcut 2 Shortcut 6 Shortcut 5 Program 10 10 2010 10 10 Staple Punch Normal 0 Density Paper Selection Aut...

Page 105: ...that matches the size of the original will be selected automatically To change the paper size press Org Paper Finishing Paper Selection and select the desired paper source 4 Use the numeric keys to enter the copy quantity Specify the desired number up to 999 5 Press the Start key to start copying Copies Image Quality Org Paper Finishing Quick Setup Layout Edit Advanced Setup Status Shortcut 1 Shor...

Page 106: ...ace the originals on the platen 3 Set the original on the platen and press Image Quality Density 4 Adjust density pressing 3 Lighter to 3 Darker You can change the density level 3 Lighter to 3 Darker in half steps 5 Press OK 6 Press the Start key Copying begins Status Copies Add Shortcut Cancel OK Darker Density Normal Lighter 3 2 1 0 1 3 2 2 5 1 5 0 5 0 5 1 5 2 5 10 10 2010 10 10 100 A4 A4 Previe...

Page 107: ...ginally Book Magazine For mixed text and photos printed in a magazine etc Photo Printer Output For photos printed on this machine originally Book Magazine For photos printed in a magazine etc Photo Paper Suitable for photographs taken with a camera Text Off original type not set For documents that are mostly text and were originally printed on this machine On original type is set Sharply renders p...

Page 108: ...he following magnifications are available Letter R Ledger 129 Statement R 64 A3 141 A5 70 A4 25 400 Model Zoom Level Original Copy Inch Models 100 Auto 400 Max 200 STMT Ledger 154 STMT Legal 129 Letter Ledger 121 Legal Ledger 78 Legal Letter 77 Ledger Legal 64 Ledger Letter 50 Ledger STMT 25 Min Metric Models 100 Auto 400 Max 200 A5 A3 141 A4 A3 A5 A4 127 Folio A3 106 11 15 A3 90 Folio A4 75 11 15...

Page 109: ...ress XY Zoom Press or to change the displayed magnifications of X horizontal and Y vertical You can also enter the magnification directly using the numeric keys by pressing Keys Press Original Orientation to select orientation of the originals either Top Edge on Top or Top Edge on Left Then press OK 5 Press OK 6 Press the Start key Copying begins Y X Status Cancel OK Zoom Add Shortcut 25 400 Stand...

Page 110: ...d 180 Copies can be bound on the top edge facing the same orientation when turning the pages Two sided to One sided Copies each side of a two sided original onto two individual sheets The document processor is required The following binding options are available Binding Left Right Images on the second sides are not rotated Binding Top Images on the second sides are rotated 180 Two sided to Two sid...

Page 111: ...k to Two sided mode Original A3 B4 A4 R B5 R A5 R Ledger Letter R and 8K Paper A4 B5 and Letter The procedure for using two sided duplex copying is explained below 1 Press the Copy key 2 Place the originals on the platen 3 Press Layout Edit and then Duplex 4 Select the desired Duplex option 5 If you choose 1 sided 2 sided or 2 sided 2 sided select the binding edge of the finished copies of Finishi...

Page 112: ...elow Collate Scan multiple originals and deliver complete sets of copies as required according to page number Offset Without Document Finisher If the optional document finisher is not installed when you use offsetting printed copies are produced after rotating each set or page by 90º NOTE To use sorting the same size of paper as the selected paper tray must be loaded in a different orientation in ...

Page 113: ...n the platen 3 Press Org Paper Finishing and then Collate Offset 4 To use collate copying press On of Collate To use offset copying press Each Set of Offset Press OK If Off is selected for Collate press Off or Each Page of Offset 5 Press OK 6 Press the Start key Copying begins 3 2 1 3 2 1 3 2 1 3 2 1 Original Copy each set Off Each Set Off On Collate Offset Offset Copies Status Cancel OK Add Short...

Page 114: ...o Off The Copying screen appears on the touch panel during printing 1 Press Reserve Next The default screen for copying appears 2 Place the originals onto the machine for reserving copy and configure the copy settings 3 Press the Start key The machine starts scanning the originals When the current print job ends the reserved copy job is printed Copies Image Quality Org Paper Finishing Quick Setup ...

Page 115: ...to Interrupt Clear Timer on page 9 76 1 Press the Interrupt key The current print job is temporarily interrupted 2 Place the originals onto the machine for interrupt copy and configure the copy settings 3 Press the Start key to start interrupt copying 4 When interrupt copying ends press the Interrupt key The machine resumes the paused print jobs Copies Image Quality Org Paper Finishing Quick Setup...

Page 116: ...bers of sheets that can be stapled refer to Document Finisher Option on page Appendix 24 The following stapling options and orientations are available NOTE B5 R and 16K R one staple is not diagonal Original Orientation Top Edge Back Edge Original Orientation Top Edge Back Edge Original Orientation Left Top Edge Left top corner Original Orientation Left Top Edge Left top corner Cassette Paper Load ...

Page 117: ...or Top Edge on Left Then press OK 6 Press OK 7 Press the Start key Copying begins Mixed Size Stapling Even with mixed paper sizes if the sizes have the same width or same length as shown in the combinations below the output can be stapled The maximum number of sheets that can be stapled is 30 A3 and A4 B4 and B5 Ledger and Letter Ledger and Letter R 8K and 16K Staple Punch Top Right Staple Top Lef...

Page 118: ... details on paper sizes that can be punched refer to Hole Punch Unit Option on page Appendix 24 The orientations of the original and corresponding punch positions are as follows NOTE The inch model provides two hole and three hole punching The metric model provides two hole and four hole punching Original Copy Document processor Platen Orientation of Original ...

Page 119: ...s OK 6 Press OK 7 Press the Start key If the original is placed on the platen Place the next original and press the Start key Copying begins If all original pages have been scanned press Finish Scan Copying begins Staple Punch Top Right Staple Top Left 2 staples Top 2 staples Right Copies Status Cancel OK Add Shortcut Top Edge on Top Original Orientation Punch Off Off Bind and Fold 2 staples Left ...

Page 120: ...the destination folder To set up the PC Folder contact your administrator Create Register a Document Box when a Document Box is selected as the destination Select detailed transmission settings to select a Document Box as the destination or to print and send the image at the same time Follow the steps below for basic sending The following five options are available Send as E mail Sends a scanned o...

Page 121: ...an be specified NOTE When Add to Addr Book is displayed the destinations are registered in the Address Book 6 Press OK The destinations are registered in the destination list 7 Check the destination list Select a destination and press Detail Edit to check and edit it Select a destination and press Delete to remove the destination from the list E mail Address Add a new e mail destination Press E ma...

Page 122: ...ed folder of any PC Stores a scanned original image in a folder of an FTP server NOTE Refer to Creating a Shared Folder on page 3 31 for details on how to share a folder Be sure that SMB Protocol or FTP in the Command Center RX is On For details refer to the Command Center RX Operation Guide 1 Press the Send key Displays the screen for sending NOTE Depending on the settings the address book screen...

Page 123: ...gin user name and login password name of the destination PC the shared folders appear Select the folder that you want to specify and press Next The address of the selected shared folder is set NOTE Refer to the Character Entry Method on Appendix 8 for details on entering characters Press Connection Test to check the connection to the computer you chose If the connection fails check the entries you...

Page 124: ... the data Up to 64 characters Path Path to the receiving folder such as follows For example User ScanData Up to 128 characters Login User Name User name to access the PC For example abcdnet james smith Up to 64 characters Login Password Password to access the PC Up to 64 characters Item Data to be entered Max characters Host Name To specify a port number different from the default 21 enter using t...

Page 125: ... Destination page 9 44 the confirmation screen appears Enter the same host name and path again and press OK When selecting On for Destination Check before Send page 9 43 the confirmation screen appears after pressing the Start key For details refer to Confirmation Screen of Destinations on page 3 28 10 Press the Start key Sending begins Status Destination Detail ABCD abcd efg com Address Book Fold...

Page 126: ...lected destination To delete the destination select the destination you want to delete and press Delete Press Yes in the confirmation screen The destination is deleted To add the destination press Cancel and then return to the destination screen 2 Press Check NOTE Be sure to confirm every destination by displaying them on the touch panel You cannot press Check unless you have confirmed every desti...

Page 127: ...operties Check the computer name in the window that appears In Windows XP right click My Computer and select Properties The System Properties dialog box appears Click the Computer Name tab in the window that appears and check the computer name If there is a workgroup All characters appearing in Full computer name should be entered in Host Name Example PC4050 If there is a domain The characters to ...

Page 128: ...ser name for logging onto Windows 1 From the Start menu select All Programs or Programs Accessories and then Command Prompt The Command Prompt window appears 2 At the Command Prompt enter net config workstation and then click Enter Screen example user name james smith and domain name ABCDNET ...

Page 129: ... View tab and remove the checkmark from Use Sharing Wizard Recommended in Advanced settings In Windows XP click the View tab and remove the checkmark from Use Simple File Sharing Recommended in Advanced settings 3 Click the OK button to close the Folder Options screen 1 Create a folder on the local disk C NOTE For example create a folder with the name scannerdata on the local disk C 2 Right click ...

Page 130: ...s In Windows XP select Share this folder and click the Permissions button 4 Click the Add button 5 Enter the user name in the text box and click the OK button Click the location button and select the location To select the area to be searched select a location If you are in a domain your domain is selected by default as the area to be searched ...

Page 131: ...hen security it is recommended that you select Everyone and remove the Read permission checkmark 7 Click the OK button in the Advanced Sharing screen to close the screen 8 Click the Security tab and then click the Edit button In Windows XP click the Security tab and then click the Add button 9 Select the entered user make sure that checkmarks appear in allow Modify and allow Read execute and click...

Page 132: ...en click Search 2 Click pc4050 scannerdata that appears in the search results In Windows XP double click the computer pc4050 that appears in the search results 3 Click pc4050 scannerdata that appears in the search results Check the address bar The third and following text strings f should be entered for the path In Windows XP double click the scannerdata folder and check the address bar The text s...

Page 133: ...E Log on to Windows with administrator privileges Checking file and printer sharing 1 From the Start menu select Control Panel System and Security and Allow a program through Windows Firewall NOTE If the User Account Control dialog box appears click the Continue button 2 Click Change settings select the File and Printer Sharing checkbox and click OK ...

Page 134: ...eration 3 36 Adding a port 1 From the Start menu select Control Panel System and Security and Check firewall status 2 Click Advanced settings 3 Click Inbound Rules 4 Click New Rule 5 Select Port and click Next ...

Page 135: ...Basic Operation 3 37 3 6 Select TCP select Specific local ports enter 139 and click Next 7 Select Allow the connection and click Next 8 Make sure all checkboxes are selected and click Next ...

Page 136: ...Security Center and then Check Firewall Status or Windows Firewall If the User Account Control dialog box appears click the Continue button 2 Click the Exceptions tab and then the Add port button 3 Specify Add a Port settings Enter any name in Name example Scan to SMB This will be the name of the new port Enter 139 in Port Number Select TCP for Protocol 4 Click the OK button to close the Add a Por...

Page 137: ...stinations are listed by selecting Name or No from the Sort pull down menu NOTE To cancel the selection press the check box and remove the checkmark For details on the external address book refer to Command Center RX Operation Guide 3 Press OK to register the selected destination in the destination list NOTE To delete a destination in the list select the destination and press Delete To change the ...

Page 138: ...ype Name Detail Folder Detail Address Book Sort Addr Book 0001 0002 0005 0004 0003 ABCD abcd efg com TUVW tuvw xyz com Group1 Group2 Group3 Name Register Edit Address Book 1 2 i FAX FAX ABC DEF JKL MNO PQRS TUV WXYZ GHI 0 9 10 10 2010 10 10 1 2 3 4 Keys used Search type Subjects searched 1 Search by name Search by registered name 2 Search by address number Search by registered address number 3 Adv...

Page 139: ... Up to 100 Folders SMP FTP Total of 10 SMB and FTP FAX Up to 500 i FAX Up to 100 Also depending on the settings you can send and print at the same time Procedures are the same as used in specifying the destinations of respective types Continue to enter E mail address or folder path so that they appear in the destination list Press the Start key to start transmission to all destinations at one time...

Page 140: ...r to Deletion of Job Retention on page 7 19 Private Print Stored Job Box page 7 14 In Private Printing you can specify that a job is not printed until you release the job at the operation panel When sending the job from the application software specify a 4 digit access code in the printer driver The job is released for printing by entering the access code on the operation panel ensuring confidenti...

Page 141: ...hen power is turned off the original data will be deleted NOTE Repeat Copy function is not available when the optional Data Security Kit is installed Form for Form Overlay Box page 7 20 Image Overlay feature copies the original document overlaid with a form or image This Job Box is used to store the forms or images for overlaying Removable Memory Box A USB memory inserted into the USB Port A1 of t...

Page 142: ...egistering boxes refer to Creating a New Custom Box Add Edit Box on page 7 2 You cannot access boxes if you forget your password In this event access the machine using administrator privileges and overwrite your box password Refer to Adding a User Local User List on page 10 5 for the default login user name and password 3 Select the box containing the document you want to work with and press Open ...

Page 143: ...om Box Job Box Removable Memory Status FAX Box Search No Search Name Program 10 10 2010 10 10 Listing the boxes by number in ascending descending order Listing the boxes by name in alphabetical order Registers new boxes and checks modifies or deletes box information Opens the selected box Displays the details for the selected box Saves the document in the selected box Listing the boxes by owner in...

Page 144: ... Name 10 10 2010 10 10 Selecting more than one document at a time Listing the documents by time of update in ascending descending order Listing the documents by size in ascending descending order Listing the documents by name in alphabetical order Previews the selected document Highlighting a document to display its details with Detail Selecting documents by checking checkboxes Box Detail 1 1 2008...

Page 145: ...d press OK 4 If you have changed the details press Save and then press Yes in the confirmation screen If you did not change the details press No 5 Press Close The display returns to the default Document Box screen Document Box Removable Memory Add Edit Box No Name Owner Used 0001 SALES Anonymous 1 1 Add Detail Edit Delete Close Status Search Name Search No 10 10 2010 10 10 Status Box Box No Box Na...

Page 146: ... the document details The operations available in the preview screen are shown below 3 When you have finished previewing documents or checking document details press Close Close Preview No 1 6 2007040410574501 Status Size Resol Color 10 10 2010 10 10 Full Color 300x300dpi A4 When you have zoomed in you can use these keys to move the displayed area In multiple page documents you can change pages by...

Page 147: ...ate all boxes User A user can gain access and manipulate his her own boxes and the shared boxes Access level Accessibility Administrator User Operation Creating a box Yes No Changing box owner Yes No Deleting a box Others Yes No Owner Yes Yes Box information Changing box number Others Yes No Owner Yes No Renaming a box Others Yes No Owner Yes Yes Changing the password to a box Others Yes No Owner ...

Page 148: ...he permission Press Change of Permission and select either Private or Shared Then press OK NOTE For information on specifying other settings refer to Creating a New Custom Box Add Edit Box on page 7 2 Working With User Privileges When User Login Administration is Enabled When user login administration is enabled the owner of a box with user privileges set can change the following box information t...

Page 149: ...g select Cancel and then press Yes in the confirmation screen NOTE If Reserve Next Priority refer to page 9 42 is set to Off The Copying screen appears in the touch panel during printing 1 Press the Stop key or Cancel The current print job is canceled Canceling printing from a computer To cancel a print job executed using the printer driver before the printer begins printing do the following 1 Dou...

Page 150: ...the functions available for registration are as follows For details on Quick Setup Screen for FAX refer to the Fax System V Operation Guide Function Default Registration Functions Available for Registration Copying 1 Paper Selection 2 Zoom 3 Density 4 Duplex 5 Combine 6 Staple Punch Paper Selection Zoom Density Duplex Combine Staple Punch Original Orientation Collate Offset Original Image Original...

Page 151: ...e Background Density Adj Sending From Box 1 File Format 2 Delete after Transmitted 3 FAX TX Resolution 4 Sending Size File Format Delete after Transmitted FAX TX Resolution Sending Size Printing From Box 1 Paper Selection 2 Delete after Printed 3 Collate Offset 4 Duplex 5 Combine 6 Staple Punch Paper Selection Delete after Printed Collate Offset Duplex Staple Punch Combine Function Default Registr...

Page 152: ...ement location 4 Press OK A confirmation screen appears Press Yes The Original Image Quality function will be newly registered Key 1 Cancel OK Off Key 2 Key 3 Key 4 Key 5 Key 6 Copy Original Image Add Original Image to the Quick Setup screen Status 10 10 2010 10 10 ...

Page 153: ...ion 1 Press the Program key while the copy mode is accessed 2 Press Add and press a number 01 to 50 for the program number If entering Program screen from the Copy screen Send screen or Document Box screen go to step 4 NOTE If you select a program number already registered the currently registered functions can be replaced with a new set of functions 3 Check that Copy is selected and press Next 4 ...

Page 154: ... program number and program name or delete program Use the procedure below to edit or delete a program 1 Press the Program key 2 Press Edit and press the key s corresponding to the program number 01 to 50 to change or delete 3 To edit a program use the procedure for registering a program and press Change Then change the program number and program name and press Save Choose Yes in the confirmation ...

Page 155: ...dy registered the currently registered shortcut can be replaced with a new one 3 Enter the shortcut name and press Save to add the shortcut Editing and Deleting Shortcuts Follow the steps shown below to change a shortcut number name or delete a shortcut 1 In the setup screen of each function press Add Shortcut in the bottom of the screen 2 Press Edit and press the keys corresponding to the shortcu...

Page 156: ...he application list screen appears 2 Press Internet Browser The Internet browser starts up 3 Use the browser screen to browse web pages For information on how to use the browser screen refer to Using the Browser Screen on page 3 59 4 To exit the browser press X Close and then press Yes in the exit confirmation screen The application list screen reappears NOTE You can specify preferences such as th...

Page 157: ...when you are viewing a protected page Loader Progress bar Shows the status of page loading When the browser is loading a web page the loader changes to an animated display Menu Displays the browser setup menu You can use this menu to specify the browser s display magnification set the text encoding scheme and check the server certificate Search Search Internet Retrieval in page Displays a search m...

Page 158: ...ime on page 2 14 Setting Weekly Timer 1 Press the Application key The application list screen appears 2 Press Weekly Timer Weekly Timer starts up 3 Press the Enable the Application checkbox so that a checkmark appears 4 Select the day you want to set and press Edit 5 Press the Enable checkboxes for power ON OFF so that checkmarks appear press or to enter the times and press OK Keys can be pressed ...

Page 159: ...s Total FAX Copy 1800 200 600 FAX Others 1000 600 300 100 1000 Printed Pages by Paper Size 10 10 2010 10 10 Try It Select paper source by choosing a Cassette or MP Tray Selecting Paper Source 1 2 End Setting Procedure 1 Press Org Paper Finishing 2 Press Paper Selection Display List Status 10 10 2010 10 10 Displays information about functions and machine operation Help titles Show the screen of the...

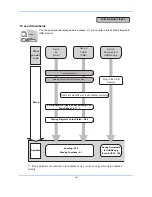
Page 160: ...Basic Operation 3 62 ...

Page 161: ...Centering 4 16 Border Erase 4 18 Booklet 4 20 Cover 4 22 Form Overlay 4 23 Page 4 24 Memo Page 4 26 Image Repeat 4 28 Text Stamp 4 30 Bates Stamp 4 31 EcoPrint 4 33 Sharpness 4 34 Background Density Adj 4 35 Prevent Bleed thru 4 36 Continuous Scan 4 37 Auto Image Rotation 4 38 Negative Image 4 38 Mirror Image 4 39 Job Finish Notice 4 40 File Name Entry 4 42 Priority Override 4 42 Repeat Copy 4 43 ...

Page 162: ... R B5 B5 R A5 A5 R B6 B6 R A6 R Folio 8K 16K 16K R and 216 340mm Metric models Ledger Legal Letter Letter R Statement Statement R Oficio II 11 15 8K 16K and 16K R Others Select from envelope postcard or the custom sized originals For instructions on how to specify the custom original sizes Custom 1 to 4 refer to Custom Original Size on page 9 4 The input units can be changed in the System menu Ref...

Page 163: ...n page 11 14 Selecting the Cassette Use the procedure below to select the paper supply cassette 1 Press the Copy key 2 Place the originals on the platen 3 Press Org Paper Finishing and then Paper Selection 4 Press the key of the paper source corresponding to the required paper size The cassette in which the paper is loaded is selected If Auto is selected the paper matching the size of the original...

Page 164: ...rd sizes and custom sizes ISO B5 Envelope 10 Commercial 10 Envelope 9 Commercial 9 Envelope 6 Commercial 6 3 4 Envelope Monarch Envelope DL Envelope C5 Envelope C4 Hagaki Oufuku hagaki Youkei 4 Youkei 2 and Custom 1 to 4 For instructions on how to specify the custom paper sizes Custom 1 to 4 refer to Custom Paper Size on page 9 5 Size Entry Enter the size not included in the standard sizes 1 and 2...

Page 165: ...art key to start scanning the originals 10 If the specified size of paper is not loaded in the paper source cassette or multi purpose tray a confirmation screen appears When Auto is used and the same size of paper as the detected original size is not loaded a paper confirmation screen appears Load the required paper in the multi purpose tray and press Continue to start copying Paper Selection Pape...

Page 166: ...originals of different sizes can be placed in the document processor at the same time Supported Combinations of Originals Originals of the Same Width The supported combinations of originals are as follows Ledger and Letter A3 and A4 Ledger and Letter R Folio and A4 R B4 and B5 Ledger A3 Ledger A3 Letter A4 Letter A4 Legal Folio Letter R A4 R Legal Folio Letter R A4 R ...

Page 167: ...When mixing the original sizes as using the following combination A4 R B5 R and Folio make sure to set the System Menu key Common Settings Original Paper Settings Original Auto Detect to On for Folio For more information refer to Original Auto Detect Available for metric models only on page 9 10 A3 B4 A4 and B5 B4 A4 R and B5 A4 R B5 R and Folio A4 R B4 B5 A4 R B4 B5 A4 R B5 R B5 R A4 R ...

Page 168: ...riginals are not aligned in this way they may not be scanned correctly and skewing or original jams may result 3 Press Org Paper Finishing and then Mixed Size Originals 4 Select Mixed Size Copies or Same Size Copies as finish size 5 Select the combination of originals from Same Width and Different Width When Same Size Copies is selected select Long Edge Left or Short Edge Left as the first origina...

Page 169: ... Bates Stamp NOTE If On is selected as the Orientation Confirmation on page 9 16 setting in the System Menu the selection screen for original orientation appears when you select any of the above functions When placing originals on the platen When placing originals on the document processor NOTE To change the default setting for the original orientation refer to Original Orientation on page 9 16 Or...

Page 170: ...g Paper Finishing and then Original Orientation 4 Select Top Edge on Top or Top Edge on Left as the way the original is oriented 5 Press OK 6 Press the Start key to start copying Original Orientation Top Edge on Left Select the orientation of the original document s top edge Top Edge on Top Copies Status Cancel OK Add Shortcut 10 10 2010 10 10 100 A4 A4 Preview Original Zoom Paper ...

Page 171: ... unit For details on paper sizes and numbers of sheets that can be folded refer to Center Folding Unit Option on page Appendix 25 The following folding options and orientations are available Orientaion Landscape Orientaion Portrait Bi Fold Tri Fold Inside R to L B to T L to R T to B Outside R to L B to T L to R T to B ...

Page 172: ...nd then Fold 4 Select the fold method NOTE To use saddle stitching press Bi Fold and then Saddle Stitch For more information on saddle stitching refer to Booklet on page 4 20 5 Press OK 6 Press the Start key to start copying Status Copies Add Shortcut Cancel OK Fold Off Staple Off Saddle Stitch Tri Fold Bi Fold 10 10 2010 10 10 100 A4 A4 Preview Original Zoom Paper ...

Page 173: ...that can be used Use the procedure below to select the output destination 1 Press the Copy key 2 Place the originals on the platen 3 Press Org Paper Finishing and then Paper Output 4 Select the output destination for finished copies 5 Press OK 6 Press the Start key to start copying Destination Description Lower Left Tray Upper Left Tray This cannot be selected when the optional document finisher i...

Page 174: ...4 R B5 B5 R A5 R Folio Ledger Legal Oficio II 216 340mm Letter Letter R Statement R 8K 16K and 16K R 2 in 1 Mode For copying two originals onto a single sheet This mode can be used with Duplex mode to copy four originals onto one sheet The following 2 in 1 options and output orientations are available NOTE When placing the original on the platen be sure to copy the originals in page order Original...

Page 175: ...o one sheet The following 4 in 1 options and output orientations are available NOTE When placing the original on the platen be sure to copy the originals in page order Types of Page Boundary Lines The following types of the boundary lines are available Original Document processor Platen Orientation of Original Copy None Dotted Solid Borders Cropmark ...

Page 176: ...op bottom side When you copy onto paper different from the original size you can center the original image on the paper The following margin widths are available Margin on the Back Side When duplex copying you can also specify the margin on the back side Auto When Auto is selected an appropriate margin is applied automatically on the rear page depending on a margin specified for the front page and...

Page 177: ...Press Original Orientation to choose the orientation of the originals either Top Edge on Top or Top Edge on Left Then press OK 6 Press OK 7 Press the Start key to start copying Status Copies Cancel OK Margin Centering Add Shortcut Left Right Off Margin mm 18 18 Top Bottom 18 18 mm Keys Keys Original Orientation Centering Back Page 0 0 Auto Top Edge on Top 10 10 2010 10 10 100 A4 A4 Preview Origina...

Page 178: ...iginal such as a thick book You can specify the widths individually to erase the borders around the edges and in the center of the book Individual Border Erase Specify border erase widths individually for all edges In each option the available ranges are as shown below NOTE To specify the default width value of Border Erase refer to Border Erase Default on page 9 21 for details Original Copy Origi...

Page 179: ...Right Press Keys to use the numeric keys for entry Press Original Orientation to select the original orientation from either Top Edge on Top or Top Edge on Left Then press OK For 2 sided originals press Back Page and then press Same as Front Page or Do Not Erase 5 Press OK 6 Press the Start key to start copying Item Detail Same as Front Page Border Erase performed using the same setting as the fro...

Page 180: ...copies fold them in two with staples in the center This is limited to the A3 B4 A4 R Ledger Legal Letter R 8K The supported original and paper sizes are as follows For binding on the left side The folded copies can be read from left to right For binding on the right side The folded copies can be read from right to left For top binding The folded copies can be read from top to bottom Type of Origin...

Page 181: ...press OK 8 If the document finisher and folding unit are installed the Staple Fold option is displayed To fold finished copies in half press Staple Fold and then press Fold Only To use saddle stitching press Staple Fold and then press Saddle Stitch NOTE The number of sheets that can be folded or Saddle Stitch stapled varies by paper weight For details refer to Center Folding Unit Option on page Ap...

Page 182: ... Cover 4 Press Front Cover or Front and Back Covers 5 Press OK 6 Press the Start key Copying begins If the originals are placed on the platen consecutively replace each original after pressing the Start key After scanning all originals press Finish Scan to start copying Type of Cover Description Front Cover First page of the originals is copied on a different paper Front and Back Covers First page...

Page 183: ...ady registered press Select Stored Form Press Select Form to display the document boxes that store documents which can be used as a form Select the desired form from the list and press OK NOTE To return to a higher level folder press Up 4 Press OK 5 Place the originals Place the original for the form on top of the other originals When using the document processor the first page of the originals sh...

Page 184: ...e Copy key 2 Place the originals in the document processor or on the platen 3 Press Layout Edit and then Page Item Detail Font Size Set the font size of the printed page number Registered font sizes are displayed For details on registering font sizes refer to System Stamp on page 9 29 Style Set the font style of the printed page number Bold or Italic can be set Font Set the font of the printed pag...

Page 185: ... numbered a negative number of pages counting backwards from the last page Then press OK You can set a value up to 10 You can also enter the number with the numeric keys after pressing Keys 10 The total number of pages n in the format 1 n can be changed manually Press Denominator and select Manual Press or to enter the total number of pages and press OK You can also enter the number with the numer...

Page 186: ...le for the copy paper sizes of A3 B4 A4 A4 R B5 B5 R A5 R Ledger Legal Oficio II 216 340mm Letter Letter R Statement R Folio 8K 16K and 16K R Layout A Reduces images of each original page for printing onto half of a page leaving the other half blank for notes Layout B Reduces images of two original pages for copying onto half of a single page leaving the other half blank for notes Original Copy Or...

Page 187: ... Border Line to select the page boundary line Press OK 6 Press Original Orientation to select orientation of the originals either Top Edge on Top or Top Edge on Left Press OK 7 Press OK 8 Press the Start key to start copying None Dotted Solid Borders Cropmark Status Copies Cancel OK Memo Page Add Shortcut Off Layout B Original Orientation Layout A Border Line Top R to L Top R to B Top L to B Top L...

Page 188: ... in half to make 2 copies that are identical to the original Follow the steps shown below to use Image Repeat 1 Press the Copy key 2 Place the originals on the platen 3 Press Layout Edit and then press Image Repeat 4 Press Zoom Priority To make double copies press Double Copy and proceed to step 8 5 Press or to set the zoom size Press Keys to enter with numeric keys 6 To set the area of the origin...

Page 189: ...can enter the border width directly using the numeric keys after pressing Keys Y1 Length from top left of platen to top edge of repeat area X1 Length from Height from top left of platen to left edge of repeat area Y2 Height of repeat area X2 Width of repeat area 8 Press OK 9 Press the Start key Copying begins ...

Page 190: ...mp Method Each Print Page Stamp on each printed page Each Original Page Stamp each page of the document Position Selectable positions are Top Left Top Middle Top Right Middle Left Center Middle Right Bottom Left Bottom Middle and Bottom Right Font Size Set the font size of the printed text stamp Registered font sizes are displayed For details on registering font sizes refer to System Stamp on page...

Page 191: ... to specify the Bates Stamp settings 1 Press the Copy key 2 Place the originals on the platen 3 Press Layout Edit and then press Bates Stamp Item Detail Position Selectable positions are Top Left Top Middle Top Right Middle Left Center Middle Right Bottom Left Bottom Middle and Bottom Right Font Size Set the font size of the printed bates stamp Registered font sizes are displayed For details on re...

Page 192: ...e starting sequence number 1 to 9999999 6 Press Position and select the position of the bates stamp 7 Press Font and select font and display settings for the bates stamp 8 Press Original Orientation to choose the orientation of the originals either Top Edge on Top or Top Edge on Left Then press OK 9 Press OK 10 Press the Start key Copying begins Status Copies Cancel OK Bates Stamp Add Shortcut On ...

Page 193: ...copies using EcoPrint is explained below 1 Press the Copy key 2 Place the originals on the platen 3 Press Image Quality and then EcoPrint 4 Press On 5 Press 1 to 5 Low High to adjust the Toner Save Level 6 Press OK 7 Press the Start key to start copying Status Copies Cancel OK EcoPrint Off Toner Save Level On Add Shortcut Low High 1 2 3 4 5 10 10 2010 10 10 100 A4 A4 Preview Original Zoom Paper ...

Page 194: ...s below to adjust sharpness 1 Press the Copy key 2 Place the originals on the platen 3 Press Image Quality and then Press Sharpness 4 Press All or Text Fine Line 5 When All is selected press 3 to 3 Blur Sharpen to adjust the sharpness When Text Fine Line is selected press 0 to 3 Normal Sharpen to adjust the sharpness 6 Press OK 7 Press the Start key Copying begins Item Detail All Sharpen Emphasize...

Page 195: ...Follow the steps below to use background density adjust 1 Press the Copy key 2 Place the originals on the platen 3 Press Image Quality and then press Background Density Adj 4 Press Auto or Manual 5 When Manual is selected press 1 to 5 Lighter Darker to adjust the background density 6 Press OK 7 Press the Start key Copying begins Original Copy Background Density Adj Copies Status Cancel OK Add Shor...

Page 196: ...ress the Copy key 2 Place the originals on the platen 3 Press Image Quality and then press Prevent Bleed thru 4 Press On Prevent Bleed thru is selected 5 Press OK 6 Press the Start key Copying begins Prevent Bleed thru Copies Status Cancel OK Add Shortcut Off On Hide background colors and image bleed through when scanning thin original 10 10 2010 10 10 100 A4 A4 Preview Original Zoom Paper ...

Page 197: ...ess Sheet Insertion to insert a blank paper Press Next Copy On Back in duplex copying to print the next page on back page 6 Place the next original and press the Start key Repeat these steps to scan the remaining originals After scanning all originals press Finish Scan to start copying Original size Paper Selection Original orientation Zoom Original Image Border erase Duplex Density Background Den...

Page 198: ...using Auto Image Rotation is explained below 1 Press the Copy key 2 Place the originals on the platen 3 Press Advanced Setup and then Auto Image Rotation 4 Press On to select Auto Image Rotation 5 Press OK 6 Press the Start key to start copying Negative Image Inverts black and white portions of the image for printing Use the procedure below to make negative image copies 1 Press the Copy key 2 Plac...

Page 199: ...image of the original Use the procedure below to make mirror image copies 1 Press the Copy key 2 Place the originals on the platen 3 Press Advanced Setup and then Mirror Image 4 Press On to select Mirror Image 5 Press OK 6 Press the Start key to start copying ...

Page 200: ...en 3 Press Advanced Setup and then Job Finish Notice 4 To select the destination from the address book press Address Book on the left of the screen and then press Address Book in the next screen Select the destination to be notified on the address book screen then press OK NOTE For the procedure to select the destination from the Address Book refer Specifying Destination on page 3 39 You can view ...

Page 201: ...mail Address enter the address and press OK 5 Press OK 6 Press the Start key to start copying Upon completion of the job an E mail notice is sent to the selected destination Status Copies Cancel OK Job Finish Notice Add Shortcut Address Book E mail Address Address Entry Off 10 10 2010 10 10 ...

Page 202: ...ide Suspends a current job and gives the selected job priority for copying The suspended job resumes after Priority Override copying is finished NOTE The current job that is selected as Priority Override cannot be suspended The procedure for using Priority Override is explained below 1 Press the Copy key 2 Place the originals on the platen 3 Press Advanced Setup and then Priority Override 4 Press ...

Page 203: ...fault setting Refer to Repeat Copy on page 9 28 Giving a file name to a copy job will facilitate identification of the data when copying refer to File Name Entry on page 4 42 Selecting Repeat Copy Use the procedure below to select repeat copying 1 Press the Copy key 2 Place the originals on the platen 3 Press Advanced Setup and then Repeat Copy 4 Press On To register a password press Keys and ente...

Page 204: ... the Repeat Copy function 5 Press OK DP Read Action Set the operation when a document is scanned from the document processor The table below shows the available settings NOTE Cannot be used when set to On in Document Guard on page 9 103 Use the procedure below to set a DP Read Action 1 Press the Copy key 2 Place the original 3 Press Advanced Setup and then Press DP Read Action 4 Select Speed Prior...

Page 205: ... 5 Printing This chapter explains the functions available for printing For details on Using the Document Box refer to the Chapter 7 Document Box Printing Printing from Applications 5 2 Using a Job Box 5 6 ...

Page 206: ...of the page numbers 5 Click the Properties button The Properties dialog box appears 6 Select the Basic tab and click the Page Size button to select the paper size To print on the special paper such as thick paper or transparency click the Media Type menu and select the media type 7 Click Source and select the paper source NOTE If you choose Auto Select paper is supplied automatically from the pape...

Page 207: ...ettings related to finishing of printed media including binding and stapling Imaging This tab lets you configure settings related to the quality of the print results Publishing This tab lets you create covers and inserts for print jobs and put inserts between sheets of OHP film Job This tab lets you configure settings for saving print data from the computer to the machine Regularly used documents ...

Page 208: ... print settings open the printer driver print settings screen and display Help as explained below 1 Click the button in the upper right corner of the screen and then click the item you want to know about 2 Click the item you want to know about and press the F1 key on your keyboard ...

Page 209: ...is selected in the printer driver the output tray automatically changes to a tray that can be used To print on paper that is 164 g m2 or heavier register the paper as a custom media type in the system menu and select that type in Media Type in the printer driver before printing Refer to Specifying Paper Size and Media Type for the Multi Purpose Tray MP Tray Setting on page 2 44 and Media Type Sett...

Page 210: ...er to send data as a Proof and Hold Print job The Proof and Hold feature produces only a single proof print of multiple print job and holds printing of the remaining copies Printing a multiple print job in Proof and Hold using the printer driver allows only a single copy to be printed while maintaining the document data in the Job Box To continue to print the remaining copies use the operation pan...

Page 211: ... Job storage is useful for jobs that need to be available for printing at any time even if the printing system has been turned off and turned on again If desired you can attach a four digit access code to a Job storage job so that you can print a job without anyone else seeing it or restrict printing to approved users When the access code is used the job is not printed until a user prints it at th...

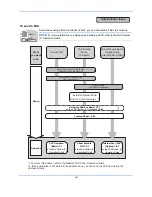
Page 212: ...Printing 5 8 ...

Page 213: ...ion Functions 6 16 Original Image 6 18 Density 6 19 Scan Resolution 6 20 Sharpness 6 21 Background Density Adj 6 22 Color Selection 6 23 Continuous Scan 6 24 Prevent Bleed thru 6 25 Border Erase 6 26 File Name Entry 6 28 E mail Subject Body 6 29 WSD Scan 6 30 Scanning using TWAIN 6 32 Job Finish Notice 6 35 Send and Print 6 36 Send and Store 6 36 FTP Encrypted TX 6 37 Text Stamp 6 38 Bates Stamp 6...

Page 214: ...cept Standard Sizes 1 Inch models A3 B4 A4 A4 R B5 B5 R A5 A5 R B6 B6 R A6 R Folio 8K 16 K 16K R 216 340mm Metric models Ledger Legal Letter Letter R Statement Statement R Oficio II 11 15 8K 16K 16K R Others Select from Hagaki and Custom Original Size Regarding the setting method of Custom Original Size Custom 1 to 4 refer to Custom Original Size on page 9 4 The input units can be changed in the S...

Page 215: ...X horizontal and Y vertical By pressing Keys you can use the numeric keys 5 Press OK 6 Specify the destination and press the Start key to start sending Standard Sizes 2 Standard Sizes 1 Auto Others Size Entry A4 A6 B5 A3 A5 B4 A4 A5 B5 Original Size Status Cancel OK Add Shortcut B6 B6 Destination 216x340mm 10 10 2010 10 10 100 A4 A4 Preview Original Zoom Send X Y mm mm Keys Keys 50 432 50 297 297 ...

Page 216: ... Select from Same as Original Size or Standard Size Inch models Same as Original Size Ledger Legal Letter Statement Oficio II 11 15 Metric models Same as Original Size A3 B4 A4 B5 A5 B6 A6 Folio 216 340mm Standard Sizes 2 Select from standard size except Standard Sizes 1 Inch models A3 B4 A4 B5 A5 B6 A6 Folio 8K 16K 216 340mm Metric models Ledger Legal Letter Statement Oficio II 11 15 8K 16K Other...

Page 217: ...ata Format and then Sending Size 4 Press Standard Sizes 1 Standard Sizes 2 or Others to select the sending size 5 Press OK 6 Specify the destination and press the Start key to start sending Same as Original Size Standard Sizes 1 Standard Sizes 2 Others Sending Size Status Cancel OK Add Shortcut Destination A3 A5 A6 A4 B4 B5 B6 216x340mm 10 10 2010 10 10 100 A4 A4 Preview Original Zoom Send ...

Page 218: ...g on page 6 7 Use the procedure below to enlarge or reduce the original to match the transmission size 1 Press the Send key 2 Place the originals on the platen 3 Select the transmission size 4 Press Advanced Setup and then Zoom 5 Press 100 or Auto 6 Press OK 7 Specify the destination and press the Start key to start sending Item Detail 100 No Zoom to be scanned at actual size Auto Zoomed automatic...

Page 219: ...per By using the centering the image is placed with a margin equally created at each of the page Top Bottom and Left Right Use the procedure below to center the image when sending a scanned image 1 Press the Send key 2 Place the originals on the platen 3 Press Advanced Setup and then Centering 4 Press On Centering is performed 5 Press OK 6 Specify the destination and press the Start key to start s...

Page 220: ...als of different sizes can be placed in the document processor at the same time Originals of the Same Width When the original widths are the same the combinations of originals that can be placed are as follows Ledger and Letter A3 and A4 Legal and Letter R A4 R and Folio B4 and B5 Ledger A3 Ledger A3 Letter A4 Letter A4 Legal Folio Letter R A4 R Legal Folio Letter R A4 R ...

Page 221: ...OTE When mixing the original sizes as using the following combination A4 R B5 R and Folio make sure to set the System Menu key Common Settings Original Paper Settings Original Auto Detect to On for Folio For more information refer to Original Auto Detect Available for metric models only on page 9 10 A3 B4 A4 B5 B4 A4 R B5 A4 R B5 R Folio A4 R B4 B5 A4 R B4 B5 A4 R B5 R B5 R A4 R ...

Page 222: ...ey may not be scanned correctly and skewing or original jams may result 3 Press Org Sending Data Format and then Mixed Size Originals 4 Select the combination of originals from Same Width and Different Width 5 Press OK 6 Specify the destination and press the Start key to start sending Scan all sheets in the document processor even if differently sized then send Up to 30 sheets can be placed in the...

Page 223: ... selecting 2 sided select the binding direction and press Original Orientation to select the direction in which the original is set on the platen When selecting Book select the binding direction 6 Press OK 7 Specify the destination and press the Start key to start sending Original Type Binding 1 sided Sheet Original 1 sided 2 sided Sheet Original 2 sided BindingLeft Right Binding Top Open Book Ori...

Page 224: ...inal is set on the platen 2 sided Book Original Border Erase NOTE If On is selected as the Orientation Confirmation page 9 16 setting in the System Menu the selection screen for original orientation appears when you select any of the above functions When placing the original on the platen When placing the original on the document processor Original Top Edge on Top Top Edge on Left Original Top Edg...

Page 225: ...ng Data Format and then Original Orientation 4 Select original orientation from Top Edge on Top and Top Edge on Left 5 Press OK 6 Specify the destination and press the Start key to start sending Select the orientation of the original document s top edge Top Edge on Left Original Orientation Top Edge on Top Destination Cancel OK Add Shortcut Status 10 10 2010 10 10 100 A4 A4 Preview Original Zoom S...

Page 226: ...Low Comp Auto Color Color Grayscale Auto Color Color Black and White Full Color Grayscale Black and White TIFF 1 Low Quality High Comp to 5 High Quality Low Comp Auto Color Color Grayscale Auto Color Color Black and White Full Color Grayscale Black and White JPEG 1 Low Quality High Comp to 5 High Quality Low Comp Auto Color Color Grayscale Full Color Grayscale XPS 1 Low Quality High Comp to 5 High...

Page 227: ...es below to split scanned original data into separate files when sending scanned originals 1 Press the Send key 2 Place the originals on the platen 3 Press Org Sending Data Format and then File Separation 4 Press Each Page to set File Separation 5 Press OK 6 Specify the destination and press the Start key The scanned originals are sent after being divided into files of one page each NOTE A three d...

Page 228: ...Method on page Appendix 8 for details on entering characters 7 Press Confirmation and enter the password again for confirmation Then press OK 8 When you enter the password to edit the PDF file select On of Password to Edit Print Document 9 In the same way as the entry of Password to Open Document enter the password to change the PDF file 10 Press Detail Item Value Detail Compatibility Acrobat 3 0 ...

Page 229: ...t Images Others Disable Enable Status Cancel OK 10 10 2010 10 10 Item Detail Not Allowed Make the printing of PDF file impossible Allowed Low Resolution only Only displayed when Acrobat 5 0 and later is selected in Compatibility Can print the PDF file only in low resolution Allowed Can print the PDF file in original resolution Item Detail Not Allowed Cannot change the PDF file Inserting Deleting R...

Page 230: ...al Image 4 Select the original image 5 Press OK 6 Specify the destination and press the Start key to start sending Item Detail Disable Prohibit the copying of text and objects on the PDF file Enable Can copy text and objects on the PDF file Item Detail Text Photo Text and photos together Photo For photos taken with a camera Text The for OCR setting can be turned on When On is selected scanning pro...

Page 231: ...below 1 Press the Send key 2 Place the originals on the platen 3 Press Color Image Quality and then Density 4 Press 3 to 3 Lighter Darker to adjust density 5 Press OK 6 Specify the destination and press the Start key to start sending Darker Density Auto Normal Lighter Cancel OK Add Shortcut Status Destination 0 1 2 3 1 2 3 2 5 1 5 0 5 0 5 1 5 2 5 10 10 2010 10 10 100 A4 A4 Preview Original Zoom Se...

Page 232: ...dpi The procedures for adjusting the scanning resolution when sending a scanned image is explained below 1 Press the Send key 2 Place the originals on the platen 3 Press Color Image Quality and then Scan Resolution 4 Select the resolution 5 Press OK 6 Specify the destination and press the Start key to start sending Select fineness of scanning resolution The larger the number the better the image r...

Page 233: ...When Text Fine Line is selected press 0 to 3 Normal Sharpen to adjust the sharpness 6 Press OK 7 Specify the destination and press the Start key to start sending Item Detail All Sharpen Emphasize the image outline Blur Blur the image outline Can weaken a Moire effect grids appearing as wavelike patterns when scanning printed photos Text Fine Line Normal Make letters and lines appear sharper Only t...

Page 234: ...to set the background density when sending scanned images 1 Press the Send key 2 Place the originals on the platen 3 Press Color Image Quality and then Background Density Adj 4 Press Auto or Manual 5 When Manual is selected press 1 to 5 Lighter Darker to adjust the background density 6 Press OK 7 Specify the destination and press the Start key to start sending Manual Off Background Background Dens...

Page 235: ...ace the originals on the platen 3 Press Color Image Quality and then Color Selection 4 Select the color mode to be used for scanning 5 Press OK 6 Specify the destination and press the Start key to start sending Black White Grayscale Color Selection Full Color Select scanning color Use Auto Color to automatically produce color originals in full color and black white originals in black white Cancel ...

Page 236: ...ion Guide The procedure for using continuous scanning when sending scanned images is explained below 1 Press the Send key 2 Press Advanced Setup and then Continuous Scan 3 Press On Continuous Scan is selected 4 Press OK 5 Specify the destination 6 Place the original and press the Start key When the scanning is completed change the settings as necessary 7 Place the next original and press the Start...

Page 237: ... key 2 Place the originals on the platen 3 Press Color Image Quality and then press Prevent Bleed thru 4 Press On Prevent Bleed thru is selected 5 Press OK 6 Specify the destination and press the Start key to start sending Hide background colors and image bleed through when scanning thin original On Prevent Bleed thru Cancel OK Add Shortcut Status Destination Off 10 10 2010 10 10 100 A4 A4 Preview...

Page 238: ...k Erases black borders around the edges and in the middle of the original such as a thick book You can specify the widths individually to erase the borders around the edges and in the center of the book Individual Border Erase Specify border erase widths individually for all edges In each option the available ranges are as below Original Copy Original Copy Original Copy Input units Border Erase Ra...

Page 239: ...tion to select the original orientation from either Top Edge on Top or Top Edge on Left and press OK For 2 sided originals press Back Page and then press Same as Front Page or Do Not Erase 5 Press OK 6 Specify the destination and press the Start key to start sending Item Detail Same as Front Page Border Erase performed using the same setting as the front page Do Not Erase No Border Erase performed...

Page 240: ...ess Advanced Setup and then File Name Entry 4 Press File Name 5 Enter the document name and press OK NOTE Up to 32 characters can be entered for the document name 6 Press Job No to enter the job No and Date and Time to enter the date and time 7 Press OK 8 Specify the destination and press the Start key to start sending Add a file name Additional information such as Job No and Date and Time can als...

Page 241: ...ess OK NOTE Up to 60 characters can be entered for the subject 6 Press Body 7 Enter the body and press OK NOTE Up to 500 characters can be entered for the body 8 You can press Body 1 Body 2 or Body 3 to enter stored text for the body text NOTE For details on registering templates refer to E mail Subject Body on page 9 27 9 Press OK 10 Specify the destination and press the Start key to start sendin...

Page 242: ...click the machine s icon Kyocera XXX XXX and then click Install NOTE If the User Account Control window appears click Continue If the Found New Hardware window appears click Cancel 3 During the installation double click the icon shown on the task bar to display the Driver Software Installation screen When Your devices are ready to use is displayed on the Driver Software Installation screen the ins...

Page 243: ...from Your Computer 1 Press the Send Key The send screen appears NOTE Depending on the settings the address book screen may appear In this event press Cancel to display the screen for sending 2 Place the originals in the document processor or on the platen 3 Press WSD Scan 4 Press From Computer and press Next 5 Use the software installed on the computer to send the images Status Back OK Cancel Comp...

Page 244: ...r selecting the machine see the Operation Guide or Help for each application software 3 Select scanning settings in the TWAIN dialog box that opens The settings that appear in the TWAIN dialog box are as follows Item Detail Original Configurations Original Size Select the scan size of the original Original Orientation Specify the type of binding Send Configurations Duplex Setting Specify whether t...

Page 245: ...on software 3 Select the Custom Box containing the document file to be scanned from the Box List If a password has been set for the box the password entry screen appears Enter the password and click the OK button When you select a box the document files in the Custom Box appear in the Document List Configuration This is used to check current settings and store frequently used settings When the Con...

Page 246: ... button to display the selected document data When the document data includes multiple pages select the checkbox beside the pages you want to scan The selected pages will be scanned NOTE In this case the scanned page or the selected document data will not be deleted from the Custom Box 8 Click the Acquire button The document data is scanned Item Detail View Change the display in the Document List ...

Page 247: ...hen press Address Book in the next screen Select the destination to be notified then press OK You can view information on the notification destination by pressing Detail 5 Specify the destination to send the finish notice and press OK NOTE For the procedure to select the destination from the Address Book refer Specifying Destination on page 3 39 6 To directly enter the address press Address Entry ...

Page 248: ... sent in a Custom Box The procedure for using Send and Store is explained below 1 Press the Send key 2 Place the originals on the platen 3 Press Advanced Setup and then Send and Store 4 Press On 5 Select the Custom Box in which the copy is to be stored If a password entry screen for the Custom Box appears enter the password You can view information on the selected Custom Box by pressing Detail 6 P...

Page 249: ... processor or on the platen 3 Press Advanced Setup and then FTP Encrypted TX 4 Press On 5 Press OK NOTE You can only change the settings by logging in with administrator privileges Refer to Adding a User Local User List on page 10 5 for the default login user name and password Click Settings Advanced Secure Protocols in the Command Center RX Be sure that SSL of Secure Protocol Settings is On and o...

Page 250: ...Item Detail Position Selectable positions are Top Left Top Middle Top Right Middle Left Center Middle Right Bottom Left Bottom Middle and Bottom Right Font Size Set the font size of the printed text stamp Registered font sizes are displayed For details on registering font sizes refer to System Stamp on page 9 29 Style Set the font style of the printed text stamp Bold or Italic can be set Font Set ...

Page 251: ...il Position Selectable positions are Top Left Top Middle Top Right Middle Left Center Middle Right Bottom Left Bottom Middle and Bottom Right Font Size Set the font size of the printed bates stamp Registered font sizes are displayed For details on registering font sizes refer to System Stamp on page 9 29 Style Set the font style of the printed bates stamp Bold or Italic can be set Font Set the fon...

Page 252: ...rmat If you selected Numbering press Numbering Default and set the starting sequence number 1 to 9999999 6 Press Position and select the position of the text stamp 7 Press Font and select font and display settings for the text stamp 8 Press Original Orientation to choose the orientation of the originals either Top Edge on Top or Top Edge on Left Then press OK 9 Press OK 10 Specify the destination ...

Page 253: ...or every TWAIN WIA compliant software Use the color profile after carefully reading the manual included with your TWAIN WIA complaint software Selecting a color profile compatible with this device 1 Select the color profile found in the DVD included with this scanner DVD Product Library under the Color Profile folder NOTE Use the indicated color profiles when you choose RGB in color type Item Deta...

Page 254: ...ur computer and configure settings for the multifunction machine to be used scanning conditions and the file save location To install File Management Utility refer to Installing Software on page 2 18 For information on using File Management Utility see File Management Utility User Guide on the DVD Using FMU Connection to scan an original 1 Make sure that File Management Utility is running on the c...

Page 255: ...apter explains the typical procedure for utilizing Document Box Using a Custom Box 7 2 Job Box 7 14 Printing Documents Stored in Removable USB Memory 7 22 Saving Documents to USB Memory Scan to USB 7 24 Removing USB Memory 7 26 ...

Page 256: ...the box number by pressing or number keys The box number can be from 0001 to 1000 A Custom Box should have a unique number If you enter 0000 the smallest number available will be automatically assigned Box Name Enter a box name consisting of up to 32 characters Refer to the Character Entry Method on Appendix 8 for details on entering characters Box Password User access to the box can be restricted...

Page 257: ... numeric keys 4 Press OK The time for document deletion is set Auto File Deletion Automatically deletes stored documents after a set period of time Press On to enable automatic deletion and then use and or the numeric keys to enter the number of days for which documents are stored You can enter any number between 1 and 31 day s To disable automatic file deletion press Off Overwrite Setting Specifi...

Page 258: ... image to be stored No Name Owner Used Add Edit Box 1 1 0001 SALES Anonymous Store File Detail Open Custom Box Job Box Removable Memory Status FAX Box Search No Search Name Program 10 10 2010 10 10 Original Size page 6 2 Density page 6 19 Zoom page 6 6 Mixed Size Originals page 6 8 Original Image page 6 18 Centering page 6 7 2 sided Book Original page 6 11 Scan Resolution page 6 20 Border Erase pa...

Page 259: ...ected the print settings selection screen appears To use the settings used at the time of printing when the document was saved press Print As Is Press Start Print to start printing To change the print settings press Print after Change Settings and change the print settings After a document saved in the machine is selected the User File Settings key may appear in the setting screen for the feature ...

Page 260: ...page 3 18 Page page 4 24 Bates Stamp page 4 31 Punch page 3 20 Job Finish Notice page 4 40 Density page 3 8 Paper Output page 4 13 File Name Entry page 4 42 Original Image page 3 9 Combine page 4 14 Delete after Printed page 7 2 Sharpness page 4 34 Margin Centering page 4 16 Priority Override page 4 42 Background Density Adj page 4 35 Booklet page 4 20 EcoPrint page 4 33 Prevent Bleed thru page 4 ...

Page 261: ...the checkmark 4 Press Send The screen for sending appears NOTE Depending on the settings the address book screen may appear 5 Set the destination NOTE For more information on selecting destinations refer to Specifying Destination on page 3 39 6 Set the sending size original image etc as desired For the features that can be selected refer to Document send features on page 7 8 7 Press the Start key ...

Page 262: ... page 6 14 FTP Encrypted TX page 6 37 Resolution page 6 18 FAX TX Resolution refer to Fax Operation Guide Delete after Transmitted page 7 8 Color Selection page 6 23 Centering page 6 7 Zoom page 6 6 Sharpness page 6 21 FAX Delayed Transmission refer to Fax Operation Guide File Separation page 6 15 Background Density Adj page 6 22 Job Finish Notice page 6 35 Text Stamp page 6 38 Prevent Bleed thru ...

Page 263: ... Overlay Select Stored Form and then Select Form NOTE You can select the form density setting through 4 levels from 10 20 30 or 100 Press the or buttons in Density 6 In Form Overlay Select Form select the image file to be overlaid onto the document from the displayed document boxes You can only select one image file 7 Press OK 8 Press OK again to return to the Functions screen 9 Press the Start ke...

Page 264: ...ect the document in the list that you want to move or copy by pressing the checkbox The document is marked with a checkmark NOTE To deselect press the checkbox again and remove the checkmark 4 Press Move Copy 5 To move the document press Move to Custom Box To copy the document press Copy to Custom Box or Copy to Memory 6 Press Next 1 1 0001 2008101010574501 2010 10 10 09 40 21 Box File Name Date a...

Page 265: ...Box select the box containing the documents you want to join and press Open NOTE If a custom box is protected by a password enter the correct password 3 Select the documents in the list that you wish to join by pressing the checkbox The document is marked with a checkmark You can join up to 10 documents NOTE To deselect press the checkbox again and remove the checkmark 4 Press Join Move Move to Cu...

Page 266: ...OK NOTE Enter up to 64 characters as the file name 8 Press Join and then press Yes in the confirmation screen The documents are joined NOTE After joining the original documents are left unchanged Delete the documents if they are no longer needed Next File Name Up Date and Time Size 1 1 Join Down Status Cancel Confirm the order of documents to combine 2008101010574501 2010 10 10 09 40 21 MB 2008101...

Page 267: ...ete by checking the checkbox The document is marked with a checkmark NOTE Delete is disabled until a document is selected To deselect press the checkbox again and remove the checkmark 4 Press Delete The delete confirmation screen appears 5 Press Yes The document is deleted 1 1 0001 2008101010574501 2010 10 10 09 40 21 Box File Name Date and Time Size MB Status 2008101010574511 2008101010574521 201...

Page 268: ...Job and press Open 4 Select the creator of the document to print and press Open 5 Select the document and press Print 6 If the document is protected by a password enter the password using the numeric keys 7 Specify the number of copies to print as desired 8 Press Start Print to start printing Upon completion of printing the Private Print job is automatically deleted Close Private Print Stored Job ...

Page 269: ...the print data which is printed by using the printer driver as a Quick Copy or Proof and Hold Print job Refer to the Printer Driver User Guide on how to print a job as Quick Copy or Proof and Hold Print job using the printer driver Quick Copy Job Retention To maintain free space on the hard disk you can set the maximum number of stored jobs Use the procedure below to set the number of stored jobs ...

Page 270: ... 3 Select Quick Copy Proof and Hold and press Open 4 Select the creator of the document and press Open 5 Select the document to print and press Print Document Box Removable Memory Quick Copy Job Retention Set the maximum number of quick copy proof print jobs to retain Use or the numeric keys to enter a number Set this number to 0 to not retain any jobs 0 50 32 Cancel OK Status job s 10 10 2010 10 ...

Page 271: ...e creator of the document and press Open 4 Select the document to delete and press Delete The delete confirmation screen appears 5 Press Yes The document is deleted Close 1 2 Open User Name Files Quick Copy Proof and Hold Status 5 2 1 1 1 User User User User User 1 2 3 4 5 10 10 2010 10 10 1 1 Detail Close User File File File File File Print Delete 2010 10 10 09 40 2010 10 10 09 45 2010 10 10 09 5...

Page 272: ... documents stored in the Repeat Copy box Use the procedure below to print a document 1 Press the Document Box key 2 Press Job Box 3 Select Repeat Copy box and press Open 4 Select the document to print and press Print 5 If the document is protected by a password enter the password using the numeric keys 6 Press Start Print to start printing The Repeat Copy box job will be deleted when the main powe...

Page 273: ...ress Document Box Removable Memory Next of Job Box then Change of Deletion of Job Retention 3 Select the time for automatic deletion To deactivate automatic deletion press Off 4 Press OK NOTE This function is valid for documents saved after the function is set Regardless of this function setting temporary documents are deleted when the main power switch is turned off Item Detail Off Temporary docu...

Page 274: ...iginal is scanned 7 Press the Start key The original is scanned and stored in the Form for Form Overlay box NOTE For information on using image overlays with a stored form see Form Overlay on page 4 23 and Form Overlay from Custom Boxes Form Overlay on page 7 9 Name Files Quick Copy Proof and Hold Removable Memory Job Box Custom Box Open Repeat Copy Form for Form Overlay Private Print Stored Job 2...

Page 275: ... 3 Select Form for Form Overlay and press Open 4 Select the form to delete and press Delete The delete confirmation screen appears 5 Press Yes The form is deleted Form for Form Overlay Name Date and Time Size 2008101000530910 1 1 Detail Print Close Delete Store File 2008101009530900 2010 10 10 09 00 2010 10 10 09 10 MB 30 MB 21 2008101000530920 2010 10 10 09 20 MB 30 10 10 2010 10 10 Status ...

Page 276: ...memory printing is error free if a USB hub is used Printing Print Print documents stored in the removable USB memory 1 Plug the USB memory into the USB Port A1 IMPORTANT Use USB memory formatted by this machine If a USB memory formatted by any other device is used The removable memory is not formatted may appear To format a USB memory press Format and follow the instructions on the screen 2 When t...

Page 277: ... TIFF files XPS Fit to Page Reduces or enlarges the image size to fit to the selected paper size when printing XPS files Status Detail Delete Memory Information 001 999 Name Date and Time Size Remove Memory Print Document MB 1 Document MB 3 Document MB 4 Document MB 1 Document MB 2 2010 10 10 09 30 2010 10 10 09 40 2010 10 10 09 50 2010 10 10 10 00 2010 10 10 10 05 Removable Memory Store File Open...

Page 278: ...ined below 1 Plug the USB memory into the USB Port A1 IMPORTANT Use only USB memory that has been formatted on this machine If USB memory formatted on another device is used The removable memory is not formatted message may appear To format the USB memory press Format CAUTION When Format is pressed all data in the external media is erased 2 When the machine reads the USB memory Removable Memory is...

Page 279: ...ument MB 1 Document MB 3 Document MB 4 Document MB 1 Document MB 2 2010 10 10 09 30 2010 10 10 09 40 2010 10 10 09 50 2010 10 10 10 00 2010 10 10 10 05 Removable Memory Store File Open Custom Box Job Box Removable Memory FAX Box Up 1 2 3 4 5 Program 10 10 2010 10 10 Original Size page 6 2 Original Image page 6 18 Border Erase page 6 26 Mixed Size Originals page 6 8 Scan Resolution page 6 20 Contin...

Page 280: ... is displayed NOTE USB memory can also be removed after checking the status of the device For details refer to Check of Device Status on page 8 14 Status Detail Delete Memory Information 001 999 Name Date and Time Size Remove Memory Print Document MB 1 Document MB 3 Document MB 4 Document MB 1 Document MB 2 2010 10 10 09 30 2010 10 10 09 40 2010 10 10 09 50 2010 10 10 10 00 2010 10 10 10 05 Remova...

Page 281: ... to check the remaining amount of toner and paper and the status of devices and how to cancel the fax communication Checking Job Status 8 2 Checking Job History 8 9 Pause and Resumption of Jobs 8 11 Canceling of Jobs 8 11 Priority Override for Waiting Jobs 8 12 Reordering Print Jobs 8 12 Checking the Remaining Amount of Toner and Paper Paper Supplies 8 13 Device Communication 8 14 ...

Page 282: ...ending Jobs and then Scheduled Job For an explanation of the screen refer to Details of the Status Screens on page 8 3 Screen Job status to be displayed Printing Jobs Copy Printer FAX reception i FAX reception E mail reception Printing from Document Box Printing data from removable memory Application Job Report List Sending Jobs FAX transmission i FAX transmission E mail Folder Application Multipl...

Page 283: ...tus 1 1 Detail Paper Supplies Device Communication Storing Jobs Sending Jobs Printing Jobs 10 10 09 10 10 10 09 15 000003 10 10 09 20 doc20081010092015 Waiting BBBBB 10 10 2010 10 10 1 2 3 4 5 6 7 8 9 10 12 11 No Item Key Detail 1 Job No Acceptance No of job 2 Accepted Time Accepted Time of job 3 Type Icons that indicate the job type Copy job Printer job Job from Document Box FAX reception i FAX r...

Page 284: ... 10 Priority Override Select the job to be overridden and press this key Refer to Priority Override for Waiting Jobs on page 8 12 11 Move Up In the list select the job that you want to move up the job queue and press this key Refer to Reordering Print Jobs on page 8 12 12 Detail Select the job for displaying detailed information from the list and press this key Refer to Checking the Detailed Infor...

Page 285: ...Sending Job Application Sending Job Multiple 4 Destination Destination Either destination name FAX number E mail address or server name 5 User Name User Name for the executed job 6 Status Status of job InProcess The status before starting sending such as during scanning originals Sending Sending Waiting Sending Waiting Canceling Canceling the job Pause Pausing the job 7 of Job Type Only selected t...

Page 286: ... the job type Storing Job Scan Storing Job Printer Storing Job FAX Storing Job i FAX Join Box Document Copy Box Document 4 Job Name Job name or file name is displayed 5 User Name User Name for the executed job 6 Status Status of job InProcess The status before starting to save such as during scanning originals Storing Storing Data Canceling Canceling the job Pause Pausing the job 7 of Job Type Onl...

Page 287: ...stination by pressing Detail in Status Destination Log abc def com 438 14 47 1 1 Status Printing Jobs Sending Jobs Storing Jobs Device Communication Paper Supplies Detail InProcess Status User Name Job Name Type Accepted Time Job No Cancel Job Type All Status Status Scheduled Job Priority Override 10 10 2010 10 10 Detail Job No Close Job No Status Destination Job Type Destination User Name Job Nam...

Page 288: ...the list Press or select a destination and press Detail Information on the selected job is displayed for checking 4 To exit from the detailed information press Close Detail Job No Close Job Type Destination Type Status 1 2 User01 doc20070404131415 000081 Detail All Sending Waiting Status 10 10 2010 10 10 ...

Page 289: ...ress Log Screen Job histories to be displayed Printing Jobs Copy Printer FAX reception i FAX reception E mail reception Printing from Document Box Job Report List Printing data from removable memory Sending Jobs FAX i FAX E mail Folder Application Multiple destination Storing Jobs Scan FAX i FAX Printer Join Box Document Copy Box Document Status Log All Job No End Date Type doc20070225141427 User ...

Page 290: ...il Detailed information of the selected job is displayed NOTE To check the information of the next previous page press or 4 To exit from the detailed information press Close Status Log All Job No End Date Type doc20070225141427 User Name Result Completed 000080 01 25 14 14 Status Job Name 1 1 Device Communication Paper Supplies doc20070225142253 Completed 000081 01 25 14 22 doc20070225142310 Compl...

Page 291: ...n paused press Resume All Print Jobs Canceling of Jobs For more information on canceling jobs refer to the Canceling Jobs on page 3 51 doc20081010091015 InProcess 000001 doc20081010091510 Waiting 000002 AAAAA AAAAA Pause All Print Jobs Cancel Priority Override Move Up Status Status Status Log Job Type All Job No Accepted Time Type Job Name User Name Status 1 1 Detail Paper Supplies Device Communic...

Page 292: ...a higher priority and press Move Up The priority of the selected job is increased by 1 To further raise the job s priority press Move Up again Each time you press Move Up the priority increases by 1 doc20081010091015 InProcess 000001 doc20081010091510 Waiting 000002 AAAAA AAAAA Pause All Print Jobs Cancel Priority Override Move Up Status Status Status Log Job Type All Job No Accepted Time Type Job...

Page 293: ...status of waste toner box Paper You can check the size orientation type and remaining amount of paper in each paper source The remaining amount of paper is shown by 5 levels as 100 75 50 25 and 0 however the paper in the multi purpose tray is shown by 2 levels as 100 and 0 Others You can check the status of staples and punch waste box NOTE If the optional document finisher and punch unit are insta...

Page 294: ... are described below Scanner The status of an original scanning in the document processor or the error information paper jam opened cover etc is displayed Printer Error information such as paper jam out of toner or out of paper and status such as waiting or printing are displayed Hard Disk The information such as formatting overwriting for erasure and error occurrence is displayed Ready Scanner Re...

Page 295: ...s displayed Press Line Off to cancel a fax in sending receiving For details refer to Canceling FAX Communication on page 8 16 in the section afterwards Press Manual RX to start a fax Use this function when you want to talk to the sender before receiving the fax originals For details refer to the Operation Guide of FAX kit Press Log to display the fax transmission history For details refer to the O...

Page 296: ...or FAX Port 2 3 Press Yes in the confirmation screen The line is disconnected and the fax communication is canceled Ready Scanner Ready Printer Not connected Removable Memory Hard Disk Format Remove Line Off Manual RX FAX Port 1 Log FAX Check New FAX i FAX FAX Port 2 Line Off Status Printing Jobs Sending Jobs Storing Jobs Device Communication Paper Supplies Status Dialing Receiving Overwriting 10 ...

Page 297: ...Memory 9 52 Printer 9 54 Report 9 61 Adjustment Maintenance 9 65 Date Timer 9 72 Edit Destination Address Book Adding One Touch Keys 9 77 Internet 9 84 Application 9 86 System Initialization 9 89 Restart Entire Device 9 89 Network 9 90 Interface Block Setting 9 102 Security Level 9 103 Document Guard 9 103 Data Security 9 105 Optional Function 9 107 Accessibility Display Enlarged Touch Panel Displ...

Page 298: ...9 29 Manual Staple 9 38 Customize Status Display 9 39 Low Toner Alert Level 9 39 NOTE If user login administration is enabled you can only change the settings by logging in with administrator privileges Language Select the language displayed on the touch panel Use the procedure below to select the language 1 Press the System Menu key 2 Press Common Settings and then Change of Language 3 Press the ...

Page 299: ...e Fax key is pressed appears Status The Status Job Cancel screen the screen shown when the Status Job Cancel key is pressed appears Document Box The Document Box screen the screen shown when the Document Box key is pressed appears Program The Program screen the screen shown when the Program key is pressed appears Application The Application selecting screen the screen shown when the Application ke...

Page 300: ...displayed on the screen to select original size The dimensions available are as follows The table below lists the sizes that can be registered Item Value Description Volume 0 Mute 1 Minimum to 5 Maximum Set the buzzer volume level Key Confirmation Off On Emit a sound when the control panel and touch panel keys are pressed Job Finish Off On FAX Reception Only This is displayed when the optional fax...

Page 301: ...added Select media type for each paper size Media type Plain Transparency Rough Vellum Labels Recycled Preprinted Bond Cardstock Color Prepunched Letterhead Thick Envelope Coated High Quality Custom 1 8 NOTE Refer to Media Type Setting on page 9 8 for Custom 1 8 for the media type Use the procedure below to select a custom paper size and media type 1 Press the System Menu key 2 Press Common Settin...

Page 302: ...izes 1 Only A4 Letter and B5 can be specified in cassettes 6 and 7 when cassettes 3 and 4 and the optional Large Capacity Side Feeder 500 1 500 sheet x 2 are used Available options are as follows Inch models Ledger Legal Letter Letter R Statement R 12 18 Oficio II Metric models A3 B4 A4 A4 R B5 B5 R A5 R Folio 216 340 mm Standard Sizes 2 Select a standard size except that selected in Standard Size...

Page 303: ...ws Inch models Ledger Legal Letter Letter R Statement R 12 18 Oficio II Executive Metric models A3 B4 A4 A4 R B5 B5 R A5 R B6 R A6 R Folio 216 340 mm Standard Sizes 2 Select a standard size except that selected in Standard Sizes 1 Inch models A3 B4 A4 A4 R B5 B5 R A5 R B6 R A6 R Folio 8K 16K 16K R Metric models Ledger Legal Letter Letter R Statement R 12 18 Oficio II Executive 8K 16K 16K R Others ...

Page 304: ... m2 136 g m2 to 163 g m2 164 g m2 to 220 g m2 221 g m2 to 256 g m2 257 g m2 to 300 g m2 Trans paren cies Plain N Y default Y Y N N N N N N Rough N Y Y Y default Y Y Y Y Y N Vellum N Y default Y Y Y Y Y Y Y N Labels N Y Y Y Y Y default The media type cannot be selected for the cassettes Y Y Y N Recycled N Y default Y Y N N N N N N Preprinted N Y Y Y Y default Y Y Y Y A media type set for Cassette 1...

Page 305: ... Change of Name Enter the name and press OK NOTE Refer to the Character Entry Method on page Appendix 8 for details on entering characters Default Paper Source Select the default paper source from Cassette 1 7 and Multi Purpose Tray NOTE Cassette 5 to Cassette 7 are displayed when the following options are installed Cassette 5 When a side feeder 3 000 sheet side feeder 500 sheet x 3 or large capac...

Page 306: ...ki of A6 Hagaki Select Off to disable automatic detection or On to enable automatic detection of Folio and 11x15 respectively 4 Press OK Media for Auto B W Select a default media type for auto paper selection when Auto is selected of Paper Selection If Plain is selected the paper source with plain paper loaded in the specific size is selected Select All Media Types for the paper source with any ki...

Page 307: ...1 Press the System Menu key 2 Press Common Settings Next of Original Paper Settings and then Change of Paper Source for Cover 3 Select the paper source to load cover paper 4 Press OK Special Paper Action When printing on Prepunched Preprint and Letterhead punch holes might not be aligned or the print direction might be upside down depending on how originals are set and the combination of copying f...

Page 308: ...ypes 1 Press the System Menu key 2 Press Common Settings Next of Original Paper Settings and then Change of Special Paper Action 3 Select Adjust Print Direction or Speed Priority 4 Press OK Measurement Select inch or metric for the unit for paper dimensions Use the procedure below to change the input units 1 Press the System Menu key 2 Press Common Settings and then Change of Measurement 3 Select ...

Page 309: ...g is displayed when an optional document finisheris installed Finished Pages Exceeded Select what to do when finishing stapling or offsetting capacity is exceeded during printing NOTE This setting is displayed when an optional document finisheris installed Item Description 1 sided Printed in 1 sided Display Error Error message to cancel printing is displayed Item Description Ignore The setting is ...

Page 310: ...ment finisheris installed Use the procedure below to specify the settings for error handling 1 Press the System Menu key 2 Press Common Settings and then Next of Error Handling 3 Press Change at the error for which you wish to change the handling 4 Select the error handling method in the selection screen for each of the errors and then press OK 5 The previous screen appears To set the handling for...

Page 311: ...m Menu key 2 Press Common Settings and then Next of Paper Output 3 Press Change of Copy Custom Box Printer or FAX Port 1 or FAX Port 2 NOTE FAX Port 1 appears when the optional fax kit is installed If you have 2 optional fax kits installed Fax Port 2 appears You can specify the output tray for the second kit Dual FAX 4 Select the Output Tray 5 When changing the output tray of Copy Custom Box move ...

Page 312: ...defaults makes subsequent jobs easier IMPORTANT If you want to enable the changed defaults immediately move to the function screen and press the Reset key Original Orientation Set the original orientation defaults The available default settings are shown below Refer to page 4 9 for Original Orientation Use the procedure below to select the default orientation when originals are placed on the plate...

Page 313: ...tings Next of Function Defaults and then Change of Org Image Send Store 3 Select Text Photo Photo Text or Text for OCR for the default 4 Press OK Item Description Text Photo Printer For mixed text and photo documents printed on this machine originally Text Photo Magazine For mixed text and photos printed in a magazine etc Photo Printer For photos printed on this machine originally Photo Magazine F...

Page 314: ... color mode 3 Press OK File Format Select the default file type to send the scanned originals The available default settings are shown below Color mode Description Auto Color Color Gray Automatically recognize whether the document is color or black and white and scan color documents in Full Color and black and white documents in Grayscale Auto Color Color B W Automatically recognize whether the do...

Page 315: ...ngs Next of Function Defaults and then Change of File Separation 3 Select the default for Off or Each Page 4 Press OK Backgrnd Density Copy Set the default Backgrnd Density Copy The available default settings are shown below Use the procedure below to select the default Backgrnd Density Copy 1 Press the System Menu key 2 Press Common Settings Next of Function Defaults and then Change of Backgrnd D...

Page 316: ...leed thru Copy Set the default Prevent Bleed thru Copy Use the procedure below to select the default Prevent Bleed thru Copy 1 Press the System Menu key 2 Press Common Settings Next of Function Defaults and then Change of Prevent Bleed thru Copy 3 Set the default Prevent Bleed thru Copy 4 Press OK Prevent Bleed Send Store Set the default Prevent Bleed Send Store Item Description Off Do not adjust ...

Page 317: ...times and then Change of Zoom 3 Select the default zoom setting 4 Press OK Border Erase Default Set the default width to be erased as a border The table below shows the measurement ranges that can be set NOTE Refer to page 4 18 and page 6 26 for Border Erase Use the procedure below to set the default border erase width 1 Press the System Menu key 2 Press Common Settings Next of Function Defaults a...

Page 318: ...es that can be set Use the procedure below to set the default margin width 1 Press the System Menu key 2 Press Common Settings Next of Function Defaults and then Change of Margin Default 3 Use the or to enter the margin widths for Left Right and Top Bottom You can use the numeric keys to enter the number directly 4 Press OK Auto Image Rotation Select the default Auto Image Rotation setting The tab...

Page 319: ...ettings Next of Function Defaults twice and then Change of EcoPrint 3 Select Off or On for the default 4 Press OK Toner SaveLevel EcoPrint Select the default Toner SaveLevel EcoPrint One of five levels 1 5 can be set NOTE Raising the level reduces toner consumption but image quality falls IMPORTANT If you want to enable the changed defaults immediately move to the function screen and press the Res...

Page 320: ...ess Common Settings and Next of Function Defaults Press twice and then Change of Color TIFF Compression 3 Select TIFF V6 or TTN2 4 Press OK Image Quality File Format Select the default PDF TIFF JPEG XPS file quality Five options are available from 1 Low Quality High Comp to 5 High Quality Low Comp NOTE Higher quality will make the stored files larger Refer to page 6 14 for file formats Use the pro...

Page 321: ...below shows the available settings Use the procedure below to set the default JPEG TIFF Print settings 1 Press the System Menu key 2 Press Common Settings Next of Function Defaults Press twice and Change of JPEG TIFF Print 3 Select the default for Fit to Paper Size Image Resolution or Fit to Print Resolution 4 Press OK Item Description Collate Off Collate not performed On Collate performed Offset ...

Page 322: ...gs are shown below Refer to page 4 37 for Continuous Scan Use the procedure below to select the default settings for continuous scanning 1 Press the System Menu key 2 Press Common Settings Next of Function Defaults twice and then Change of Continuous Scan 3 Select Off or On for the default 4 Press OK PDF A Set the PDF file format used on the machine Use the procedure below to select the default PD...

Page 323: ... the subject and body automatically entered default subject and body when sending the scanned originals by E mail In addition set the template for entering the body text One of three templates can be set NOTE Refer to Send as E mail E mail Addr Entry on page 3 23 Use the procedure below to set the default e mail subject and message body 1 Press the System Menu key 2 Press Common Settings Next of F...

Page 324: ...Repeat Copy 3 Select the default for Off or On 4 Press OK DP Read Action Set the operation when a document is scanned from the document processor The table below shows the available settings NOTE Cannot be used when set to On in Document Guard on page 9 103 Use the procedure below to set a DP Read Action 1 Press the System Menu key 2 Press Common Settings and Next of Function Defaults Press three ...

Page 325: ...a stamp template during sending Use the procedure below to set a Text Text Stamp 1 Press the System Menu key 2 Press Common Settings Next in System Stamp Next in Basic Add Edit in Text Text Stamp 3 Select the key in which the print text will be registered press Add Edit and enter a maximum of 32 characters for the text string 4 Press OK Font Page When page numbers are used set the font sizes that ...

Page 326: ...ttings for stamps when a document is printed After configuring the setting return to the Copying Functions or Document Box Printing a Document screen from the system menu and press the Reset key Text Stamp Select whether or not a text stamp is used Use the procedure below to set a Text Stamp 1 Press the System Menu key 2 Press Common Settings Next in System Stamp Next in Printing Jobs Change in Te...

Page 327: ...a Bates Stamp 1 Press the System Menu key 2 Press Common Settings Next in System Stamp Next in Printing Jobs Change in Bates Stamp 3 Select Off or On 4 Press OK NOTE When On is selected the Bates Stamp settings cannot be changed when printing Item Description Each Print Page Stamp on each printed page Each Original Page Stamp each page of the document Item Description Size Set the font size of the...

Page 328: ...ess Position and set the position of the printed bates stamp Positions that can be selected are Top Left Top Middle Top Right Middle Left Center Middle Right Bottom Left Bottom Middle and Bottom Right 7 Press Font and select font and display settings for the Bates Stamp to be printed The following settings can be selected 8 Press OK Sending Jobs Configure stamp settings for sending documents After...

Page 329: ...be printed from the displayed templates 4 Press Position and set the position of the printed text stamp Positions that can be selected are Top Left Top Middle Top Right Middle Left Center Middle Right Bottom Left Bottom Middle and Bottom Right 5 Press Font and set font and display settings for the printed text stamp The following settings can be selected 6 Press OK Item Description Size Set the fo...

Page 330: ...nge in Edit Bates Stamp 3 Set the bates stamp to print Items that can be set are Date User Name Serial Number Numbering Text 1 and Text 2 If you selected Text 1 or Text 2 press Change below and enter a maximum of 32 characters for the text string 4 If you selected Date for the bates stamp to be printed press Date Format and set the date display format Items that can be set are MM DD YYYY DD MM YYY...

Page 331: ...ing Edit Text Stamp Set the default text stamp Use the procedure below to Edit a Text Stamp 1 Press the System Menu key 2 Press Common Settings Next in System Stamp Next in Storing Jobs Change in Edit Text Stamp 3 Press Keyboard and enter a maximum of 32 characters for the text string or select the text stamp to be printed from the displayed templates Item Description Size Set the font size of the...

Page 332: ...ss Common Settings Next in System Stamp Next in Storing Jobs Change in Bates Stamp 3 Select Off or On 4 Press OK NOTE When On is selected the Bates Stamp settings cannot be changed when storing Item Description Size Set the font size of the printed text stamp Style Set the font style of the printed text stamp Bold or Italic can be set Font Set the font of the printed text stamp Courier or Letter G...

Page 333: ...nd set the starting sequence number 1 9999999 6 Press Position and set the position of the printed bates stamp Positions that can be selected are Top Left Top Middle Top Right Middle Left Center Middle Right Bottom Left Bottom Middle and Bottom Right 7 Press Font and select font and display settings for the Bates Stamp to be printed The following settings can be selected 8 Press OK Item Descriptio...

Page 334: ... Select the default setting for Manual Staple 4 If you selected On in 3 set the time until manual stapling mode is automatically cancelled 5 Press OK Staple Position Set the default Staple Position The table below shows the available settings Use the procedure below to select the default Staple Position 1 Press the System Menu key 2 Press Common Settings Next in Manual Staple Change in Staple Posi...

Page 335: ...g Off alerts you low toner when the amount of remaining toner becomes 5 The procedure for setting the Low Toner Alert Level is explained below 1 Press the System Menu key 2 Press Common Settings Change in Low Toner Alert Level If the user authentication screen appears enter your login user name and password and then press Login For this you need to login with administrator privileges Refer to Addi...

Page 336: ...dministrator privileges Paper Selection Set the default paper selection The table below shows the available settings Use the procedure below to set the default paper selection 1 Press the System Menu key 2 Press Copy and Change of Paper Selection 3 Press Auto or Default Paper Source 4 Press OK 5 Move to the copy screen and press the Reset key Item Description Auto Automatically select the cassette...

Page 337: ...paper source of different size from the original is selected select whether automatic zoom reduce zoom is performed The table below shows the available settings IMPORTANT If you want to enable the changed defaults immediately move to the function screen and press the Reset key Use the procedure below to specify the automatic zoom priority 1 Press the System Menu key 2 Press Copy and Change of Auto...

Page 338: ...uick Setup Registration Select the copying functions to be registered for Quick Setup Six keys of the Quick Setup screen are allocated to typical functions but can be changed as necessary Six items from the following options are available Paper Selection Zoom Staple Punch Density Duplex Combine Collate Offset Original Image Original Size Original Orientation Continuous Scan Background Density Adj ...

Page 339: ...us Scan Background Density Adj Use the procedure below to register the Quick Setup functions 1 Press the System Menu key 2 Press Send and Next of Quick Setup Registration 3 Press Change of the function to be registered in Quick Setup 4 Select a key 1 6 allocated on the Quick Setup Registration screen Press Off to delete a key from the Quick Setup 5 Press OK If you overwrite the setting a confirmat...

Page 340: ... Entry Check for New Dest When adding new destination display the entry check screen to check the entered destination The table below shows the available settings Use the procedure below to set entry check for new destination 1 Press the System Menu key 2 Press Send and then Change of Entry Check for New Dest 3 Select Off or On 4 Press OK Item Description RGB Send color documents in RGB sRGB Allow...

Page 341: ...gs Forward Set whether or not transmission copies are forwarded The table below shows the available settings Use the procedure below to set the settings for Forward 1 Press the System Menu key 2 Press Send Next of Send and Forward Change of Forward 3 Select Off or On 4 Select the type of address to be specified as a forwarding destination and press OK Item Detail Destination Displays the destinati...

Page 342: ...tion on page 3 39 for Address List Specifying by entering an e mail address Press E mail Address enter the e mail address and press OK NOTE Refer to the Character Entry Method on page Appendix 8 for details on entering characters Specifying a folder Select FTP or SMB press Host Name Path Login User Name and Login Password enter each item and press OK The table below explains the items to be entere...

Page 343: ...to the Character Entry Method on page Appendix 8 for details on entering characters Press Connection Test to check the connection to the server you chose If the connection fails check the entries you made 4 Check if the destination entry is correct and press OK The destination is added to the Address Book Color Setting Color settings for forwarded transmission copies can be set The settings are de...

Page 344: ...use PDF encryption functions For details refer to the following PDF Encryption Functions File Format Adjustable range of image quality Color Setting PDF The file format can be set to PDF A 1a or PDF A 1b 1 Low Quality High Comp to 5 High Quality Low Comp Auto Color Color Grayscale Auto Color Color Black and White Full Color Grayscale Black and White TIFF 1 Low Quality High Comp to 5 High Quality L...

Page 345: ... Next of Send and Forward Change of File Format 3 Press PDF or High Comp PDF and Encryption 4 Press of Compatibility select Acrobat 3 0 and later or Acrobat 5 0 and later 5 When you enter the password to open the PDF file select On of Password to Open Document 6 Press Password enter a password up to 256 characters and then press OK NOTE Refer to the Character Entry Method on page Appendix 8 for de...

Page 346: ...printing of PDF file impossible Allowed Low Resolution only Only displayed when Acrobat 5 0 and later is selected in Compatibility Can print the PDF file only in low resolution Allowed Can print the PDF file in original resolution Item Detail Not Allowed Cannot change the PDF file Inserting Deleting Rotating Pages Only displayed when Acrobat 5 0 and later is selected in Compatibility Can only inse...

Page 347: ...f forwarded e mails Use the procedure below to set the default E mail Subject 1 Press the System Menu key 2 Press Send Next of Send and Forward Change of E mail Subject 3 Enter a maximum of 60 characters for the e mail subject and press OK NOTE Refer to the Character Entry Method on page Appendix 8 for details on entering characters FTP Encrypted TX Set whether transmission copies are encrypted be...

Page 348: ... a box in the custom box or deletes a box from the custom box For details refer to Using a Custom Box on page 7 2 Default Setting Sets the time at which documents in the custom box are automatically deleted For details refer to Setting the document deletion time on page 7 3 Job Box The following three operations can be done For details refer to each page shown below Quick Copy Proof and Hold page ...

Page 349: ... Background Density Adj Print Quick Setup Paper Selection Collate Offset Staple Punch Duplex Combine Delete after Printed Send Quick Setup Sending Size FAX TX Resolution File Format Delete after Transmitted Use the procedure below to register the Quick Setup functions 1 Press the System Menu key 2 Press Document Box Removable Memory and Next of Quick Setup Registration 3 Press Next of Store File P...

Page 350: ...strator privileges Emulation Select the emulation for operating this machine by commands oriented to other types of printers Selection of emulation The printer can emulate PCL 6 KPDL and KPDL Auto Use the procedure below to select the emulation 1 Press the System Menu Key 2 Press Printer Change of Emulation 3 Select the desired emulation NOTE If you selected KPDL Auto set Alternative Emulation too...

Page 351: ...ion and then press OK 4 Press OK Setting of KPDL error report When an error has occurred during printing in KPDL emulation mode set whether or not the error report is output The default setting is Off not output Use the procedure below to specify the KPDL error report setting 1 Press the System Menu Key 2 Press Printer Change of Emulation KPDL or KPDL Auto KPDL Error Report 3 Press On or Off and t...

Page 352: ...elect the default Toner SaveLevel EcoPrint 1 Press the System Menu key 2 Press Printer and Change of Toner SaveLevel EcoPrint 3 Select from 1 to 5 for the default Toner SaveLevel EcoPrint 4 Press OK Override A4 Letter Select whether to treat A4 size and Letter which are similar in size as the same size when printing The table below shows the available settings Use the procedure below to specify th...

Page 353: ...ss 1 sided 2 sided Bind LongEdge or 2 sided Bind ShortEdge 4 Press OK Copies Set the default number of copies from 1 to 999 Use the procedure below to specify the default number of copies 1 Press the System Menu key 2 Press Printer and Change of Copies 3 Press or the numeric keys to set the default number of copies 4 Press OK Item Description Finish 1 sided No duplex mode 2 sided Bind LongEdge Lon...

Page 354: ... may sometimes wait if there is no information signaling that the last page does not have any more data to be printed When the preset timeout passes the machine automatically prints the document The options are between 5 and 495 seconds Use the procedure below to set the form feed timeout 1 Press the System Menu key 2 Press Printer and Change of Form Feed Timeout 3 Press or to set the Form Feed Ti...

Page 355: ...he available settings Use the procedure below to specify a CR action 1 Press the System Menu key 2 Press Printer and Change of CR Action 3 Press CR Only LF and CR or Ignore CR 4 Press OK Job Name Set whether the job name set in the printer driver is displayed Use the procedure below to set the Job Name 1 Press the System Menu key 2 Press Printer and Change of Job Name 3 Select Off or On 4 Press OK...

Page 356: ...vailable settings Use the procedure below to select the paper feed mode 1 Press the System Menu key 2 Press Printer and Change of Paper Feed Mode 3 Press Auto or Fixed 4 Press OK KIR The machine is equipped with the smoothing function which realizes an excellent printing of about 9600 dpi 600 dpi 15 gradation 600 dpi Use the procedure below to set the KIR 1 Press the System Menu key 2 Press Printe...

Page 357: ...onfigured NOTE If user login administration is enabled you can only print by logging in with administrator privileges Print Report Printable reports are as follows Status Page Check the information including current settings memory installed and optional equipment installed Font List Check the font samples installed in the machine Status Page Firmware Version ...

Page 358: ...ally print a report of transmission result when a transmission is complete The table below shows the available settings 1 Press the System Menu key 2 Press Report Next of Result Report Setting Next of Send Result Report and then Change of E mail Folder 3 Press Off On or Error Only 4 Press OK Item Description Off No result report printed On Result report automatically printed Transmitted images can...

Page 359: ...ss press E mail Address Entry Press E mail Address enter the destination e mail address and then press OK 4 To set an address from the address book press E mail Address Book 5 Press Address Book Select the destination from the address book and press OK The selected e mail addresses is displayed NOTE For information on specifying destinations refer to Specifying Destination on page 3 39 You can vie...

Page 360: ...e confirmation screen appears press Yes The log history is sent Job Log Subject Set the subject automatically entered when sending log histories by e mail Use the procedure below to set the subject 1 Press the System Menu key 2 Press Report Next of Sending Log History and then Change of Job Log Subject 3 Enter an e mail subject not more than 60 characters NOTE Refer to the Character Entry Method o...

Page 361: ...stration is enabled you can only change the settings by logging in with administrator privileges Density Adjustment The density for all copying and the density for all sending and storing in document boxes can be made darker or lighter Use the procedures below to adjust the density Copy 1 Press the System Menu key 2 Press Adjustment Maintenance and then Next of Density Adjustment 3 Press Next of C...

Page 362: ...o 1 Press the System Menu key 2 Press Adjustment Maintenance and then Next of Background Density Adj 3 Press Change of Copy Auto 4 Press 3 3 Lighter Darker to adjust background density 5 Press OK Send Box Auto 1 Press the System Menu key 2 Press Adjustment Maintenance and then Next of Background Density Adj 3 Press Change of Send Box Auto 4 Press 3 3 Lighter Darker to adjust background density 5 P...

Page 363: ...ance and then Change of Correcting Black Line 3 Press Off On Low or On High 4 Press OK System Initialization Initialize the hard disk installed on the machine to return it to the factory defaults Refer to System Initialization on page 9 89 about the initialization procedures Item Description Off No correction performed On Low Correction performed On High Select this item if a streak remains after ...

Page 364: ...he original is color or black and white in Auto Color Selection Mode Setting a lower value will result in more originals being identified as color while a larger value will tend to increase the number of originals being identified as black and white Use the procedure below to set the Auto Color Detection Level 1 Press the System Menu key 2 Press Adjustment Maintenance and then Change of Auto Color...

Page 365: ...at the number 2 is printed at the bottom of the pattern and repeat steps 4 to 6 to read the pattern 7 Press OK in the adjustment end confirmation screen Drum Refresh1 Refresh the drum when image blur appear on images in copies Takes about 90 seconds NOTE Drum Refresh1 cannot be performed while printing Execute Drum Refresh1 after the printing is done To use Drum Refresh1 load Ledger or A3 size pap...

Page 366: ...ted press OK to return to the Adjustment Maintenance screen Calibration Cycle After Auto Clear has been activated or during printing Calibration Remaining 50 seconds may be displayed While this message is displayed the machine makes adjustments to maintain image quality Wait until the message disappears Set the calibration cycle here The setting items are as follows 1 Press the System Menu key 2 P...

Page 367: ...nd then Next of Calibration 3 Press Execute Calibration begins 4 Press OK after Calibration is complete Developer Refresh When the printing is too light or incomplete even though there is enough toner refresh the developer 1 Press the System Menu key 2 Press Adjustment Maintenance and then Next of Developer Refresh 3 Press Start Developer Refresh begins NOTE Waiting time may be longer when the ton...

Page 368: ...e the machine If you perform Send as E mail the date and time set here will be displayed on the header NOTE Be sure to set Time Zone before the Date Time setup Use the procedure below to set the date and time 1 Press the System Menu key 2 Press Date Timer and then Change of Date Time 3 Press or to enter the date and time respectively 4 Press OK NOTE If you try to change the date time when a trial ...

Page 369: ... press OK NOTE If you select a region that does not utilize summer time the summer time setting screen will not appear Auto Panel Reset If no jobs are run for a certain period of time automatically reset settings and return to the default setting NOTE Refer to page 9 16 for the default settings Auto Panel Reset Select to use Auto Panel Reset or not Use the procedure below to specify the auto panel...

Page 370: ... Low Power Mode Specify a value from 1 240 minutes 1 minute increments For more information on Low Power Mode refer to the Low Power Mode and Auto Low Power Mode on page 2 11 Use the procedure below to set the Low Power Mode 1 Press the System Menu key 2 Press Date Timer and then Low Power Timer 3 Press or the numeric keys to enter the time until Low Power Mode is turned on 4 Press OK Auto Sleep I...

Page 371: ...t of time elapses For details refer to Responding when Error Messages on page 12 7 Auto Error Clear Select whether to use Auto Error Clear or not Use the procedure below to specify the auto error clear setting 1 Press the System Menu key 2 Press Date Timer and then Change of Auto Error Clear 3 Press Off or On 4 Press OK Error Clear Timer If you select On for Auto Error Clear set the amount of time...

Page 372: ...ime for the interrupt clear timer 4 Press OK Error Job Skip Set whether a job for which a Add paper in cassette or Add paper in Multi Purpose tray error occurred when the job was started is automatically skipped after a set period of time elapses The period of time can be set within the range 5 to 90 seconds increments of 5 seconds NOTE When a job is skipped it is moved to the end of the job queue...

Page 373: ...System Menu key 2 Press Edit Destination Add Edit of Address Book Add Contact and then Next 3 To specify the address number press Change in Address Number 4 Press or numeric keys to enter a particular Address Number 1 2500 To have the number assigned automatically enter 0000 NOTE Address Number is an ID for a destination You can select any available number out of 2 000 numbers for contacts and 500...

Page 374: ...e default 21 use the Host name port number format e g FTPhostname 140 To enter the IPv6 address enclose the address in brackets e g 3ae3 9a0 cd05 b1d2 28a 1fc0 a1 10ae 140 NOTE Refer to the Character Entry Method on page Appendix 8 for details on entering characters Press Connection Test to check the connection to the FTP server you chose If the connection fails check the entries you made Item Des...

Page 375: ...ed folder is set NOTE Refer to the Character Entry Method on page Appendix 8 for details on entering characters Press Connection Test to check the connection to the computer you chose If the connection fails check the entries you made 9 Check if the destination entry is correct and press Save The destination is added to the Address Book To register the registered address in a one touch key press Y...

Page 376: ...groups If you specify an address number that is already in use an error message appears when you press Save and the number cannot be registered If you set 0000 as the address number the address is registered under the lowest available number 5 Press OK The Add Group screen reappears 6 Press Change of Name 7 Enter the group name displayed on the Address Book not more than 32 characters NOTE Refer t...

Page 377: ...firmation screen to register the changed destination Editing a Group 1 Change Address Number and Name Refer to Group on page 9 80 for the details 2 Press Member 3 To delete any destination from the group select the destination and press Delete Press Yes on the screen to confirm the deletion 4 After you have completed the changes press Save 5 Press Yes in the change confirmation screen to register ...

Page 378: ...ne Touch Key Use the procedure below to edit the One Touch key 1 Press the System Menu key 2 Press Edit Destination and then Add Edit of One Touch Key 3 Select a One Touch Key number 0001 to 1000 for the destination Pressing Quick No Search key or No enables direct entry of a One Touch Key number The procedure differs depending on the details to be edited Changing the Registered Information 1 Pres...

Page 379: ... table below shows the available settings Use the procedure below to specify the Narrow Down settings 1 Press the System Menu key 2 Press Edit Destination Next of Address Book Defaults and then Change of Narrow Down 3 Select the type of destination filter 4 Press OK Item Detail No Displays the destination list in order of the registered number Name Displays the destination list in order of the reg...

Page 380: ...s Change of Internet Browser 4 Press On or Off 5 Press OK Browser Preferences This specifies Internet browser preferences such as your home page setting and how pages are displayed NOTE This is not displayed if you selected Off in Internet Browser Setting page 9 84 Use the procedure below to set your Internet browser preferences 1 Press the System Menu key 2 Press and then Internet NOTE If the use...

Page 381: ... For this you need to login with administrator privileges Refer to Adding a User Local User List on page 10 5 for the default login user name and password 3 Press Change of Proxy and then press On To set whether or not the same proxy server is used for all protocols 1 If the same proxy server will not be used remove the checkmark from Use the Same Proxy Server for All Protocols To set a proxy serv...

Page 382: ...word and then press Login For this you need to login with administrator privileges Refer to Adding a User Local User List on page 10 5 for the default login user name and password 4 Press Add 5 Select the application to be installed and press Install You can view detailed information on the selected application by pressing Detail 6 When the confirmation screen appears press Yes Installation of the...

Page 383: ...activate 4 Enter the license key and press Official Some applications do not require you to enter a license key If the license key entry screen does not appear go to Step 5 To use the application as a trial press Trial without entering the license key 5 When the confirmation screen appears press Yes CAUTION If you change the date time while using an application you will no longer be able to use th...

Page 384: ...en Application NOTE If the user authentication screen appears enter your login user name and password and then press Login For this you need to login with administrator privileges Refer to Adding a User Local User List on page 10 5 for the default login user name and password 3 Select the application to be deleted and press Delete You can view detailed information on the selected application by pr...

Page 385: ...r privileges Refer to Adding a User Local User List on page 10 5 for the default login user name and password 3 When the confirmation screen appears press Yes Initialization starts IMPORTANT The Formatting Do not turn off the main power switch message appears during initialization Wait until initialization ends 4 Once the initialization ends the message Task is completed Turn the main power switch...

Page 386: ...e machine Use the procedure below 1 Press the System Menu key 2 Press System Next of Network Check the host name displayed under Host Name TCP IP Select whether or not to use TCP IP The default setting is Off IMPORTANT After changing the setting restart the network from the system menu or turn the machine OFF and then ON For detailed information on restarting the network refer to Restart Network o...

Page 387: ...tting 3 Press Change of TCP IP 4 Press On and then press OK 5 Press Change of IPv4 6 Press DHCP 7 Press Off of DHCP and then press OK 8 Press Bonjour 9 Press Off of Bonjour and then press OK 10 Press IP Address and enter the address using the numeric keys 11 Press Subnet Mask and enter the address using the numeric keys 12 Press Default Gateway and enter the address using the numeric keys 13 Check...

Page 388: ...the IP address prefix length and gateway address of TCP IP IPv6 The manual setting is available when selecting On for TCP IP IPv6 IMPORTANT After changing the setting restart the network from the system menu or turn the machine OFF and then ON For detailed information on restarting the network refer to Restart Network on page 9 101 Use the procedure below 1 Press the System Menu key 2 Press System...

Page 389: ...4 Press Change of RA Stateless 5 Press On or Off of RA Stateless When selecting On IP Address 1 to 5 Stateless appears 6 Press OK DHCP IPv6 Settings Select whether or not to use the DHCP IPv6 server The DHCP IPv6 Settings are available when selecting On for TCP IP IPv6 The default setting is On IMPORTANT After changing the setting restart the network from the system menu or turn the machine OFF an...

Page 390: ... FTP On Y SMB Client Transmission Select whether or not to send documents using SMB When selecting On set the SMB default Port Number Use the SMB default port 139 For Windows Vista use 445 On Port 139 N i FAX Select whether or not to use i FAX On N LDAP Select whether or not to use LDAP Off N SNMP Select whether or not to communicate using SNMP On Y SNMPv3 Select whether or not to communicate usin...

Page 391: ...s for NetWare network from Auto Ethernet II 802 3 802 2 or SNAP The default settings are On Frame Type Auto IMPORTANT After changing the setting restart the network from the system menu or turn the machine OFF and then ON For detailed information on restarting the network refer to Restart Network on page 9 101 Use the procedure below 1 Press the System Menu key 2 Press System Next of Network and t...

Page 392: ...ystem menu or turn the machine OFF and then ON For detailed information on restarting the network refer to Restart Network on page 9 101 Use the procedure below 1 Press the System Menu key 2 Press System Next of Network and then Change of WSD Print 3 Press On or Off 4 Press OK Enhanced WSD Set whether to use our proprietary web services The WIA driver TWAIN driver and Network driver use this Enhan...

Page 393: ...T After changing the setting restart the network from the system menu or turn the machine OFF and then ON For detailed information on restarting the network refer to Restart Network on page 9 101 The following Secure Protocol settings are available SSL 9 97 IPP Security 9 98 HTTP Security 9 98 LDAP Security 9 99 SMTP Security 9 99 POP3 Security User 1 9 100 POP3 Security User 2 9 100 POP3 Security...

Page 394: ...work Next of Secure Protocol and then Change of IPP Security 3 Press IPP over SSL Only or IPP or IPP over SSL 4 Press OK HTTP Security Select the HTTP security level This setup is available when SSL is On The default setting is HTTP or HTTPS NOTE HTTP or HTTPS must be set to On in Protocol Detail on page 9 94 IMPORTANT After changing the setting restart the network from the system menu or turn the...

Page 395: ...l that can be used on the SMTP port This setup is available when SSL is On The default setting is Off NOTE SMTP must be set to On in Protocol Detail on page 9 94 Use the procedure below 1 Press the System Menu key 2 Press System Next of Network Next of Secure Protocol and then Change of SMTP Security 3 Press Off SSL TLS or STARTTLS 4 Press OK Item Description Off Do not use security employed by th...

Page 396: ...hat can be used on the POP3 port This setup is available when SSL is On The default setting is Off For the procedure for selecting the POP3 Security User 3 Setting see POP3 Security User 1 IPSec Sets up IPSec The default setting is Off IMPORTANT After changing the setting restart the network from the system menu or turn the machine OFF and then ON For detailed information on restarting the network...

Page 397: ...n restarting the network refer to Restart Network on page 9 101 Use the procedure below 1 Press the System Menu key 2 Press System Next of Network and then Change of LAN Interface 3 Select Auto 10BASE T Half 10BASE T Full 100BASE TX Half 100BASE TX Full or 1000BASE T as the LAN interface 4 Press OK Restart Network To restart the network card of the device follow the steps below 1 Press the System ...

Page 398: ...hen press Login For this you need to login with administrator privileges Refer to Adding a User Local User List on page 10 5 for the default login user name and password 3 Press Block 4 Press OK USB Device This locks and protects the USB interface connector B1 USB Device The default setting is Unblock Use the procedure below to specify the USB Device setting 1 Press the System Menu key 2 Press Sys...

Page 399: ...est you confirm how the machine performs this function in your environment Machine Operation after Detecting the Document Guard Pattern Item Description Common operation Displays the message that indicates the machine detected the document guard pattern and stops scanning the remaining documents Copy functions Prints the documents in blank when the machine detected the document guard pattern Send ...

Page 400: ...ed on the colored paper or paper that is decorated with special design may not be detected We do not guarantee the integrity of the detection If a malfunction occurs contact your service representative Use the procedure below to specify the Document Guard setting 1 Press the System Menu key 2 Press System and then Change of Document Guard NOTE If the user authentication screen appears enter your l...

Page 401: ...resume when the power is turned on but complete sanitization cannot be guaranteed The data erased by initialization is shown below Category Data erased Devices jobs Job settings set by user Network settings Image data saved in document boxes etc Data registered in one touch keys Job logs User information user lists address books document boxes registered by user etc Account information for account...

Page 402: ...must log in with administrator authority Refer to Adding a User Local User List on page 10 5 for the default login user name and password 3 Press Start Initialization starts When initialization is completed the sanitization results will appear on the screen Hard Disk Initialization When the optional Data Security kit is installed Hard Disk Initialization is added to the Data Security settings For ...

Page 403: ...od differ depending on the application Starting Application Use Use the procedure below to start using an application 1 Press the System Menu key 2 Press System and then Next of Optional Function NOTE If the user authentication screen appears enter your login user name and password and then press Login For this you need to login with administrator privileges Refer to Adding a User Local User List ...

Page 404: ... Accessibility Display Enlarged Touch Panel Display Touch panel characters and key displays can be enlarged Use the numeric keys to select items and proceed to the next screen NOTE Accessibility can be used only with Copying and Sending registered on the Quick Setup screen To set functions other than those displayed in the accessibility screens you must return to the original display Press the Acc...

Page 405: ...10 1 10 Management This chapter explains the following operations User Login Setting 10 2 Job Accounting Setting 10 20 ...

Page 406: ...user for whom the function is not prohibited First User Login Administration Follow these steps for the first user login administration Enable user login administration page 10 2 Add a user page 10 5 Log out page 10 4 The registered user logs in for operations page 10 3 User Login This enables user login administration Select one of the following authentication methods Use the procedure below to e...

Page 407: ...d entry screen appears each time you use this machine NOTE If the guest authentication setting is enabled the authentication logout key must be pressed when logging in Login Use the procedure below to login 1 When the machine is operated and the next screen appears select the authentication destination from the Login to pull down menu and press Login User Name Press Keys to enter the login data us...

Page 408: ...Local or Network can be selected as the authentication destination 5 Check the login user name and password are correct and press Login Logout To log out the machine press the Authentication Logout key to return to the login user name login password entry screen Auto Logout Logout is automatically executed in the following cases When the Power key is pressed to enter the sleep mode When auto sleep...

Page 409: ...t ID Refer to Job Accounting Setting on page 10 20 E mail Address The user can register his her E mail address The registered address will be automatically selected for subsequent operations that need any E mail function Local Authorization Set usage authority for each user Local Authorization must be enabled Refer to page 10 9 Use of the following items can be restricted Print Restriction Select ...

Page 410: ...r Login Job Accounting 4 If the user authentication screen appears enter your login user name and password and then press Login For this you need to login with administrator privileges Refer to Adding a User Local User List on page 10 5 for the default login user name and password 5 Press Next of User Login Setting Add Edit of Local User List and then Add 6 Press Change of User Name 7 Enter the us...

Page 411: ... Press Save to add a new user on the local user list NOTE If simple login is enabled a confirmation screen appears when new registration is finished asking if you will configure simple login settings To configure simple login settings press Yes For the procedure for configuring simple login settings refer to Simple Login Settings on page 10 17 If you select No you will return to the user list scre...

Page 412: ... password and then press Login For this you need to login with administrator privileges Refer to Adding a User Local User List on page 10 5 for the default login user name and password 4 Press Next of User Login Setting and Add Edit of Local User List 5 Select the user whose properties you wish to change NOTE Select Name and Login Name from the Sort pull down menu to sort the user list Press Searc...

Page 413: ...ies Press Detail of Login User Name or Account Name to check the present status 4 Press Save to finalize changed user properties Local Authorization Select whether or not to use Local Authorization Use the procedure below 1 Press the System Menu key 2 Press User Login Job Accounting 3 If the user authentication screen appears enter your login user name and password and then press Login For this yo...

Page 414: ...it 6 Press OK Group Authorization Set Set restrictions of the machine usage by each individual group registered in the authentication server NOTE To use the group authorization settings Network Authentication must be selected for the authentication method in User Login on page 10 2 Select On for LDAP in Protocol Detail on page 9 94 Group Authorization Use the group authorization Use the procedure ...

Page 415: ...b of user properties If you are using Windows Server 2000 2003 check ADSIEdit ADSIEdit is a support tool included on the installation DVD for Windows Server OS under SUPPORT TOOLS Enter the ID displayed on the group list between 1 and 4294967295 Group Name Enter the name displayed on the group list up to 32 characters Access Level Select Administrator or User for group access privileges Print Rest...

Page 416: ...uest users who cannot log in to the machine are allowed to use NOTE To use Guest Authorization Set User Login Administration must be enabled in User Login on page 10 2 Cannot be used when the Key Counter option is used Guest Authorization Set guest approval Use the procedure below 1 Press the System Menu key 2 Press User Login Job Accounting 3 If the user authentication screen appears enter your l...

Page 417: ...scription User Name Enter the name displayed on the user list up to 32 characters Access Level The authority of the user appears This cannot be changed Account Name Add an account where the user belongs Authorization Rules Set usage authority for each user Use of the following items can be restricted Print Restriction Select whether or not use of the print function of the printer is prohibited Cop...

Page 418: ...to the Character Entry Method on Appendix 8 for details on entering characters 7 Press Change of Account Name 8 Select the account and press OK NOTE Select Name and ID from the Sort pull down menu to sort the account list Press Search Name or Search ID to search by account name or account ID 9 Press Next of Authorization Rules 10 Press Change of Print Restriction 11 Select Reject Usage or Off and ...

Page 419: ...Network Authentication Use the procedure below 1 Press the System Menu key 2 Press User Login Job Accounting 3 If the user authentication screen appears enter your login user name and password and then press Login For this you need to login with administrator privileges Refer to Adding a User Local User List on page 10 5 for the default login user name and password Item Description Server Name 1 E...

Page 420: ...type to Kerberos press Authentication Type and set the authentication method 15 Press Search Timeout to set the amount of time to wait before time out 16 Press or the numeric keys to enter the time and press OK 17 Press LDAP Security to select the type of encryption according to the type of security employed by the LDAP server 18 Select Off SSL TLS or STARTTLS and press OK User Login Job Accountin...

Page 421: ... and then press Login For this you need to login with administrator privileges Refer to Adding a User Local User List on page 10 5 for the default login user name and password 4 Press Next of User Login Setting Next of Simple Login Settings and then Change of Simple Login 5 Select On or Off 6 Press OK Simple Login Key Register a user for simple login You can add Up to 20 users Use the procedure be...

Page 422: ...e user to be set for simple login NOTE Destinations can be sorted or searched by destination name or address number Refer to Specifying Destination on page 3 39 for Address List Status Add or edit the Simple Login key 01 No Detail A 02 B 03 C Close Delete Add Edit User Login Job Accounting Simple Login Key 1 2 10 10 2010 10 10 Simple Login Key Display Name Save Icon Password Login Change User Stat...

Page 423: ...s on entering characters 10 Press Change of Password Login 11 Press On or Off and then press OK 12 Press Change of Icon 13 Select the user icon to be displayed and press OK 14 Press Save Status User Name Domain OK Keys Simple Login Key User Enter login user name and password Cancel Back Login User Name Login Password Keys domain 1 0099 10 10 2010 10 10 Cancel OK Male 1 Simple Login Key Icon Set th...

Page 424: ...p Follow these steps for the first job accounting setup Enable job accounting page 10 20 Add an account page 10 22 Log out page 10 21 Other users login for operations page 10 21 Job Accounting Enable job accounting Use the procedure below to specify the job accounting setting 1 Press the System Menu key 2 Press User Login Job Accounting 3 If the user authentication screen appears enter your login ...

Page 425: ...unter you can refer to the number of pages printed and the number of pages scanned When the screen to enter the login user name and password appears If user login administration is enabled the screen to enter the login user name and password appears Enter a login user name and password to login Refer to Login Logout on page 10 3 If the user has already registered the account information the accoun...

Page 426: ...reen reappears NOTE Refer to the Character Entry Method on Appendix 8 for details on entering characters 7 Follow steps 5 and 6 above to enter the Account ID NOTE Any account ID that has already registered cannot be used Enter any other account ID 8 Activate or deactivate restriction Refer to Restricting the Use of the Machine on page 10 24 9 Press Save to add a new account on the Account List Ite...

Page 427: ...unt name or account ID The procedure differs depending on the details to be edited Changing account information 1 Press Detail 2 Refer to steps 5 to 7 of Adding an Account and steps 2 to 5 of Restricting Using the Machine to change account information 3 Press Save 4 Press Yes in the registration confirmation screen The account information is changed Deleting an account 1 Press Delete 2 Press Yes T...

Page 428: ...ult login user name and password 4 Press Next of Job Accounting Setting Next of Default Setting and then Change of Copy Printer Count 5 Press Total or Split 6 Press OK Restricting the Use of the Machine This section explains how to restrict the use of the machine by account or the number of sheets available The items that can be restricted differ depending on whether Split or Total is selected for...

Page 429: ...ess Save The restricted account is added Item Detail Print Restriction Total Limits the total number of sheets used for copying and printing Scan Restriction Others Limits the number of sheets scanned excludes copying FAX TX Restriction Limits the number of sheets sent by fax This is displayed when the optional fax kit is installed FAX Port Restriction Restricts the ports used for faxing This is d...

Page 430: ...Press Next of Job Accounting Setting Next of Default Setting and then Change of Apply Limit 5 Select Immediately Subsequently or Alert Only 6 Press OK Default Counter Limit When you add a new account you can change the default restrictions on the number of sheets used You can set any number from 1 to 9 999 999 in 1 sheet increments The items that can be set differ depending on whether Split or Tot...

Page 431: ...tion Total Sets the default restriction on the number of sheets used for copying Print Restriction Total Sets the default restriction on the number of sheets used forprinting Scan Restriction Others Sets the default restriction on the number of sheets used for scanning excludes copying FAX TX Restriction Sets the default restriction on the number of sheets used for sending faxes This is displayed ...

Page 432: ...nt by Paper Size to check the number of pages used in the paper size set in Count by Paper Size on page 10 30 as well as the number of pages used in other paper sizes You can use the Count by Duplex Combine to check the number of pages used in Duplex 1 sided mode Duplex 2 sided mode and the total for both as well as the pages used in Combine None mode Combine 2in1 mode Combine 4in1 mode and the to...

Page 433: ...nfirm the count and press Close 7 Press Start of Counter Reset to reset the counter 8 Press Yes on the screen to confirm the reset The counter is reset Each Job Accounting This counts the number of pages for each account and resets the counts by account Use the procedure below to display and reset the counter 1 Press the System Menu key 2 Press User Login Job Accounting 3 If the user authenticatio...

Page 434: ... g count the letter size color paper used If no media type is specified usage is counted for all media types of that size Use the procedure below to count the number of pages 1 Press the System Menu key 2 Press User Login Job Accounting 3 If the user authentication screen appears enter your login user name and password and then press Login For this you need to login with administrator privileges R...

Page 435: ... to specify media type 7 Select the media type and press OK 8 Press Close User Login Job Accounting Paper Size 1 Select the paper sizes and types to count On Off Cancel OK A5 Plain Media Type B4 A3 A4 B5 Folio Letter Statement Ledger Legal Status 10 10 2010 10 10 ...

Page 436: ...to print a job accounting report 1 Check that Letter or A4 paper is loaded in the cassette 2 Press the System Menu key 3 Press User Login Job Accounting 4 If the user authentication screen appears enter your login user name and password and then press Login For this you need to login with administrator privileges Refer to Adding a User Local User List on page 10 5 for the default login user name a...

Page 437: ...nd Printing Counter Press the Counter key to check the number of sheets printed and scanned You can check the number of pages printed in each paper size by pressing Printed Pages by Paper Size Counter Status Close Print Status Page Printed Pages Black White Total Printer Copy Scanned Pages Originals Total FAX Copy 1800 200 600 FAX Others 1000 600 300 100 1000 Printed Pages by Paper Size 10 10 2010...

Page 438: ...Management 10 34 ...

Page 439: ...11 1 11 Maintenance This chapter describes cleaning and toner replacement Regular Maintenance 11 2 Cleaning 11 11 ...

Page 440: ...Using a toner container that is not genuine may cause image defects and product failure The memory chip in the toner container of this product stores information necessary for improving customer convenience operation of the recycling system for used toner containers and planning and development of new products The stored information does not include information that makes it possible to identify i...

Page 441: ...disposal bag 4 Remove the new toner container from the box 5 Place a cushioning material on a flat surface hold the toner container vertically on the material and tap the upper part of the container about 5 times Invert the toner container so that the other end is up and hit in the same way ...

Page 442: ...e way in 8 After pushing the toner container all the way in turn the toner container release lever to the horizontal position 9 Close the front cover NOTE Return the exhausted toner container and waste toner box to your dealer or service representative The collected toner container and waste toner box will be recycled or disposed in accordance with the relevant regulations ...

Page 443: ...lace the waste toner box immediately replace the waste toner box CAUTION Do not attempt to incinerate the toner container or the waste toner box Dangerous sparks may cause burns 1 Open the front cover 2 Push up the release lever for the waste toner box and pull out the waste toner box 3 Detach the accessory cap from the side of the box and attach to the tip 4 Insert into the provided plastic dispo...

Page 444: ...r box 7 Push the waste toner box firmly all the way in 8 Close the front cover NOTE Return the exhausted toner container and waste toner box to your dealer or service representative The collected toner container and waste toner box will be recycled or disposed in accordance with the relevant regulations ...

Page 445: ...and C are the same as for staple cartridge holder A If a message displays indicating that staples have run out the staple cartridge holder need to be replenished with staples NOTE If the Staple Unit runs out of staples contact your service representative or the place of purchase Follow the steps below to refill staples Refilling Staple Cartridge Holder A NOTE See page 11 8 to refill staple cartrid...

Page 446: ...nto the staple cartridge holder 5 Re install the staple cartridge holder The staple cartridge holder will click into place when it has been inserted correctly 6 Close the front cover 1 Refilling Staple Cartridge Holders B C Option Follow the steps below to refill staples for the optional folding unit Follow the same procedure to refill staple cartridge holders B and C 1 Open the front cover 1 and ...

Page 447: ...n it contains no more staples 4 Insert the new staple cartridge into the staple cartridge holder and close the stopper 5 Re install the staple cartridge holder When re installing align the triangle marks on the staple cartridge holder and the staple unit The staple cartridge holder will click into place when it has been inserted correctly 6 Close the front cover 1 and 2 ...

Page 448: ...n power switch on the machine switched ON while performing this procedure 1 Open the front cover 1 2 Grasp the punch waste box handle and remove the box from the Document Finisher NOTE Take care not to spill the waste hole punch scraps when removing the container 3 Dispose of the hole punch scraps appropriately 4 Re install the punch waste box Align it with the guides in the Document Finisher 5 Cl...

Page 449: ...ays unplug the power cord before cleaning the machine Platen Cover Glass Platen Wipe the backside of the platen cover the inside of the document processor and the glass platen with a soft cloth dampened with alcohol or mild detergent IMPORTANT Do not use thinner or other organic solvents Platen Cover Glass Platen ...

Page 450: ...so NOTE Wipe the slit glasses with the dry accessory cloth Do not use water soap or solvents for cleaning 1 Remove the cloth from the cleaning cloth compartment 2 Open the document processor and wipe the slit glass a Hold 1 Open the document processor 2 Clean the slit glass surface and the white reading guide on the document processor with the dry accessory cloth 3 Close the document processor and...

Page 451: ...ument processor 4 Open the top cover of the document processor and wipe the glass scanning unit 5 Wipe the white roller 6 Close the document processor top cover and return the cleaning cloth to the cleaning cloth compartment 7 Press End on the touch panel b ...

Page 452: ...solvents for cleaning Do not touch the photoconductor drum 1 Pull out cassette 1 and remove the cloth from the cleaning cloth compartment 2 Pull up the lever and open the right cover 1 3 Wipe off the dirt on both sides of the conveying guide 4 Press the specified position of the right cover 1 to close 5 Return the cleaning cloth to the cleaning cloth compartment and push cassette 1 back in place s...

Page 453: ...ast monthly to ensure optimum output quality 1 Open the front cover 2 Remove the cleaning brush blue colored 3 Pull up the lever and open the right cover 1 4 As shown in the figure clean dirt from the separator by moving the brush from side to side along the separator ...

Page 454: ...Maintenance 11 16 5 Press the specified position of the right cover 1 to close 6 Put away the cleaning brush and close the front cover ...

Page 455: ...12 1 12 Troubleshooting This chapter explains how to solve problems with the machine Solving Malfunctions 12 2 Responding when Error Messages 12 7 Clearing Paper Jams 12 21 ...

Page 456: ... machine in Sleep mode Press the Power key to recover the machine from Sleep mode The machine will be ready to copy within a minute 2 12 Blank sheets are ejected Are the originals loaded correctly When placing originals on the platen place them face down and align them with the original size indicator plates 2 46 When placing originals in the document processor place them face up 2 48 Check that t...

Page 457: ... platen or the document processor dirty Clean the platen or the document processor 11 11 Is the conveying guide dirty Clean the conveying guide 11 14 Run Drum Refresh1 9 69 Run Developer Refresh 9 71 Printouts are fuzzy Is the machine being used in very humid conditions Use in an environment that has suitable humidity Run Drum Refresh1 9 69 Images are skewed Are the originals placed correctly When...

Page 458: ...with new paper 2 29 Change the orientation in which the paper is positioned xl 2 31 2 38 Cannot print Is the machine plugged in Plug the power cord into an AC outlet Is the machine powered on Turn on the main power switch 3 2 Are the printer cable and network cable connected Connect the correct printer cable and network cable securely 2 3 Was the machine powered on before the printer cable was con...

Page 459: ...it Clean the paper ramp using a soft dry lint free cloth Part of the image is periodically faint or blurred Run Developer Refresh 9 71 Run Drum Refresh1 9 69 Part of the image is periodically faint or shows white lines Run Drum Refresh1 9 69 Print on the back of the sheet is visible on the front Set Prevent Bleed through to On 4 36 6 25 9 20 The background density is obtrusive Run Background Densi...

Page 460: ... Host Name been entered properly Check the name of the computer to which data is being sent 3 24 Has the Path been entered properly Check the share name for the shared folder 3 24 Has the Login User Name been entered properly Check the domain name and login user name 3 24 Has the same domain name been used for the Host Name and Login User Name Delete the domain name and backslash from the Login Us...

Page 461: ...strator Expansion Authentication is disabled Turn the main power switch off and on If the error exists contact administrator Add paper in cassette Is the indicated cassette out of paper Load paper Select the available paper Press Continue to print 2 29 Add paper in Multi Purpose tray Is the paper of the selected size loaded in the multi purpose tray Load paper Select the available paper Press Cont...

Page 462: ...nation shared folder to the previous setting 3 29 Is the account information user ID password used to access the shared folder to which the scanned image is to be sent incorrect Enter the correct user ID and password For a domain environment the domain name must be specified User ID Domain Name Example sa720XXXX km Cannot fold this paper Did you select a paper size type that cannot be folded If th...

Page 463: ...per size type that cannot be stapled If the selected paper is not changed and Continue is pressed staple is released Select the available paper Press Continue to print Cannot use due to a failure Call service Check the document processor Is the document processor open Close the document processor Is the top cover of the document processor open Close the document processor cover Check the folder se...

Page 464: ...d pattern Job is canceled Press End 9 103 Empty the punch waste box Is the punch waste box full Follow the instructions on the touch panel and empty the punch waste box 11 10 Error occurred at cassette Open the cassette Check inside the machine and remove the paper Error occurred at the multi purpose tray Remove the paper from the multi purpose tray 2 38 Failed to specify Job Accounting Failed to ...

Page 465: ...ta Incorrect account ID The account ID was incorrect when processing the job externally The job is canceled Press End Incorrect box password The box password was incorrect when processing the job externally The job is canceled Press End Incorrect Login User Name or Password The login user name or password was incorrect when processing the job externally The job is canceled Press End Incorrect pass...

Page 466: ...the paper and press Continue Printing then resumes Maximum number of scanned pages Is the acceptable scanning count exceeded Cannot scan pages any more Follow the instructions on the touch panel Memory is full The memory is full and the job cannot be continued Press Continue to print the scanned pages The print job cannot be processed completely Press Cancel to cancel the job The process cannot be...

Page 467: ... removable memory The job stopped Press End Possible error codes are as follows 01 Connect a removable memory that can be written to An error occurred in the removable memory The job stopped Press End Possible error codes are as follows 01 The amount of data that can be saved at once has been exceeded Restart the system or turn the power OFF ON If the error still occurs the removable memory is not...

Page 468: ...e performed due to insufficient memory of the scanner Follow the instructions on the touch panel Send error An error has occurred during transmission The job is canceled Press End Refer to Responding to Send Error for the error code and corrective actions 12 17 Staple is empty Has the document finisher run out of staples If the staples are depleted the machine will stop and the location of staple ...

Page 469: ... this machine The slit glass requires cleaning Clean the slit glass using the cleaning cloth supplied with the document processor 11 12 Toner container is empty Replace the toner container to our specified toner container 11 2 Toner is empty Replace the toner container to our specified toner container 11 2 Toner is running out It is almost time to replace the toner container Obtain a new toner con...

Page 470: ...oom temperature Adjust the temperature and the humidity of your room Warning low memory Cannot start the job Try again later Waste toner box almost full It is almost time to replace the waste toner box Obtain a new waste toner box You cannot use this system Is a workflow registered Close FMU Connection and create a workflow To create a workflow File Management Utility PC application is required Fi...

Page 471: ...nd login password NOTE If the sender is a domain user specify the domain name Host name Path 3 24 Failed to send the e mail Failed to send i FAX Check the following on the Command Center RX SMTP login user name and login password POP3 login user name and login password Failed to send via FTP Check the FTP settings Login user name and login password NOTE If the sender is a domain user specify the d...

Page 472: ...axing i FAX Option 1106 Failed to send the e mail Failed to send i FAX Check the sender address of SMTP on the Command Center RX 2 27 1131 Failed to send via FTP Select On of the secure protocol settings on the Command Center RX 2 27 1132 Failed to send via FTP Check the following of the FTP server Is FTPS available Is the encryption available 2 27 2101 Failed to send via SMB Failed to send via FT...

Page 473: ...e hub is not operating properly The server is not operating properly 2202 Failed to send the e mail Failed to send via FTP Failed to send i FAX 2203 Failed to send via FTP Failed to send via SMB 2231 Failed to send via FTP 2204 Failed to send the e mail Failed to send i FAX Check the e mail size limit of the SMTP settings on the Command Center RX 2 27 3101 Failed to send the e mail Failed to send ...

Page 474: ...ch off and back on If this error occurs several times make a note of the displayed error code and contact your service representative 9181 The scanned original exceeds the acceptable number of pages of 999 Send the excess pages separately Symptom Corrective Actions Reference Page Cannot connect to authentication server Set machine time to match the server s time 2 14 Check the domain name 10 2 Che...

Page 475: ... purpose tray 3 Open fuser cover A1 and remove the paper 4 Close the cover Status 10 10 2010 10 10 Hold JAM Paper jam 02 04 1 Remove the paper from the paper ejector 2 Open main unit right cover 1 and remove the paper Remove the paper from the multi purpose tray 3 Open fuser cover A1 and remove the paper 4 Close the cover Status A D I L L M M M M M K K K H G K K K J K K K K K B C E E E F C C Paper...

Page 476: ...of paper from inside the machine Scraps of paper left in the machine could cause subsequent jamming Discard paper that has jammed in the optional document finisher A page affected by a paper jam will be printed again CAUTION The fixing unit is extremely hot Take sufficient care when working in this area as there is a danger of getting burned Cassette 1 Follow the steps below to clear paper jams in...

Page 477: ... tears remove every loose scrap from inside the machine 5 Push cassette 1 back in place securely 6 Press the specified position to close right cover 1 Cassette 2 Follow the steps below to clear paper jams in cassette 2 1 Open right cover 3 2 Remove the jammed paper ...

Page 478: ...rom inside the machine 5 Push cassette 2 back in place securely 6 Close right cover 3 Cassettes 3 and 4 Follow the steps below to clear paper jams in cassettes 3 or 4 1 If you are using the optional side feeder pull up the release lever and separate the side feeder from the multifunction machine 2 Open right cover 4 ...

Page 479: ...ubleshooting 12 25 12 3 Remove the jammed paper If the paper tears remove every loose scrap from inside the machine 4 Pull out cassettes 3 and 4 5 Remove the jammed paper 6 Pull out the paper feed unit B1 ...

Page 480: ... 26 7 Open the paper feed unit cover B2 and remove the jammed paper 8 Close the paper feed unit cover B2 and push the paper feed unit all the way back in 9 Push the cassette back in place securely 10 Close right cover 4 ...

Page 481: ...he multi purpose tray 1 Remove all sheets of paper from the multi purpose tray 2 If paper is jammed inside pull the paper toward you to remove 3 Pull up right cover 1 lever and open the right cover 1 4 Remove the jammed paper If the paper tears remove every loose scrap from inside the machine ...

Page 482: ...side the Right Covers 1 3 and 4 Follow the steps below to clear paper jams inside right cover 1 3 or 4 1 Remove all sheets of paper from the multi purpose tray 2 If paper is jammed inside pull the paper toward you to remove 3 Open the right cover where the paper is jammed inside ...

Page 483: ...the jammed paper If the paper tears remove every loose scrap from inside the machine 5 If you are using the optional document finisher follow step on page 12 36 to remove jammed paper in the optional bridge unit 6 Close the right cover ...

Page 484: ... 12 30 Duplex unit Follow the steps below to clear paper jams in the duplex unit 1 Pull up right cover 1 lever and open the right cover 1 2 Remove the jammed paper 3 Press the specified position to close left cover 1 ...

Page 485: ...assette 1 Follow the steps below to clear paper jams in duplex unit and cassette 1 1 Pull up right cover 1 lever and open the right cover 1 2 Remove the jammed paper 3 Press the specified position to close right cover 1 4 Open the right cover 2 ...

Page 486: ...f the paper tears remove every loose scrap from inside the machine 6 Close the right cover 2 7 Pull out cassette 1 and remove the jammed paper If the paper tears remove every loose scrap from inside the machine 8 Push cassette 1 back in place securely ...

Page 487: ...ht cover 1 lever and open the right cover 1 2 Remove the jammed paper 3 Open the fuser cover CAUTION The fixing unit is extremely hot Take sufficient care when working in this area as there is a danger of getting burned 4 Remove the jammed paper If the paper tears remove every loose scrap from inside the machine ...

Page 488: ...e right cover 1 Document Processor Follow the steps below to clear paper jams in the document processor Dual scan DP 1 Remove the original from the original tray 2 Open the document processor top cover 3 Remove the jammed original If the original tears remove every loose scrap from inside the machine ...

Page 489: ...document processor top cover 5 Reload the originals on the document processor tray Right tray Follow the steps below to clear paper jams in the right tray 1 If jammed paper is seen through the paper ejection slot of the right tray pull it toward your side to remove it If the paper tears remove every loose scrap from inside the machine 2 Pull up right cover 1 lever and open the right cover 1 3 Pres...

Page 490: ...se scrap from inside the machine 5 Press the indicated position to close right cover 1 Bridge Unit If a paper jam occurs in the bridge unit follow the steps below to remove the jam 1 Open the front cover 2 Pull out the relay unit 3 Open the relay unit cover and remove the jammed paper ...

Page 491: ... unit cover and push the bridge unit all the way back in 6 Close the front cover Document Finisher If a paper jam occurs in the optional document finisher follow the steps below to remove the jam Coupling Section 1 Open the front cover 1 2 Open conveyor guide D1 and remove the jammed paper 3 Close the conveyor guide D1 and front cover 1 ...

Page 492: ... is seen through the paper ejection slot pull it toward your side to remove it 2 Open the front cover 1 3 Open the conveyor guide D6 and remove the jammed paper 4 Close the conveyor guide D6 5 Open the conveyor guide D4 and remove the jammed paper ...

Page 493: ...eed knob D3 until the jammed paper is in a location where it is easy to remove 6 Close the conveyor guide D4 and front cover 1 Tray B 1 If jammed paper is seen through the paper ejection slot pull it toward your side to remove it 2 Open the front cover 1 3 Open the conveyor guide D2 ...

Page 494: ...4 Turn the conveyor knob D3 to the left to feed the paper along to enable easy removal 5 Close the conveyor guide D2 and front cover 1 Tray C 1 Open the upper left cover 2 Remove the jammed paper 3 Close the upper left cover ...

Page 495: ... 2 Open the conveyor guide D2 3 Turn the conveyor knob D3 to the left to feed the paper along to enable easy removal 4 Follow step 2 onward on page 12 38 to remove jammed paper Mailbox Option 1 Open the mailbox cover and remove the jammed paper 2 Close the mailbox cover ...

Page 496: ...he left cover of the center fold unit and remove the jammed paper 4 Turn feed knob D9 until the jammed paper is in a location where it is easy to remove 5 Close the folding unit left cover 6 Open the folding unit top cover and remove the paper jam 7 Turn feed knob D9 until the jammed paper is in a location where it is easy to remove 8 Close the folding unit top cover and return the folding unit to...

Page 497: ...5 until the jammed paper is in a location where it is easy to remove If there is no paper jam in the conveyor guide D7 proceed to the following step 4 Close the conveyor guide D7 5 Open the conveyor guide D8 and remove the jammed paper 6 Close the conveyor guide D8 7 Remove the paper jammed in the center folding unit 8 Close the front cover 1 and 2 ...

Page 498: ... capacity side feeder 500 1 500 sheet x 2 follow the steps below to remove the jam Side Feeder 3 000 sheet 1 Pull up the release lever and separate the side feeder from the multifunction machine 2 Remove the paper from the connection port 3 Pull out cassette 5 4 Remove the jammed paper 5 Push the cassette back in place securely 6 Connect to the multifunction machine ...

Page 499: ...x 3 or Large Capacity Side Feeder 500 1 500 sheet x2 1 Pull up the release lever and separate the side feeder from the multifunction machine 2 Remove the paper from the connection port 3 Open the top cover and right cover 1 4 Remove the jammed paper ...

Page 500: ...ine Cassette 6 7 Option If a paper jam occurs in cassette 6 or 7 when you are using the optional side feeder 500 sheet x 3 or large capacity side feeder 500 1 500 sheet x 2 follow the steps below to remove the jam Side Feeder 500 sheet x3 1 Pull up the release lever and separate the side feeder from the multifunction machine 2 Follow steps 2 to 5 on page 12 45 to remove the jammed paper ...

Page 501: ...47 12 3 Open the right cover 2 4 Remove the jammed paper 5 Pull out the cassette in use 6 Remove the jammed paper 7 Push the cassette back in place securely 8 Close the right cover 2 9 Connect to the multifunction machine ...

Page 502: ... 500 1 500 sheet x2 1 Pull up the release lever and separate the side feeder from the multifunction machine 2 Follow steps 2 to 5 on page 12 45 to remove the jammed paper 3 Open the right cover 2 4 Remove the jammed paper 5 Pull out cassettes 6 and 7 ...

Page 503: ...feed unit B1 8 Open the paper feed unit cover B2 and remove the jammed paper 9 Close the paper feed unit cover B2 and push the paper feed unit all the way back in 10 Push the cassette back in place securely 11 Close the right cover 2 12 Connect to the multifunction machine ...

Page 504: ...ve the jammed staples Follow the steps below to remove jammed staples Staple cartridge holder A 1 Open the front cover 1 2 Remove the staple cartridge holder A 3 Open the cover plate A of the staple cartridge holder A and remove any jammed staples 4 Close the cover A plate of the staple cartridge holder into its original position A ...

Page 505: ...it has been inserted correctly 6 Close the front cover 1 Staple cartridge holder B C Follow the steps below to remove jammed staples from the optional folding unit 1 Open the front cover 1 and 2 2 Remove staple cartridge holder B or C 3 Open the cover plate B of the staple cartridge holder and remove any jammed staples B ...

Page 506: ...into its original position 5 Re install the staple cartridge holder When re installing align the triangle marks on the staple cartridge holder and the staple unit The staple cartridge holder will click into place when it has been inserted correctly 6 Close the front cover 1 and 2 ...

Page 507: ...Appendix 1 Appendix Optional Equipment Appendix 2 Character Entry Method Appendix 8 Paper Appendix 11 Specifications Appendix 19 Glossary Appendix 26 ...

Page 508: ...Optional Equipment The following optional equipment is available for the machine Document Finisher Side Feeder 3 000 sheet Side Feeder 500 sheet x 3 Large Capacity Side Feeder 500 1 500 sheet x 2 Mailbox Folding Unit Hole Punch Unit Copy tray D ...

Page 509: ...Appendix 3 Key Counter FAX Kit Expansion Memory Gigabit Ethernet Board ...

Page 510: ...tout into individual copies It can also staple or hole punch optional the offset printouts User can select manual staple by operation button A mail box and folding unit are also available as options Manual staple mode You can staple copied paper manually without any copying operation It is useful when you have forgotten to set the staple sort mode before starting copying or when you want to staple...

Page 511: ...d If it does not light replace the paper 4 Let go of the paper and then press the stapling button Stapling starts Stapling finishes and the output is delivered to tray A CAUTION Be sure that your hands are away from the paper while stapling is in progress Finishing the manual staple mode Press the stapling position button several times until the stapling position lamps turn off The shutter of the ...

Page 512: ...em V Operation Guide Expansion Memory Image storage memory 128 MB that allows the machine to receive more pages of incoming faxed originals Expansion memory should only be installed or removed by the service representative Gigabit Ethernet Board The Gigabit Ethernet Board provides a high speed connection for the Gigabit per second interface Since the kit was designed to work with TCP IP NetWare Ne...

Page 513: ...ation Option Enables emulation whereby the machine operates using commands for other printers Installing this option enables IBM Proprinter DIABLO 630 and EPSON LQ 850 emulation USB Keyboard A USB keyboard can be used to enter information into the text fields on the operation panel A special mount is also available to install the keyboard on the MFP Please contact your dealer or service representa...

Page 514: ...try Screen Status Use the keyboard to enter Backspace Upper case Lower case No Symbol Space Cancel OK Lower case _ Q W E R T Y U I O P A S D F G H J K L Z X C V B N M 10 10 2010 10 10 Input characters Limit characters 0 128 1 2 4 5 6 7 8 9 10 11 3 No Display Key Description 1 Display Displays entered characters 2 Limit Display Displays maximum number of characters 3 Cursor Key Press to move the cu...

Page 515: ...Lower case No Symbol Space Cancel OK Lower case _ Q W E R T Y U I O P A S D F G H J K L Z X C V B N M 10 10 2010 10 10 Input characters Limit characters 0 128 Status Use the keyboard to enter Backspace Upper case Lower case No Symbol Space Cancel OK Lower case 1 2 3 4 5 6 7 8 9 0 _ 10 10 2010 10 10 Input characters Limit characters 0 128 12 No Display Key Description 12 To enter a number or symbol...

Page 516: ... Backspace Upper case Lower case No Symbol Space Cancel OK Lower case L _ Q W E R T Y U I O P A S D F G H J K L Z X C V B N M 10 10 2010 10 10 Input characters Limit characters 1 128 Status Use the keyboard to enter Backspace Upper case No Symbol Space Cancel OK Lower case 1 2 3 4 5 6 7 8 9 0 q w e r t y u i o p a s d f g h j k l z x c v b n m _ List 10 10 2010 10 10 Input characters Limit charact...

Page 517: ... R Statement R Folio 8K 16K 16K R 216 340 mm 550 64 g m2 500 80 g m2 Supported types Supported paper sizes No of sheets Plain paper 60 to 256 g m2 Recycled paper 60 to 256 g m2 A4 B5 Letter 3 500 64 g m2 3 000 80 g m2 Supported types Supported paper sizes No of sheets Plain paper 60 to 300 g m2 Recycled paper 60 to 300 g m2 Colored paper 60 to 300 g m2 A4 A4 R B5 B5 R A5 R B6 R A6 R Letter Letter ...

Page 518: ...ith this machine as listed in the Basic Paper Specifications shown below such as moisture or pulp content For this reason we recommend purchasing a small amount of recycled paper as a sample for testing prior to use Choose recycled paper that gives the best printing results and contains low levels of paper dust We are not responsible for the problems occurred from the use of paper that does not co...

Page 519: ...damage the drum Be sure to use the standard paper that contains at least 80 pulp i e not more than 20 of the total paper content consists of cotton or other fibers Supported Paper Sizes Paper of the following sizes is supported by the machine Measurements in the table take into account a 0 7 mm dimensional accuracy for length and width Corner angles must be 90 0 2 Multi Purpose Tray Cassette or Mu...

Page 520: ...f moisture to dryness expressed as a percentage Moisture affects how the paper is supplied the electrostatic chargeability of the paper and how the toner adheres Paper moisture content varies depending on the relative humidity in the room High relative humidity causes paper to become damp making the edges expand so it appears wavy Low relative humidity causes paper to lose moisture making the edge...

Page 521: ...ough sheets are uncut or edges or corners are crushed In order to prevent these problems be especially careful when you cut the paper yourself Packaging Choose paper that is properly packaged and stacked in boxes Ideally the packaging itself should have been treated with a coating to inhibit moisture Specially treated paper We do not recommend printing onto the following types of paper even if it ...

Page 522: ...g conditions To avoid problems use the multi purpose tray for transparencies and load transparencies with the long side facing the machine If transparencies jam frequently at output try pulling the leading edge of sheets gently as they are ejected Hagaki Before loading Hagaki into the multi purpose tray fan them and align the edges If the Hagaki paper is curled straighten it before loading Printin...

Page 523: ...s with Hagaki by placing the paper on a flat surface and rubbing the edges gently a few times with a ruler Printing onto paper with rough edges may cause jams NOTE If the paper is not supplied correctly even after it is smoothed load the paper in the multi purpose tray with the leading edge raised a few millimeters Label Be sure to feed labels from the multi purpose tray For selecting labels use e...

Page 524: ... the Appendix The colored ink must be able to withstand the heat of printing It must be resistant to silicone oil as well Do not use paper with a treated surface such as glossy paper used for calendars Recycled Paper Recycled paper must conform to the specifications listed on page 2 of the Appendix however its whiteness may be considered separately NOTE Before purchasing recycled paper in volume t...

Page 525: ... Plain Recycled Thick Multi Purpose Tray Plain Transparency OHP film Rough Vellum Labels Recycled Preprinted Bond Cardstock Color Colour Prepunched Letterhead Thick Coated Envelope High Quality Custom 1 to 8 Paper Size Cassette 1 2 Maximum 12 18 A3 Duplex 12 18 A3 Minimum Statement R A5 R Duplex Statement R A5 R Cassette 3 4 A4 B5 Letter Multi Purpose Tray Maximum 12 48 304 8 1220 0 mm Minimum Sta...

Page 526: ...ore than A4 Letter 55 sheets 64 g m2 50 sheets 80 g m2 Output Tray Capacity Lower Left Tray 275 sheets 64 g m2 250 sheets 80 g m2 Upper Left Tray 110 sheets 64 g m2 100 sheets 80 g m2 Right tray 110 sheets 64 g m2 100 sheets 80 g m2 Continuous Copying 1 to 999 sheets Image Write System Semiconductor laser and electrophotography Main Memory Standard 2048 MB Maximum 2048 MB Hard Disk 65 160GB or mor...

Page 527: ... 60 Hz 9 5 A Options Document Finisher Key Counter FAX Kit Expansion Memory Data Security Kit Printed Document Guard Kit Internet Fax Kit A Folding Unit Mailbox Side Feeder 3 000 sheet Side Feeder 500 sheet x 3 Gigabit Ethernet Board Large Capacity Side Feeder 500 1 500 sheet x2 Emulation Option Hole Punch Unit USB Keyboard Item Description Printing Speed Same as Copying Speed Resolution 600 600 d...

Page 528: ...1 65 ppm model 80 ppm model 1 sided B W 100 Images min Color 70 Images min 2 sided B W 160 Images min Color 100 Images min A4 landscape 300 dpi Image quality Text Photo original Interface Ethernet 10 BASE T 100 BASE TX 1000 BASE T Network Protocol TCP IP Transmission System PC transmission SMB Scan to SMB FTP Scan to FTP FTP over SSL E mail transmission SMTP Scan to E mail TWAIN scan 2 WIA scan 3 ...

Page 529: ... reverse roller method No Sheets 500 sheets 80 g m2 1 cassette 1 500 sheets 80 g m2 2 cassettes No Sheets 550 sheets 64 g m2 1 cassette 1 750 sheets 64 g m2 2 cassettes Paper Size Tray 5 A3 B4 A4 A4 R B5 R A5 R Ledger Legal Oficio II 12 18 Letter Letter R Statement R Folio 8K 16K 16K R 216 340 mm Tray 6 7 A4 B5 Letter Supported Paper Paper weight 60 256 g m2 Media types standard recycled Thick Dim...

Page 530: ...00 sheets Stapling Maximum Number A3 B4 B5 R Ledger Legal Oficio II 12 18 216 340 mm Folio 8K 16K R 30 sheets 52 to 90 g m2 20 sheets 91 to 105 g m2 2 cover sheet only 106 g m2 to 135 g m2 A4 A4 R B5 Letter Letter R 16K 65 sheets 52 to 90 g m2 55 sheets 91 to 105 g m2 2 cover sheet only 106 g m2 to 135 g m2 Media types Plain Recycled Prepunched Dimensions W D H 23 29 32 26 5 16 41 25 32 607 2 668 ...

Page 531: ...ber of Sheets Bi Fold 5 sheets 60 to 90 g m2 3 sheets 91 to 120 g m2 1 sheet 121 to 256 g m2 Saddle Stitch 16 sheets 60 to 90 g m2 13 sheets 91 to 105 g m2 1 cover sheet only 106 g m2 or heavier Tri Fold 5 sheets 60 to 90 g m2 3 sheets 91 to 120 g m2 Maximum Number for Storage 80 g m2 Bi Fold 5 sheets or less per set 30 sets or more 6 to 10 sheets per set 20 sets or more 11 to 16 sheets per set 10...

Page 532: ...s originals when printing Auto Sleep A mode designed for electrical power saving activated when the machine is left unused or there is no data transfer for a specific period In Sleep mode power consumption is kept to a minimum Bonjour Bonjour also known as zero configuration networking is a service that automatically detects computers devices and services on an IP network Bonjour because an indust...

Page 533: ...ies made in this mode are thus lighter than normal Emulation The function to interpret and execute other printers page description languages The machine emulates operation of PCL6 KPDL and KPDL automatic FTP File Transfer Protocol A protocol to transfer files on the TCP IP network whether the Internet or an intranet Along with HTTP and SMTP POP FTP is now frequently used on the Internet Grayscale ...

Page 534: ...ervices NetWare Novell s network management software that is able to run on a variety of operating systems PDF A This is ISO 19005 1 Document management Electronic document file format for long term preservation Part 1 Use of PDF PDF A and is a file format based on PDF 1 4 It has been standardized as ISO 19005 1 and is a specialization of PDF which has been mainly used for printing for long term s...

Page 535: ...his context indicates the first section of the IP address When an IP address is written the length of the network address is indicated by the prefix length after a forward slash For example 24 in the address 133 210 2 0 24 In this way 133 210 2 0 24 denotes the IP address 133 210 2 0 with a 24 bit prefix network section This new network address section originally part of the host address made poss...

Page 536: ...h speed data transfer WIA Windows Imaging Acquisition A function to import images supported after Windows Me XP from digital cameras and other peripheral devices This function replaces what TWAIN used to do The feature is provided as a part of Windows functions and improves ease of operation so that you import images directly to My Computer without using any application ...

Page 537: ...on 2 0 xxxiv AppleTalk Appendix 26 Setup 2 17 Applications Installing Applications 9 86 Launching Applications 9 87 Authorization Rules Copy Restriction 10 13 Fax TX Restriction 10 13 Print Restriction 10 13 Send Restriction 10 13 Storing Restr in Box 10 13 Storing Restr in Memory 10 13 Auto Image Rotation 4 38 Auto Low Power Mode 2 11 Auto Paper Selection Appendix 26 Auto Sending Sending Log Hist...

Page 538: ...l 9 39 Manual Staple 9 38 Orientation Confirmation 9 16 Original Paper Settings 9 4 Paper Output 9 15 Sound 9 4 System Stamp 9 29 USB Keyboard Type 9 29 Connecting LAN Cable 2 5 Power Cable 2 8 USB Cable 2 7 Connection Method 2 3 Continuous Scan Copy 4 37 Send 6 24 Conventions in This Guide xxxix Conveyor Guide Cleaning 11 14 Copy 9 40 Appendix 7 Collate Offset 3 14 Combine 4 14 Density 3 8 Duplex...

Page 539: ...Default 9 22 Original Image Copy 9 17 Original Image Send Store 9 17 Original Orientation 9 16 PDF A 9 26 Prevent Bleed Send Store 9 20 Prevent Bleed thru Copy 9 20 Repeat Copy 9 28 Scan Resolution 9 18 Toner SaveLevel EcoPrint 9 23 XPS Fit to Page 9 26 Zoom 9 21 Default Gateway Appendix 26 Default Setting Apply Limit 10 26 Copier Printer Count 10 24 Count by Paper Size 10 30 Density 6 19 Copy 3 8...

Page 540: ...ling Duplexing Error 9 13 Finished Pages Exceeded 9 13 Finishing Error 9 13 Inserted Paper Mismatch 9 14 No Staple Error 9 13 Paper Jam before Staple 9 14 Paper Mismatch Error 9 14 Punch Waste Full Error 9 14 Error Job Skip 9 76 Error Messages 12 7 Expansion Memory Appendix 6 F FAX Kit Appendix 6 File Format 6 14 PDF 6 16 File Name Entry 4 42 Sending 6 28 File Separation 6 15 Fixing unit 12 33 Fol...

Page 541: ...playing Status Screens 8 2 Pause and Resumption 8 11 Reordering 8 12 Sending the Log History 9 63 Job Accounting Restricting the Use of the Machine 10 24 Job Accounting Setting 10 20 Each Job Accounting 10 29 Job Accounting 10 20 Print Accounting Report 10 32 Total Job Accounting 10 29 Job Box Form for Form Overlay 7 20 Private Print Stored Job Box 7 14 Quick Copy Proof and Hold 7 15 Repeat Copy 7...

Page 542: ...terface 9 101 NetWare 9 95 Preparation 2 15 Restart Network 9 101 Secure Protocol 9 97 TCP IP IPv4 9 91 TCP IP IPv6 9 92 WSD Print 9 96 WSD Scan 9 96 Network Cable 2 4 Connecting 2 5 Network Interface 2 4 Network Interface Connector 1 5 O One Touch Key Changing the Registered Information 9 82 Deleting the Registered Information 9 82 Editing 9 82 Open SSL xxxi Operation Panel 1 4 Option Copy trays ...

Page 543: ...x 11 Special Paper 9 11 Appendix 15 Specifications Appendix 12 Weight 9 8 Paper Jam 12 21 Bridge Unit Option 12 36 Cassette 1 12 22 Cassette 2 12 23 Cassettes 3 and 4 12 24 Document Processor 12 34 Inside the Right Covers 1 3 and 4 12 28 Jam Location Indicators 12 21 Multi Purpose Tray 12 27 Precaution 12 22 Paper Jams Cassette 5 Option 12 44 Cassette 6 7 Option 12 46 Center Folding Unit Option 12...

Page 544: ...ing and Deleting 3 56 Recalling 3 56 Registering 3 55 Protocol Detail 9 94 Punch 3 20 Q Quick No Search key 3 4 Quick Setup Screen 3 52 Changing Registration 3 53 9 42 9 43 9 53 R RA Stateless Appendix 29 Raw Port Protocol Detail 9 94 Regular Maintenance 11 2 Release button 1 5 Repeat Copy 4 43 Maximum Number 4 44 Outputting 4 43 Selecting 4 43 Report Print Report 9 61 Reserve Next 3 16 Reserve Ne...

Page 545: ... Color Type 9 44 Quick Setup Registration 9 43 Send and Forward 9 45 Sending Size 6 4 Sending to Different Types of Destinations Multi Sending 3 41 Separator Cleaning 11 15 Setting Date and Time 2 14 Setting Driver TWAIN 2 24 WIA 2 25 Sharpness 4 34 Copy 4 34 Sharpness adjust Send 6 21 Shortcuts 3 57 Adding 3 57 Sleep 2 12 Slit Glass 1 5 Cleaning 11 12 SMTP Appendix 29 SMTP E mail TX Protocol Deta...

Page 546: ... Setup 2 15 TCP IP IPv6 Appendix 27 TCP IP Setting IPv4 9 91 IPv6 9 92 Protocol Detail 9 94 Text Stamp 4 30 6 38 ThinPrint Protocol Detail 9 94 Tone Curve Adjustment 9 68 Toner Container 1 5 Checking the Remaining Amount of Toner 8 13 Toner Container Release Lever 1 5 Trade Names xxx TWAIN Appendix 29 U Upper Left Tray 1 5 USB Appendix 30 USB Cable Connecting 2 7 USB Interface 2 4 USB Interface Co...

Page 547: ...p 9 96 WSD Scan 6 30 Setup 9 96 X XPS File formats 6 14 9 18 Printing documents stored in Removable USB Memory 7 22 Saving documents to Removable USB Memory 7 24 Z Zoom 3 10 Zoom Copying Auto Zoom 3 10 Manual Zoom 3 10 Preset Zoom 3 10 XY Zoom 3 11 Zoom Mode Copy 6 6 Send 6 6 ...

Page 548: ...Index Index 12 ...

Page 549: ...We recommend the use of our own brand supplies We will not be liable for any damage caused by the use of third party supplies in this machine ...

Page 550: ......

Page 551: ......

Page 552: ...Rev 1 2011 4 2LFKMEN101 ...

Reviews: