background image

14

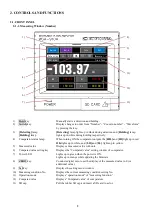
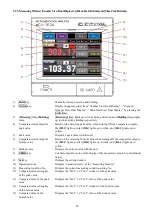
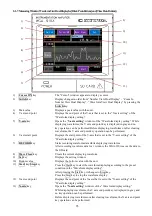
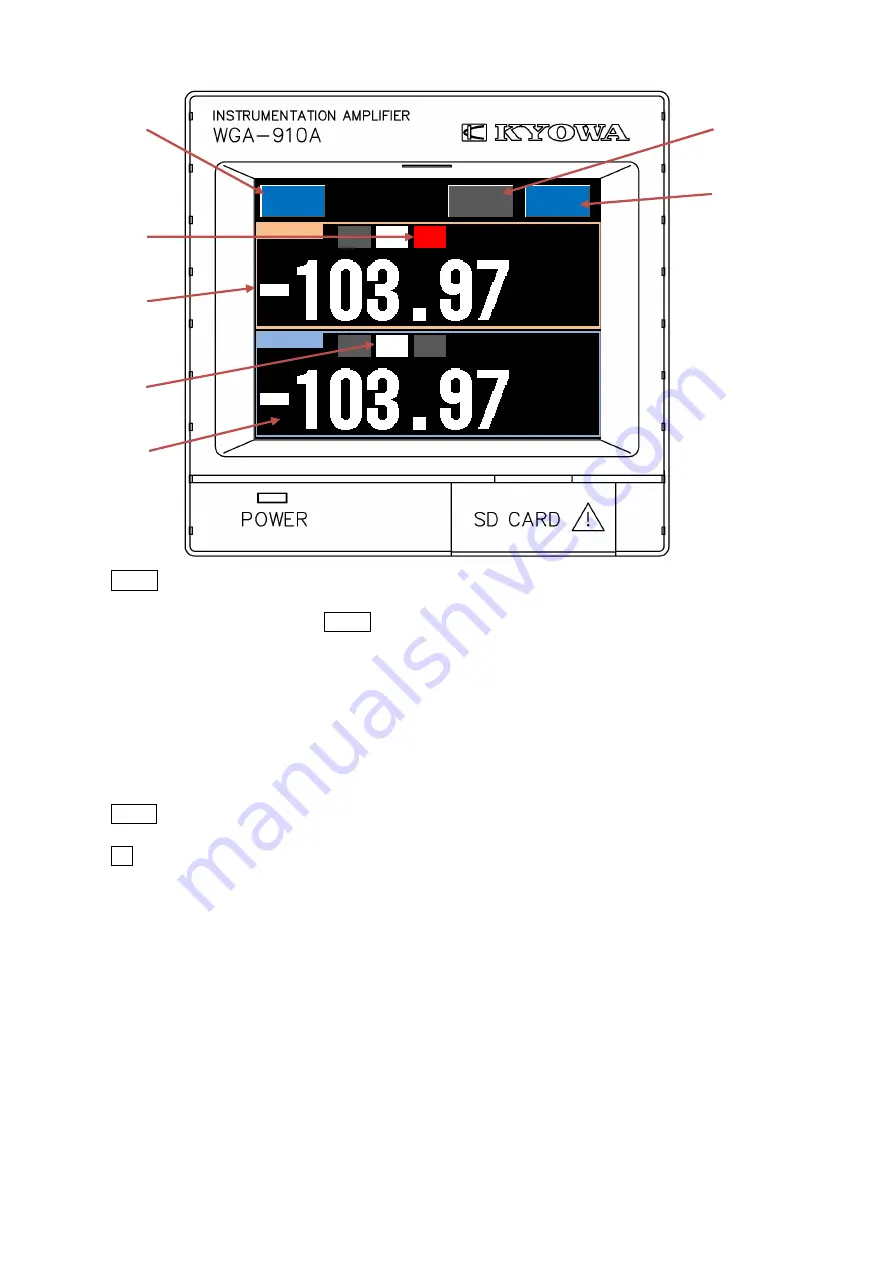
2-1-6.MeasuringWindow(ZoomInNumberViewDualDisplayfor[BlockPeak-Bottom]and[TimePeak-Bottom])

1)

Switch

key

Display changes in order from “Number View Dual Display” - “Zoom In
Number View Dual Display” - “Waveform View Dual Display” by pressing the

Switch

key.

2)

Comparator status lamp for
peak value

Based on the detecting peak value, when turning ON the comparator outputs,
the [

HI-1

] light up in red, [

OK

] lights up in white, and [

LO-1

] lights up in

yellow.

3)

Peak value

Displays a peak value with the unit.

4)

Comparator status lamp for
bottom value

Based on the detecting bottom value, when turning ON the comparator outputs,
the [

HI-2

] light up in red, [

OK

] lights up in white, and [

LO-2

] lights up in

yellow.

5)

Bottom Value

Displays the bottom value with the unit.

6)

ZERO

key

Conducts digital zero to set the display of the measured value to 0 (or additional
value).

7)

Set

key

Displays the setting window.

Bottom

LO

OK

HI

kN

Switch

Zero

Set

HI

Peak

LO

OK

kN

1)

2)

3)

4)

5)

6)

7)

Summary of Contents for WGA-910A Series

Page 1: ...other than described in this Manual Generally company names and trade names described in this Instruction Manual are trademarks or registered trademarks of the companies This Instruction Manual may not be copied or reproduced in whole or part without consent of KYOWA Copyright Kyowa Electronic Instruments Co Ltd All rights reserved The contents of the Instruction Manual are subjected to change wit...

Page 2: ... 15 2 2 BACK PANEL 16 3 CONNECTION 19 3 1 PROCEDURES FOR MEASUREMENTS 19 3 2 INSTALLATION ONTO A PANEL 20 3 3 WIRING 21 3 3 1 Connecting transducer 21 3 3 2 Connecting Control Input 22 3 3 3 Connecting Control Output 23 3 3 4 Connecting RS 232C Interface 24 3 3 5 Monitior Output 25 3 3 6 Connecting AC Power 26 3 4 SD Card 28 4 BASIC OPERATION PROCEDURES 29 4 1 SETTING TREE 29 4 2 CONFIGURING WINDO...

Page 3: ...3 Self Check 90 6 5 4 Operation Check 92 6 5 5 SD CARD SETTING 98 7 OPERATION TIMING 108 7 1 CONTROL INPUT HOLD COMMAND RESET COMMAND ZERO COMMAND 108 7 1 1 Control Input 108 7 1 2 Block specified 109 7 1 3 Time specified 109 7 2 COMPARATOR OUTPUT 110 7 3 DELAY TIME BETWEEN INPUT AND OUTPUT 110 7 4 DISPLAYING WAVEFORMS AND OUTPUTTING SD SIGNAL WITH WAVEFORM COMMAND CONTROL OUTPUT AND RECORD KEY 11...

Page 4: ... DIMENSIONS 141 12 APPENDIX 142 12 1 LIST OF SETTING ITEM 142 12 1 1 Calibration 142 12 1 2 Input Setting 142 12 1 3 Measuring Condition Setting 143 12 1 4 Waveform Display Setting 143 12 1 5 Initial Setting 144 12 1 6 Option Setting 145 12 2 UNIT LIST 145 ...

Page 5: ... Warranty 1 each 1 Including a PC software for a SD card OPTIONS Model Manufacture AC power cable 100 VAC P 23 KYOWA ELECTORONIC INSTRUMENTS CO LTD AC power cable 200 VAC P 28 KYOWA ELECTORONIC INSTRUMENTS CO LTD INPUT connector PRC03 12A10 7M10 5 TAJIMI ELECTRONICS CO LTD I O connector PCR S36FS PCR LS36LA HONDA TSUSHIN KOGYO CO LTD RS 232C connector FCN 361J008 AU FCN 360C008 B FUJITSU COMPONENT...

Page 6: ...ments Co Ltd assumes no liability for any damages resulting from user s failure to comply with the safety precautions For safety operation of the WGA 910A the following symbol mark is attached to the WGA 910A Indicates PROTECTIVE GROUND TERMINAL Be sure to connect the GND terminal to the ground Excluding when using a 3P AC power cable for grounding SAFETY SYMBOLS For safety operation of the WGA 91...

Page 7: ...utioned not to cut the protective grounding conductor or disconnect the GND terminal Confirmation of Protective Ground To prevent an electric shock hazard be sure to check safe protective ground function before operating the WGA 910A If any abnormal matters are found in the protective ground function fuse holder etc do not operate the WGA 910A External Connection To prevent an electric shock hazar...

Page 8: ...duct in a magnetic field environment where the PC may be used Performance may be lowered and erroneous operation and troubles may result if it is used near a telemetry system microwave oven electronic furnace or any other equipment generating a strong magnetic field Do not use the product under poor conditions Operate the product within the range of 100 to 240 VAC 50 60 Hz The power supply used fo...

Page 9: ...he configuration of the control panel to be used the other devices to be connected and wirings Therefore customers are required to check whether the CE marking requirements on the product are satisfied or not Use shielded cables as input cables output cables and control cables Wiring should be 30 m or less Before connecting the analog monitor and RS 232C communication cables be sure to mount ferri...

Page 10: ...5k ohm or more Reference items required when handling the product Essential precautions required when handling the product NOTATIONS USED IN THE INSTRUCTION MANUAL The following notations are used in the Instruction Manual for convenience Names described on the panel surface Names described on the panel surface are expressed in double quotation mark Informational notes Certain notations are used a...

Page 11: ...hold arbitrary point hold block peak bottom time peak bottom block average time average 5 calibration functions Actual load calibration Sensitivity registering calibration Numeric value registering calibration TEDS auto caribration TEDS part caribration Various hold functions BCD output model D A output model RS 485 output model BCD D A output model CC Link model Display waveform function Capable ...

Page 12: ...ng the optional units Customers are required to purchase the products applicable to you Model Option The number of channels input format WGA 910A 0 None 1 Load strain WGA 910A 1 BCD WGA 910A 2 D A WGA 910A 3 RS 485 WGA 910A 4 CC Link WGA 910A 12 BCD D A ...

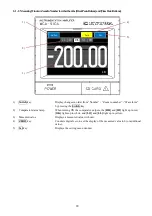
Page 13: ...alue with unit 6 Compared value setting key Displays the Compared value setting window of comparator 7 Power LED Lights up in green when the power is ON Lights up in orange while updating the firmware 8 ZERO key Conducts digital zero to set the display of the measured value to 0 or additional value 9 Set key Displays the setting menu window 10 Measuring condition No Displays the current measuring ...

Page 14: ... Waveform by pressing the Switch key 2 Comparator status lamp When turning ON the comparator outputs the HH and HI light up in red OK lights up in white and LO and LL light up in yellow 3 Measured value Displays a measured value with unit 4 ZERO key Conducts digital zero to set the display of the measured value to 0 or additional value 5 Set key Displays the setting menu window 1 2 3 4 5 ...

Page 15: ...ecording waveform data for 1 window the WGA 910A saves the data in the SD card 8 Wave Clear key Clears the current displaying waveform 9 Set key Opens the setting menu window 10 Start key Stop key Press the Start key to start the waveform displaying according to the preset condition in the Waveform display setting After pressing the Start key it changes to Stop key Press the Stop key to stop the w...

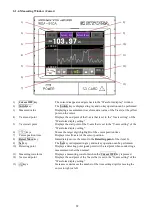
Page 16: ...the cursor position time 7 Cursor position time Displays time X axis of the cursor position 8 Detect Move key Immediately moves the cursor to the Detecting point of the item 10 9 Set key The Set key is displayed in gray and no key operation can be performed 10 Detecting point Displays a detecting point peak point with a red point when conducting a measurement other than normal 11 Measuring wavefor...

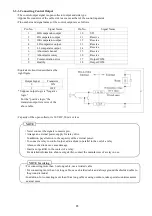
Page 17: ...r outputs the HI 1 light up in red OK lights up in white and LO 1 lights up in yellow 7 Bottom value Displays the bottom value with the unit 8 ZERO key Conducts digital zero to set the display of the measured value to 0 or additional value 9 Set key Displays the setting window 10 Operation mode Displays operation mode of the measuring function 11 Measuring condition No Displays the current measuri...

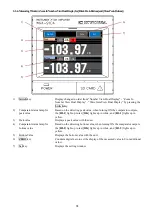
Page 18: ... 1 light up in red OK lights up in white and LO 1 lights up in yellow 3 Peak value Displays a peak value with the unit 4 Comparator status lamp for bottom value Based on the detecting bottom value when turning ON the comparator outputs the HI 2 light up in red OK lights up in white and LO 2 lights up in yellow 5 Bottom Value Displays the bottom value with the unit 6 ZERO key Conducts digital zero ...

Page 19: ... key Starts recording waveform data while displaying waveforms After recording waveform data for 1 window the WGA 910A saves the data in the SD card 8 Wave Clear key Clears the current displaying waveform 9 Set key Displays the setting window 10 Bottom value Displays the bottom value with the unit 11 Start key Stop key Press the Start key to start the waveform displaying according to the preset co...

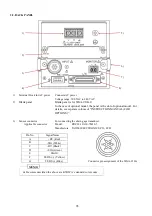
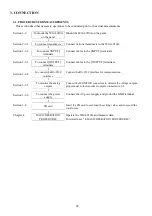
Page 20: ...optional model the panel is the slot of optional model For details see separate volume of INSTRUCTION MANUAL FOR OPTIONS 3 Sensor connector For connecting the strain gage transducer Applicable connector Model PRC03 12A10 7M10 5 Manufacture TAJIMI ELECTRONICS CO LTD Pin No Signal Name A BV Red B SIG White C BV Black D SIG Green E Shield F TEDS Yellow G TEDS Blue 3 4 7 8 2 6 5 1 MEMO Connector pin a...

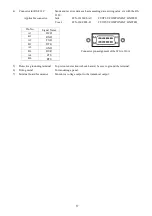
Page 21: ...over FCN 360C008 B FUJITSU COMPONENT LINITED Pin No Signal Name A1 DCD B1 RXD A2 TXD B2 DTR A3 GND B3 DSR A4 CTS B4 RTS 5 Protective grounding terminal To prevent an electronic shock hazard be sure to ground the terminal 6 Fitting metal For mounting a panel 7 Terminal board for monitor Monitors a voltage output to the transducer output Connector pin assignment of the WGA 910A ...

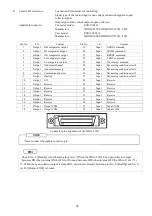
Page 22: ...HH comparator output 19 Input ZERO command 2 Output HI comparator output 20 Input HOLD command 3 Output OK comparator output 21 Input RESET command 4 Output LI comparator output 22 Input TEDS command 5 Output LL comparator output 23 Input Waveform command 6 Output Abnormal channel 24 Input Measuring condition select 0 7 Output Abnormal memory 25 Input Measuring condition select 1 8 Output Communic...

Page 23: ...inals Connect cables to the OUTPUT terminals Section 3 3 4 To connect the RS 232C interface Connect the RS 232C interface for communication Section 3 3 5 To monitor the analog outputs Connect the MONITOR connectors to monitor the voltage outputs proportional to the transducer outputs connected in 3 3 Section 3 3 6 To connect the power supply Connect the AC power supply and ground the GND terminal ...

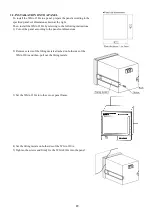
Page 24: ...by referring to the following instructions 1 Cut out the panel according to the panel cut dimensions 2 Remove screws of the fitting metals attached on both sides of the WGA 910A and then pull out the fitting metals 3 Set the WGA 910A into the cut out panel frame 4 Set the fitting metals on both sides of the WGA 910A 5 Tighten the screws and firmly fix the WGA 910A into the panel ...

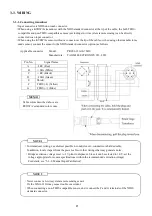
Page 25: ...el PRC03 12A10 7M10 Manufacture TAJIMI ELECTRONICS CO LTD Pin No Signal Name A BV Red B SIG White C BV Black D SIG Green E Shield F TEDS Yellow G TEDS Blue For transducer wiring use shortest possible 4 conductor or 6 conductotor shielded cable In addition locate it apart from the power cable or other wirings that may generate noise Bridge excitation voltage is set to 2 V prior to shipment Since it...

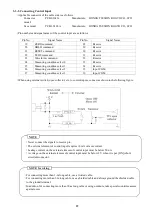
Page 26: ...measures against noise 3 3 2 Connecting Control Input Applicable connector of the cable side is as follows Connector model PCR S36FS Manufacture HONDA TSUSHIN KOGYO CO LTD Case model PCR LS36LA Manufacture HONDA TSUSHIN KOGYO CO LTD Pin numbers and signal names of the control input are as follows Pin No Signal Name Pin No Signal Name 19 ZERO command 28 Reserve 20 HOLD command 29 Reserve 21 RESET c...

Page 27: ...l countermeasures against noise 3 3 3 Connecting Control Output The control output signal is open collector output and sink type Applicable connector of the cable side is as same as that of the control input side Pin numbers and signal names of the control output are as follows Pin No Signal Name Pin No Signal Name 1 HH comparator output 10 SD 2 HI comparator output 11 Reserve 3 OK comparator outp...

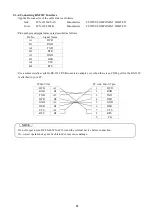
Page 28: ...OMPONENT LIMITED Cover FCN 360C008 B Manufacture FUJITSU COMPONENT LIMITED Pin numbers and signal names are described as follows Pin No Signal Name A1 DCD B1 RXD A2 TXD B2 DTR A3 GND B3 DSR A4 CTS B4 RTS Use a commercially available RS 232C USB conversion adapter etc when there is no COM port for the RS 232C is attached to your PC WGA 910A PC side D sub 9 pin DCD A1 1 DCD RXD B1 2 RXD TXD A2 3 TXD...

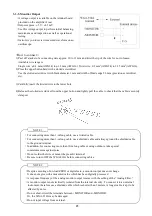
Page 29: ... apt to be affected by noise Do not short circuit the terminals between MONITOR and MONITOR Or the WGA 910A may be damaged Do not input voltage from external 3 3 5 Monitior Output A voltage output is available on the terminal board provided on the amplifier s rear Outputs approx 5 V 3 2 mV Use this voltage output to perform initial balancing maintenance and inspection as well as operational testin...

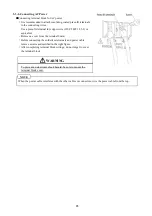
Page 30: ...alent Remove a cover from the terminal board Before connecting the solderless terminals and power cable remove screws as described in the right figure After completing terminal block wirings do not forget to cover the terminal block WARNING To prevent an electronic shock hazard be sure to mount the terminal block cover When the power cable interferes with the other cables or connectors wire the po...

Page 31: ...lding machine etc power supply condition may be deteriorated due to excessive noise Take appropriate countermeasures against the noise by using an insulation transformer or commercially available noise cut transformer Before connecting the power cable to the AC outlet check the power voltage The operating power voltage of the WGA 910A is from 100 to 240 VAC 50 60 Hz 20 VA or less Be sure to keep t...

Page 32: ...til it clicks and it comes out little 4 Pull out the SD card for removing and close the SD cap Note that after inserting the SD card the measured value cannot be updated the display value does not vary even if the input changes and the key operation cannot be performed for approx 2 seconds due to the process Due to the SD speed class or various files saved in the SD card the loading writing speed ...

Page 33: ...Unit TEDS Ope Setting Numeric Regist Cal TEDS Reading Ope ZERO during TEDS TEDS Info Display Input Setting Smoothing ZERO Compensation Additional Value Sensor Output Value Analog Filter ZERO every Comp Time Minimum Scale Min Scale Zero Fix Moving Average Meas Cond Setting Measuring Condition Comparison Setting Measure Mode Setting 1 2 page 1 2 page HH compared value Operation Mode HI compared valu...

Page 34: ... Channel Check Set Initialize Backlight Time Language 2 2 page Clock Operation Check SD Card Setting 1 2 page 1 2 page Display Check Set Value Save Touch Panel Check Set Value Read Control I O Check View Wave File Name Communication Check Format 2 2 page 2 2 page BCD Output Check Update D A Output Check SD Card Check Option Setting Com Setting BCD Output Setting D A Output Setting CC Link Setting ...

Page 35: ...sure Manual Input Cal Next 1 2 TEDS Auto Cal TEDS Part Cal TEDS Ope Setting TEDS Read Ope and Zero dur ing TEDS are set TEDS informa tions are displayed Calibration is automatically conducted with all reading from TEDS built in sensor Calibration is conducted with the only selected item from TEDS built in sensor 10 0 S kN Set Wave Clear Start 0 0 200 00 300 00 kN Cursor ON Y axis X axis Switch REC...

Page 36: ...s the target parameter key input a setting value and press the key Calibration Bridge Voltage No Load Zero Sens Regist Cal or Actual Load Cal and Unit are set Return Measure Manual Input Cal Next 1 2 TEDS Auto Cal TEDS Part Cal TEDS Ope Setting TEDS Read Ope and Zero dur ing TEDS are set TEDS informa tions are displayed Calibration is automatically conducted with all reading from TEDS built in sen...

Page 37: ...w are satisfied After pressing the key the key changes to the key Press the key to stop loading the waveform data While loading the waveform no key operation other than the key can be performed and all keys other than the key are displayed in gray After loading the waveform for one window the detecting point is displayed with a red point when detecting the point such as peak value with the operati...

Page 38: ... the SD card is already filled Does not overwrite the waveform file No 001 5 Capable of measuring the data with saving the waveform to the SD card However the next measurement cannot be started for approx 1 5 sec to complete the saving of the downloaded waveform data 6 The control output SD is turned ON while saving the waveform data in the SD card 7 The number of the waveform data of one window i...

Page 39: ...point on the cursor Key Increases or decreases the number of the time setting digit for moving the cursor to right or left Detecting Point The measured detecting point Peak value Red point Bottom value Blue point Key The cursor moves directly to the Detecting point When detecting the both peak value and bottom value as you press the key the detecting point changes as the peak value bottom value Di...

Page 40: ...ity value written in the test data sheet of transducers and Actual load calibration that calibrates data by applying the already known load to transducers You are able to calibrate data properly TEDS based automatic calibration Applicable to the TEDS compatible sensors Calibrates the data automatically by loading all the necessary information from the TEDS information Partial calibration based on ...

Page 41: ... OF CALIBRATION Unit TEDS Part Cal TEDS Auto Cal Measuring Window Actual Load Cal No load ZERO Manual Input Calibration TEDS based Automatic Calibration TEDS Cal Item Setting Window Partial Calibration based on TEDS Calibration Data Bridge Voltage Sens Regist Cal Numeric Regist Cal Numeric Regist Cal ...

Page 42: ...in the recommended excitation voltage of the sensor Setting range 2 V or 10 V How to operate 1 Press the key on the Calibration window 2 Press either or key and press the key to register the setting value 3 After the registration press the key to move to the No load Zero window Calibration Bridge Voltage No Load Zero Sens Regist Cal or Actual Load Cal and Unit are set Return Measure Manual Input C...

Page 43: ...operate 1 Set the sensor in no load state Current sensor output value is displayed on the New column 2 After stabilizing the value in the New column press the key The No Load Zero window on the upper left blinks the sensor output is loaded and the zero point output at the no load state is registered 3 After the registration press either or key to move to the target calibration window MEMO Blinks N...

Page 44: ...n the case of example if 2 0040 is input 2 0040 mV V is displayed in the New column In addition the key blinks during the setting Press the key The Sens Registering window on the upper left blinks and the Rated Output is registered 2 After pressing the key input a setting value with a numeric keyboards In the case of example if 200 00 is input 200 00 kN is displayed in the New column In addition t...

Page 45: ...t is displayed to the New column of the rated output Check that the value is stabled 2 0040 mV V is displayed in the right figure 2 Input a setting value of the Rated Output with the numeric keyboard Suppose 200 00 is input 200 00 kN is displayed in the New column 3 Press the key The Sens Registering window on the upper left blinks and the Rated Output and Rated Display are registered 4 After the ...

Page 46: ...of the unit first and press the target key Press the key as an example 2 Units of the selected type appear below Press the target key Press key when the target unit is not displaying on the window Press the key to display the kgf on the New column as an example 3 Press the key to register the setting value 4 Calibration finishes Press the key at last to move to the Measuring window ...

Page 47: ...g the key the Confirmation of TEDS Auto Cal window appears 3 Press the key After conducting the no load zero the TEDS information is read and the calibration is started Press the key to cancel the calibration and gets back to the previous window 4 The calibration starts and the TEDS Calibration window on the upper left blinks 5 The calibration is finished after a short time and a new calibration v...

Page 48: ... to Allow in the TEDS Reading Operation window Operation TEDS command of the control input is turned ON Receives a communication command EID that executes the automatic sensitivity registering calibration with the TEDS After turning ON the power again MEMO NOTE Blinks Next 1 2 Comparison Set and Measure Meas Cond Setting Mode Set are set as measure ment condition The necessary setting to dis Wave ...

Page 49: ...l Item window Setting Range Common to the Ex Volt Rd Out Rd Cap and Unit Execute or Prohibit How to operate 1 Press the key on the Calibration window 2 Press the key on the TEDS Part Cal window 3 Every time the right key of the calibration item is pressed or changes After the setting press the key After the registration press the key 4 Press the key to display the Confirmation of TEDS Part Cal win...

Page 50: ...following operations during the setting or during the setting Setting Set Cnt Input Power ON Command to Allow in the TEDS Reading Operation window Operation TEDS command of the control input is turned ON Receives a communication command EID that executes the automatic sensitivity registering calibration with the TEDS After turning ON the power again 6 The calibration starts and the TEDS Calibratio...

Page 51: ...ter 0 5432 the 0 5432mV V appears 5 Press the key The Registering ini Val window blinks on the top left for registering the new initial value Registering Registering ini Val ini val 4 5 6 7 8 9 Return C 0 1 2 3 Input the desired value with keyboard Push Register key Register New 0 5432 mV V ini Val Now 0 1000 mV V 4 5 6 0 1 2 3 Input the desired value with keyboard Push Register key Register New 0...

Page 52: ...L LO OK HI HH Detecting Measure 0 Holding Time Peak Registering ini Val Registering LO LL 150 00 999 99 HH HI 999 99 500 00 Next 1 2 Comparison Set and Measure Meas Cond Setting Mode Set are set as measure ment condition The necessary setting to dis Wave Display Setting play the wave such as X axis and Y axis are set Calibration is conducted with Calibration sensor by Manual Input TEDS Auto or TED...

Page 53: ...the value to other than 0 This is pretty much same as resetting a pointer to 0 before you puts an object on a scale The digital zero function has 2 ways by key operation and by control input operation from the rear panel 1 By key operation 1 Press key on the Measuring window 2 The Confirmation of Digital Zero window appears Press the key to conduct digital zero and the display value becomes zero A...

Page 54: ...on TEDS Calibration Data For detailed of the operations refer to 5 CALIBRATION 2 Cnt Input Short circuit the terminals between No 35 or No 36 and No 23 TEDS command of the rear panel I O connector for 2 seconds or more the TEDS Calibration window blinks the TEDS information is read and the calibration is conducted 3 Power ON If the Power ON is set to Allow the TEDS Calibration window blinks on the...

Page 55: ...g the TEDS information for the calibration Setting Range Execute or Prohibit How to operate 1 Press the key on the TEDS Ope Setting window 2 Select and press either key and select the key for registering the setting value 3 TEDS info Display TEDS information Display The TEDS information is read and displayed on the window How to operate 1 Press the key on the TEDS Ope Setting window 2 After pressi...

Page 56: ...s to the recommended applied voltage and higher one should be selected Example 2 V is set for the recommended applied voltage of 3 V 3 Calculation of the calibration coefficient Register the calibration coefficient that is obtained from the following expression Rated capacity of the sensor y Rated output x 4 No load zero No load zero of the TEDS calibration is same with that of the manual input ca...

Page 57: ...number of sensors is not applicable Check that the connecting number of sensors is within 1 to 4 Cable is too long TEDS information may not function correctly if the cable length exceeds 30 m Pay attention when using an extension cable to the sensor Connecting non TEDS compatible sensor After disappearing the TEDS Error display the calibration value of the TEDS information is not applied and the W...

Page 58: ...eset frequency and eliminates the input signal over than that Setting Value 1 Hz 30 Hz 300 Hz and None 1 kHz or more How to operate 1 Press the key on the Measuring window 2 Press the key on the Setting window 3 Press the key on the Input Setting window 4 Press the key on the Smoothing window 5 After pressing the target key press the key to register the setting value Zero Compensation Additional V...

Page 59: ...only suppresses the variation of the display value but also not to update the display value higher than the requiring resolution Displays the setting values of the minimum scale according to the preset decimal position that was set in the rated display of the calibration Setting Value 1 2 5 10 20 50 100 count How to operate 1 Press the key on the Smoothing window 2 Press the key to change pages un...

Page 60: ...tering Setting value None 2 4 8 16 32 64 128 256 512 1024 and 2048 times How to operate 1 Press the key on the Smoothing window 2 Press the key to change pages until the target value is displayed 3 Select and press the target key and press the key to register the setting value ...

Page 61: ...J Time Judging Time 0 00 to 9 99 sec C Range Compensation Range 0 to 99999 count How to operate 1 Press the key on the Measuring window 2 Press the key on the Setting window 3 Press the key on the Input Setting window 4 Press the key on the Zero Compensation window 5 After pressing the key input a setting value with the numeric keyboard and press the key to register the setting value 6 After press...

Page 62: ...Adds the setting value to the measured value and displays it After conducting the digital zero with the additional value set to other than 0 the setting value is displayed Displayed value Measured value after conducting the digital zero Additional value Setting Range 99999 to 99999 count How to operate 1 Press the key on the Measuring window 2 Press the key on the Setting window 3 Press the key on...

Page 63: ...ow 2 Press the key on the Setting key 3 Press the key on the Input Setting key 4 After pressing the key the output value of the sensor is continuously measured and displayed for every 0 5 second 5 Press the key to stop the measurement of the sensor output value Zero Compensation Additional Value Original Value The original value of sensor is monitored A function that automatically compensates the ...

Page 64: ...tion files is 32 for the key operation 16 for the control input and 32 for the communication command The setting values are stored in a file having the displaying No on the Meas Cond Setting window 6 3 1 Measuring Condition Capable of selecting the No of the measuring condition by the key operation on the window when selecting the Key Operation in the Meas Select Signal of the Initial Set window C...

Page 65: ... OFF open ON close 13 OFF open OFF open ON close ON close 14 ON close OFF open ON close ON close 15 OFF open ON close ON close ON close 16 ON close ON close ON close ON close 6 3 2 Comparison Setting Compares a measured value with a compared value and puts out the result The comparison result is obtained from the control I O connector as an open collector output In addition colors of the comparato...

Page 66: ... every comparator are classified as follows Classification Control Output Keys and setting values Upper limit of the peal value HH comparator HI1 Compared Value Lower limit of the peak value LL comparator LO1 Compared Value Upper limit of the bottom value HI comparator HI2 Compared Value Lower limit of the bottom value LO comparator LO2 Compared Value 2 Hysteresis Width Common to all comparators S...

Page 67: ...e high How to operate 1 Press the key on the Comparison Setting 2 2 window 2 Input a setting value with the numeric keyboard and press the key for registration 4 Using Comparator Select whether or not to use comparators If the key is selected the target comparator key on the Measuring window is displayed in gray Setting Range Use Compares with the measured value with the selected comparator Not Us...

Page 68: ...d OFF and HI lamp lights up in gray LO comparator or HI2 comparator When the measured value lowers the LO compared value the LO comparator output is turned ON and LO lamp lights up in yellow When the measured value exceeds the LO compared value hysteresis width the LO comparator output is turned OFF and LO lamp lights up in gray LL comparator or LO2 comparator When the measured value lowers the LL...

Page 69: ...er the lapse of delay time the peak value is detected for the preset specified time Setting the detecting time is known as time specified operation After the lapse of preset detecting time the indicated peak value is kept hold When the RESET command is turned ON the kept peak value is canceled Bottom hold When the HOLD command is turned ON and after the lapse of delay time the bottom value is dete...

Page 70: ...d OFF the indicated average value is kept hold When the RESET command is turned ON the indicated average value is canceled How to operate 1 Press the key on the Measuring window 2 Press the key on the Setting window 3 Press the key on the Meas Cond Setting window 4 Press the key on the Measure Mode Setting 1 2 window 5 Press the key to display the target mode Press the target key and key for regis...

Page 71: ...the Measure Mode Setting 1 2 window 2 Input a setting value with the numeric keyboard and press the key for registering 3 Delay Time Delays the start of the detecting block for the delay time For setting modes excluding Normal mode in the Operation Mode window only For the Normal mode setting of the Delay Time is invalid Setting Range 0 00 to 9 99 sec How to operate 1 Press the key on the Measure ...

Page 72: ... output turns ON when the measured value exceeds the HI compared value turns OFF when the measured value lowers the compared value Hold Comp Compares the measured value and compared value during holding block Example Even if the measured value exceeds the HI compared value during detecting block the comparator output does not turn ON at the time The comparator output is turned ON when the display ...

Page 73: ... is always updated and displayed in response to changes of the input in the detecting block The peak bottom value is held and displayed in the holding block Hold Disp The measured value immediately after turning ON the holding command is held and displayed in the delay time and detecting block The peak bottom value in the detecting block is displayed when entering the holding block How to operate ...

Page 74: ...ime Comparison Mode DisplayMode cannotbe set 6 3 4 2 Peak Hold Capable ofsetting the Delaytime However the DetectTime Comparison Mode and DisplayMode cannotbe set A Behavior with control inputsignal When the HOLD command is turned ON and after the lapse ofdelaytime the peak value is detected and indicated until the HOLD command is turned OFF The detection ofthe peak value and hold displayare relea...

Page 75: ...ime to hold the displayvalue Press the keyfor the third time to cancel the holding value 2 HoldDisplayMode A Behavior with control inputsignal When the HOLD command is turned ON and after the lapse ofdelaytime the peak bottom value isdetected The measured value immediatelyafter turningON the HOLD command is kept hold during the detecting block When the HOLD command is turned OFF the peak bottom va...

Page 76: ... value is kepthold Press the keyfor the second time to cancel the holding value 2 HoldDisplayMode A Behavior with control inputsignal When the HOLD command is turned ON and after the lapse ofdelaytime the peak bottom value isdetected The measured value immediatelyafter turningON the HOLD command is kept hold during the detecting block After the lapse ofpreset detecting time the peak bottom value d...

Page 77: ...nd time Press the keyfor the second time and the detecting block ends 6 3 4 6 ArbitraryPointHold Capable ofsetting the DelayTime However the DetectTime Comparison Mode and DisplayMode cannotbe set A Behavior with control inputsignal Holds the measured value ofthearbitrary point The detecting point is the time when the HOLD command is turned ONand after the lapse of delaytime The measured value is ...

Page 78: ...ue Press the keyfor the third time to cancel the holding value 2 Time Peak Bottom Hold display mode DetectTime DelayTime Comparison Mode and DisplayMode can be set A Behavior with control inputsignal When the HOLD command is turned ON and after the lapse ofdelaytime the peak value and bottomvalue are detected However during the delaytime and detecting block the measured value thatis detected immed...

Page 79: ...A Behavior with control inputsignal When the HOLD command is turned ON and after the lapse ofdelaytime the average value is detected and indicated until the Hold command is turned OFF When the Hold command is turned OFF the average value iskepthold When the RESETcommand is turned ON the hold mode is canceled B Behavior with keyoperation Press the keyfor the first time to hold the displayvalue at t...

Page 80: ...N the Hold command is displayed After the lapse ofpreset detecting time the indicated average value during the detecting block is kepthold When the RESETcommand is turned ON the hold mode is canceled B Behavior with keyoperation Press the keyfor the first time to hold the displayvalue at the time Though you cannotsee theWGA 910Ais detecting the average value afterthe lapse of the delaytime After t...

Page 81: ... 3 5 How WGA 910A works with HOLD and RESET commands The WGA 910A works as follow during detecting holding and normal blocks by turning ON OFF the HOLD command and RESET command Example Block specified peak ...

Page 82: ... 2 and LO 2 of the Bottom Value the OK lamp on the target window lights up in white When the both OK lamps on the dual windows light up in white the OK comparator output is turned ON 6 3 6 Relations Between Control Inputs Comparator Outputs and Operation Statuses for Block Peak Bottom and Time Peak Bottom Example Block Peak Bottom NOTE ...

Page 83: ... 3 Press the key on the Wave Display Setting 1 2 window 4 Press the key to display the target value Press the target key and key for registering How to operate the X axis directly from the Measuring window 1 Press the key on the Waveform window 2 The X axis Setting window appears Conduct setting as the above 0 0 200 00 300 00 kN Cursor ON Y axis X axis Switch RECORD 10 0 S kN Set Wave Clear Start ...

Page 84: ... the peak bottom value is loaded without thinning or averaging The number of the waveform data in one window X axis sec Thinning Interval 0 5 250 μs 1 0 500 μs 2 0 1 ms 5 0 2 5 ms 10 0 5 ms 20 0 10 ms 50 0 20 ms 100 0 50 ms 0 0 200 00 300 00 kN Cursor ON Y axis X axis Switch RECORD 10 0 S kN Set Wave Clear Start MEMO 2001 data Including the data at 0 0 sec Same with the sampling speed 4000 times s...

Page 85: ...oard Press the key for the registration 3 After pressing the key press the key to display the target value Press the target key and key for registration How to operate the Y axis directly from the Measuring window 1 Press the key on the Waveform window 2 The Y axis Setting window appears Conduct setting as the above 0 0 200 00 300 00 kN Cursor ON Y axis X axis Switch RECORD 10 0 S kN Set Wave Clea...

Page 86: ...veform of one window to the end point of the X axis the waveform is held in the Waveform Holding Time and then the next waveform is displayed repeatedly Press the key or turn OFF the Waveform Command for stop loading 2 Normal Mode Press the key or turn ON the Waveform Command The WGA 910A becomes trigger condition waiting mode see the above MEMO and starts displaying the waveform only when the mea...

Page 87: ... 6 4 4 Passed Level Trigger Level Sets a passed level of the measured value as the trigger condition The key is invalid and displayed in gray if the Auto Mode is selected Setting Range 99999 to 99999 count How to operate 1 Press the key on the Wave Display Setting 1 2 window 2 Input a setting value with the numeric keyboard and press the key for registering 1 2 The level that measured value passes...

Page 88: ... registration 6 4 6 Hold Time of Wave Sets a time that holds the previous waveform time for clearing the previous waveform to complete from the end of one window to display the next waveform when selecting the Auto Mode in the Start Mode of Wave window The key is invalid and displayed in gray when selecting the Normal Mode and Single Mode Setting Range 0 0 99 9 sec How to operate 1 Press the key o...

Page 89: ...ontrol input Command How to operate 1 Press the key on the Measuring window 2 Press the key on the Setting 1 2 window 3 Press the key on the Setting 2 2 window 4 Press the key on the Initial Setting window 5 Press the target key and key for the registration set The operations of WGA 910A and external device are checked System Self Check Operation Check Next 1 2 Initial Setting The signal to select...

Page 90: ...asuring window The key changes to the key In addition other keys are invalid and displayed in gray How to release the lock 1 Press the key on the Measuring window 2 Press the key and then key for releasing System The Lock or Release to change the sets by key is se fault Input Set lected Release Each of the set values is re turned to reset to the de 1 2 The time of turning on the Return Measure Key...

Page 91: ...etting values excluding the calibration value How to operate 1 Press the key on the System 1 2 window 2 Press the key to display the target setting key Select and press the target key and key 3 The Confirmation of Set Initialize window appears Press the key for initializing Press the key to get back to the previous window without initialization The and keys are invalid and displayed in gray System...

Page 92: ... the key on the System 1 2 window 2 Select the target key and key for changing System The Lock or Release to change the sets by key is se fault Input Set lected Release Each of the set values is re turned to reset to the de 1 2 The time of turning on the Return Measure Key Lock Set Initialize Backlight Time backlight is set The indicated language is set Language Next 0 min English System The Lock ...

Page 93: ...e window to blink the target place 2000 01 01 00 00 00 Year Month Day Hour Minute Second 3 Input a value with numbers on the window and press the key for registration Year 00 to 99 Last digit of the year Month 01 to 12 Day 01 to 31 The last day varies with the month Hour 00 to 23 Minute 00 to 59 Second 00 to 59 2 2 The time of built in clock is set Previous System The time of built in clock is set...

Page 94: ...tput Abnormal memory How to operate 1 Press the key on the Initial Setting window 2 Press the key on the Self Check window 3 Press the key to start the memory check 4 The result is displayed after a short time Only the Ex SRAM is displaying Error in the right window Next 1 2 Initial Setting The signal to select the num ber of measurement condition is set Return Measure Meas Select Signal Key Opera...

Page 95: ...e Bridge Volt Checks that the measured value of the excitation voltage bridge voltage is within 10 of 10 V or 2V Input Over Checks that the sensor output is within the input range Display Over Checks that the measured value is within 99999 How to operate 1 Press the key on the Self Check window 2 Press the key to start the channel check 3 The result is displayed after a short time Only the Display...

Page 96: ... Color Backlight Return Measure Push the key the color is changed in order of red green blue yellow and red Push the key for turning OFF Push the panel for turning ON Return Measure Color Push the panel for turning ON Push the key the color is changed in order of red green blue yellow and red Push the key for turning OFF Display Check Display Check Color Backlight Return Measure Push the key the c...

Page 97: ...control input signal is turned ON Press the key of the target pin No The display color becomes yellow and the control output signal is turned ON Press the same pin No again to get back to the standard color and the control output signal is turned OFF Setting Range Input 19 to 27 Pin No 19 to 27 Output 1 to 10 Pin No 1 to 10 How to operate 1 Press the key on the Operation Check 1 2 window 2 White s...

Page 98: ...played on the received data column 5 BCD Output Check Valid for equipping the optional BCD output WGA 910A 1 or BCD and D A output WGA 910A 12 Capable of checking the operations of the connected external device by outputting an arbitrary BCD data The key is displayed in gray when the optional BCD output board is not connected Setting Range 99999 to 99999 count How to operate 1 Press the key on the...

Page 99: ...10A 12 Capable of checking the operation of the connecting external device by outputting an arbitrary D A converted voltage The key is displayed in gray when the optional D A output board is not connected Setting Range 10V Outputs 10 V 0V Outputs 0 V 10V Outputs 10 V How to operate 1 Press the key on the Operation Check window 2 Press the target key and key to output the target voltage MEMO ...

Page 100: ...Error is displayed in the Rst column when any error is detected and the following error is displayed in the Error Dialog window Error of the SD card check Display 1 SD card is not set in WGA 910A Confirm that SD card is correctly inserted in slot 2 SD card has no enough the empty capacity The data cannot be saved no more 3 SD card is state of write protect 4 The set value file is not existed in SD...

Page 101: ... because it takes time to check the free capacity of the SD card Wait for a while and the Checking SD card window blinks again Do not remove the SD card until you have received the result About error message of the SD card is not set in WGA 910A Confirm that SD card is correctly inserted in slot The above error message also appears when the SD card is not correctly formatted Format the SD card wit...

Page 102: ... previous window without saving 5 After starting the saving of the setting values the Saving the set values window appears The red flame blinks and the progress condition is displayed on the progress bar while saving the setting value After the saving the SD Card Set window appears again the calibration value are 1 2 read from SD card Set Value Read View Wave File Name Format Next The all datas sa...

Page 103: ...ey on the Confirmation of reading the set values window The setting values are read from the SD card and setting values of the WGA 910A are rewritten Press the key to get back to the previous window without reading the setting values 3 Starts reading the setting values and Reading the set values window appears The red flame blinks and the progress condition is displayed on the progress bar while s...

Page 104: ...SD card is removed from the slot after starting the waveform display To close the error window press the key and stop the updating of the waveform display Then press the key to change the window Insert the SD card to the slot again 4 The free capacity of the SD card is not enough after pressing the key on the waveform display window To close the error window press the key to get back to the wavefo...

Page 105: ...lor changes to yellow and the character color changes to black Press the key to display the waveform file names saved in the directory 4 The Name Size and Renewal Date of the waveform files appear Each single page includes 10 file data To display the next 10 file data 2nd page press the key The WGA 910A has 2184 pages 21844 data in total データの編集 名前変更 Next 1 10 Delete Wave Data 00114 24 0KB 18 00 00...

Page 106: ... Data Select Size Name Renewal Date 12 0KB 12 0KB All Select One Select 00119 00118 20 40 33 12 0KB 15 0KB 124 9KB 00116 00115 00117 Next 1 10 Delete Wave Data Directory Name 20160123 00114 00113 22 59 59 22 30 12 00200 00199 00120 21 00 00 12 0KB 15 6KB 24 0KB 24 0KB 24 0KB 20 00 00 19 40 32 19 10 11 19 02 00 18 00 00 17 30 00 データの編集 名前変更 Return Measure View Wave File Name Data Select Name Size R...

Page 107: ... black データの編集 名前変更 Return Measure View Wave File Name Data Select Name Size Renewal Date 00200 12 0KB 22 59 59 00199 12 0KB 22 30 12 00120 12 0KB 21 00 00 00119 12 0KB 20 40 33 One Select 00118 15 0KB 20 00 00 00117 124 9KB 19 40 32 00116 15 6KB 19 10 11 All Select 00115 24 0KB 19 02 00 00113 24 0KB 17 30 00 20160123 Next 1 10 Delete Wave Data 00114 24 0KB 18 00 00 Directory Name データの編集 名前変更 Retur...

Page 108: ...ve Return Measure View Wave File Name Confirmation of deleting the wave data Cancel Execute data from the SD card Push Cancel key to get back to the previous win dow Selected data number 2 pcs Progressing state Return Measure View Wave File Name Deleting the wave data Deleting the wave data Do not pull out SD card or turn off the power Measurement cannot be conducted during deleting データの編集 名前変更 Re...

Page 109: ...us window without formatting 3 Format starts and the Formatting window appears The red flame blinks and the progress condition is displayed on the progress bar during formatting After completing the formatting the SD Card Set 1 2 window appears again The all set values excluding The all set values excluding the calibration value are saved to SD card SD Card Setting Set Value Save Return Measure th...

Page 110: ...dating 3 After starting the updating the progress condition is displayed with the progress bar The POWER LED lights up in orange during updating After finishing the updating the POWER LED lights up in green 4 Turn OFF the WGA 910A and turn ON it again The new version is displayed on the right side of the opening window Check that the version is changed to the new one In addition check that the ver...

Page 111: ...ram Save the all 4 programs in the root directory ex E Drive of the SD card Or you cannot update the program About program for updating 4 program names are as follows PVER h WGA910_A BIN WGA910_B BIN WGA910_C BIN The file format is dedicated to the WGA 910A NOTE ...

Page 112: ...108 7 OPERATION TIMING 7 1 CONTROL INPUT HOLD COMMAND RESET COMMAND ZERO COMMAND 7 1 1 Control Input ...

Page 113: ...109 7 1 2 Block specified 7 1 3 Time specified ...

Page 114: ...110 7 2 COMPARATOR OUTPUT 7 3 DELAY TIME BETWEEN INPUT AND OUTPUT Delay time between input RS output MAX 30 ms ...

Page 115: ... card Data in the SD card Operation modes Block Peak Bottom etc If you want to cancel the loading of waveform data during loading of waveform data turn ON and OFF the Waveform command again 7 4 DISPLAYING WAVEFORMS AND OUTPUTTING SD SIGNAL WITH WAVEFORM COMMAND CONTROL OUTPUT AND RECORD KEY 7 4 1 Single Mode Conditions Measuring condition setting Operation mode Normal Waveform display setting X ax...

Page 116: ...card Data in the SD card Operation modes Block Peak Bottom etc When X axis setting is 0 5 sec 1 0 sec and 2 0 sec measurement data during switching between screens T4 T5 can t be display and record Writing of data to SD card take a priority 7 4 2 Auto Mode Normal Mode X axis setting 0 5 sec 1 0 sec 2 0 sec Conditions Measuring condition setting Operation mode Normal Waveform display setting X axis...

Page 117: ...nd capacities of the SD card Data in the SD card Operation modes Block Peak Bottom etc When X axis setting is X axis setting 5 0 sec 10 0 sec 20 0 sec 50 0 sec and 100 0 sec the waveforms window data can be saved continuous X axis setting 5 0 sec 10 0 sec 20 0 sec 50 0 sec 100 0 sec Conditions Measuring condition setting Operation mode Normal Waveform display setting X axis setting 5 0 sec Start M...

Page 118: ...apital letters According to the command characteristic some control commands are suffixed by parameters A termination code is added to the end of a control command Different termination codes are used as follows CR Command output to the WGA 910A CR LF Data output from the WGA 910A If an unrecognizable command or number is input and if the decimal point position of the calibration value is incorrec...

Page 119: ... calibration VCL 122 20 Conduct the sensitivity registering calibration EIC 122 21 Execute numeric value registering calibrations VRC 123 22 Conduct the TEDS based automatic calibration EID 123 23 Smoothing function setting SSM 123 24 Additional value setting SZM 124 25 ZERO compensation setting SZT 124 26 Comparison setting SCF 125 27 Compared value setting SCV 125 28 Measuring mode setting SMF 1...

Page 120: ... turned OFF 2 RS Content RS line test Format RS CR Parameter None Return value format ok CR LF Description and others RS 232C CR LF For the RS 232C or RS 485 CR LF For the RS 485 when the data is received correctly 3 SYS Content Output model etc Format SYS CR Parameter None Return value format WGA 910A aa xx xx yyyyyyyyy CR LF Serial No 9 digit Character string of 0 to 9 A B C Program version If t...

Page 121: ...comparator is ON d LO comparator is ON e LL comparator is ON f Measuring g Detecting h holding i Errors Set the mode 10 to stop the outputting When you cannot set the mode Turn OFF the WGA 910A once and turn ON again to set it to mode 10 2 Return value of the mode 02 D1 xxxxxx CR LF Sabcdefghi CR LF The mode 02 outputs the measured value and status once during the holding time After the data is ou...

Page 122: ... value 1 or measured value 2 Description and others For the Block Peak Bottom and Time Peak Bottom D1 yyyyyy zz D2 yyyyyy zz For the other operation modes D1 yyyyyy zz Example Block Peak Bottom Return value when the peak value measured value 1 999 99 bottom value measured value 2 125 56 unit kN 03 D1 999 99 03 CR LF D2 123 56 03 CR LF Block specified Bottom Return value when the bottom value measu...

Page 123: ...R Content Read the setting value Format PRRppp CR Parameter ppp 010 Sensitivity registering value 011 Numeric Value Registering Calibration value 012 Excitation voltage 020 Smoothing function 030 Additional value 041 Comparison setting 051 Compared value of the HH comparator 052 Compared value of the HI comparator 053 Compared value of the LO comparator 054 Compared value of the LL comparator 058 ...

Page 124: ...RST CR Interval specified peak hold HLD CR Detecting interval Holding interval RST CR Time specified peak hold HLD CR Detecting interval Holding interval RST CR 11 RST Content Reset command To execute the peak hold etc Format RST CR Parameter None Return value format ok CR LF Working properly 12 ZON Content ZERO command To execute the DIGITAL ZERO function Format ZON CR Parameter None Return value...

Page 125: ... 09 Meas condition 9 10 Meas condition 10 11 Meas condition 11 12 Meas condition 12 13 Meas condition 13 14 Meas condition 14 15 Meas condition 15 16 Meas condition 16 17 Meas condition 17 18 Meas condition 18 19 Meas condition 19 20 Meas condition 20 21 Meas condition 21 22 Meas condition 22 23 Meas condition 23 24 Meas condition 24 25 Meas condition 25 26 Meas condition 26 27 Meas condition 27 2...

Page 126: ...e has no decimal point it is filled with 0s from the head Return value format ok CR LF E 12 CR LF When an error occurs Description and others The results of the command will be saved Reading command PRR010 Return value For details see the EIC 20 EIC Content Conduct sensitivity registering calibration Format EIC x xxxx yyyyy zz CR Parameter x xxxx yyyyy zz Unit 01 to 79 79 types Refer to 11 2 UNIT ...

Page 127: ...citation voltage and sensitivity registering calibration with the rated capacity value rated output value recommended excitation voltage value and unit of the TEDS information Reading command PRR010 Return value x xxxx yyyyyy zz CR LF Unit Rated display value Rated output value 23 SSM Content Set the smoothing function Format SSMaa b c CR Parameter aa b c Analog filter 0 1 Hz 1 30 Hz 2 300 Hz 3 No...

Page 128: ...Additional value 25 SZT Content To set Automatic ZERO compensation functions Format SZTxxxxxx y yy z CR Parameter xxxxxx y yy z Zero near zero 0 to 9 count Determination time 0 00 to 9 99 sec Automatic ZERO compensation range 0 to 99999 count The value including the decimal point When the value has no decimal point it is filled with 0 from the head Return value format ok CR LF Description and othe...

Page 129: ...b c d e xxxxx Hysteresis width 0 to 9999 count Including a decimal point Comparator output logic 0 Negative logic 1 Positive logic Using comparator LL 0 Use 1 Not use Using comparator LO 0 Use 1 Not use Using comparator HI 0 Use 1 Not use Using comparator HH 0 Use 1 Not use 27 SCV Content Set the compared value Format SCVa xxxxxx CR Parameter a xxxxxx Compared value 99999 to 99999 count Indicated ...

Page 130: ...alue aa b c x xx y yy CR LF Detect time Delay time Comparison mode Display mode Operation mode 29 SG1 Content Set the waveform display setting 1 X axis and Y axis settings Format SG1a b xxxxxx CR LF Parameter a b xxxxxx Start point of Y axis 99999 to 99999 count Indicated value with a decimal point If the indicated value has no decimal point it is filled with 0s from the head End point of X axis 0...

Page 131: ...Normal Mode 2 Single Mode Return value format ok CR LF Description and others Corresponding to the M command Reading command PRR131 Return value a b xxxxxx yy y CR LF Hold time of wave Passed level Level passing way Start mode of wave 31 SPN Content Set the measuring condition selecting signal Format SPNa CR Parameter a 0 key operation 1 Control input 2 Command Return value format ok CR LF Descrip...

Page 132: ...mand PRR152 Return value a language 34 STM Content Set clock Format STM uu vv ww xx yy zz CR Parameter uu vv ww xx yy zz Second 00 to 59 Minute 00 to 59 Hour 00 to 23 Day 01 to 31 Month 01 to 12 Year 00 to 99 Return value format ok CR LF Description and others Corresponding to the M command Reading command PRR153 Return value uu vv ww xx yy zz Second Minute Hour Day Month Year ...

Page 133: ...y Transmission speed 0 Approx 16 times sec 1 Approx 32 times sec 2 Approx 64 times sec 3 Approx 125 times sec 4 Approx 250 times sec 5 Approx 500 times sec 6 Approx 1000 times sec EOC logic 0 Negative logic 1 Positive logic Polarity logic 0 Negative logic 1 Positive logic Data logic 0 Negative logic 1 Positive logic Return value format ok CR LF Description and others Corresponding to the M command...

Page 134: ...o 99999 count 2 For the Block Peak Bottom and Time Peak Bottom only Or you will not get the BCD or D A classification value 38 OP2 OP3 Content Set the BCD output and D A output Format BCD output The same as the OP2 D A output The same as the OP3 Parameter BCD output The same as the OP2 D A output The same as the OP3 Return value format ok CR LF Description and others Corresponding to the M command...

Page 135: ...on the Option Setting window 5 Press the key on the Com Setting window 6 Press the target key and key to register the target value Return Measure Com Setting The communication speed of RS Communication Speed 232C and RS 485 is set 9600bps It is only applied to RS 485 Device ID The ID of WGA 910A is set 1 The transmission mode of com Transmission Mode munication such as the oper ation by command is...

Page 136: ...command etc Setting Range Repeat Output Continuously outputs the measured value and status such as the HH comparator is ON etc Output at Hold Outputs the measured value and status once during the holding time Tx and Rx Sends and receives the data with the control command How to operate 1 Press the key on the Com Setting window 2 Press the target key and key to register the target value 設定 Return M...

Page 137: ... may be disconnected or may be incorrectly connected How to Check Check that the Transducer is in no load state or receiving an excessive load After that conduct the channel check 2 Sens Registering Displaying Content Stops the sensitivity registering Cause The setting value of the rated output and rated display may out of the specification range or may not set 10000 per 0 1 mV V or less In additi...

Page 138: ...Calibration Wave Display Set Input Set Meas Condition Set Calibration is conducted with sensor by Manual Input TEDS Auto or TEDS Part Cal Smoothing Additional Value and Zero Compensation are set play the wave such as X axis and Y axis are set Measure The sensor output is monitored 1 2 Comparison Set and Measure Mode Set are set as measure ment condition The necessary setting to dis Next Input valu...

Page 139: ...ISPLAY VALUE OR MONITOR OUTPUT DOES NOT CHANGE The display value does not change and monitor output does not output The input cable is not correctly connected to the INPUT connector or is broken Conduct the channel check The display value changes but monitor output does not output The monitor output cable is not correctly connected to the MONITOR terminal board or is broken Repair or replace the m...

Page 140: ...l of the INPUT connector Interference due to electrical potential Occurs when a measuring object has an electrical potential of DC or AC In this case it is not necessarily to ground the WGA 910A but connect the measuring object and WGA 910A It should be noted that you cannot solve the trouble with a simple method if there is the inductive interference or if the measuring object has electrical pote...

Page 141: ...e is approximately 5 years at 25 Overhaul the product every 5 years Every 5 years Lithium battery When the battery is died the clock function is reset to the default settings after turning ON the power The startup window is also reset to the default settings Service life depends on the frequency of use and ambient temperature is approximately 5 years Replace the product every 5 years Every 5 years...

Page 142: ...s 3 5 inch TFT color LCD display area 70 6 59 2 mm 320 240 dots touch panel Indication Setting range 99999 to 99999 count Update speed Numeric value display Approx 4 times sec Wave display Approx 2 times sec Calibration function Manual calibration Sensitivity registering calibration Actual load calibration Unit TEDS auto calibration TEDS part calibration TEDS calibration item TEDS operation Config...

Page 143: ...20 0 50 0 100 0 sec Y axis setting Start point 99999 to 99999 End point 250 500 1000 2000 5000 10000 20000 50000 100000 200000 Start mode of waveform passed level passed level way holding time of waveform WGA displays the waveform of the input variation regardless to the Measure Mode Set setting System Key lock setting value initialize backlight illumination time language clock Self check Memory c...

Page 144: ...to the SD card View wave file name Browsing the waveform data deleting the wave data and deleting the directory are available Format Erase all data that are saved in the SD card is available Quick format is available Update Capable of updating the program version that is saved in the SD card SD card type SD SDHC up to 32 GB Power supply 100 to 240 V 50 60 Hz Power consumption 20 VA or less Dimensi...

Page 145: ...141 11 2 DIMENSIONS Unit mm ...

Page 146: ...pe Setting TEDS Reading Ope Key operation Allow prohibit Allow Control input Allow prohibit Allow Power ON Allow prohibit Prohibit Command Allow prohibit Allow Zero during TEDS Execute prohibit Execute TEDS Info Display Numeric Regist Cal Initial Value 3 2000 3 2000 mV V 0 000 mV V 12 1 2 Input Setting Item Function Name Parameter Name Setting Value Initial Value Smoothing Analog Filter 0 1 Hz 1 3...

Page 147: ...ttom Hold 5 Block Bottom 6 Time Bottom 7 Arbitrary Hold 8 Block Peak Bottom 9 Time Peak Bottom 10 Block Average 11 Time Average Normal Detect Time 0 00 to 9 99 sec 1 00 sec Delay Time 0 00 to 9 99 sec 0 00 sec Comparison Mode 0 Normal Comp 1 Hold Comp Normal Comp Display Mode 0 Normal Disp 1 Hold Disp Normal Disp 12 1 4 Waveform Display Setting Item Function Name Parameter Name Setting Value Initi...

Page 148: ...Initial value Self Check Memory Check CPU FlashROM OK Error Ex FlashROM OK Error CPU SRAM OK Error Ex SRAM OK Error Ex EEPROM OK Error Channel Check Bridge Volt OK Error Input Over OK Error Display Over OK Error Operation Check Display Check Color Red Green Blue Yellow Red Backlight ON OFF Touch Panel Check Control I O Check Input 19 to 27 Pin No 19 to 27 Output 1 to 10 Pin No 1 to 10 Communicatio...

Page 149: ...s are command parameters or return value format of the communication RS 232C RS 485 Force and Mass Pressure Torque Displacement Others 01 mN 14 Pa 30 mN m 39 μm 45 None 64 02 N 15 hPa 31 N m 40 mm 46 μV 65 K 03 kN 16 kPa 32 kN m 41 cm 47 mV 66 m s2 04 MN 17 MPa 33 MN m 42 m 48 V 67 G 05 mgf 18 gf mm2 34 gf cm 43 km 49 kV 68 Gal 06 gf 19 kgf mm2 35 kgf cm 44 inch 50 μA 69 No 07 kgf 20 tf mm2 36 gf ...

Page 150: ...146 Kyowa Electronic Instruments Co Ltd 3 5 1 Chofugaoka Chofu Tokyo 182 8520 Japan http www kyowa ei com ...

Reviews: