background image

STRATUS Multi-Deck Display Case

23

Procedures—Fan removed from the case

1. 

Disconnect the fan plug from the case wire harness and inspect the 

pins. If they appear bent, straighten them out and reconnect the 

plug. If pins are broken, replace the power harness.

2. 

Remove the fan side harness plug from the back of the fan. This 

is generally best accomplished by placing a thumb under the plug 

and applying steady pressure outwards from the fan.

3. Check for liquid in the slot where the harness plugs into the fan. If 

any liquid is present, check that the seal around the perimeter of 

the slot is completely intact. Replace any fan with a damaged seal. 

If the seal is good, completely dry out the slot and the harness pins 

before proceeding further.

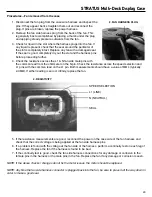
4. Check the resistance across the L1 & N fan side male pins with 

the common lead from the ohmmeter on the N pin. Check the resistance across the speed selection and 

L1 pins with the common lead on the L1 pin. Both measurements should have a value of MΩ’s (typically 

2-3MΩ). If either reading is zero or infinity, replace the fan.

2. FAN HARNESS PLUG

4. RESISTIVITY

SPEED SELECTION

L1 (LINE)
N (NEUTRAL)

SEAL

5. 

If the resistance measurements are good, reconnect the power on the case side of the fan harness and 

check that the correct voltage is being applied at the fan side harness pins.

6. 

If a problem is found with the voltage at the fan side of the harness, perform a continuity test on each leg of 

the harness. Replace the fan if the harness is found to be bad.

7. 

If the continuity test is good, check the fan side harness connections for any damage or corrosion to the 

female pins in the harness or the male pins in the fan. Replace the fan if any damage or corrosion is seen.

NOTE: If the above checks / changes do not fix the motor issues, the motor should be replaced.

NOTE: Any time the fan side harness connector is plugged back into the fan, be sure to press it all the way down in 

order to make a good seal.

Summary of Contents for DX6LN-MCU

Page 1: ... Part No 31E01037 Models DX6LN MCU Applications Introduction General Information 2 Plan and Cross Section Views 3 Paragon ERC 2 Set Up Instructions 4 Case Data 7 Case Installation 8 Modular Condensing Unit 11 Electrical Connections General 17 ECM Evaporator Fan 22 Operation 24 Parts List 26 Warranty 26 ...

Page 2: ...ative humidity may result in operational issues such as the following increased thermal Btuh load high product temperatures coil icing product frosting and external sweating This case will accommodate up to 5 levels of product display shelving in addition to the deck pan level for greater merchandising visibility that grabs shoppers attention These cases offer exceptional display facing area and p...

Page 3: ...STRATUS Multi Deck Display Case 3 Cross Section View Plan View 80 22 20 161 4 55 6 42 59 1 1 2 80 7 8 AIR SPACE 3 42 35 29 29 3 42 3 4 16 1 2 DX6LN MCU 22 22 22 22 32 35 3 8 44 7 8 221 4 1031 8 273 4 ...

Page 4: ... 115 VAC 60 Hz 1 Phase 1 9 Amps Capacity 1 6 GPM at zero head Pump is UL Listed Paragon ERC 2 Controller Set Up Instructions A Paragon ERC 2 Controller is provided to control the compressor fans and case defrost Temperature Control When the case reaches the desired discharge air temperature the controller shuts off the compressor When the discharge air temperature rises above the cut in set point ...

Page 5: ...ature First Level follow these steps 1 Press and hold SET for five 5 seconds The display will show CLoC 2 Press SET again to change the time of day 3 Press UP or DOWN until the correct time of day is displayed 4 Press SET to accept the new time 5 Press DOWN to go to the next parameter Setpoint Temperature The display will show SEt 6 Press SET to change the setpoint temperature 7 Press UP or DOWN t...

Page 6: ...ft case 18 5 gallons per day 3 75 Gallon Pan A 6 ft 1 pan B 8 ft 2 pans C 12 ft 2 pans Evaporation pan heater is UL Listed Buck and Boost Transformer Optional A 1 5 KVA Buck Boost transformer is an available option The primary and secondary of the Buck Boost trans former can be interconnected for use as an autotransformer to slightly step up or down voltages When used as an autotransformer to slig...

Page 7: ...eater Amps N A N A N A Condensate Pump Amps 115 V 1 90 1 90 1 90 Compressor RLA 208 V 12 00 15 70 23 20 Condenser Fan Motor Amps 208 V 2 20 2 20 2 20 Refrigeration Cycle Amps 2 03 2 12 2 69 Defrost Cycle Amps 2 03 2 12 2 69 Evaporation Pan s Heater Amps 208 V 7 21 14 42 14 42 Case Circuit Minimum Circuit Ampacity Circuit 1 2 54 2 65 3 36 Case Circuit Maximum Overcurrent Protection Circuit 1 15 15 ...

Page 8: ...utside entrances or heating and cooling outlets 3 Verify at least 2 feet of distance between hot and cold cases 4 Ensure floor loading will support the case and the case contents 5 Ensure proper AC power is available Refer to case AC input requirements located in the electrical connec tions section of this manual 6 Ensure location will allow connection to drain lines and the drain line when instal...

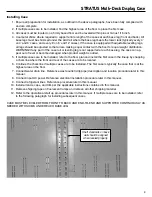
Page 9: ...ht is added 5 If multiple cases are to be installed refer to the floor plan and install the first case in the lineup by snapping a chalk line where the front and rear of the cases are to be located 6 Continue the chalk line if multiple cases are to be installed The first case is typically the case that is at the highest area on the floor 7 Connect water drain line Reference waste outlet drip pipe ...

Page 10: ...ossible in drain piping 1 fall for each 4 of horizontal run Avoid long runs in drain piping which make it impossible to provide maximum downslope in piping Provide a space between the end of the drip pipe and the floor drain or sewer connection Case Freezing Do not allow drain piping to come into contact with uninsulated suction lines that will cause drain water inside the drain piping to freeze D...

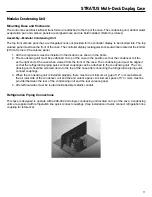
Page 11: ...coil fac es the right end of the case when viewed from the front of the case The condensing unit must be aligned so that the refrigeration piping quick connect couplings can be attached to the condensing unit The con densing unit should be screwed down to the top of the case after connecting the refrigeration piping quick connect couplings 3 When the condensing unit is installed properly there mus...

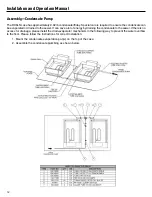
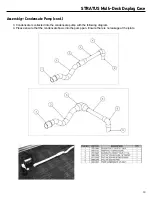
Page 12: ...ed to the sewer It can save a lot of energy by draining the condensate to the sewer If there is no access for drainage please install the drain evaporator mechanism in the following way to prevent the water overflow to the floor Please follow the instructions for correct installation 1 Mount the condensate evaporation pan s on the top of the case 2 Assemble the condensate plumbing as shown below ...

Page 13: ...splay Case 13 Assembly Condensate Pump cont 3 Condensate is collected into the condensate pump with the following diagram 4 Please ensure that the condensate flows into the pump pan Ensure there is no leakage at the joints ...

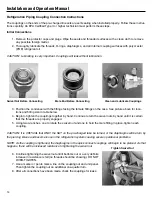
Page 14: ...tting size in table below 4 Begin to tighten the couplings together by hand Continue to turn the swivel nuts by hand until it is certain that the threads are properly engaged 5 Using two wrenches one to rotate the swivel nut and one to hold the male fitting in place tighten each coupling CAUTION It is CRITICAL that ONLY the NUT on the pre charged tube be turned or the diaphragms will be torn by th...

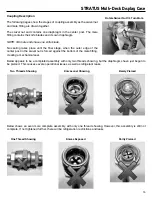
Page 15: ...post in the swivel nut is forced against the bottom of the male fitting creating a mechanical seal Below appears to be a completed assembly with only two threads showing but the diaphragms have just begun to be pierced This causes severe operational issues as well as refrigerant leaks Two Threads Showing Knives Just Showing Barely Pierced Below shows an even more complete assembly with only one th...

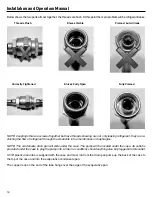
Page 16: ...e stricting the flow of refrigerant through the small slits in the membranes or diaphragms NOTE The condensate drain pan will slide under the case The pump will be located under the case An outlet is provided under the case to plug the pump into Under no conditions should anything else be plugged into this outlet A 3 8 plastic drain tube is supplied with the case and must run from the drain pan pu...

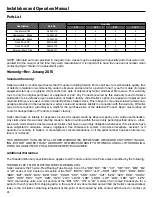
Page 17: ...h as the following increased thermal load high prod uct temperature coil icing product frosting and external sweating Shelf Light Installation T8 Shelf Lights Make sure plugs are FULLY SEATED before applying power Due to the nature of rapid start ballasts it is highly recommended that lights are plugged in BEFORE power is applied to cases and BEFORE cases are at a steady rate operating temperature...

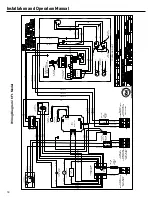
Page 18: ...NNECT TO MATCHING CONTROL CIRCUIT VOLTAGE BLK RED BLK BLK RED BLK T1 T2 L1 L2 RED BLU FAN 2 WHEN REQ D LOAD SIDE OF CONTACTOR T2 T1 T2 T1 BLK BLK SPLICE WHEN REQ D WHT BLK BLK WHT BOTTOM 15A CIRCUIT BREAKER TOP GRN WHT BLK Max 16A 5 1 A 6 7 8 2 8 3 A250V 16FLA 96LRA 14 AWG BLK CIRCUIT 3 CONDENSATE EVAPORATION PAN POWER SUPPLY 208 VAC 50 60 Hz SINGLE PHASE 14 AWG WHT 14 AWG GRN 14 AWG BLK BOTTOM 35...

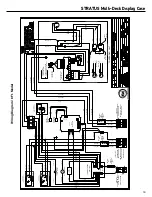
Page 19: ...LK RED BLK BLK RED BLK T1 T2 L1 L2 RED BLU FAN 2 WHEN REQ D LOAD SIDE OF CONTACTOR T2 T1 T2 T1 BLK BLK SPLICE WHEN REQ D WHT BLK BLK WHT BOTTOM 15A CIRCUIT BREAKER TOP GRN WHT BLK Max 16A 5 1 A 6 7 8 2 8 3 A250V 16FLA 96LRA 14 AWG BLK CIRCUIT 3 CONDENSATE EVAPORATION PAN POWER SUPPLY 208 VAC 50 60 Hz SINGLE PHASE 14 AWG WHT 14 AWG GRN 14 AWG BLK BOTTOM 35A CIRCUIT BREAKER TOP 10 AWG GRN 10 AWG RED...

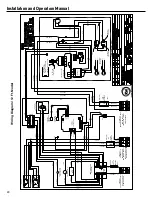
Page 20: ... BLK T1 T2 L1 L2 RED BLU FAN 2 WHEN REQ D LOAD SIDE OF CONTACTOR T2 T1 T2 T1 BLK BLK SPLICE WHEN REQ D WHT BLK BLK WHT 15A CIRCUIT BREAKER GRN WHT BLK Max 16A 5 1 A 6 7 8 2 8 3 A250V 16FLA 96LRA 14 AWG BLK CIRCUIT 3 CONDENSATE EVAPORATION PAN POWER SUPPLY 208 VAC 50 60 Hz SINGLE PHASE 14 AWG WHT 14 AWG GRN 14 AWG BLK 50A CIRCUIT BREAKER 20A CIRCUIT BREAKER 8 AWG GRN 8 AWG RED 8 AWG RED CIRCUIT 2 C...

Page 21: ...near the expansion valve bulb Read the suction line pressure as near coil as possible If closest is at the condensing unit estimate suction line loss at 2 PSIG 2 Convert coil suction pressure to temperature The difference between the coil temperature and the thermo couple temperature at the expansion valve bulb is superheat Use average superheat when expansion valve is hunting 3 Do not set the sup...

Page 22: ... reprogram the fan as needed disconnect the programmer and reconnect fan power If the setting is correct continue with troubleshooting Motor is not spinning Perform a hard reset of the electronics by removing power to the fan for at least 10 seconds Check that the fan blades are completely free of obstruction by manually spinning the fan blade If any obstruction is found remove it and inspect the ...

Page 23: ...nce across the speed selection and L1 pins with the common lead on the L1 pin Both measurements should have a value of MΩ s typically 2 3MΩ If either reading is zero or infinity replace the fan 2 FAN HARNESS PLUG 4 RESISTIVITY SPEED SELECTION L1 LINE N NEUTRAL SEAL 5 If the resistance measurements are good reconnect the power on the case side of the fan harness and check that the correct voltage i...

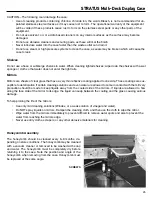
Page 24: ...s shut off during defrost During refrigeration the fans start after the evaporator coil temperature reaches 10ºF and run continuously thereafter As a safety precaution a safety cutoff Klixon is wired in series with the defrost heater to turn the heater off at temperatures above 65ºF 3 Single Condensing Case Systems A thermostat should be used to control case temperatures The ther mostat bulb shoul...

Page 25: ...coating applied to one side These coatings are sus ceptible to deterioration if certain cleaning solutions and even water are allowed to come in contact with them Every precaution should be made to keep liquids away from the coated side of the mirrors If liquids are allowed to flow along the face side of the mirror to its edge the liquid can seep between the coating and the glass causing serious d...

Page 26: ...oduct Buyer must prepay all costs for transportation of Products to Seller s factory Seller shall have no liability for expenses incurred for repairs made by Buyer except by prior written authorization Any claim under this warranty shall be made to Seller in writing within the warranty period specified above other wise such claim shall be deemed waived Seller shall have no warranty obligation what...

Page 27: ...ation or forty two 42 months from the date of shipment by Seller whichever first occurs PRO3 PACKAGED REFRIGERATION SYSTEM Seller warrants the PRO3 Packaged Refrigeration System for a period of two 2 years from date of original installa tion or thirty 30 months from date of shipment by Seller whichever first occurs HYPERCORE Microchannel Coil Seller warrants the Hypercore Microchannel Condenser Co...

Page 28: ...eller s indoor equipment is specified to operate in a conditioned ambient environment not to exceed 75 degrees Fahrenheit or 55 relative humidity NOTE Providing specified ambient environmental conditions are the responsibility of the owner end user 9 To equipment with final destinations unknown to seller as indicated on the original sales order 10 To labor cost for repair or replacement of parts 1...

Page 29: ...5201 Transport Blvd Columbus GA 31907 P 800 866 5596 F 706 568 8990 www kysorwarren com ...

Reviews: