background image


K1

K1

K1

K1


reference wst

reference wst

reference wst

reference wst

®

®

®

®

 system

 system

 system

 system    

RIGGING PROCEDURES

RIGGING PROCEDURES

RIGGING PROCEDURES

RIGGING PROCEDURES    


VERSION 2.0 

K1_RM_EN_2-0 

w w w . l - a c o u s t i c s . c o m  

8

8

8


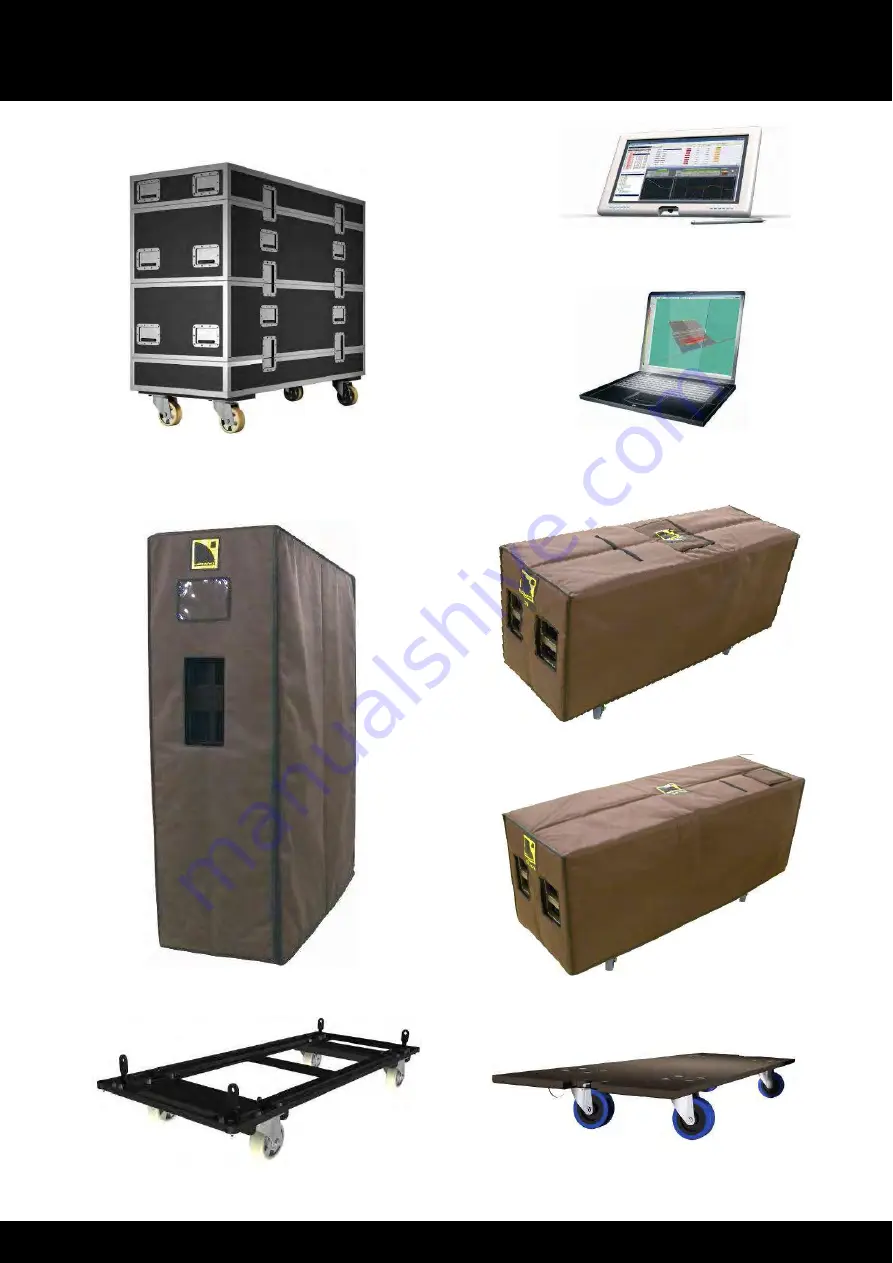
Figure 2: K1 system components (part 2) 

K1-CHARIOT 

K1-CHARIOTCOV 

SOUNDVISION 

LA NETWORK MANAGER 

K1-SBCOV 

K1-COV 

K1-PLA 

K1BUMP-FLIGHT 

Summary of Contents for K1

Page 1: ...WS REFERENCE WS REFERENCE WS REFERENCE WST T T T SYSTEM SYSTEM SYSTEM SYSTEM R R R RIGGING PROCEDURES IGGING PROCEDURES IGGING PROCEDURES IGGING PROCEDURES VERSION 2 VERSION 2 VERSION 2 VERSION 2 0 0 0 0 www l acoustics com ...

Page 2: ...w w w l a c o u s t i c s c o m ...

Page 3: ...onnel that are familiar with the rigging techniques and safety recommendations outlined in this manual It is recommended to attend the training courses offered by L ACOUSTICS before proceeding with the installation of the system 6 Personnel health and safety During installation and set up personnel should wear protective headgear and footwear at all times Under no circumstances personnel should cl...

Page 4: ...at any overhead suspension of L ACOUSTICS systems has been made in accordance with all applicable local regulations 12 Flying a loudspeaker assembly Always ensure that nobody is standing underneath the loudspeaker assembly when it is being raised As the system is being raised check each individual component to make sure that it is securely fastened to the component above Never leave the system una...

Page 5: ...illmann Head of Engineering Design dept 1 General standard maximum load Up to 24 K1 and or K1 SB enclosures 4 LA RAK touring racks and corresponding cable set can be flown as a vertical line source array using the K1 BUMP structure Up to 22 K1 and or K1 SB and 6 KARA enclosures 4 LA RAK touring racks and corresponding cable set can be flown as a vertical line source array using the K1 BUMP structu...

Page 6: ...y 10 5 3 K1BUMP FLIGHT case 11 6 INSTALLATION 12 6 1 K1 BUMP preparation and LA RAK rigging 12 6 1 1 K1 BUMP preparation 12 6 1 2 LA RAK rigging 14 6 2 Flying a vertical array by using the TOWER method 19 6 2 1 Modeling and safety 19 6 2 2 Array mounting 19 6 2 3 Array removal 28 6 3 Flying a vertical array by using the CATERPILLAR method 35 6 3 1 Modeling and safety 35 6 3 2 Array mounting 35 6 3...

Page 7: ...eaving the factory and should arrive in perfect condition If found to be damaged notify the shipping company or the distributor immediately Only the consignee may initiate a claim with the carrier for damage incurred during shipping Be sure to save the carton and packing materials for the carrier s inspection Refer to 5 for a full description of the shipping carton contents 3 4 Web links Please ch...

Page 8: ...d in conjunction with K1 BUMP KARA DOWNK1 Accessory to rig KARA as a K1 downfill array K1BUMP FLIGHT Modular flight case for up to 4 K1 BUMP flying structures K1 LASERMOUNT Laser support plate for a K1 or K1 SB enclosure refer to the K1 LASERMOUNT Technical bulletin 3 4 K1 CHARIOT Cart for an array of 4 K1 and or K1 SB enclosures K1 CHARIOTCOV Protective cover for an array of 4 K1 and or K1 SB enc...

Page 9: ..._RM_EN_2 0 w w w l a c o u s t i c s c o m 7 7 7 7 Figure 1 K1 system components part 1 Eight K1 enclosures LA RAK K1 DELTA SB28 K1 BUMP K1 LASERMOUNT Four K1 SB enclosures KARA DOWNK1 Six KARA enclosures ...

Page 10: ...system system RIGGING PROCEDURES RIGGING PROCEDURES RIGGING PROCEDURES RIGGING PROCEDURES VERSION 2 0 K1_RM_EN_2 0 w w w l a c o u s t i c s c o m 8 8 8 8 Figure 2 K1 system components part 2 K1 CHARIOT K1 CHARIOTCOV SOUNDVISION LA NETWORK MANAGER K1 SBCOV K1 COV K1 PLA K1BUMP FLIGHT ...

Page 11: ...n frame One central bar Four R BLP round shaped ball locking pins Two R BLP Two T BLP T shaped ball locking pins Four shackles fitted with 22 mm 0 87 inch diameter bolts and safety pins ready for two point hang and two point safety attachment 9 2 One adjustable sling to be used in case of climbing hoist setup 9 3 One rack stabilizer to mount LA RAK touring racks onto the K1 BUMP 6 1 2 The K1 DELTA...

Page 12: ...w l a c o u s t i c s c o m 10 10 10 10 5 2 KARA DOWNK1 rigging accessory The L ACOUSTICS KARA DOWNK1 rigging accessory has been exclusively designed to attach KARA enclosures as a downfill array for K1 The KARA DOWNK1 package is composed of the following elements One main frame Four 5 16 R BLP round shaped ball locking pins for KARA rigging Figure 4 KARA DOWNK1 rigging accessory Main frame R BLP ...

Page 13: ...ories for rigging dV DOSC or KARA as downfill arrays and others The footprint is equivalent to the K1 CHARIOT s one thus facilitating truck packing Note Both K1 BUMP can be hooked and lifted from the case using motors without any physical handling The inner cut outs of the compartments also allow transporting cables in place of the bottom K1 BUMP Its modular conception makes the K1BUMP FLIGHT read...

Page 14: ...ty pin inserted 1 Place the K1 BUMP beneath the rigging points with rack rails on top and laser slits towards the front Note The K1 BUMP can be transported and prepared into the K1BUMP FLIGHT case 5 3 2 Put the central bar from shipping to rigging position a Remove both shipping T BLP and put them in their storage locations b Remove both rigging R BLP c Lift up rotate and align the central bar wit...

Page 15: ...eck if the four shackles are well secured to the central bar 4 If necessary attach the adjustable sling to the front external shackle 9 3 5 If necessary attach the K1 DELTA to the rear external shackle 9 5 Figure 7 Attaching the adjustable sling and the K1 DELTA ...

Page 16: ...ust have been prepared as described in 6 1 1 All along the procedure Strictly follow the sequence of the successive steps Systematically ensure that each BLP is fully inserted by pulling on it 1 Take a first LA RAK and remove the dolly board a Turn a spring loaded safety and slide out the coupling bar b Repeat for the second coupling bar Figure 8 Removing the dolly board from an LA RAK 2 Place the...

Page 17: ...coupling bar Figure 9 Rigging a first LA RAK to the K1 BUMP 4 If necessary install a second LA RAK onto the second 2 rail template by repeating steps 1 to 3 The LA RAK touring racks must be arranged so as to properly balance the K1 BUMP s centre of gravity Therefore if only two racks are used each one must be placed directly onto the K1 BUMP see Figure 10 Figure 10 Rigging a second LA RAK to the K...

Page 18: ...y install a third and a fourth LA RAK onto the first ones and secure each one by repeating steps 1 to 3 The LA RAK touring racks must be arranged so as to properly balance the centre of gravity of the K1 BUMP Therefore if four racks are used they must be arranged in two dual rack columns see Figure 11 A maximum of four LA RAK can be rigged on top of the K1 BUMP a b Figure 11 Rigging a third a and ...

Page 19: ...or two LA RAK rails until it locks one rail for 1 or 3 LA RAK two rails for 2 or 4 LA RAK Figure 12 Installing the rack stabilizer chains not represented for visibility purposes 7 Screw in the safety screw and place the front motor chain into the groove of the rack stabilizer1 Figure 13 Securing the rack stabilizer and the front motor chain ...

Page 20: ...AK is 1 or 3 place the front motor chain and a rubber molding on the external side of the rack stabilizer see Figure 14 This will prevent the K1 BUMP from tilting when it is flown The K1 BUMP will recover stability after four K1 and or K1 SB enclosures have been rigged At this moment the front motor chain and the rubber molding must be slid back into the groove of the rack stabilizer see Figure 13...

Page 21: ...on 6 2 2 Array mounting The TOWER method consists in building the array by successively adding 4 enclosure blocks Each block called TOWER ships onto an L ACOUSTICS K1 CHARIOT cart The fully integrated rigging system on K1 and K1 SB allows assembling the enclosures and K1 BUMP with no need for any external fastening accessory The following procedure describes how to fly a vertical array of eight K1...

Page 22: ...e R BLP enters and locks Figure 15 0 angle setting 6 Attach the K1 BUMP to the TOWER 1 as described below see also Figure 16 a Remove the four R BLP from the K1 BUMP main frame and let them hang b Lower the K1 BUMP so as to align the front rigging points with both angle arm oblong holes on the TOWER 1 and attach them use two R BLP c Lift both rear arms out of TOWER 1 and attach them to the K1 BUMP...

Page 23: ...e that NO yellow stickers located on the rear arms are visible b Select the variable setting by pulling on the angle unlocking latch until a click is heard Check that the variable setting is selected on each latch by making sure that a yellow sticker is visible c Pre select the desired angle remove the R BLP hold it facing to the desired angle hole and slide the angle arm until the R BLP enters an...

Page 24: ... system RIGGING PROCEDURES RIGGING PROCEDURES RIGGING PROCEDURES RIGGING PROCEDURES VERSION 2 0 K1_RM_EN_2 0 w w w l a c o u s t i c s c o m 22 22 22 22 Figure 17 Verifying attachment and pre selecting the angles c L c L a L b L Yellow sticker on latch a L a L NO yellow sticker on rear arm ...

Page 25: ... a c o u s t i c s c o m 23 23 23 23 8 On both sides of each enclosure except for the bottom one select the fix setting by pressing the angle locking pushbutton Figure 18 Selecting the fix setting Angle locking pushbutton ...

Page 26: ...their locking position and a shlack noise should be heard ALWAYS check that all inter enclosure angles have reached their locked position by making sure that NO yellow stickers located on the angle locking latches are visible except on the bottom enclosure 10 Remove the K1 CHARIOT from TOWER 1 as described below a Remove both front R BLP from the bottom enclosure while holding the K1 CHARIOT b Rem...

Page 27: ...chment and pre select the angles for the TOWER 2 by repeating step 7 Also pre select the angle for the top enclosure 14 Attach the front rigging points between TOWER 1 and TOWER 2 as described below a Lower the TOWER 1 so as to align the front rigging points with both angle arm oblong holes on TOWER 2 b Attach both points by using two R BLP Figure 20 Attaching TOWER 2 to TOWER 1 front rigging poin...

Page 28: ...losures of TOWER 2 except on the bottom one see step 8 Figure 21 Selecting the fix setting on TOWER 1 and TOWER 2 16 Raise the array until the K1 CHARIOT wheels are off the ground Note As the array is raised all angle latches should subsequently take their locking position and a shlack noise should be heard ALWAYS check that all inter enclosure angles have reached their locked position by making s...

Page 29: ...on both sides of the array grabbing the bottom handles of TOWER 2 pull towards the back while lowering the array until both K1 CHARIOT front wheels touch the ground c Continue lowering the array until the TOWER 2 and TOWER 1 rear corners are in contact Stop lowering the array at the exact moment when both TOWER rear corners are in contact so as to avoid putting too much stress on the K1 CHARIOT wh...

Page 30: ...o the main rigging structure using two safety slings not provided 9 2 6 2 3 Array removal All along the disassembling procedure Strictly follow the sequence of the successive steps Ensure that each BLP is fully inserted by pulling on it For clarity purposes the loudspeaker cable removing procedure will not be described The loudspeaker cables will not be represented on the figures 1 Detach both saf...

Page 31: ...of TOWER 2 pull backwards while lowering the array until both K1 CHARIOT front wheels touch the ground Stop lowering the array at the exact moment when both K1 CHARIOT front wheels touch the ground so as to avoid putting too much stress on the K1 CHARIOT wheels c Remove both rear R BLP of enclosure 5 see Figure 24 and put them back in their storage locations d Pull back both rear arms of enclosure...

Page 32: ...ing the hoist controller and two on both sides of TOWER 2 grabbing handles to prevent it from swinging frontward raise the array until TOWER 2 is hinging from its front rigging points 7 On both sides of each enclosure from 2 to 5 select the variable setting by pulling on the angle unlocking latch until a click is heard In the variable setting a yellow sticker must be visible on the angle unlocking...

Page 33: ...m twisting and put them in their storage locations both angle arms should automatically slide in c On both sides of enclosure 4 put the front top R BLP in its storage location the angle arm is locked in shipping position Figure 26 Detaching the front rigging points 10 Remove TOWER 2 from the rigging location 11 For arrays of more than 8 enclosures repeat steps 3 to 10 until all TOWERS but TOWER 1 ...

Page 34: ... four wheels are laid on the ground Stop lowering the array at the exact moment when all four bottom enclosure front angles have collapsed 15 Detach K1 BUMP from TOWER 1 as described below a Remove both rear R BLP from K1 BUMP and let them hang b Pull back both rear arms of TOWER 1 they should lock back into the top enclosure c Remove both front R BLP from K1 BUMP and let them hang Figure 27 Separ...

Page 35: ... m 33 33 33 33 17 On both sides of the top enclosure remove the front top R BLP the angle arm should automatically slide in and put it in its storage location the angle arm is locked in shipping position Figure 28 Preparing TOWER 1 for shipping ...

Page 36: ... locations on the K1 BUMP main frame Note These locations are located inside or outside the frame The inner locations can help for shipping Figure 29 R BLP shipping locations on the frame 20 Lower the K1 BUMP until it is laid on the ground 21 If necessary remove the LA RAK touring racks by following procedure 6 1 2 in the reversed sequence 22 Remove the motor hooks from the K1 BUMP 23 Set the K1 B...

Page 37: ... of the system before installation 6 3 2 Array mounting The CATERPILLAR method consists in building the array by adding the enclosures one by one Each enclosure ships onto an L ACOUSTICS K1 PLA dolly board The fully integrated rigging system on K1 and K1 SB allows assembling the enclosures and K1 BUMP with no need for any external fastening accessory The following procedure describes how to fly a ...

Page 38: ...oth sides of each enclosure ensure that the variable setting is selected by pulling on the angle unlocking latch In the variable setting a yellow sticker must be visible on the angle unlocking latch Figure 31 Setting the variable position 3 On both sides of each enclosure except for enclosure 1 lift out the rear arm and attach it to the adjacent enclosure use two R BLP Figure 32 Attaching the rear...

Page 39: ... 6 If necessary install LA RAK touring racks on the K1 BUMP 6 1 2 7 Raise the K1 BUMP in the horizontal orientation to more than 0 7 m 2 3 ft height Figure 33 Pre selecting the angles 5 example 8 On the enclosure 1 lift out both rear arms and attach them to the K1 BUMP rear rigging points use two R BLP The K1 BUMP must be installed with laser slits oriented towards the front of the array or REAR i...

Page 40: ...aight ball locking pin from each K1 PLA by pulling on the lanyards Figure 35 Removing S BLP from K1 PLA 10 Raise the array until the enclosure 1 is flown K1 BUMP in the horizontal position the K1 PLA should separate from enclosure 1 11 With 2 people one on each side lift the front of enclosure 1 and attach both angle arm oblong holes to the K1 BUMP front rigging points use two R BLP Figure 36 Atta...

Page 41: ...from enclosure 2 Have on person holding the last enclosure to prevent array rough movements 13 With 2 people one on each side lift the front of enclosure 2 and attach both angle arm oblong holes to the enclosure 1 front rigging points use two R BLP Figure 37 Attaching front rigging points between enclosures 1 and 2 WARNING b L a L ...

Page 42: ... 15 Repeat steps 12 to 14 until all enclosures composing the array are flown 16 If a KARA downfill array is intended to be rigged attach it under the bottom K1 6 4 2 17 Fly the array at desired trim height and adjust the site and azimuth angles 9 4 9 5 Check that NO yellow stickers are visible on the angle locking latches and on the rear angle arms to ensure that the inter enclosure angles and rea...

Page 43: ...ay so as to prevent it from swinging For clarity purposes the loudspeaker cable removing procedure will not be described The loudspeaker cables will not be represented on the figures 1 Detach both safety slings from the K1 BUMP 9 2 2 If a KARA downfill array has been rigged remove it from the bottom K1 6 4 3 3 Take down the array until the bottom enclosure is reaching 0 3 m 1 ft height 4 Attach a ...

Page 44: ...OCEDURES VERSION 2 0 K1_RM_EN_2 0 w w w l a c o u s t i c s c o m 42 42 42 42 5 On both sides of the first four enclosures select the variable setting by pulling on the angle unlocking latch until a click is heard In the variable setting a yellow sticker must be visible on the angle unlocking latch Figure 40 Selecting the variable setting IMPORTANT Yellow sticker ...

Page 45: ...ached a stable hanging position The rear rigging points must remain attached to prevent the bottom enclosure from falling d Have two people pulling back the bottom enclosure while lowering the array until the four K1 PLA wheels are laid on the ground Have one person pulling back the bottom enclosure at all time while the array is been lowered e Repeat steps a to d three times again Have one person...

Page 46: ...GGING PROCEDURES RIGGING PROCEDURES VERSION 2 0 K1_RM_EN_2 0 w w w l a c o u s t i c s c o m 44 44 44 44 7 On both sides of the four landed enclosures remove the angle R BLP slide in the angle arm and put the R BLP into its storage location the angle arm is locked in shipping position Figure 42 Putting the angle arm in shipping position ...

Page 47: ...ld lock back into the enclosures and a yellow sticker should be visible on each one Figure 43 Detaching rear rigging points between all enclosures including K1 BUMP 10 Lower the K1 BUMP until it is laid on the ground 11 If necessary remove the LA RAK touring racks from the K1 BUMP by following procedure 6 1 2 in the reversed sequence 12 Remove the motor hooks from the K1 BUMP 13 Set the K1 BUMP in...

Page 48: ...SOUNDVISION Software Mechanical Data section to verify the mechanical conformity of the system before installation The KARA and KARA DOWNK1 fully integrated rigging systems allow assembling the array with no need for any external accessory The following procedure describes how to mount a vertical array of six KARA under a K1 array by successively adding two 3 KARA arrays called ARRAY 1 and ARRAY 2...

Page 49: ...ne inserted into a yellow link hole and the bottom one inserted into angle hole 0 2 4 Figure 44 Inter enclosure connection check for ARRAY 1 3 On KARA 1 take the 4 arms out as follows repeat for each side a Remove the front top R BLP from storage position rotate the front arm up slide it down and secure by re inserting the R BLP into the yellow link hole b Remove the rear top R BLP slide the angle...

Page 50: ...t the KARA 1 rigging arms pass through the 4 slits and secure by re inserting the 4 R BLP Figure 46 Connecting KARA DOWNK1 to ARRAY 1 5 Raise the K1 array slightly higher than the KARA DOWNK1 and place ARRAY 1 beneath it 6 Connect the rear rigging points between the K1 and the KARA DOWNK1 as follows a Remove both rear R BLP from the bottom K1 and let them hang b Remove both rear link R BLP between...

Page 51: ...inserting the front bottom R BLP on the K1 Figure 48 Front rigging point connection between KARA DOWNK1 and K1 8 With 2 people working simultaneously on each side of ARRAY 1 connect the rear rigging points between KARA 1 and KARA 2 3 as follows a Grab the back handle of KARA 2 and rotate KARA 2 3 upwards so as to align the rear rigging point between KARA 2 and KARA 1 b Attach the rear bottom link ...

Page 52: ...the R BLP into the corresponding angle hole 0 2 4 or 1 3 5 7 5 10 d Repeat for KARA 3 Figure 50 ARRAY 1 inter enclosure angle setting 11 Place another full KARA flight case at the rigging location and remove the lid Direct the front face of the 3 KARA array towards the audience In the following the array will be designated as ARRAY 2 and the enclosures as KARA 4 to KARA 6 from top to bottom 12 Che...

Page 53: ... the array to a height for which the angle arms of ARRAY 2 are comfortably reachable 17 With 2 people working simultaneously on each side of the array connect both rear rigging points between ARRAY 1 and ARRAY 2 as follows a Remove the KARA 4 rear top R BLP from storage position slide the angle arm so as to align the cursor with the desired angle value and secure by re inserting the R BLP into the...

Page 54: ...not be described The loudspeaker cables will not be represented on the figures 1 Lower the array to a height for which the angle arms of ARRAY 2 are comfortably reachable 2 With 2 people working simultaneously on each side of ARRAY 2 set the inter enclosure angles to 0 as follows a While grabbing the back handle of KARA 6 remove the rear top R BLP of KARA 6 b Rotate KARA 6 so as to align the curso...

Page 55: ...oth rear rigging points between ARRAY 1 and ARRAY 2 as follows a While grabbing the back handle of KARA 5 remove the rear bottom link R BLP from KARA 3 and re insert it into the bottom storage hole b Rotate ARRAY 2 downwards and place the rear corners into the tray while still suspended from the front connecting points c Remove the rear top angle R BLP from KARA 4 slide the angle arm so as to alig...

Page 56: ...t bottom link R BLP and re insert them into the bottom storage holes d Rotate both KARA 4 front arms down and re insert both R BLP into the top storage holes Figure 57 Front rigging point disconnection between ARRAY 2 and ARRAY 1 8 Push ARRAY 2 away from the rigging location and put the flight case lid on 9 Lower the array to a height for which the angle arms of ARRAY 1 are comfortably reachable a...

Page 57: ...t case tray Figure 58 Rear rigging point disconnection between KARA 2 and KARA 1 13 With 2 people working simultaneously on each side of the array disconnect the front rigging points between the KARA DOWNK1 and the K1 as follows a Grab the front of the KARA DOWNK1 and remove the front bottom R BLP from the bottom K1 b Rotate the KARA DOWNK1 downwards until the KARA 3 front corners are installed in...

Page 58: ... R BLP from the bottom K1 b Rotate KARA 1 downwards so as to align the rear rigging points between KARA 1 and KARA 2 and insert both rear bottom link R BLP on KARA 1 c Re insert both rear R BLP on the K1 Figure 60 Rear rigging point disconnection between KARA DOWNK1 and K1 15 Remove ARRAY 1 from under the K1 array 16 Remove the KARA DOWNK1 from ARRAY 1 as follows a Remove the 4 R BLP from the KARA...

Page 59: ... the front arm up rotate down and secure by re inserting the R BLP into the top storage hole b On each side of KARA 1 remove the rear top angle R BLP slide the angle arm so as to align the cursor with the storage position and secure by re inserting the R BLP into the top storage hole c Put the flight case lid on Figure 62 Setting ARRAY 1 for transport a L b L ...

Page 60: ...igns of deformation fissure or corrosion They must be securely fixed to the enclosure Any enclosure incorporating a part showing signs of defect must immediately be put aside and withdrawn from use to be inspected by qualified service personnel Ensure that each BLP on the K1 K1 SB K1 BUMP KARA DOWNK1 and K1 PLA operates normally by moving its mechanism and checking that it automatically returns to...

Page 61: ...d or K1 SB enclosures per K1 BUMP Material Polyester powder coated high grade steel Included accessories One adjustable sling one rack stabilizer four shackles eight BLP Not included accessory K1 DELTA plate 6 5 kg 14 3 lbs with three shackles 1 The M6 notation refers to the European standard see applicable external documentation 2 Installation safety limits are specified in SOUNDVISION Software w...

Page 62: ...aximum of 6 KARA enclosures per KARA DOWNK1 Material Polyester powder coated steel 1 Installation safety limits are specified in SOUNDVISION Software which is designed to help with L ACOUSTICS product implementation Reference K1 CHARIOT Dimensions L x H x D 1441 5 x 279 7 x 601 5 mm 56 7 x 11 x 23 7 inch Weight 45 kg 99 lbs Setup safety limits 1 Maximum of 4 K1 and or K1 SB enclosures per K1 CHARI...

Page 63: ...ntally with laser lens oriented forwards 4 Screw in the four M4 Torx screws T20 5 Connect the XLR 3 cable to the sensor 6 Calibrate the inclinometer and laser by following the manufacturer recommendations Figure 64 LAP TEQ mounted to K1 BUMP Figure 65 ProSight mounted to K1 BUMP ProSight mounting procedure Not included material XLR 6 cable 5 mm hex key four M6 flat head bolts and adapted keys medi...

Page 64: ... used when LA RAK touring racks are mounted on the K1 BUMP see Figure 67 and 6 1 2 Up to 24 K1 and or K1 SB enclosures 4 LA RAK touring racks and corresponding cable set can be flown as a vertical line source array using the K1 BUMP flying structure ALWAYS secure a flow array using two safety slings ALWAYS refer to the mechanical data and warning indications provided in SOUNDVISION software Mechan...

Page 65: ...ling provided with the K1 BUMP must be used in case of climbing hoist setup in order to prevent the chain bag to lie in front of the enclosures located on top of the array Figure 68 a Standard and b climbing hoist setups a b Electric chain hoists Chain bags Ceiling structure No adjustable sling Adjustable sling ...

Page 66: ...2 0 K1_RM_EN_2 0 w w w l a c o u s t i c s c o m 64 64 64 64 Sling length setting procedure 1 Free the inserted link from the setting shackle by pulling it up 2 Slide the chain through the setting shackle so as to select the desired length 3 Insert the appropriate link into the setting shackle and let the load hang Figure 69 Sling length setting Setting shackle Inserted link Load ...

Page 67: ...muth angle setting Array azimuth angle setting needs the addition of the K1 DELTA and two rear motors The recommended spacing between the suspension points on the ceiling structure is a minimum of 1 m 3 3 ft Variations from 10 to 10 are performed by setting the relative heights between both rear rigging points Figure 71 Setting the azimuth angle using K1 DELTA and two rear motors front views 10 az...

Page 68: ...w w w l a c o u s t i c s c o m ...

Page 69: ...w w w l a c o u s t i c s c o m ...

Page 70: ...w w w l a c o u s t i c s c o m ...

Page 71: ...w w w l a c o u s t i c s c o m ...

Page 72: ...1_RM_EN_2 0 Distribution date December 20th 2010 2010 L ACOUSTICS All rights reserved No part of this publication may be reproduced or transmitted in any form or by any means without the express written consent of the publisher Printed on recycled paper ...

Reviews: