background image


K2_RM_EN_0.5


w w w . l - a c o u s t i c s . c o m


2 3   /   52


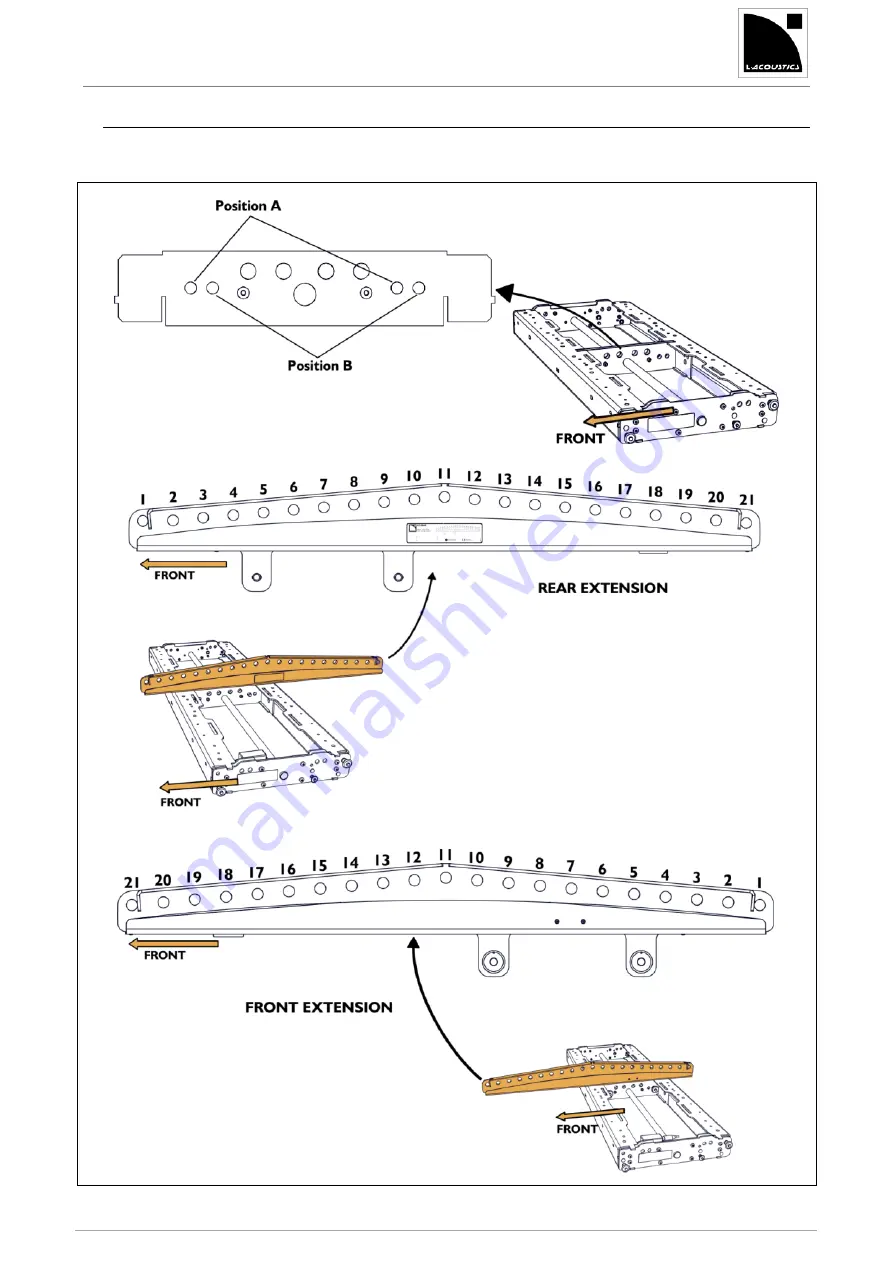
Attaching K2-BAR on K2-BUMP 

PROCEDURE D.

1.


Refer to your SOUNDVISION model to identify the extension and position of the bar. 


Summary of Contents for WST K2

Page 1: ...K2 WST enclosure RIGGING MANUAL VERSION 1 0 K2_RM_EN_1 0 w w w l a c o u s t i c s c o m 1 52 ...

Page 2: ... warnings in Mechanical Data section 9 Be cautious when flying a loudspeaker array Always verify that no one is standing underneath the loudspeaker array when it is being raised As the array is being raised check each individual element to make sure that it is securely fastened to the adjacent element Never leave the array unattended during the installation process As a general rule L ACOUSTICS re...

Page 3: ...an be set with laser like accuracy up to a generous 10 allowing the optimization of the vertical coverage with SPL smoothly spread across the audience Horizontally the K2 coverage pattern can be adjusted to sector and match any audience or specific room geometries Four different settings are possible two symmetric 70 or 110 and two asymmetric 90 as 35 55 or 55 35 Thanks to its full range capabilit...

Page 4: ...ing 14 4 2 Flying 15 5 SUBSET PROCEDURES 17 Preparing a block of 4 K2 17 PROCEDURE A Preset the inter enclosure angles 19 PROCEDURE B Stacking K2 on K2 BUMP 20 PROCEDURE C Attaching K2 BAR on K2 BUMP 23 PROCEDURE D Attaching a block of four K2 under K2 BUMP 25 PROCEDURE E Attaching a block of four K2 under K2 27 PROCEDURE F Attaching a block of four K2 under a K1 system element 31 PROCEDURE G Atta...

Page 5: ...rovided with two bow shackles WLL 3 25 t K2 BAR Rigging bar designed to provide a wider range of site angles for the K2 BUMP Provided with two bow shackles WLL 3 25 t K1 DELTA Rigging plate designed to be used optionally with the K2 BUMP to adjust the azimuth angle of flown K2 K1 K1 SB arrays K2 BUMPFLIGHT Flight case dedicated to the rigging elements of the K2 system In order to be used as storag...

Page 6: ... MANUAL VERSION 1 0 K2_RM_EN_1 0 w w w l a c o u s t i c s c o m 6 52 K2 K1 SB LA RAK K2 BUMP K2 BAR K2 LINK K1 DELTA K2 RACKMOUNT K2 CHARIOT LA SLING2T K2 BPCHAIN SOUNDVISION Main components involved in the K2 rigging process ...

Page 7: ...gh The rated WLL is an indication of the element resistance to tensile stress For complex mechanical systems such as loudspeaker arrays WLLs cannot be used per se to determine the maximum number of enclosures within an array or to assess the safety of a specific array configuration Mechanical modeling with SOUNDVISION The working load applied to each linking point along with the corresponding safe...

Page 8: ... with the K1 rigging system 3 1 Elements for enclosure rigging On both sides the K2 enclosure integrates two arms to connect to another element of the rigging system such as an enclosure or to a flying frame At the front a rotating arm provides a fixed point around which the enclosure can freely rotate until its connection at the rear At the rear a sliding arm allows the inter element angle settin...

Page 9: ...portation the blocks must have an inter enclosure angle of 10 to avoid any separation of the enclosures This angle must be set using the enclosure rear rigging arm pin The automatic locking system must remain unloaded The K2 CHARIOT rear rigging arm must be at its 15 site angle position TIPPING HAZARD If the enclosures are not pinned at 10 they can separate at the back causing the stack to tip ove...

Page 10: ...r SOUNDVISION model to know which holes to use With K1 SB and a single motor the hole no 2 provides a 0 site angle By adding a K2 BAR to the K2 BUMP the site angle range can be increased 21 holes are available on the K2 BAR which can be attached to the K2 BUMP as a rear or a front extension and in position A or B thus offering a total of 84 discrete positions for pick up points The rear extension ...

Page 11: ...MP Alternative Two K2 BAR attached on the sides The K2 system can be flown under a K1 system element K1 K1 SB or K1 BUMP The K2 LINK is designed to make the rigging systems compatible It provides three holes and therefore three angles between the top K2 enclosure and the bottom K1 element 0 25 2 5 and 5 ...

Page 12: ... K2 RACKMOUNT is designed to stack one or two LA RAK on top of a flown array It is composed of four rails and a stabilizer The rails are screwed on the K2 BUMP Their number and position depend on the number of racks The K2 RACKMOUNT must be used along with either one or two K2 BAR 1 LA RAK 2 rails 2 K2 BAR 2 LA RAK 4 rails 1 K2 BAR ...

Page 13: ...are mounted side by side the stabilizer is used to prevent the assembly from tipping or toppling over The stabilizer traps one of the chains used to lift the assembly 0 site angle 30 positive site angle Refer to APPENDIX A PICKUP POINTS GUIDELINES for more information ...

Page 14: ... are visible on the front and on both sides of the array K2 enclosures on K1 SB Stack as many K1 SB enclosures as necessary Refer to the K1 rigging manual to set up the K1 SB part of the array Position and attach a K2 BUMP on the K1 SB stack Refer to PROCEDURE H Position and attach an upside down K2 on the K2 BUMP and add as many K2 enclosures on top of the first one Refer to PROCEDURE C ...

Page 15: ... If necessary stack one or two LA RAK on the K2 BUMP Refer to PROCEDURE I Refer to APPENDIX A when stacking only one LA RAK Attach the shackles Refer to SOUNDVISION for the number and position of the shackles Lift the assembly so you can position a block of four K2 under it Attach the block of four K2 to the K2 BUMP Refer to PROCEDURE E Verify that the rear rigging arms are secured by pins and tha...

Page 16: ...o SOUNDVISION for the number and position of the shackles Lift the assembly so you can position a block of K1 SB under it Attach the K1 SB block to the K2 BUMP Refer to PROCEDURE H Repeat the last two steps until the K1 SB array is complete K2 array setup Prepare all the blocks of 4 K2 necessary to build the array If a block is not built already refer to PROCEDURE A Preset the inter enclosures ang...

Page 17: ... a K2 enclosure on K2 CHARIOT Fully rotate the rear rigging arms of the K2 CHARIOT Position the K2 enclosure on the K2 CHARIOT dolly Secure the enclosure at the front using the LINK hole Lift the rear of the enclosure and rotate the dolly rear rigging arm in its upward position Secure the enclosure using the LINK hole ...

Page 18: ...osure on the first one Keep holding the enclosure in position with the handles until the front rigging arm is secured While holding the handle rotate the front rigging arm and secure it with both LINK pins Slide the rear rigging arm and secure it with both pins in the LINK and 10 holes 3 Make sure the automatic locking system button is unloaded If the button has been pressed pull to disengage the ...

Page 19: ... i c s c o m 1 9 52 Preset the inter enclosure angles PROCEDURE B On both sides Remove the pin from its current angle hole Position the pin at the chosen angle hole and slide the rigging arm until the pin goes in Press the lock button ...

Page 20: ...UMP PROCEDURE C 1 Prepare the K2 block top enclosure and turn it upside down on the K2 BUMP Take out and lock the rear and front rigging arms Define the K2 line site angle with the rear rigging arm Select a value between 0 25 and 7 5 and substract 3 to obtain the final site angle Remove the lower rear and front pins ...

Page 21: ...nd rear rigging arm to the K2 BUMP Slide the front rigging arm up and down to align the holes Secure the front rigging arm to the K2 enclosure Raise the enclosure to align the holes Push the locking system button to unblock the lock 3 Prepare the K2 block top enclosure Adjust the inter enclosure angle with the rear rigging arm Remove the lower front and rear pins ...

Page 22: ...2 Secure the front and rear rigging arm to the lower K2 enclosure Secure the front and rear rigging arm to the K2 BUMP Slide the front rigging arm up and down to align the holes Secure the front rigging arm to the top enclosure Raise the top enclosure to align the holes Push the locking system button to unblock the lock 5 Repeat steps 3 to 5 until the line is complete ...

Page 23: ...K2_RM_EN_0 5 w w w l a c o u s t i c s c o m 2 3 52 Attaching K2 BAR on K2 BUMP PROCEDURE D 1 Refer to your SOUNDVISION model to identify the extension and position of the bar ...

Page 24: ... K2_RM_EN_1 0 w w w l a c o u s t i c s c o m 2 4 52 2 Remove the pins and lift the K2 BAR using the motor 3 Turn the K2 BUMP FLIGHT 90 lower the K2 BAR and pin it according to the chosen flying option position A or B in front or rear extension ...

Page 25: ...rming this procedure Refer to PROCEDURE B Rotate the arm and secure it with the K2 BUMP pin Lower the K2 BUMP and secure the connection with the K2 pin If you cannot insert the pin move the frame back and fortt 3 Lower the rear of the K2 BUMP 4 Attach the rear rigging arm to the frame Slide the arm to its 5 position Secure the arm with the frame pin Preset the angle at 5 with the enclosure pin Do ...

Page 26: ... K2_RM_EN_1 0 w w w l a c o u s t i c s c o m 2 6 52 5 Raise the array to lock the enclosures 6 Remove the K2 CHARIOT Hold the dolly with one hand Remove the back pin on both sides Hold the dolly with one hand Remove the front pin on both sides ...

Page 27: ...nclosure angles Preset the K2 inter enclosure angles before performing this procedure Refer to PROCEDURE B Rotate the arm to align its hole with the K2 rigging hole Pin the arm in the LINK hole of the flown array Lower the flown array and secure the assembly with the LINK pin If you cannot insert the pin move the flown array back and forth with enclosure handle ...

Page 28: ...osure RIGGING MANUAL VERSION 1 0 K2_RM_EN_1 0 w w w l a c o u s t i c s c o m 2 8 52 8 Lock the inter enclosure angles of the block Raise the array The lower K2 enclosures swing and the latches automatically lock ...

Page 29: ...eels inside the dolly Pull back the bottom enclosures while lowering the array until the array and the top enclosure of the block are in contact Slide the arm upward and secure it with the pin using the LINK hole Position the pin at the entrance of the chosen angle hole and slide the rigging arm until the pin goes in Press the lock button ...

Page 30: ...a c o u s t i c s c o m 3 0 52 10 Raise the array to lock the inter enclosure angle The latches automatically lock 11 Remove the K2 CHARIOT Hold the dolly with one hand Remove the back pin on both sides Hold the dolly with one hand Remove the front pin on both sides ...

Page 31: ...nter enclosure angles before performing this procedure Refer to PROCEDURE B 1 Attach the front rigging arm on both sides Rotate the arm to align its hole with the K1 K1 SB rigging hole Pin the arm on the flown array Lower the flown array and secure the assembly with the LINK pin If you cannot insert the pin move the flown array back and forth with enclosure handle ...

Page 32: ...K2 WST enclosure RIGGING MANUAL VERSION 1 0 K2_RM_EN_1 0 w w w l a c o u s t i c s c o m 3 2 52 2 Lock the inter enclosure angles Raise the array ...

Page 33: ...he K2 LINK interfaces to the K1 K1 SB Turn the wheels inside the dolly Pull back the bottom enclosures while lowering the array until only the front wheel touches the ground On both sides attach a K2 LINK at the back of the K1 SB enclosure Do not pin K2 LINK on K2 ...

Page 34: ...MANUAL VERSION 1 0 K2_RM_EN_1 0 w w w l a c o u s t i c s c o m 3 4 52 4 Attach the K2 LINK to the K2 enclosure Lower the array Push the K2 LINK to guide it into the K2 rigging Secure the K2 LINK on the K2 rigging middle hole 5 ...

Page 35: ..._0 5 w w w l a c o u s t i c s c o m 3 5 52 5 Remove the K2 CHARIOT Raise the array Hold the dolly with one hand Remove the back pin on both sides Hold the dolly with one hand Remove the front pin on both sides ...

Page 36: ... BUMP PROCEDURE H 1 Slide out K1 SB front rigging arm and pin it at 0 on both sides 2 Attach the K2 BUMP to the K1 elements block Remove the K2 BUMP rear and front pins on both sides Lower the K2 BUMP so it rest on the topmost enclosure Rotate the rear rigging arm and pin it on the frame Pin the front rigging arm on the frame ...

Page 37: ...with 13 mm hex socket 1 Remove the nuts and bolts from the K2 RACKMOUNT rails 2 Position and secure as many rails as necessary on the K2 BUMP 1 LA RAK 2 LA RAK 3 Secure the rails on the K2 BUMP Use the wrench with a 13 mm hex socket and the electric screwdriver Set the torque to 5 N m Before securing the side rails make sure the frame pins are on the outside ...

Page 38: ...1 0 K2_RM_EN_1 0 w w w l a c o u s t i c s c o m 3 8 52 4 Install as many K2 BAR as necessary When installing a single K2 BAR at the center of the frame make sure the pins are inserted between the central bar of the frame and the closest rail ...

Page 39: ...the LA RAK on the rails Secure the LA RAK with the coupling bars Insert the spring loaded safety in the LA RAK rails give a quarter turn and slide the bar until the safety locks into place Insert the coupling bars from the back for a negative angle rear extension from the front for a positive angle front extension Always insert so the metallic safety is pointed upward depending on the tilt angle ...

Page 40: ...tacking 2 LA RAK side by side on K2 BUMP insert the stabilizer between the two racks Release the locking system by raising and turning the handle Insert the stabilizer on the side opposite to the K2 BAR from the front in rear extension from the rear in front extension Secure the stabilizer by locking the handle ...

Page 41: ...A K2 system can be lifted using one or two motors One or two motors with K2 BUMP alone Two motors with K2 BUMP and one K2 BAR Two with K2 BUMP and two K2 BAR K2 BUMP with LA RAK OK NOT OK OK With a single LA RAK on top of a K2 BUMP always implement a bridle suspension using two LA SLING2T ...

Page 42: ...g 8 mm Steels grade 8 Nominal length incl hooks 1 m 39 4 in Maximum sling angle βmax 60 Load rating 2 8 t for β 0 45 2 t for β 46 60 Never use slings shorter that 1 m 39 4 in One leg of the LA SLING2T must always be connected to the K2 BAR hole no 1 i e the closest to the array The other leg can be connected to holes no 11 to no 21 Refer to your SOUNDVISION simulation to choose the hole ...

Page 43: ... w w l a c o u s t i c s c o m 4 3 52 K2 BUMP with no LA RAK OK NOT OK With two K2 BAR on a K2 BUMP do not implement a bridled suspension between the two bars Do not implement a bridled suspension on a single K2 BAR ...

Page 44: ... rear pickup point The recommended space between the two lifting point is 1 m 33 ft By adjusting the height of both pickup points you can adjust the azimuth angle from 10 to 10 K2 BPCHAIN with a climbing hoist With a climbing hoist you must use a K2 BPCHAIN adjustable sling to prevent the chain bag from hanging in front of the top enclosures of the array Electric chain hoists Climbing hoists ...

Page 45: ...TOOLCASE SSE ProSight TEQSAS LAP TEQ XLR 3 cable T20 Torx key Medium strength thread locker blue 1 Remove the four M4 Torx screws T20 from the plate 2 Put thread locker in the four threaded inserts 3 Position the LAP TEQ so it points toward the front of the K2 BUMP 4 Secure the LAP TEQ with the four screws 5 Connect the XLR 3 cable to the sensor 6 Follow the manufacturer instructions to calibrate ...

Page 46: ... compression driver DOSC waveguide Nominal impedance LF 2 8 Ω MF 8 Ω HF 16 Ω RMS power handling LF 450 W MF 320 W HF 160 W Connectors IN 1 8 point PA COM LINK 1 8 point PA COM Rigging components Captive 4 point rigging system Inter enclosure angles 0 25 1 2 3 4 5 7 5 or 10 Dimensions Physical data Weight net 56 kg 123 2 lb Cabinet first grade Baltic birch plywood Finish Dark Grey brown proprietary...

Page 47: ...int SpeakON Rigging components2 Captive 4 point rigging system Inter enclosure angles 0 0 5 1 1 5 2 2 5 3 4 or 5 Handles integrated in the cabinet Dimensions Physical data Weight net 83 kg 183 lb Cabinet Baltic birch plywood Finish Dark Grey brown Pantone 426C Pure white RAL 9010 Front Steel grill with anti corrosion coating Airnet acoustically neutral fabric Protection Rating IP45 Rigging compone...

Page 48: ... u s t i c s c o m 4 8 52 K2 BUMP Description Rigging frame for K2 enclosure Dimensions Weight 42 3 kg 93 3 lb Material High grade steel with anti corrosion coating K2 BUMP FLIGHT Description Flight case for the K2 system rigging elements Dimension s Weight 105 kg 231 lb ...

Page 49: ...tion Rigging bar for K2 BUMP Dimensions Weight 17 kg 37 5 lb Material High grade steel with anti corrosion coating K2 LINK Description Rigging interface for K2 and K1 K1 SB or K1 BUMP Dimensions Weight 1 8 kg 4 lb Material High grade steel with anti corrosion coating ...

Page 50: ...ing interface for stacking one or two LA RAK on top of a K2 array flown with a K2 BUMP Dimensions Weight 3 3 kg 7 3 lb Material Steel with anti corrosion coating Description Stabilizer for two LA RAK side by side on top of a K2 array flown with a K2 BUMP Dimensions Weight 2 2 kg 4 lb Material Steel with anti corrosion coating ...

Page 51: ...scription Rigging element for the K1 system Dimensions Weight 9 5 kg 21 lbs Material High grade steel with anti corrosion coating K2 CHARIOT Description Transport dolly for the K2 enclosure Dimensions Weight 50 kg 110 2 lb Material Steel with anti corrosion coating ...

Page 52: ...o u s t i c s c o m 5 2 52 Document reference K2_RM_EN_1 0 Distribution date December 6 2013 2013 L ACOUSTICS All rights reserved No part of this publication may be reproduced or transmitted in any form or by any means without the express written consent of the publisher ...

Reviews: