6
7
SAFETY NOTICE:
IF THIS APPLIANCE IS NOT PROPERLY INSTALLED, OPERATED AND
MAINTAINED, A HOUSE FIRE MAY RESULT.
TO REDUCE THE RISK OF FIRE, FOLLOW THE INSTALLATION
INSTRUCTIONS. FAILURE TO FOLLOW INSTRUCTIONS MAY RESULT IN
PROPERTY DAMAGE, BODILY INJURY OR EVEN DEATH.
CONTACT LOCAL BUILDING OR FIRE OFFICIALS ABOUT RESTRICTIONS
AND INSTALLATION INSPECTION REQUIREMENTS IN YOUR AREA.
Please read this manual carefully before installing and lighting the stove. If you have any
doubt, please contact the selling Firm or the Producer.
THE CHIMNEY FLUE
The Chimney flue: our stoves’ “engine”
The chimney flue is a key element for the optimal functioning of our stoves.
General rules:
•
Each stove must have its own, adequately insulated, chimney flue to the roof - through it the
smoke will flow outside, by natural draft. DO NOT CONNECT THIS UNIT TO A CHIMNEY FLUE
SERVING ANOTHER APPLIANCE.
•
Each stove must be separated from combustible or flammable materials (wooden roofs,
matchboards and any plastic pipes) through a suitable insulating material, for at least 30 cm all
around. The insulation is also recommended when the chimney is installed inside a masonry. This
will prevent the cold air from creeping between the steel pipe and the wall. Furthermore, a good
insulation will be needed in case of passage in an open floor.
•
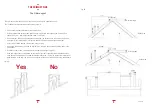
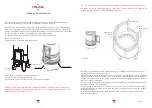
If the chimneypot is installed on a roof lower than a higher nearby roof, the distance must be
more than 5 meters. (FIG. 2 C)
•
The inner section of the chimney flue shall be uniform and without narrowings, possibly round
shaped, with smooth walls and corners not any higher than 45°.
•
The section of the chimney flue must be bigger than the diameter of the stove smoke pipe. For
our stoves we recommend a chimney flue diameter from 160 mm to 180 mm and a chimney flue
height of not less than 2,5 meters.
•
The connection between the stove smoke pipe and the chimney flue in the wall must be done
through a pipe fitting (90° or 135°). Moreover, the connection must not have more than two 90°
bends and it must have an horizontal length of no more than 2 meters with a gradient of 5%. We
recommend that the chimney flue is equipped with a condensate and soot collection chamber,
which shall end with an airtight door, accessible for cleaning. This will avoid unpleasant smells,
bad draft and frequent cleaning of the stove.
Fig. 2A
Fig. 2B
Fig. 2C
3-5 of 3-14
Summary of Contents for Stack
Page 2: ......
Page 10: ...1 7 of 1 41 ...
Page 15: ...1 12 of 1 41 ...
Page 16: ...1 13 of 1 41 ...
Page 17: ...1 14 of 1 41 ...
Page 18: ...di R Perino e S Neri S n c 1 15 of 1 41 ...
Page 19: ...di R Perino e S Neri S n c 1 16 of 1 41 ...
Page 20: ...di R Perino e S Neri S n c 1 17 of 1 41 ...
Page 21: ...di R Perino e S Neri S n c 1 18 of 1 41 ...
Page 22: ...di R Perino e S Neri S n c 1 19 of 1 41 ...
Page 23: ...di R Perino e S Neri S n c 1 20 of 1 41 ...
Page 24: ...di R Perino e S Neri S n c All holes Ø 6mm 1 21 of 1 41 ...
Page 25: ...1 22 of 1 41 ...
Page 26: ...1 23 of 1 41 ...
Page 27: ...1 24 of 1 41 ...
Page 28: ...1 25 of 1 41 ...
Page 29: ...1 26 of 1 41 ...
Page 30: ...1 27 of 1 41 ...
Page 31: ...1 28 of 1 41 ...
Page 32: ...1 29 of 1 41 ...
Page 33: ...1 30 of 1 41 ...
Page 34: ...1 31 of 1 41 ...
Page 35: ...1 32 of 1 41 ...
Page 36: ...1 33 of 1 41 ...
Page 37: ...1 34 of 1 41 ...
Page 48: ...2 4 of 2 57 ...
Page 49: ...2 5 of 2 57 ...
Page 50: ...2 6 of 2 57 ...
Page 51: ...2 7 of 2 57 ...
Page 52: ...2 8 of 2 57 ...
Page 53: ...2 9 of 2 57 ...
Page 54: ...2 10 of 2 57 ...
Page 55: ...2 11 of 2 57 ...
Page 56: ...2 12 of 2 57 ...
Page 57: ...2 13 of 2 57 ...
Page 58: ...2 14 of 2 57 ...
Page 59: ...2 15 of 2 57 ...
Page 60: ...2 16 of 2 57 ...
Page 61: ...2 17 of 2 57 ...
Page 62: ...2 18 of 2 57 ...
Page 63: ...2 19 of 2 57 ...
Page 64: ...2 20 of 2 57 ...
Page 65: ...2 21 of 2 57 ...
Page 66: ...2 22 of 2 57 ...
Page 68: ...2 24 of 2 57 ...
Page 69: ...2 25 of 2 57 ...
Page 70: ...2 26 of 2 57 ...
Page 71: ...2 27 of 2 57 ...
Page 72: ...2 28 of 2 57 ...
Page 73: ...2 29 of 2 57 ...
Page 74: ...2 30 of 2 57 ...
Page 75: ...2 31 of 2 57 ...
Page 76: ...2 32 of 2 57 ...
Page 77: ...2 33 of 2 57 ...
Page 78: ...2 34 of 2 57 ...
Page 79: ...2 35 of 2 57 ...
Page 80: ...2 36 of 2 57 ...
Page 81: ...2 37 of 2 57 ...
Page 82: ...2 38 of 2 57 ...
Page 83: ...2 39 of 2 57 ...
Page 84: ...2 40 of 2 57 ...
Page 85: ...2 41 of 2 57 ...
Page 86: ...2 42 of 2 57 ...
Page 87: ...2 43 of 2 57 ...
Page 88: ...2 44 of 2 57 ...
Page 89: ...2 45 of 2 57 ...
Page 90: ...2 46 of 2 57 ...
Page 91: ...2 47 of 2 57 ...
Page 103: ...INSTRUCTION MANUAL FOR INSTALLATION USE AND MAINTENANCE TYPE RNO 200 MODEL 3 2 of 3 14 ...
Page 121: ...4 6 of 4 40 ...
Page 122: ...4 7 of 4 40 ...
Page 123: ...4 8 of 4 40 ...
Page 128: ...4 13 of 4 40 ...
Page 129: ...4 14 of 4 40 ...
Page 130: ...4 15 of 4 40 ...
Page 133: ...4 18 of 4 40 ...
Page 134: ...4 19 of 4 40 ...
Page 138: ...4 23 of 4 40 ...
Page 139: ...4 24 of 4 40 ...
Page 140: ...4 25 of 4 40 ...
Page 145: ...4 30 of 4 40 ...
Page 146: ...4 31 of 4 40 ...
Page 147: ...4 32 of 4 40 ...
Page 152: ...4 37 of 4 40 ...
Page 153: ...4 38 of 4 40 ...
Page 154: ...4 39 of 4 40 ...

