U
S
A
&
C
ANADA
Ovens
O
PERATION
Rack levels 1 and 2 should be used depending on the size of the food being cooked. For best results we
recommend that the grill pan is not located on the uppermost shelf.
After preheating (between 5 and 10 minutes depending on the temperature required), set the cooking mode
for the food to be cooked. You can then place your food in the oven.
3.4. The oven dishes
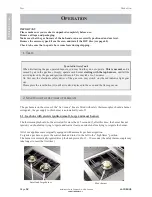
There are several different trays in your oven:
1.
The
drip pan or the pastry tray/cookie sheet
with
an enamelled coating. This is intended exclusively for
pastry-making or for ingredients to be grilled under the gas
or electric oven grill.
The large size of this tray means that it can be used as a
cooking tray itself but is generally used for very large
pieces of meat. You should not use it to cook poultry or
small roast.
2.
The
”shelf”/”rack” tray acts as a support
for all
trays which are used in this oven.
3.
The
large roasting dish in porcelain
(one dish per
stove)
4
3
2
1
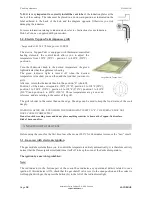
4.
Two
small lifted racks
which enable you to:
-
to place a roast in a terra cotta dish to sit on the one or two small racks in the large tray. Therefore, by
using this system one makes the most of the natural air convection, allowing for the air flow to travel round
and under the food.
-
to place to roast directly onto the rack in the large tray. The roast will remain seasoned as well as remai-
ning medium rare or rare if you desire.
By using the ”spit” concept, the hot air envelopes the entire piece of meat regardless of its size.
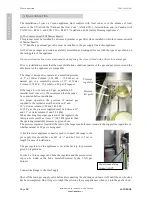
3.5. Instal lation of the ”shelf” tray or ”drip pan” or “oven racks”
The sliders of the oven and the ”shelf” tray or ”drip pan” or “oven racks” are supplied with stops in order to
avoid taking away the shelves by inadvertence; these shelves can be removed and replaced easily.
Stops
Stops
Slots
Slots
"Shelf" tray small oven
"Shelf" tray large oven
To use your oven in complete safety you must
set up the large tray or ”drip pan” or “oven rack”
correctly.
To position the large tray or drip pan at the required height, place it above the lateral oven sliders, with the
tray slots above the slider stops. Then push the tray to the very back of the oven until the stops are re-
inserted into the slots. Pull the large tray forward until the back of the tray is blocked by the stops of the
lateral oven sliders.
Page
60
Installation Guide Château G4 - USA Canada
LA CORNUE
08NOTINSG4/ULC-1
4
3
2
1
Summary of Contents for Chateau 120
Page 73: ......

