background image

en 

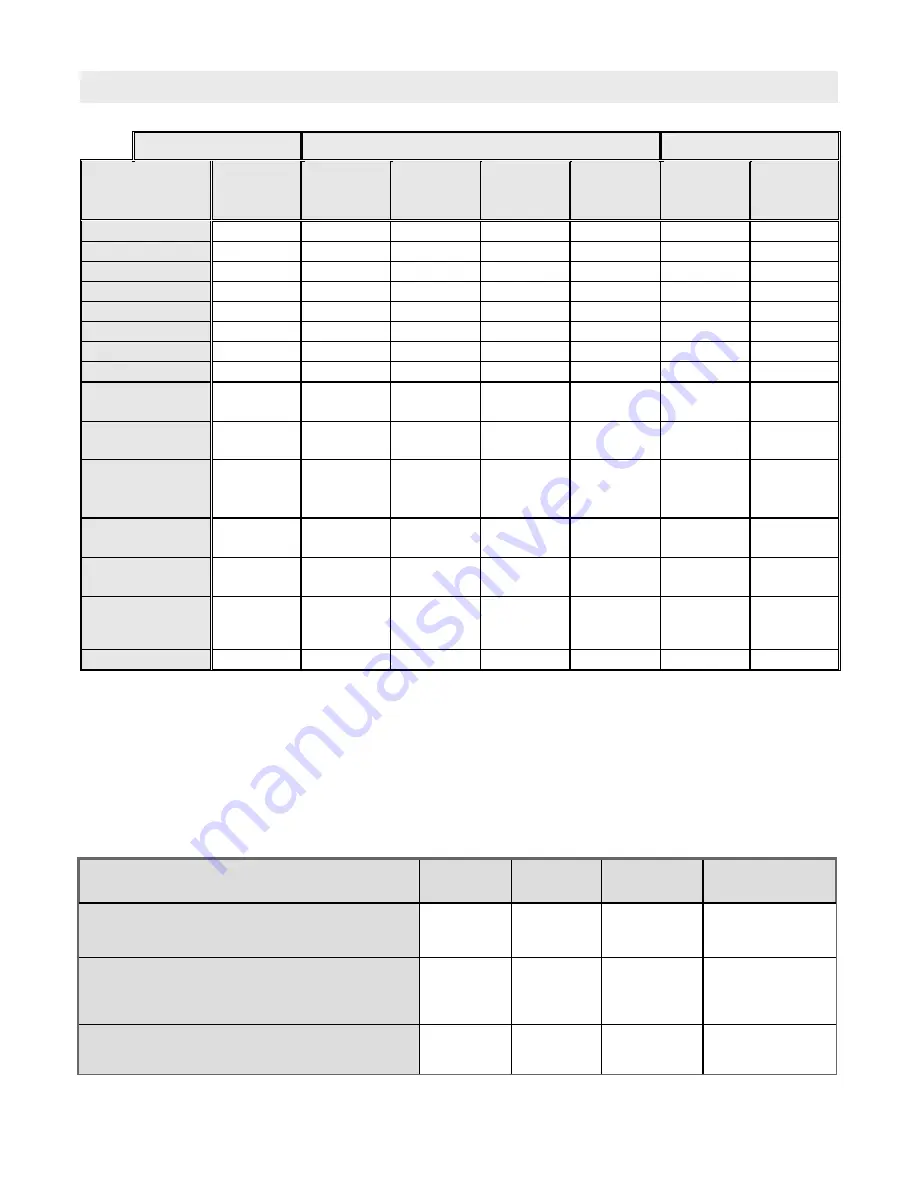
3. HOOD DIMENSIONS AND TECHNICAL INFORMATION 

Type with remote blower 

Tot. A 

Tot. W 

LED Lamps  Remote In-Line 

Blower 

G005 GA 4E RC  

(Château 75, Château 90)  


3,8 A 


460 W 


4 x 2,5 W 


EBI 600 

G005 GA 4E RC 


(Le Château 120, Le Château150, Le Château 
165, Grand Chatelet 135) 


7,6 A 


910 W 


4 x 2,5 W 


EBI 1200 

G005 GA 8E RC 


(Grand Palais 180) 


7,7 A 


920 W 


8 x 2,5 W 


EBI 1200 

GA = Remote In-Line Blower EBI 600 or EBI 1200 

Electrical rating for products intended for use in conjunction with remote In-Line blower separately sold: 


G 005 2E250 8E RC


G 005 2E250 4E RC


G 005 E250 4E RC


Grand 

Palais 180 

Château 

165 

Château 

150 

Grand 

Châtelet 

135 

Château 

120 

Château 

90 

Château 

75 

X 1  

(mm)


2000 

1850 

1700 

1550 

1400 

1100 

950 

X 2  

(mm)


1600 

1450 

1300 

1150 

1000 

700 

550 

X 3  

(mm)


1744 

1594 

1444 

1294 

1144 

844 

694 

X 4  

(mm)


1556 

1406 

1256 

1106 

956 

656 

465 

X 5  

(mm)


1534 

1384 

1234 

1084 

934 

624 

475 

X 6  

(mm)


598 

548 

498 

548 

398 

X 7  

(mm)


458 

408 

358 

408 

258 

Weight


kg


160 

150 

130 

110 

100 

80 

70 

Voltage


Volts


120 Va.c. 

60Hz 

120 Va.c. 

60Hz 

120 Va.c. 

60Hz 

120 Va.c. 

60Hz 

120 Va.c. 

60Hz 

120 Va.c. 

60Hz 

120 Va.c. 

60Hz 

Total power


Watt


920 

910 

910 

910 

910 

460 

460 

Number of 
integrated 
motor  

Number of 
filters 

Number of  
LED lights  

Diameter of the 
exhaust flange


mm


200 

200 

200 

200 

200 

150 

150 

Fixing screws  

10 

10 

10 

10 


Summary of Contents for Chateau 120

Page 1: ......

Page 2: ... Technical characteristics of hood equipment 7 3 LaCornue hood Dimensions and technical information 8 10 ASSEMBLY INSTRUCTIONS 11 16 ELECTRICAL DIAGRAM 17 18 WARRANTY 19 20 All of the characteristics are provided for information purposes only With the aim of constantly improving its production quality La Cornue may make modifications to its appliances in line technological develop ments CONTENTS ...

Page 3: ...pment manu facturer s guideline and safety standards such as those pub lished by the National Society for Heating Refrigeration and Air Conditioning Engineers ASHRAE and the local code authorities When cutting or drilling into wall or ceiling do not damage electrical wiring and other hidden utilities Ducted fans must always be vented outdoors CAUTION For general ventilating use only Do not use to ...

Page 4: ...network only a qualified electrician may connect the hood to the elec tric current In this case the electrician must connect the hood to a single phase alternating current circuit equipped with a bipolar differential switch WARNINGS 2 Risk of injury 3 Danger of electric shock 1 Installation Observe all governing codes and ordinances Ensure that the electrical installation is adequate and in confor...

Page 5: ...talling the hood as close as possible to the ventilation shaft Your hood is an external ventilation model Do not evacuate the air to areas with walls and ceilings e g Roof space attics garages Check that there is sufficient air entering your kitchen taking account of all other appliances installed in the same room and powered by a source of energy other than electrical energy e g Wood burning or f...

Page 6: ... Cornue Château line hood models With our special individual manu facturing principle offering a wide variety of models it is quite possible that you may not find the description or the technical characteristics for your personal model in this brochure This guide only provides you with the dimensions and the technical characteristics for standard wall hoods equipped with integrated motors one or t...

Page 7: ...20 V a c single phase earth 60 Hz for 1 motor version and 4 LED Lights Nominal flow 600 cfm Electrical power 460W Current 3 8 A Lighting light LED power 2 5 W Filter Stainless steel Dimensions 300 x 400 mm Control panel inside the hood on the motor speed regulator and light button ...

Page 8: ...50 4E RC Grand Palais 180 Château 165 Château 150 Grand Châtelet 135 Château 120 Château 90 Château 75 X 1 mm 2000 1850 1700 1550 1400 1100 950 X 2 mm 1600 1450 1300 1150 1000 700 550 X 3 mm 1744 1594 1444 1294 1144 844 694 X 4 mm 1556 1406 1256 1106 956 656 465 X 5 mm 1534 1384 1234 1084 934 624 475 X 6 mm 598 548 498 548 398 X 7 mm 458 408 358 408 258 Weight kg 160 150 130 110 100 80 70 Voltage ...

Page 9: ... INFORMATION Grand Palais 180 Château 165 Château 150 Grand Châtelet 135 Château 120 Château 90 Château 75 L 2000 1850 1700 1550 1400 1100 950 L 2 1000 925 850 775 700 550 475 B 1590 1440 1290 1140 990 690 540 C 1000 1000 850 700 550 L L ...

Page 10: ...lais 180 Château 165 Château 150 Grand Châtelet 135 Château 120 Château 90 Château 75 Y 2000 1850 1700 1550 1400 1100 950 Y 1 1800 1650 1500 1350 1200 900 750 Y 2 1515 1365 1215 1065 915 615 465 Y3 1704 1554 1404 1254 1104 804 654 Ø 200 200 200 200 200 150 150 ...

Page 11: ...the external extraction ventilation shaft in the wall or in the ceiling To guarantee the best smoke extraction results the hood must be centred in relation to the cooking To facilitate mounting start by tracing the cook top s central axis If there are no constraints respect a height of approximately 900 mm 50mm between the cook top and the hood minimum 30 on electric and minimum 36 on gas Dependin...

Page 12: ...ing Drill the holes indicated on the jig in the wall and insert pegs adapted to the type of wall Fix the assembly jip into holes C with long screws and into the upper and lower holes d D with the threaded roads supplied with the hood N B The pegs supplied are only suitable for solid materials 4 Now fix the hood body to the assembly jig s central crossbeam and ensure that the jig and the body are w...

Page 13: ...nge Please note The ventilation shaft must not be folded or crushed Perform the electrical connections 7 1 ELECTRICAL CONNECTIONS HARD WIRE FROM HOME POWER SUPPLY Electrical Shock Hazard Disconnect power before servicing Replace all parts and panels before operating Failure to do so can result in death or electrical shock Electrical Shock Hazard Electrically ground blower Connect ground wire to gr...

Page 14: ...ides of the body 9 Fit the mantel B onto the threaded rods K using the provide nuts The hood mantel must not be twisted Using a 90 degree screwdriver screw the mantel at the Bottom via the hatch and at the top space left vacant for the ferrule Replace the hatches inside the Body via the filters ...

Page 15: ... place by sliding it in parallel above The Hood mantel The two clips on the rear lugs L must be inserted into the holes H on the ferrule The screws G on the left and right of the hood must simultaneously enter the holes provided for that purpose in the ferrule By pushing the ferrule backwards strongly these screws ensure that the ferrule is well positioned and sufficiently stable Do not pay attent...

Page 16: ...d fix them in place on the left and right with a M3 screw Fix the connecting pierce in place J ASSEMBLY INSTRUCTIONS 11 Fix the 5 star plate to the listel connecting piece J with 3 M3 screws 12 Position the filters in place and perform an operating test ...

Page 17: ...en 17 ELECTRICAL DIAGRAM Hood with internal Motor ...

Page 18: ...en 18 ELECTRICAL DIAGRAM Hood with external Motor ...

Page 19: ...en 19 ...

Page 20: ...en 20 ...

Page 21: ......

Page 22: ......

Page 23: ......

Page 24: ...INDEX 03 15 Artikel Nr 3421 ...

Reviews: