background image

Model: 308-2316                          www.lacrossetechnology.com/support                                                             

Page | 5


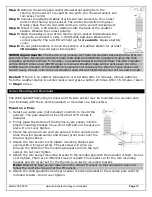
Step 4:

 Remove the wind speed sensor/showerproof casing from the 

            thermo-hygro sensor to reveal the two ports (for the wind sensor and  

            rain sensor cords) 

Step 5:

 Connect the attached cables of wind and rain sensors to the correct  

            ports of the thermo-hygro sensor. The cords should click into place.  

            Double-check the rain and wind cords are in the correct marked port.   

Step 6: 

Insert 3 x AA, 1.5V Alkaline batteries into the back of the weather  

            station. Observe the correct polarity. 

Step 7:

 Open the battery cover of the thermo-hygro sensor located below the  

            two ports, and insert 2 x AA, 1.5V Alkaline batteries. Observe the  

            correct polarity. The red LED will light up for 

4 seconds

. Replace battery  

            cover. 

Step 8:

 Do not press buttons or move the sensors or weather station for at least  


10 minutes

 to avoid signal interruption. 


WWVB Signal Search:

 The thermo-hygro sensor will transmit weather data within the first 24 

seconds. Then, the sensor will start radio controlled time (WWVB) reception. During the time 

reception period (maximum 5 minutes), no weather data will be transmitted. The LED indicator 

will be blink 5 times once WWVB signal is received. Weather data will be sent again once the 

WWVB search finished. If the WWVB time signal is not received, the thermo-hygro sensor will 

search every 2 hours until received. Weather data will be transmitted when not in search mode. 


Restart:

 If there is no outdoor temperature or wind data after 10 minutes, remove batteries 

from the weather station & outdoor sensor and press a button 20 times. After 15 minutes, return 
to 

Step 1

 above. 


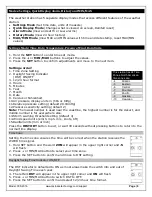
Sensor Mounting and Placement 


The Wind speed/Thermohygro sensor and the Rain sensor may be mounted on a wooden pole 

(not included) with the U-bolts (included) or mounted on a flat surface. 
 

Mount on a Pole: 

1.


Select a wooden pole (not included) on which to mount the 

sensors. The pole should not be more that 0.75 inches in 

diameter. 

2.


Firmly place the bottom of the thermo-hygro sensor into the 

plastic mounting bracket. Use a short bolt and nut to secure in 
place. Do not over tighten. 

3.


Check the wind and rain cord are secured to the correct ports. 

Slide the wind speed sensor and shower proof cover over the 
thermo-hygro sensor. 

4.


Attach the rain sensor to the plastic mounting bracket and 
secure with a long set screw. The set screw will come up 

through the bottom of the mounting bracket and into the rain 

sensor. Do not over tighten. 

5.


Attach the rain sensor mounting bracket to the wooden pole with the included U-bolts. Do not 

over tighten. There are 2 different sizes of U-bolts. The smaller set for the rain mounting 
bracket and the larger set for the thermo-hygro/wind mounting bracket. 

Note:

 Attach the Rain sensor lower than the Wind/TH sensor so that rain water does not 

follow the cord into the port of the TH sensor. 

6.


Attach the wind speed/thermo-hygro sensor mounting bracket to the wooden pole with the 

included U-bolts. Do not over tighten. 


Summary of Contents for 308-2316

Page 1: ...weather station offers weather forecasting indoor outdoor temperature humidity wind rain data and precise atomic time date all on one comprehensive device Battery Compartment 3 AA Outdoor Temperature...

Page 2: ...231W Connection Ports Rain Sensor TX231R Pole NOT INCLUDED Wind Cups Thermo Hygro TX231TH Note There are 2 different sizes of U bolts One set small for the rain mounting bracket and one set large for...

Page 3: ...ure Sensitivity Settings 2 3 or 4 10 Storm Warning Threshold 3 9 10 Wind Speed Units mph km h m s knots and bft 10 Rainfall Units Inches or Millimeters 10 Quick Display Mode 10 Outdoor Temperature Win...

Page 4: ...12 or 24 hour time display Perpetual calendar with Radio Controlled Clock RCC Time alarm High light LED backlight Wall hanging or free standing Synchronized instant reception Low power consumption ov...

Page 5: ...transmitted when not in search mode Restart If there is no outdoor temperature or wind data after 10 minutes remove batteries from the weather station outdoor sensor and press a button 20 times After...

Page 6: ...e rain sensor will need to be cleaned periodically 4 Batteries need to be changed every two years 5 Mount the sensors at least 6 from any building structure ground or roof top that may provide radiant...

Page 7: ...e and humidity display 13 Outdoor temperature and humidity low alarm and high alarm 14 Temperature display unit 15 General outdoor alarm icon 16 Weather forecast icon 17 Weather tendency indicator 18...

Page 8: ...sensitivity setting default 2 Note The lowest number is used near the coastline the highest number is for the desert and middle number is for everywhere else 13 Storm warning threshold setting defaul...

Page 9: ...meric date will flash Press or MIN MAX button to select the correct date Press the SET button to confirm selection and move to the date format 17 Press the SET button to confirm selection and select F...

Page 10: ...ree hour period 30 The number 4 storm warning threshold will flash in the pressure area 31 Press or MIN MAX button to select a threshold from 3 9 for the storm warning 32 Press the SET button to confi...

Page 11: ...Absolute Pressure Wind Speed or Wind Gust display 5 Press and release the SET button three times The Wind Speed number will flash 6 Press the or MIN MAX buttons to display Wind Speed or Wind Gust Rain...

Page 12: ...t 7 days Monthly rainfall rainfall over the past 30 days Total rainfall Total since the startup of weather station until reset To view different rainfall readings 1 Press and release the SET button fo...

Page 13: ...17 Press the ALARM button to activate or deactivate the alarm 18 Press the SET button to select the Wind Chill High Alarm 19 Press the or MIN MAX buttons to adjust the wind chill value 20 Press the AL...

Page 14: ...utton to activate or deactivate the alarm 15 Press the SET button to select the Outdoor Temperature Low Alarm 16 Press the or MIN MAX buttons to adjust the temperature value 17 Press the ALARM button...

Page 15: ...aximum records and seven minimum records to view with time and date of occurance You may choose to view and or reset any or all of these records 1 Press the MIN MAX button once to enter MAX mode 2 Pre...

Page 16: ...speed maximum value with time and date stamp 17 With the value flashing press the SET button to reset the record to current value date and time 18 Press the button to view wind gust maximum value with...

Page 17: ...w wind chill temperature minimum value with time and date stamp 11 With the value flashing press the SET button to reset the record to current value date and time 12 Press the button to view dew point...

Page 18: ...in the pressure area 4 Press or MIN MAX button to select a number between 3 and 9 for a sensitivity setting 5 Press the SET button to confirm selection then the History button to exit setting mode Wh...

Page 19: ...range 300 1100hPa 8 85 32 5inHg Alarm interval 120 seconds Outdoor Temperature Range 40 F to 149 F 40 C to 65 C OFL outside this range Alkaline Batteries 20 F to 149 F 28 8 C to 65 C Lithium Batteries...

Page 20: ...dren The product is not to be used for medical purpose or for public information It is intended for home use only The specs of this product may change without prior notice Improper use or unauthorized...

Page 21: ...ipment into an outlet on a circuit different from that to which the receiver is connected Consult the dealer or an experienced radio TV technician for help This device must not be co located or operat...

Reviews: