

INTRODUCTION:
The Analog-Style Digital Atomic Clock features atomic (radio-
controlled) time and date, indoor temperature/humidity, week
of the year. Tap or wave your hand past the motion sensor
under LCD to change the display options.
ANALOG-STYLE DIGITAL ATOMIC CLOCK:
SETUP INSTRUCTIONS:
Note
: Setup is most effective at night when the WWVB radio-
controlled time/date signal is strongest.
1. Slide the
/
ON/OFF switch to
ON
.
2. Remove battery cover from the back of the Analog-Style
Digital Atomic Clock. Slide tab down and pull out to remove
the cover.
3. Insert four NEW AA batteries (not included) into the Analog-
Style Digital Atomic Clock. Observe the correct polarity (see
marking inside the battery compartment).
4.
Do not touch buttons for 15 minutes while the clock
searches for the WWVB time signal.
Important:
•
Do NOT mix old and new batteries.
•
Do Not Mix Alkaline, Standard, Lithium or Rechargeable
Batteries
PROGRAM MENU STEP-BY-STEP:
STEP 1:
TIME ZONE
Hold the /SET button for 2 seconds to enter the
program menu.
Press and release the
+
button to select a different Time Zone:
o
NST
= Newfoundland
o
AST
= Atlantic
o
EST
= Eastern
o
CST
= Central
o
MST
= Mountain
o
PST
= Pacific
o
AKST
= Alaska
o
HAT
= Hawaiian time zone.
DAYLIGHT SAVING TIME INDICATOR:
Press the
–
button to
select DST. The letters DST will appear in the upper right
corner. Confirm time zone and DST setting with the /SET
button and move to step 2.
STEP 2
:
LANGUAGE
: EN (English) will flash. Use the
+
or
–
button to
select the language for the day of the week:
o
EN
(English)
o
DE
(German)
o
FR
(French)
o
IT
(Italian)
o
ES
(Spanish)
o
NE
(Dutch)
o
RU
(Russian).
Confirm with the /SET button and move to step 3.
STEP 3
:
YEAR
: The year will flash. Press and release the
+
or
–
button
to select the correct year. Confirm with the /SET button and
move to step 4.
STEP 4
:
MONTH/DATE
: The month and date will flash. Press and
release the
+
or
–
button to select the correct month and date.
Hold the button to change the digits quickly. Confirm with the
/SET button and move to step 5.
Note
: The Day of the Week will set automatically after the
year, month and date are set.
STEP 5:
TIME
: The hours and minutes will flash together. Press and
release the
+
or
–
button to select the correct time. Hold the
button to change the digits quickly. Confirm with the /SET
button and move to step 6.
STEP 6
:
12/24 HOUR
12H will flash. Press and release the
+
button to
select 24-hour time.
Note:
In 12-hour time, the PM indicator will show during
afternoon hours.
FAHRENHEIT/CELSIUS
: Press and release the
-
button to
select Fahrenheit of Celsius. Confirm with the /SET button
and exit.
Note
: The Analog-Style Digital Atomic Clock will return to
active display after 30 seconds with no buttons pressed. The
clock will reflect whatever adjustments made before it timed
out.
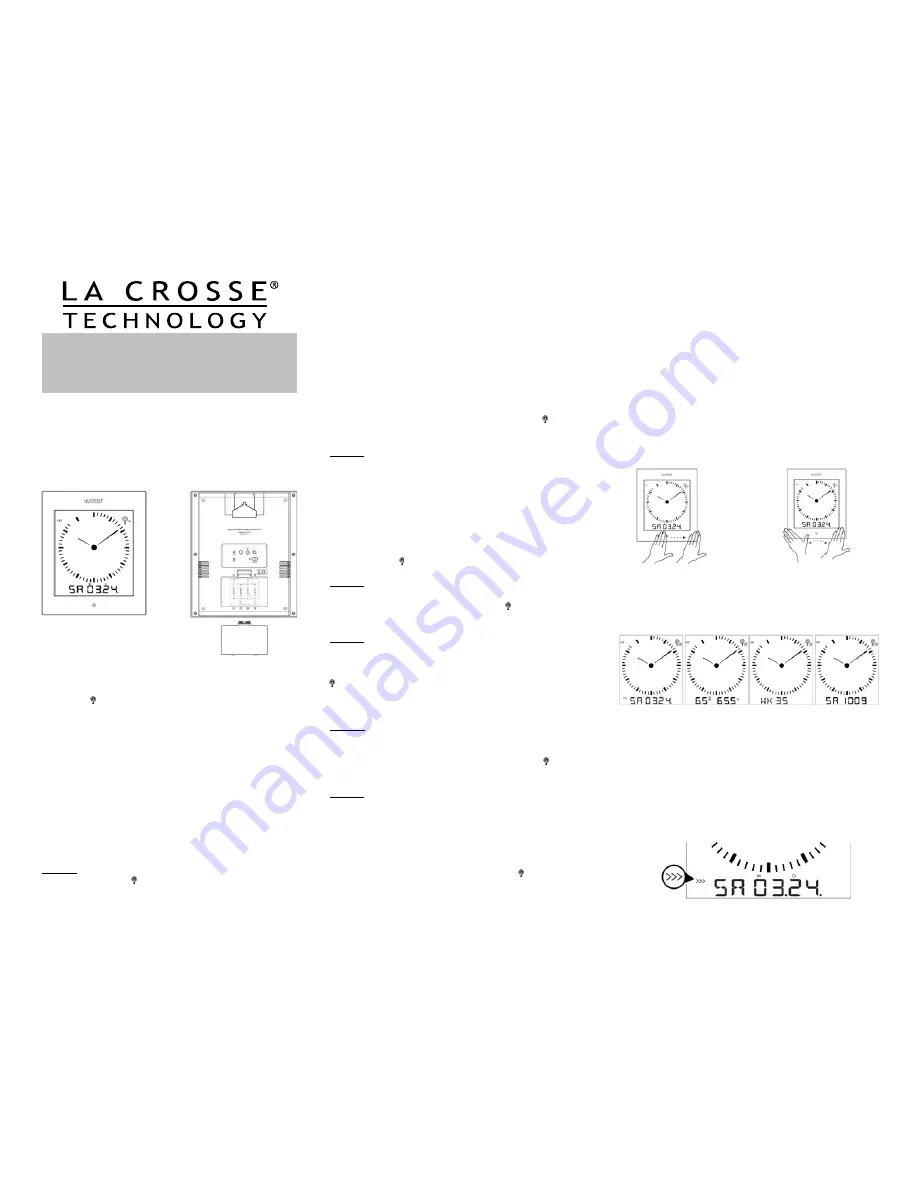
CHANGE DISPLAY MODES
: The clock will digitally display
different options in the lower portion of the LCD. A simple tap
or slow wave over the motion sensor on the front of the clock
below the LCD will change the display.
•
One change of display mode
:
Tap
and release (1
second), or
slowly
Wave
of your hand over the motion
sensor (must be within .75" / 2 cm of sensor) to change the
display one time.
•
Repeat the tap or slow wave to change again. The display
will stay on the last change.
•
Display modes
:
o
Calendar (weekday, month, date)
o
Indoor temperature / humidity
o
Work week of the year (Mon-Sun view)
o
Digital time and weekday
Note:
Tap or Wave very slowly, within .75" (2 cm) from motion
sensor to change the display.
Auto-scrolling display
:
The clock will default to auto-scrolling through the display
options. When in auto-scroll this symbol
>>>
will appear in
front of the display.
Turn off the auto-scroll by
tap and hold
(3 seconds) or slowly
wave over the motion sensor for 3 seconds. The
>>>
symbol
will disappear and the clock will stay on the current display.
Analog-Style Digital Atomic Clock
with motion sensor that changes display options
Model: 513-1311 | Quick Setup Guide
TAP WAVE


