background image

Setup

Power up. Insert 2-AA batteries into the sensor, then into the 

clock. Observe the correct polarity.

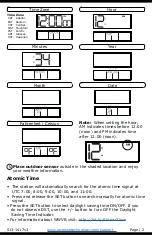
Configure basic settings. Hold the SET button for 3 seconds to 

enter settings menu.  Use the +/- buttons to adjust and SET to 

confirm.

AA
AA

Setting order:

1. Language: English | Español

2. Beep ON | OFF

3. Atomic ON | OFF 

4. DST ON | OFF (Daylight Saving Time)

5. Time Zone

6. Hour

7. Minutes

8. Year

9. Month

10. Date

11. Fahrenheit | Celsius

Note: When Español is selected, weekday and sub menu 

instructions will be in Spanish. Calendar order: Day, Month, Year.

AA

AA

English | Español

Beep ON | OFF

Atomic ON | OFF

DST ON | OFF

Page | 1             

www.lacrossetechnology.com/support 

                513-1417v3

Note: When the Atomic setting 

is set to OFF, the menu will skip 

to item 6, your Hour setting

Summary of Contents for 513-1417v3

Page 1: ...Atomic Digital Clock with Temperature and Moon Phase Model 513 1417v3 D C 010317 Protected under U S Patents 5 978 738 6 076 044 RE43903 For online video support http bit ly LaxTechTalk...

Page 2: ...ish Espa ol 2 Beep ON OFF 3 Atomic ON OFF 4 DST ON OFF Daylight Saving Time 5 Time Zone 6 Hour 7 Minutes 8 Year 9 Month 10 Date 11 Fahrenheit Celsius Note When Espa ol is selected weekday and sub menu...

Page 3: ...button to search manually for atomic time signal Press the SET button to select daylight saving time ON OFF If you do not observe DST use the button to turn OFF the Daylight Saving Time Indicator For...

Page 4: ...alarm settings Use the buttons to adjust and ALARM to confirm Deactivate Activate The alarm is active when set Press and release the ALARM button to deactivate or activate the alarm The clock icon wi...

Page 5: ...all Waning Crescent HI LO Temperature Press the PLUS button to view HI Temperature Press again to view LO Temperature Hold the PLUS button for 5 seconds to reset HI and LO temperature Note All records...

Page 6: ...nt the outdoor sensor on a north facing wall or in any well shaded area Under an eave or deck rail is preferred The maximum wireless transmission range to the forecast station is over 300 feet 91 mete...

Page 7: ...atteries from the sensor and the batteries from the clock Press any button 20 times After 15 minutes insert batteries into the sensor and into the clock Wait 15 minutes to establish a strong connectio...

Page 8: ...equipment off and on the user is encouraged to try to correct the interference by one or more of the following measures Reorient or relocate the receiving antenna Increase the separation between the...

Reviews: