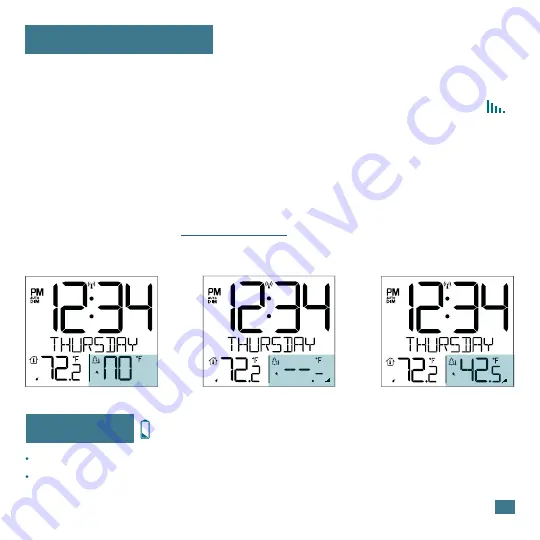
background image

Outdoor Temperature 

If you are seeing NO or dashes for your outdoor readings, please try the following 

steps:

 1. Hold the 

+

 button to search for your outdoor sensor. The Reception Indicator       

    will begin to animate. 
2. If after 3 minutes the sensor still isn’t connected, bring the sensor inside next to 
    the display and remove power from both the sensor and clock. 
3. Press any button on the clock 20 times and leave the parts sit for a few moments 
    with the power off. 
4. Install a new set of alkaline batteries into the sensor, then into your clock.
    For additional help visit: 

bit.ly/basic_restart

5. If your outdoor data is still not appearing after these steps, please contact our 
    support staff via the links below

Low Battery 

8

  By the Indoor Temp, replace clock batteries.
  By the Outdoor Temperature, replace sensor batteries.

Summary of Contents for 616-1410

Page 1: ...SET UP GUIDE MODEL 616 1410 616 12667 616 1410v2 616 12667v2 Atomic Projection Clock with Indoor Outdoor Temperature...

Page 2: ...he clock will search for the Atomic Time Signal at power up and at UTC 7 00 8 00 9 00 10 00 and 11 00 The Atomic Time Signal Icon will flash while searching and be solid when it has connected From the...

Page 3: ...tons to adjust values 3 Press and release SET to confirm values 4 Press and release the SNOOZE LIGHT button at any time to save and exit Settings Menu Order Language English Spanish French German Beep...

Page 4: ...cted times 1 Hold the SNOOZE LIGHT button to enter the Auto Dim Settings Menu 2 Press the buttons to turn the Auto Dim feature on or off Press SNOOZE LIGHT to confirm 3 Press the buttons to adjust the...

Page 5: ...breviated weekday with date or alarm time Projection Image 1 Hold the button to enter the Projection Settings 2 Use the buttons to change projection selection 3 Projection image will stay on last opti...

Page 6: ...n a wall or ceiling Time Alarm Set Alarm 1 Hold the ALARM button to enter the Alarm Settings Menu 2 Use the buttons to adjust the flashing values 3 Press the ALARM button to confirm and move forward N...

Page 7: ...tton press or time out after 2 minutes GOOD DAY will show briefly then return to normal time display Temperature Trend Arrows Both the Indoor and Outdoor temperature have Trend Arrows to indicate temp...

Page 8: ...and remove power from both the sensor and clock 3 Press any button on the clock 20 times and leave the parts sit for a few moments with the power off 4 Install a new set of alkaline batteries into th...

Page 9: ...t every 51 seconds Power 2 AA IEC LR6 batteries not included Battery Life Over 12 months Dimensions 1 57 L x 0 79 W x 5 12 H 4 0cm L x 2 0cm W x 13 0 H cm 9 Designed in La Crosse Wisconsin Made in Chi...

Page 10: ...licated or processed using electronic mechanical or chemical process without the written permission of the publisher This booklet may contain errors or misprints The information it contains is regular...

Reviews: