background image

02

Initial Setup

Table of Contents

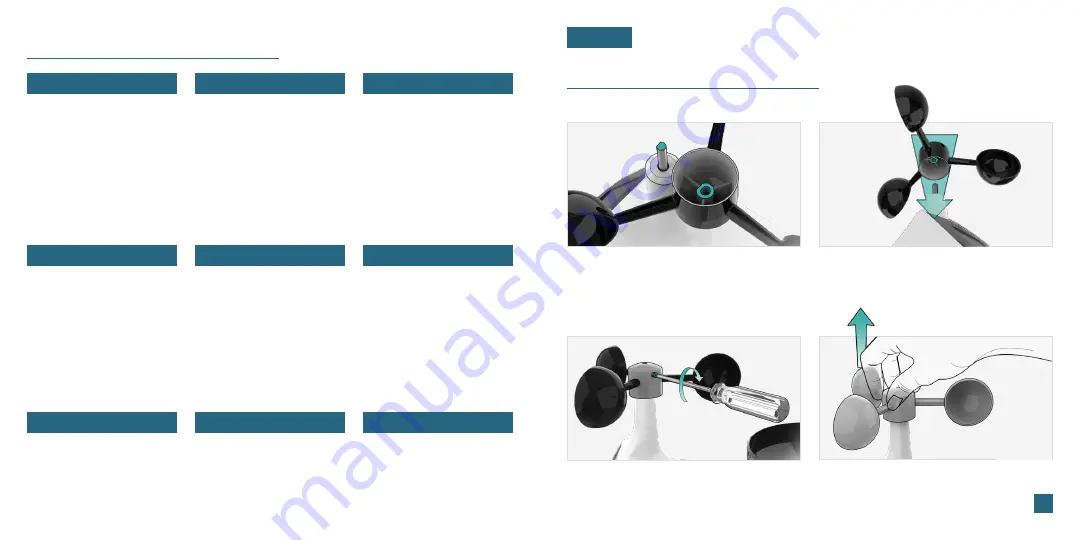
Installing the Wind Cups (if needed)

Remove the Cyclone Sensor, Wind Cups,

and Mini Screwdriver from the package.

Take note of the flat edges located on the 

head of the Cyclone Sensor and underside 

of the Wind Cups.

Carefully tighten the screw on the side of the 

cups using the Mini Screwdriver. The screw 

should tighten into the flat edge of the post.

Align the flat edges and place the Wind 

Cups on top of the Cyclone Sensor.

When the screw is tight, gently pull up on

the cups to ensure they are secure.

If they pull off, start again with step two. 

1.

3.

2.

4.

SENSORS

BASICS

WIND

SENSORS

FORECAST

TEMP. AND HUMIDITY

SUPPORT

LA CROSSE VIEW

RAIN

APPENDIX

Initial Setup
Station Settings
Buttons
LCD Display Brightness
Auto-Dim Settings
Time & Calendar Display

Viewing Wind Data
Wind Speed Records
Customizable Alerts

Wind Cup Installation
Placement & Mounting
Rain Sensor Cleaning
Add-On Sensors

Viewing Your Forecast 
Data
Viewing Extended 
Forecasts Data
Moon Phase
Seasonal Trees
Trend Arrows

Viewing Temperature
& Humidity Data
Indoor Comfort Meter
Temperature & Humidity 
Records
“Feels Like” Temperature
Customizable Alerts

We’re Here to Help
Factory Reset 
Stay in Touch

Connecting to the App
Connecting Your Station
Adding Your Sensors to 
the App
Manually Add Sensors to
the App
Data Stream Technology

Viewing Rain Data
Rainfall Records
Customizable Alerts

Specifications
Cautions & Statements
Warranty
Recycling & Disposal

02-03

07

08
09
09

10

13
14

20

02

21-23

24
25

11

12

12
12
12

18

18
19

19

20

29
29
29

04
05
06

06

10

15-16

17

20

26

26-29

29
29

Summary of Contents for V42

Page 1: ...SET UP GUIDE MODEL NUMBER V42 BP73736 Wi Fi PROFESSIONAL WEATHER STATION...

Page 2: ...al Setup Station Settings Buttons LCD Display Brightness Auto Dim Settings Time Calendar Display Viewing Wind Data Wind Speed Records Customizable Alerts Wind Cup Installation Placement Mounting Rain...

Page 3: ...Play Store to download the free La Crosse View app onto your mobile device Launch the App Connecting Your Station to the App Open the La Crosse View app Follow the on screen setup instructions to cre...

Page 4: ...r account 2 Next the app will prompt you to use your phone to scan the device ID barcode located on the back of the station Please note adding a device to your account and connecting it to Wi Fi are t...

Page 5: ...tings Menu 1 Use the buttons on the top of the station to adjust the values 2 Press the SET button to confirm your selection and move to the next setting 3 You may exit the Settings Menu at any time b...

Page 6: ...to adjust the stopping hour Press LIGHT to confirm and exit Time Calendar Display Data Stream Technology Data Streams allow you to see additional AccuWeather information in the time calendar section...

Page 7: ...ssure over the past 3 hours Viewing Extended Forecast Press and release the FORECAST button to toggle through your next 12 hours and next 7 days of forecast data 12 Rapid Increase Steady Pressure Slow...

Page 8: ...iling Wind Direction over the past hour 13 14 24 Hour Record Example 1 Month Record Example 1 Year Record Example Wind Speed Records When viewing the monthly record press and release the PLUS button t...

Page 9: ...The scale values automatically adjust when over 1 inch 25 4 mm of rain is measured Days Since Last Rain After 24 hours of no rainfall the station will start counting days without rain Rainfall readin...

Page 10: ...station to toggle through rainfall records with time and date stamps See rainfall records for the past hour 24 hours 7 days month year and total since start up Viewing Temperature Humidity Data TEMPER...

Page 11: ...Outdoor Low Humidity 7 Indoor High Temperature 8 Indoor Low Temperature 9 Indoor High Humidity 10 Indoor Low Humidity Records Viewing Order 1 Outdoor High Temperature 2 Outdoor Low Temperature 3 Outd...

Page 12: ...ensure the Cyclone Sensor especially the rain gauge is mounted level Ensure the Solar Panel is facing to the South This helps optimize battery life and transmit correct wind direction data Ideally the...

Page 13: ...installation options include tripods wall mounts chimney mounts and many others Any of these can be combined with U bolts for attachment onto a tall cylindrical conduit using our Adjustable Base Thes...

Page 14: ...endar THERMO HYGRO SENSOR LTV TH5i Outdoor Temperature Range 40 F to 140 F 40 C to 60 C Outdoor Humidity Range 10 to 99 RH Transmission Range 400 feet 121 meters open air Update Interval Every 51 Seco...

Page 15: ...s 1 This device may not cause harmful interference and 2 This device must accept any interference received including interference that may cause undesired operation Caution Any changes or modification...

Page 16: ...ons watch setup videos and provide feedback on our social media outlets Scan for Self Help Factory Reset If you are experiencing issues press and hold the ALERTS and RAIN buttons down together until t...

Reviews: