


10
09
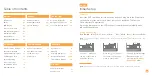
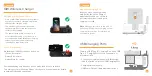
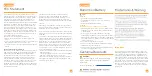
Projection Options
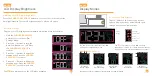
Adjusting the Projection Image
PROJECTION
PROJECTION
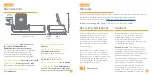
Projection Image Options
The Projection Arm tilts forwards and
backwards to adjust the location of the
projection image.
Use the Rotation Wheel on the Projection Arm to rotate the
viewing angle of the image.
Press the
PROJECTION
button to
adjust the projection’s brightness
(HI/LOW/OFF).
You can choose to see the (1) time, (2) outdoor
temperature and humidity, or (3) cycle through
both options.
Outdoor weather information is only available if
an add-on sensor is connected.
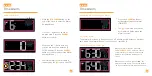
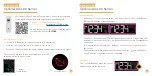
Selecting Your Projection Image
1.
2.
When an outdoor sensor is connected, hold the
PROJECTION
button on the top of the clock
to toggle between the projection options. If no
sensor is connected, this button will only adjust
the projection’s brightness.
Time will be the default projection image. Hold and release the
PROJECTION
button each time to switch between projection modes.
Note:
The fixed focus projection image will look best at about 7ft. (2.1m).
Time-Only Projection
Current Time
Outdoor Temperature
and Humidity
Outdoor Temperature &
Humidity-Only Projection
Cycle Through Both Options
outdoor
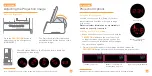
Projection Brightness
*An add-on sensor is required for additional projection options. See p.15 for details.


