
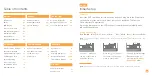


Table of Contents
Initial Setup
Buttons
LCD Display
Accessories & Ports
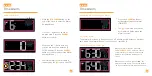
LCD Display Brightness
Auto-Dim Settings
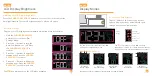
Display Modes
Display Mode Options
Specifications
Warranty
Recycling & Disposal
Cautions/Statements
Trademarks & Warning
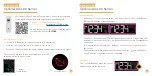
Use the
+/-
buttons on
the top of the clock to
adjust the values.
02
Initial Setup
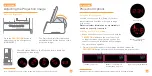
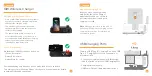
Power Up
Insert the 9V Power Adapter into an outlet, and then plug it into the Power Jack
on the bottom of the alarm clock. Next, remove the Insulation Tab from the
Clock’s Battery Compartment.
A greeting will appear on the LCD and the clock will then automatically move
into the Settings Menu.
You may exit the Settings
Menu at any time by
pressing the
SNOOZE/
BACKLIGHT
button.
20
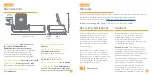
Support Information
Stay in Touch
21
21
Purchase Information
Add-On Sensor Setup
Lost Connection
Low Battery
Setting the Alarm
Activate/Deactivate
Snooze Duration
Projection Brightness
Adjusting the Projection
Projection Image Options
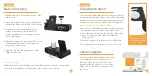
Wireless Phone Charger
Phone Compatibility
Adjustable Charging Coil
USB Charging Ports
Earbud Charging
Accesory Storage
Smart Watch Stand
Cable Organizer
12
12
13
13
14
14
BASICS
Press the
SET
button
to confirm selection and
move to next setting.
Note:
Weekday will set automatically after year, month, & date settings are adjusted.
Settings Menu Order
Beep On/Off
•
12/24 Format
•
Hour
•
Minutes
•
Year
•
Month
•
Date
•
Fahrenheit/Celsius
Note:
To enter the Settings Menu after the initial startup, hold the
SET
button on the top
of the clock
.


