background image


26 

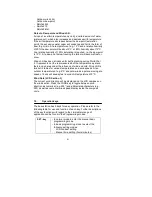
1.  Time alarm 
2.  Indoor temperature high alarm and low alarm 
3.  Outdoor temperature high alarm and low alarm 
4.  Indoor humidity high alarm and low alarm 
5.  Outdoor humidity high alarm and low alarm 
6.  Wind chill high alarm and low alarm 
7.  Dew point alarm high alarm and low alarm 
8.  Rainfall 24h alarm 
9.  Rainfall 1h alarm 
10.  Pressure high alarm and low alarm 
11.  Wind speed high alarm and low alarm 
12.  Wind direction alarm 
13.  Storm warning alarm 


Setting Alarms 

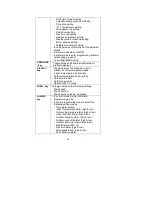
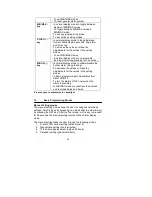
For alarm setting, press the ALARM key once while in normal 
operation mode to enter the normal alarm time and by further 
pressing the ALARM key will toggle through each of the alarm modes: 


Note: 
The alarm icon will automatically appear upon pressing the SET 
key to tell the user the alarm is activated. Further pressing the 
SET key will deactivate/reactivate the alarm. 


Time alarm setting 

1)  Press the ALARM key to enter the normal time alarm 
2)  Press and hold the SET key to enter the alarm hour time set 

mode (the hour digits will flash) and set the desired hour by using 
the PLUS (+) or MINUS (-) keys 

3)  Press the SET key to enter the alarm minute time set mode (the 

minutes digits will flash) and set the desired minutes using the 
PLUS (+) or MINUS (-) keys 

4)  Press ALARM key to confirm followed by the MIN/MAX key to 

return to the normal display mode. 


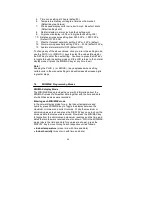
Indoor temperature high alarm and low alarm setting 

1)  Press the ALARM key to enter the normal time alarm 
2)  Press the ALARM key again to enter indoor temperature high 

alarm set mode 

3)  Press and hold the SET key to enter the indoor temperature high 

setting values (digits will start flashing) and set the desired indoor 
temperature high by using the PLUS (+) or MINUS (-) keys 

4)  Press ALARM key to confirm and press the MIN/MAX key to 

return to the normal display mode or press the ALARM once more 
to toggle to the indoor temperature low alarm set mode. 

Summary of Contents for WS-2306

Page 1: ...0 Professional Remote Weather Station Model WS 2306 Operation Manual ...

Page 2: ... 3 Safety Notes 5 4 Packaged contents 6 5 Setting up 7 6 Operation using cable connection or wireless 433MHz 9 7 LCD overview 11 8 Function test 12 9 Mounting 12 10 Resetting factory settings 18 11 Function description 19 12 Operation keys 21 13 Basic programming modes 23 14 MIN MAX programming modes 24 15 Alarm programming modes 25 16 Auto memory for stored values 33 17 Changing batteries 33 18 I...

Page 3: ... continuously updated to bring you the latest weather information on the base station s LCD The outdoor thermo hygro sensor is the main data communication unit since both the wind and rain sensors are connected to the thermo hygro sensor for operating power and rely on it to communicate to the base station Weather data sent from the thermo hygro sensor can be done by wireless 433MHz transmission u...

Page 4: ...CP htm For the detail installation instruction for the USB adaptor please visit http www ftdichip com Documents InstallGuides htm After installing the USB Adaptor Driver check in Device Manager to confirm that Windows has recognized the adaptor To determine which COM Port your USB adaptor is on 1 Find MY COMPUTER and right click the icon 2 Select MANAGE 3 Click on DEVICE MANAGER 4 You should see C...

Page 5: ...lectable in mm or inch Wind speed in km h mph m s knots or Beaufort scale user selectable Wind direction display with LCD compass as well as numerical e g 225 and abbreviated characters e g SW Wind chill temperature display Dew point temperature display Weather forecast display by weather icons sunny cloudy rainy Weather tendency indicator Storm warning alarm E L back light Simultaneous display of...

Page 6: ...al or from data inaccuracies that may occur with this product In case of harm or damage to a person or property caused by improper handling or failure to comply with this instruction manual the manufacturer and supplier cannot be held liable For reasons of safety and operation alterations to this device are strictly prohibited To operate the weather station use only the supplied adaptor and batter...

Page 7: ...cable optional connection to the base station included Wall mounting screws Plastic anchors for screws Wind Sensor Main unit with wind vane 10 metre cable already attached to the main unit Mast holder 1 x U bolts for mast holder 2 x Washers 2 x Nuts 2 x cable ties to secure wind and rain cords Rain Sensor Main unit base and funnel 10 metre cable already attached to the main unit Heavy weather PC s...

Page 8: ...unction test section 8 First choose to use the 240V adaptor included in this set or batteries for operation Both these methods allow for operation using wireless 433MHz transmission or cable connection between the base station and the sensors and setting up for both methods is as follows Base Station Socket for Thermo Hygro Sensor Socket for Adaptor PC COM Port ...

Page 9: ...wind and rain sensors to the corresponding sockets of the thermo hygro sensor by clicking them into place 3 Open the battery cover of the thermo hygro sensor located below the three sockets and insert 2 x AA IEC LR6 1 5V batteries and close the cover 4 Open the base station s battery cover located at the back of the unit and insert 3 x AA IEC LR6 1 5V batteries into the battery compartment and clo...

Page 10: ... will provide interference free transfer of the weather data from the sensors to the base station The data sending interval from the sensors to the base station will also be more frequent compared to using 433MHz transmission and will result in higher power consumption Therefore batteries will have a shorter life span for cable connection compared to using 433MHz To operate using cable connection ...

Page 11: ...n general batteries that will not be used for long periods should be removed to avoid leakage Wireless 433MHz transmission Using 433MHz wireless transmission of weather data from the sensor to the base station will provide users greater freedom as to where units can be positioned without the need to be restricted by cable Note If no outdoor weather data is displayed or the signal to the sensors is...

Page 12: ...ts inch or mm 17 Temperature display units ºC or ºF 18 Outdoor temperature humidity display 19 Indoor temperature humidity display 20 Dew point temperature display 21 Wind chill temperature display 22 Wind alarm icon 23 Wind information for Min Max speed and wind speed low high direction alarm 24 Wind direction and speed m s knots Beaufort km h or mph display 25 Alarm buzzer ON OFF icon 26 General...

Page 13: ...ermo hygro sensor and press and hold the PLUS key for 2 seconds and a short beep will sound to synchronize the base station to the sensors otherwise no weather data will be received Some weather readings such as wind speed and direction may not appear immediately on the LCD if the wind fan or vane of the wind sensor is moved This is due to the set reading time intervals for the wind readings Howev...

Page 14: ...dding exten sions to a battery only unit will shorten battery life in the thermo hygro sensor When securing the cables during mounting ensure that the base station can receive the weather data since increasing the cables length may also increase levels of interference and result with reception difficulties Interference levels will greatly depend on the surrounding area for example setting up on or...

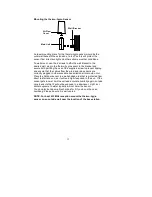
Page 15: ...that the front marked E is pointing in East West direction The wind cups must be below the mounting bracket The wind sensor should now be mounted using the screws provided onto a mast to allow the wind to travel around the sensor unhindered from all directions ideal mast size should be from Ø16mm Ø33mm Place the Wind sensor as high as you can install it In most cases 1 22 1 83 m above the peak of ...

Page 16: ...ylon straps as they may stretch in extreme weather Straps are excellent to secure wind and rain cords from blowing about 1 Unlock the mounting bracket from the remote wind speed sensor leaving the wire going through the bracket 2 Place two nylon straps through the slots on the mounting bracket 3 Place the remote wind speed sensor in your desired location 4 Fasten the two nylon straps securely arou...

Page 17: ...sed to screw the gauge down First remove the cover You have to push in the tabs on the sides and then pull the cover off There will be a teeter totter that has a metal bar for an axis Pull the metal bar out with pliers The teeter totter can then be removed giving you access to the screw holes You may also choose to mount with 25mm 1 inch strips of silicone gel along the base Be sure to leave gaps ...

Page 18: ...sors are correctly plugged in otherwise data transmission errors could occur Place the Outdoor sensor in a well shaded area that is protected from direct rainfall and sun as it will read high if exposed to the sun If the sensor gets too wet it will never read accurate humidity again so take care to ensure that it will not be exposed to a downpour Light inci dental exposure to water typically will ...

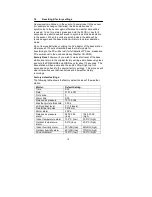
Page 19: ...to make a full reset of the base station and return to the original factory settings simultaneously press and hold the PRESSURE and WIND keys for about 10 seconds The base station will beep once and the entire LCD will light up for 5 seconds and go back to the original factory settings This process will clear all previous user defined values and all weather history recordings Factory default setti...

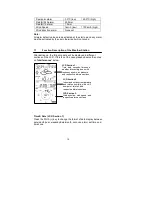
Page 20: ... different sections on the LCD If this is not the case please observe the notes on Interferences below Time Date LCD Section 1 Press the PLUS key to change the format of date display between date month year weekday date month seconds alarm set time and time zone LCD Section 1 Time date seconds time zone weather forecasting icons with tendency arrows air pressure and respective alarms sections LCD ...

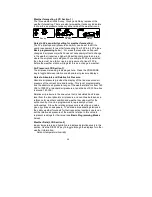
Page 21: ...pressure displays Notes to Absolute and Relative Air Pressure Absolute air pressure provides the display of the true measured air pressure of the current time and location This is not programmable and the absolute air pressure range of the weather station is from 760 hPa to 1099 hPa standard air pressure at an altitude of 2 300 metres is around 760 hPa Relative air pressure is the one value that i...

Page 22: ...feels in open area under the influence of wind and cold Wind chill is laid out in tables for various temperatures and wind speeds At an outdoor temperature of e g 8 C and calm winds a person moving at a speed of 6 m s will already feel a wind chill temperature of 0 C Wind Data LCD Section 3 The current wind direction will be displayed on the LCD compass on the wind section Press the WIND key to to...

Page 23: ...y Toggle between the following current maximum minimum display modes Indoor temperature and humidity Outdoor temperature and humidity Outdoor wind chill Outdoor dew point Rainfall 24h 1h total WIND key To toggle between the following settings Wind speed Wind direction Wind direction display in degrees ALARM key In normal mode to enter the alarm programming mode In alarm programming mode to select ...

Page 24: ...alues or make the adjustments for the values in the setting modes In basic programming mode audible storm alarm ON OFF To turn the alarms off 24 hours when the alarm is sounding In MIN MAX modes to reset recorded values and recorded dates and times Press any key to activate the E L backlight 13 Basic Programming Modes Manual Setting modes The manual setting mode allows the user to change several b...

Page 25: ... any time to exit Note Keeping the PLUS or MINUS key depressed when setting certain units in the manual setting mode will increase decrease digits in greater steps 14 MIN MAX Programming Modes MIN MAX display Mode The MIN MAX Mode provides the user with information about the MIN MAX values of all weather data together with the time and date at which these values were recorded Entering each MIN MAX...

Page 26: ...le in the minimum or maximum mode the time and dates are also displayed along with the recorded values If the MINUS key is pressed while any of these values are displayed that particular minimum or maximum record will be reset to current reading together with the current time and date with the exception of the following The first case is Rainfall Total which has neither maximum nor minimum records...

Page 27: ...he alarm Time alarm setting 1 Press the ALARM key to enter the normal time alarm 2 Press and hold the SET key to enter the alarm hour time set mode the hour digits will flash and set the desired hour by using the PLUS or MINUS keys 3 Press the SET key to enter the alarm minute time set mode the minutes digits will flash and set the desired minutes using the PLUS or MINUS keys 4 Press ALARM key to ...

Page 28: ...art flashing and set the desired outdoor temperature low by using the PLUS or MINUS keys 6 Press ALARM key to confirm and press the MIN MAX key to return the normal display mode or press the ALARM once more to toggle to another alarm setting mode Indoor humidity high alarm and low alarm setting 1 Press the ALARM key to enter the normal time alarm 2 Continue to press the ALARM key until you reach t...

Page 29: ...will start flashing and set the desired wind chill high by using the PLUS or MINUS keys 4 Press ALARM key to confirm and press the MIN MAX key to return to the normal display mode or press the ALARM key once more to toggle to the wind chill low alarm set mode 5 Press and hold the SET key to enter the wind chill low setting values digits will start flashing and set the desired wind chill low by usi...

Page 30: ...s will start flashing and set the desired rain values by using the PLUS or MINUS keys 4 Press ALARM key to confirm and press the MIN MAX key to return to the normal display mode or press the ALARM key once more to another alarm setting mode Pressure high alarm and low alarm setting 1 Press the ALARM key to enter the normal time alarm 2 Continue to press the ALARM key until you reach the pressure h...

Page 31: ...nter the normal time alarm 2 Continue to press the ALARM key until you reach the wind direction alarm set mode 3 Press and hold the SET key to enter the wind direction setting values 4 Using the PLUS or MINUS keys select the desired wind direction and use the SET key to confirm or cancel each direction input 5 Press ALARM key to confirm and press the MIN MAX key to return the normal display mode o...

Page 32: ...d to show the user that a set weather condition has been reached The activated alarm can be determined by checking the set alarm values against the MIN MAX values reached To deactivate the general weather alarm icon press the ALARM key Important When entering the alarm set mode for a specific weather or temperature condition the corresponding alarm is automatically enabled ON when the SET key is p...

Page 33: ...m to sound constantly if the measured reading is close to user set level a hysteresis function has been implemented for each weather alarm For example if the high temperature alarm is set to 25 C and the current value moves to 25 C the alarm will be activated if it has been enabled Now when the temperature drops to 24 9 C or below and thereafter again increases to beyond 25 C the data will be blin...

Page 34: ...rmo hygro sensor 1 Open the battery cover 2 Remove the old batteries and insert with new ones of the recommended type and replace the cover Once the sensor is powered up press and hold the PLUS key for approx 2 seconds in the normal display mode the base station will sound a short beep and synchronize to the sensor otherwise no weather data will be received Battery change only in the base station ...

Page 35: ... sensors and or receiver See also Item Transmission Range below Interference from other sources e g wireless radio headset speaker etc operating on the same frequency Find a different location for the sensors and or base station Neighbours using electrical devices operating on the 433MHz signal frequency can also cause interference with reception No Reception after adding extension cables Find a n...

Page 36: ...le paned and UV coated windows glass doors etc Broadband interferences in municipal areas can reach levels reducing the signal noise ratio over the entire frequency band thus also reducing the transmission distance Devices working close by example a neighbour s house may also influence reception Poorly shielded PCs can cause interferences that will reduce or in some cases stop reception The transm...

Page 37: ... is displayed Rain Volume Display 0 to 999 9 mm 1h and 24h rainfall 0 to 2499 9 mm Total rainfall Resolution 0 1 mm Wind Speed 0 to 180 km h or 0 to 50 m s Resolution 0 1 m s Wind Direction Graphic Resolution 22 5 Degrees Numerical Resolution and Letter format Using 433MHz wireless data transmission Measuring interval thermo hygro sensor 8 sec first 15 minutes after reset 32 sec if wind speed 10m ...

Page 38: ...inute Alarm duration 2 minutes approx Power consumption Base Station Batteries 3 x AA IEC LR6 1 5V Alkaline recommended or AC power INPUT 240V AC 50HZ use the provided AC DC adaptor only Thermo hygro sensor 2 x AA IEC LR6 1 5V or can draw power from the adaptor if used Battery life using 433MHz approximately 12 months alkaline batteries recommended Battery life using cable connection approximately...

Page 39: ... may cause undesired operation All rights reserved This handbook must not be reproduced in any form even in excerpts or duplicated or processed using electronic mechanical or chemi cal procedures without written permission of the publisher This handbook may contain mistakes and printing errors The information in this handbook is regularly checked and corrections made in the next issue We accept no...

Reviews: