background image


9


Because of the constant access to the opposite menu items, 

٭

MINMAX

٭

 and 

٭

ALARMS

٭

, it is possible at any time to 

toggle between the MIN/MAX and ALARMS value displays.   
 
Any action can immediately be terminated through 

٭

EXIT

٭


Radio-controlled WWVB Clock 

 
The radio-controlled WWVB clock is controlled by the radio signal of the WWVB time code sensor and will thus set time 
and date automatically. Under bad reception conditions however both can be set manually as follows:   
 

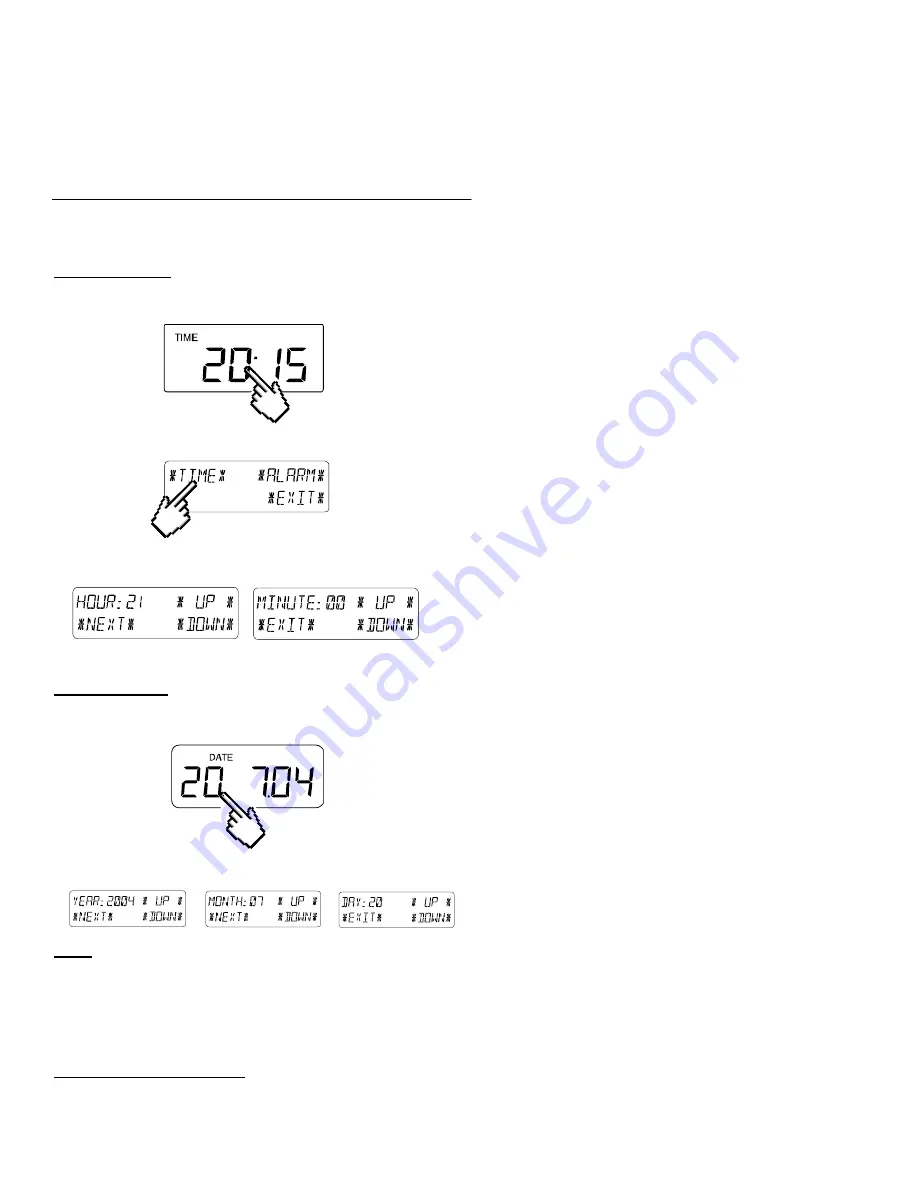
Setting the Time 


The action is started by touching the time display in the TIME section of the touch-screen.   


Select 

٭

TIME

٭

 in the menu section (last two lines on the LCD). 


Set the hours and minutes. Leave the mode with 

٭

EXIT

٭

 or wait for automatic time-out. 


Setting the Date 


The action is started by touching the date display in the DATE section of the touch-screen. 


Set the year, month and date and day. Leave the mode with 

٭

EXIT

٭


Note:


By twice touching the DATE section the display will toggle between the following: 


Date in DD.MM.YY format (24-hour time format) or Date in MM.DD.YY format (12-hour time format) 


Weekday, Date of month, Month (24-hour format) or Weekday, Month, Date of month (12-hour time format) 


Seconds 


Set wake-up alarm time 


Setting the Wake-up Alarm 


The action is started by touching the time display in the TIME section. 


Summary of Contents for WS-3510

Page 1: ...ther station the units can be supplied with power in the following possible combinations With cable connection or 433 MHz wireless transmission touch screen weather station batteries remote temperature humidity sensor batteries With 433 MHz wireless transmission touch screen weather station AC adapter remote temperature humidity sensor batteries With cable connection Both units supplied by AC adap...

Page 2: ...ng the TIME display in the upper left section of the LCD the touch screen weather station will automatically switch to the normal display mode from which all further setting can be performed by the user Note Reception of the radio controlled time information will only take place after completion of the check mode approx 15 minutes This mode can however be discontinued and the time and date can be ...

Page 3: ... in all modes performed by use of the switching areas ON or OFF UP or DOWN or by direct unit selection Advance to any next menu step with NEXT leave or terminate all respective modes with EXIT Every programming step activated by touching a switching area on the touch screen is acknowledged by an audible signal with buzzer switched ON If during any process previously activated by use of the touch s...

Page 4: ... only possible after at least 3 data sets have been stored 15 minutes after setting of a valid time It is therefore recommended to connect the PC and start the Heavy Weather Pro software only after this time period has passed Important Note User is recommended to carefully read the main operation manual for set up details And further utilization of the PC program refers to the Help file opened by ...

Page 5: ...1 TOUCH SCREEN WEATHER STATION MODEL WS 3512 Operation Manual ...

Page 6: ...r Tendency 8 Air Pressure History 9 Operating and Setting of Various Functions 9 1 Air Pressure 10 Additional Information to Function Outdoor Temperature 11 Operating and Setting the Backlight Buzzer and Alarm 11 1 EL Backlight 11 2 Buzzer 11 3 Alarm 12 PC Connection 12 1 Data Storage 12 2 Data Recall 12 3 Connections and Software 13 Technical Data 13 1 Outdoor Data 13 2 Data Transmission by 433 M...

Page 7: ...splayed time and weather data to a PC and the ability to upload the data to internet web sites 2 Important Touch Screen Operating Notes All actions and functions of the touch screen weather station are started on the touch screen by slightly touching not pressing the switching areas appearing in star symbols only in the text section at the bottom of the LCD or the displayed values respectively The...

Page 8: ... the wireless weather station into operation it is important to first perform a complete wiring and setup of the system in the configuration you intend to use This serves as a test of all components for correct function before placing and mounting them in their final destinations 3 1 Wiring the System The direct cable connection of remote temperature humidity sensor and touch screen weather statio...

Page 9: ...nce the remote temperature humidity sensor will send an identification code which has to be received and stored by the touch screen weather station within the first few minutes of operation 3 2 3 Cable Connection One further feature of the direct cable connection mentioned in Item 3 1 above is that in case of AC adapter operation power is provided not only to the touch screen weather station but t...

Page 10: ...y data 3 4 Placement After the touch screen weather station has been checked for correct function mounting the system components can take place It must be ensured however that all components work properly together at their chosen mounting or standing locations If there appear to be problems with the 433 MHz wireless transmission they can mostly be overcome by slightly moving the mounting locations...

Page 11: ...e sea level Default 29 98 inHg Weather Tendency Tendency Setting to a definite switching threshold 2 hPa to 4 hPa for a change in display of weather icons Default 3 hPa Storm Warning Storm Setting to a definite switching threshold for storm warning display at a decrease of air pressure from 3 hPa to 9 hPa over 6 hours Default 5 hPa Activate Deactivate storm warning alarm with ON OFF Default OFF Re...

Page 12: ...taneously displayed and flashing in their respective display sections when showing the coinciding min max value To recall the measuring and alarm values the menu shown below will have to be activated by touching the touch screen in the center of the text display section last two lines at the bottom of the LCD The display of the values is started by touching the displays MINMAX or ALARMS When MINMA...

Page 13: ...IME section of the touch screen Select TIME in the menu section last two lines on the LCD Set the hours and minutes Leave the mode with EXIT or wait for automatic time out Setting the Date The action is started by touching the date display in the DATE section of the touch screen Set the year month and date and day Leave the mode with EXIT Note By twice touching the DATE section the display will to...

Page 14: ... warning is displayed by Rainy symbol with a flashing down arrow Every minute when a new pressure reading is obtained this value is compared to pressure readings from last 2 hours and the biggest resulting difference is displayed in the difference barometer 8 Air Pressure History Pressure History The air pressure history shows the progress of the air pressure over a time period of 24 or 72 hours i...

Page 15: ...g the PRESSURE section Start with MAX in the menu section Note Display of the stored minimum values is possible from here through the MIN field on the LCD Display of stored value Proceed with MAX PRESSURE You may now reset the displayed value to the present value with CONFIRM if there is no need to reset advance with the EXIT field End of Example Example for Setting of Alarms by means of the HI Al...

Page 16: ...he LIGHT section When the display shows ON the backlight will be switched on for approximately 15 seconds every time any one of the LCD sections has been touched The switching condition Enabled Disabled is shown in the text section for about 30 seconds Note When the touch screen weather station is battery operated the repeated use of the EL backlight will result in a considerable decrease of batte...

Page 17: ...ns of a PC 12 3 Connections and Software The wiring between touch screen weather station and PC takes place by means of an included COM port cable The Heavy Weather Pro 3510 software package also included in the shipping contents must be installed on your PC This software allows the display of all present weather data with graphic symbols It further allows the display storage and printing of histo...

Page 18: ...tion about 2 minutes 13 5 Power Supply Base Station Batteries 3 x AA batteries Alkaline Batteries recommended Life Cycle without EL backlight approx 1 year When batteries require replacement for the touch screen weather station the low battery indicator will light up on the LCD or AC Adaptor AC Adapter INPUT 110VAC 60Hz use only the included Adapter Recommended for PC Connection and frequent use o...

Page 19: ...s contained in your owner s manual 5 damage resulting from the performance of repairs or alterations by someone other than an authorized La Crosse Technology Ltd authorized service center 6 units used for other than home use 7 applications and uses that this product was not intended or 8 the products inability to receive a signal due to any source of interference This warranty covers only actual d...

Reviews: