background image

am) until the signal is found successfully. If no signal is found during this period, 
the tower icon will not appear and the clock will search again at 12:00 am the next 
night.


II) PROGRAM MODE


To enter the Program Mode hold down the “

SET”

 button for 2 seconds, until 

“-5EST” flashes in the Date LCD.  The Program Mode is laid out in a manner that 
allows you to program each function separately, or you can follow the instructions 
entirely to program the temperature clock.  Complete programming is usually done 
for the initial set-up, and will require you to skip step 1 of programming sections C 
through H.  Press and release the “

SNOOZE”

 button at any time to exit the Program 

Mode, or wait approximately 15 seconds for the temperature clock to automatically 
return to normal operation. 

A) FUNCTION BUTTONS 


There are 4 function buttons located on the backside of the temperature clock.  
The function buttons are labeled: 

“SET”, “+”, “ALARM”, 

and 

“SNOOZE”.


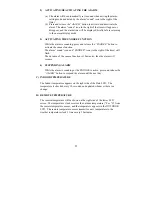
B)  TIME ZONE SETTING


1)  Hold down the 

“SET”

 button for 2 seconds, the default (factory) setting     

“-5EST” will flash in the Date LCD. 

2)  Press and release the 

“+”

 button to select the appropriate time zone.  There 

are 13 time zones to choose from: 
 

-4ATL Atlantic 

Time 

-5EST 

Eastern Time (default setting) 

-6CST Central 

Time 

-7MST Mountain 

Time 

-8PST Pacific 

Time 

-9ALA Alaskan 

Time 

-10HAW 

Hawaiian Time  

-11, -12 

Next two time zones West of HAW 

GMT 

Greenwich Mean Time 

-1, -2, -3GMT 

Three time zones West of GMT 


3)  Press and release the 

“SET”

 button to confirm the time zone setting, and to 

advance to DST (Daylight saving time) setting. 


6

Summary of Contents for WS-8011MTWC

Page 1: ...WS 8011MTWC 433 MHz Radio Controlled Temperature Clock Instruction Manual...

Page 2: ...tons 6 Time Zone Setting 6 DST Daylight Saving Time Setting 7 Language Selection 7 Time Setting 7 8 Calendar Setting 8 12 24 Hour Setting 8 Selecting F or C 9 Features Operations Changing Display Mode...

Page 3: ...States at 60 kHz The signal can be received up to 2 000 miles away through the internal antenna in the temperature clock However due to the nature of the Earth s Ionosphere reception is very limited...

Page 4: ...oes not display both temperatures after the 10 minutes please retry the set up as stated above After both indoor and outdoor temperatures are displayed for 10 minutes you can place your remote tempera...

Page 5: ...e indoor temperature the date as 1 1 the weekday as MON and the remote temperature will be displayed within three minutes Also the time will appear as for approximately 1 minute The WWVB search is aut...

Page 6: ...am Mode or wait approximately 15 seconds for the temperature clock to automatically return to normal operation A FUNCTION BUTTONS There are 4 function buttons located on the backside of the temperatur...

Page 7: ...weekday D LANGUAGE SELECTION FOR THE WEEKDAY 1 Hold down the SET button for 2 seconds the selected time zone will flash 2 Press and release the SET button 2 times until the default language US flashes...

Page 8: ...7 Press and release the SET button to confirm the month and to set the date 8 The default date 1 will flash 9 Press and release the button to select the appropriate date 10 Press and release the SET...

Page 9: ...elected time zone will flash 2 Press and release the SET button 10 times until the default F flashes in the time LCD 3 Press and release the button to toggle between F and C 4 Press and release the SE...

Page 10: ...y B THE ALARM 1 SETTING THE ALARM Note The duration of the alarm is 85 seconds After each of the first two 25 second periods the rate of the alarm increases a Hold down the ALARM button for 5 seconds...

Page 11: ...the right of the time will flash The duration of the snooze function is 10 minutes then the alarm will resume 4 SUSPENDING ALARM While the alarm is sounding or the SNOOZE is active press and release t...

Page 12: ...nds with no hinge need to be folded out towards the edge Once the foldout table stands are extended place the temperature clock in an appropriate location B WALL MOUNTING 1 Using a straightedge horizo...

Page 13: ...ounting bracket onto the mounting surface Ensure that the screws are flush with the bracket 6 Snap the remote temperature sensor onto the mounted bracket B MOUNTING WITH ADHESIVE TAPE 1 With a nonabra...

Page 14: ...Do not use solvents or scouring agents they may mark and damage the displays and casings Do not submerge in water Immediately remove all low powered batteries to avoid leakage and damage Replace with...

Page 15: ...leave the unit alone overnight without pressing buttons 5 If problems persist contact La Crosse Technology Problem Hour is incorrect minute and date are correct Solution Be sure correct time zone and...

Page 16: ...F resolution outdoor 0 C to 50 C with 0 1 C resolution Checking intervals Every 10 seconds indoor 3 times in 10 minutes for remote temperature Power source Battery type Station 2 x AA 1 5V Alkaline T...

Page 17: ...NTAL CONSEQUENTIAL PUNITIVE OR OTHER SIMILAR DAMAGES ASSOCIATED WITH THE OPERATION OR MALFUNCTION OF THIS TEMPERATURE CLOCK THIS PRODUCT IS NOT TO BE USED FOR MEDICAL PURPOSES OR FOR PUBLIC INFORMATIO...

Page 18: ...ED OPERATION All rights reserved This handbook must not be reproduced in any form even in excerpts or duplicated or processed using electronic mechanical or chemical procedures without written permiss...

Reviews: