

POWER UP
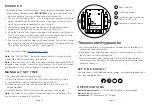
1. Remove the round Battery Cover and insert one AA battery into each
Side Battery Compartments.
IMPORTANT:
Be sure all batteries have
the same voltage and are installed according to polarity.
2. The hands will move to the 4, 8, or 12 o’clock position and stay there
while it searches for the WWVB Atomic Time Signal. Allow up to 5
nights for the clock to receive this transmission.
3. For the best reception, place the clock on an exterior wall near a
window with the front or back of it facing Fort Collins, CO.
4. Once the Atomic Time Signal is received, the clock will set to Pacific
Time. Firmly press and hold your correct Time Zone Button until the
hands begin to spin. The time will then set correctly.
5. If you live in an area that does not follow Daylight Saving Time, while
the hands are spinning to the correct time, press the Daylight Saving
Time Button once to turn the DST setting to OFF.
Watch the setup video:
bit.ly/wallclock_setup
Note:
The “NO BATTERY”, the center compartment is not used on this
model. No battery should be installed here.
Note:
In certain areas, this clock may not be able to receive the WWVB
reception due to signal strength or interference. In this case, your clock
can be set manually until the Atomic Time Signal can be received.
Manual Set Tab
Time Zone Buttons
Daylight Saving Time Button
(Default is DST ON)
1. Remove all batteries from the clock.
2. Press the Manual Set Tab at least 20 times and wait 15 minutes.
3. Insert batteries into the Side Battery Compartments.
4. Allow the hands to spin around and stop in either the 4, 8, or 12
o’clock position.
5. Hold the Manual Set Tab until your correct time is achieved.
Note:
The Atomic Time Signal will override your manual setting if the
transmission is received in the future.
4
3
2
1
MANUALLY SET TIME
Ask questions, watch detailed setup videos, and provide feedback on
our social media outlets!
LET’S BE SOCIAL!
Page | 3
Page | 2
Battery Requirements:
2 AA (IEC LR6) (batteries not included)
Battery Life:
24 months
Dimensions:
18” Diameter x 2.75” Deep
SPECIFICATIONS
Side Battery Compartments
• Your thermometer and hygrometer have been pre-calibrated and
should not need adjustment.
• Before manually adjusting your sensors, allow the clock to sit for at
least 2 hours in the same location.
• To manually adjust your sensors, gently turn the temperature or
humidity sensor adjustment on the back of the clock until desired
setting is reached.
Thermometer/Hygrometer
PT
PT
MT
MT
CT
CT
ET
ET
AA
AA
+
+
+
+
--
--
4
3
2
1
NO BATTERY
4


