


3
WWVB Radio controlled time with manual time setting
Time display: hour, minute, second
12/24h
time
format
display
Alarm setting with snooze function
Calendar
display
Weekday display (4 languages to choose from: English,
Spanish, French, German)
Time zone setting
Daylight savings time ON/OFF option (DST)
Solar mode setting
Indoor temperature display in ºF/ ºC selectable
Indoor humidity display in RH%
Primary Alkaline battery or rechargeable Alkaline battery
selection
Low
battery
indicator
Wall mount or freestanding
TO INSTALL / REPLACE BATTERY
The solar clock can use either the included 1 x alkaline
rechargeable battery (charged by solar panel) or 1 x AA
alkaline battery (non-rechargeable; not included).
INITIAL SETUP
It is very important to
follow these steps
:
1.
First, remove the label covering over the battery
compartment on the back.
2.
Open the battery compartment, and
MAKE SURE
that
the battery switch is in the
BATTERY
position (not the
SOLAR position).
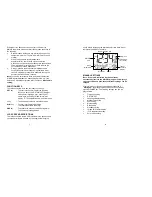
Battery switch in the BATTERY position
3.
Now locate the battery insulator tab, and gently pull to
remove it.
4.
Slide the battery switch to the SOLAR position
5.
Battery switch in the SOLAR position
6.
Continue to section titled “
Setup After
Changing/Installing the Battery
”
4
TO INSTALL / REPLACE BATTERY
The included alkaline rechargeable battery should provide you
with many years of service. If your battery needs to be
replaced, we suggest you use a fully charged AA Alkaline.
Rechargeable batteries should be fully charged before inserting
into clock.
Alkaline rechargeable batteries are
recommended.
If you choose to use a non-rechargeable battery, the battery
switch MUST be moved to the
BATTERY
position (not the
SOLAR position). In this position, the solar cells do not charge
the battery.
REGARDLESS OF THE TYPE OF BATTERY INSTALLED,
THE BATTERY SWITCH MUST BE IN THE BATTERY
POSITION WHEN THE BATTERY IS INSERTED.
If a rechargeable battery is used, the Battery switch should
be moved to the SOLAR position AFTER it is has been
inserted.
To use the included rechargeable Alkaline battery
(charged by solar panel):
1.
It is important to allow sufficient light to reach the solar
panel while activating the solar clock. Make sure the
lights are on in the setup room and the solar panel is
facing a 60W light bulb or brighter -
do not cover with
hands or other objects
.
2.
Replace battery cover
3.
Remove the black protective foil on the solar panel.
DO NOT SET THE CLOCK.
To use a non-rechargeable Alkaline battery:
1.
Remove the included rechargeable AA battery from the
compartment.
2.
Use the switch to select the alkaline battery (see below).