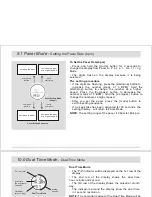
Alarm Time Mode
- The 2nd row of the display shows the current time:
hour, minute and second.
- The 3rd row of the display shows the alarm time: hour,
minute.
- T h e i n d i c a t o r s
around
t h e d i s p l a y s h o w t h e
current time in 1 second resolution.
To Set the Chime ON/OFF
- Press the [compass] button to change the ON/OFF status
of the hourly chime, in the Alarm Time Mode.
- When the chime indicator is
shown
(chime ON), the
beeps every hour on the hour
.
To Set the Alarm ON/OFF
- Press the [start/stop] button to change the ON/OFF
status of the alarm, in the Alarm Time Mode.
- When the alarm indicator is
shown
(alarm ON), the
sounds at the pre-set alarm time every day.
XG-20
XG-20
To Set the Alarm Time
- Press and hold the [mode] button for 2 seconds to change
from Alarm Time Mode to Alarm Time Setting Mode.
- The minute digits flash on the display because it is being
selected.
The Setting Procedures
- Press [mode] button to change the selection following the
Alarm Time Setting Sequence
shown on the left
.
- If the digits are flashing, press the [start/stop] button to
increase the number; hold the [start/stop] button
to change the number at a higher speed. Press the
[compass] button to decrease the number; hold the
[compass] button to change the number at a higher speed.
- After you set the alarm time, press the [mode] button to
exit the setting sequence.
- If no key-stoke has been activated for 30 seconds, the
setting display will auto return to Alarm Time Mode.
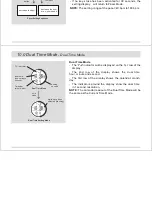
Current Time Mode
- The 1st row of the display shows the day of week.
- The 2nd row of the display shows the current time:
hour, minute and second.
- The 3rd row of the display shows the calendar: month,
day.
- The indicators
around
the display show the current time
in 1 second resolution.
To Set the Current Time and Date
- To set the current time and the date, press and
hold the [mode] button for 2 seconds to change the
display from the Current Time Mode to Current Time
Setting Mode.
- The second digits flash on the display because they are
being selected.
The Setting Procedures
- Press [mode] button to change the selections following the
Current Time Setting Sequence
shown on the left
.
- If the digits are flashing, press the [start/stop] button to
increase the number; hold the [start/stop] button
to change the number at a higher speed. Press the
[ c o m p a s s ] b u t t o n t o d e c r e a s e t h e n u m b e r ; h o l d
the [compass] button to change the number at a higher
speed.
- While 12/24 hour format setting is selected, press
the [start/stop] or [compass] button once to select between
12 or 24 hour format.
- After you set the current time, calendar and 12/24 hour
format, press the [mode] button to exit the Current Time
Setting Sequence.
- If no key-stoke has been activated for 30 seconds, the
setting display will return to Current Time Mode.
hold
mode
hold
mode
Current Time Setting Mode
Current Time Setting
Alarm Time Setting Mode
Alarm Time Setting
Current Time Mode
Alarm Time Mode
second
minute
12/24
hour format
minute
hour
hour
day
year
month
Current Time Setting Sequence
Current Time Setting Sequence
Alarm Time Setting Sequence
Alarm Time Setting Sequence
hold
mode
hold
mode
mode
button
mode
button
mode
button
mode
button
mode
button
mode
button
5.0 Alarm Time Mode -
Setting the Alarm and Chime On/Off
5.1 Alarm Time Mode -
Setting the Alarm Time
mode
button
mode
button
mode
button
4.0 Current Time Mode -
Current Time & Calendar
4.1 Current Time Mode -
Setting Current Time & Calendar
digits have been
selected (flashing)
digits have been
selected
(flashing)
Calendar
(month-day)
alarm time
(hour-minute)
analog
second
analog
second
current time
(hour:minute
second)
current time
(hour: minute,
second)
day of week
AL
AL
Increase
the number
Increase
the number
increase the
number at
a higher speed
increase the
number at
a higher speed
start/stop button
start/stop button
hold start/stop
hold start/stop
decrease
the number
decrease
the number
decrease the
number at
a higher speed
decrease the
number at
a higher speed
hold compass
hold compass
compass button
compass button
TM
TM
Summary of Contents for XG-20
Page 40: ...XG 20...
Page 42: ......
Page 43: ...XG 20 XG 20 avec un XG 20 dans un endroit sec...
Page 44: ......
Page 45: ......
Page 46: ......
Page 47: ......
Page 48: ......
Page 49: ......
Page 50: ......
Page 51: ......
Page 52: ......
Page 53: ......
Page 54: ......
Page 55: ......
Page 56: ......
Page 57: ...XG 20 XG 20...
Page 58: ......
Page 59: ...XG 20 XG 20 XG 20...
Page 60: ......
Page 63: ......
Page 64: ...XG 20 dispose de deux possibilit s XG 20 pour la premi re fois...
Page 65: ...XG 20...
Page 66: ...XG 20 dispose de deux possibilit s...
Page 67: ...XG 20...
Page 68: ...XG 20 XG 20 au bras pendant le mesurage XG 20 dispose d une fonction...
Page 69: ...XG 20 XG 20...
Page 70: ...XG 20 dispose d une fonction...
Page 71: ...XG 20...
Page 72: ...XG 20...
Page 73: ......
Page 74: ......
Page 75: ......
Page 80: ......
Page 81: ......
Page 82: ......
Page 83: ......
Page 84: ......
Page 85: ......
Page 86: ......
Page 87: ......
Page 88: ......
Page 89: ......
Page 90: ......
Page 91: ......
Page 92: ......
Page 93: ......
Page 94: ......
Page 95: ...del XG 20 el XG 20 el XG 20...
Page 96: ......
Page 97: ...del XG 20 el XG 20 el XG 20...
Page 98: ......
Page 99: ......
Page 100: ......
Page 101: ......
Page 102: ...el XG 20 EI XG 20 cuenta con ambas posibilidades...
Page 103: ...el XG 20 sobre una superficie plana que...
Page 104: ...EI XG 20 cuenta con ambas posibilidades...
Page 105: ...el XG 20 sobre una superficie plana que...
Page 106: ...el XG 20 sobre el XG 20 durante la medici n en el brazo el XG 20 dispone de una...
Page 108: ...el XG 20 dispone de una...
Page 109: ...el XG 20 puede verificar su posici n mediante...
Page 110: ...el XG 20...
Page 111: ......
Page 112: ......
Page 113: ......


