background image


La Crosse Technology 

Page 9 


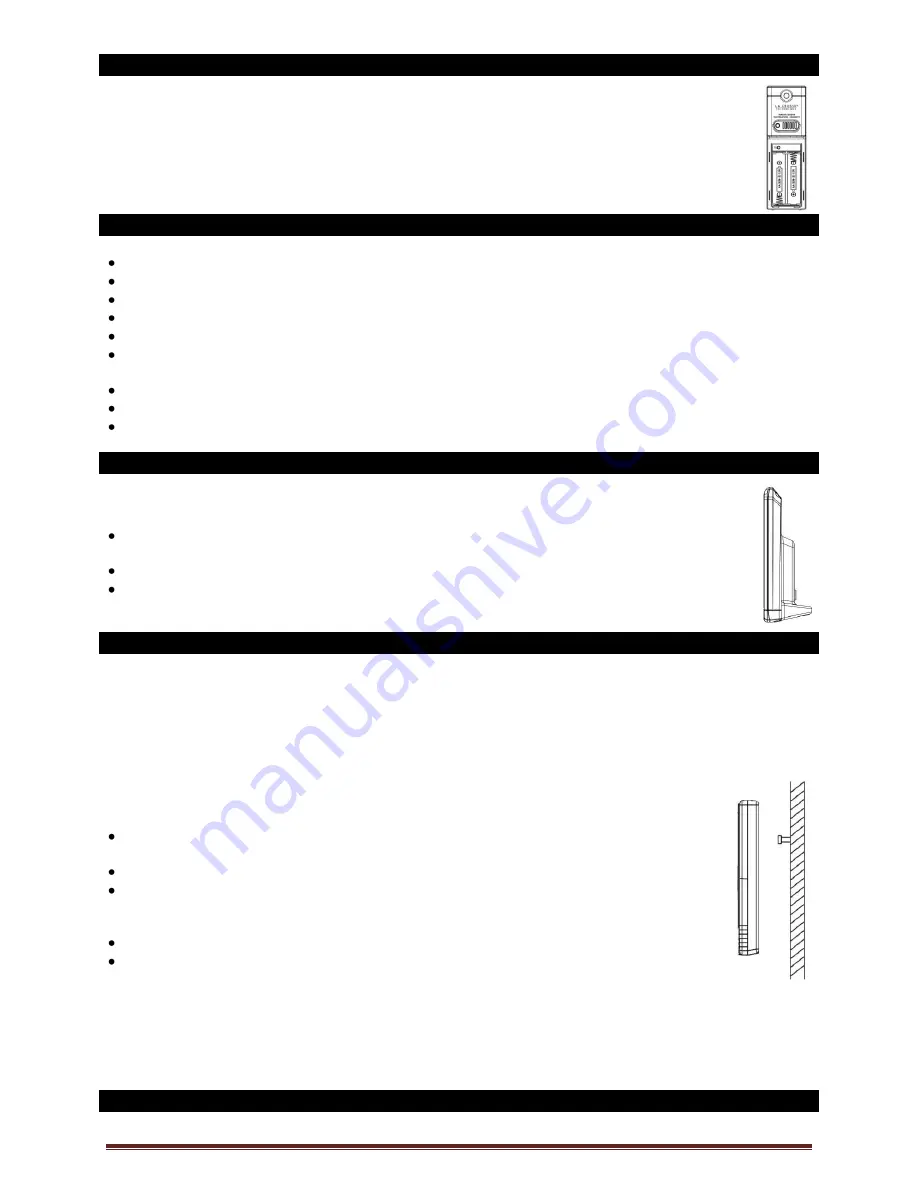
Install Batteries in the Outdoor Transmitter 

 
1.  Slide the battery cover down, then lift off the front of the transmitter. 
2.  Insert two new AA batteries into the transmitter. Observe the correct polarity (see marking 

inside battery compartment).  

3.  Keep transmitter 5-10 ft. from the weather station during setup. 
4.  If the outdoor temperature shows on the weather station after 15 minutes, you can move the 

outdoor transmitter outside to a shaded location within range of the weather station. 
 

Care and Maintenance 


Do Not Mix Old and New Batteries 


Do Not Mix Alkaline, Lithium, Standard, or Rechargeable Batteries 


Do not expose the weather station to extreme temperatures, vibration or shock. Keep dry. 


Clean weather station with a soft damp cloth. Do not use solvents or scouring agents. 


The weather station is not a toy. Keep it out of reach of children. 


The weather station is not to be used for medical purpose or for public information. It is for home use 
only. 


The specifications of this weather station may change without prior notice. 


Improper use or unauthorized opening of housing will void the warranty. 


If the weather station does not work properly, change the batteries. 


Position the Weather Station  

 
Choose a location for the weather station that is within range of the outdoor transmitter. The  
weather station has a built in base stand to sit on a table or desk.   

  Choose a location 6 feet or more from electronics such as cordless phones, gaming systems, 

televisions, microwaves, routers, baby monitors, etc., which can prevent signal reception.  

  Be aware of electrical wires and plumbing within a wall. 
  Best reception is achieved when the front or the back of the weather station is facing the 

outdoor transmitter. This allows a larger portion of the antenna to receive a signal.  
 

Position the Outdoor Transmitter 

 
Once the  weather station  shows the outdoor temperature, place it and the transmitter in the desired 
locations and wait approximately 1 hour before permanently mounting the transmitter to ensure that there 
is proper reception. The transmitter should be mounted vertically, in a shaded, protected area, at least 6 
feet from the ground to avoid damage and ensure accurate readings. The transmitter is water resistant, 
not waterproof and should not be placed anywhere it will become submerged in water or subject to 
standing water or snow. Choose a location for the transmitter that is within range of the weather station 
and under an overhang for accuracy. 

 
Option 1: 

  Install one mounting screw (included) into a wall leaving approximately ½ of an inch 

(12.7mm) extended. 

  Place the transmitter onto the screw, using the hanging hole on the backside. 
  Gently pull the transmitter down to lock the screw into place.  

 
Option 2:    

  Insert the mounting screw through the front of the transmitter and into the wall.  
  Tighten the screw to snug (do not over tighten). 

 
To achieve a true temperature reading, mount where direct sunlight cannot reach the outdoor  transmitter. 
Mount the outdoor transmitter on a North-facing wall or in any well shaded area. Under an eave or deck 
rail work well. The maximum transmitting range in open air is over 200 feet (60 meters). Obstacles such 
as walls, windows, stucco, concrete and large metal objects can reduce the range. Place the transmitter 
at least 6 feet in the air to improve signal transmission. 
 

Specifications


Summary of Contents for 308-1711

Page 1: ...backyard Monitor indoor and outdoor temperature track temperature trends and set customizable temperature alerts easily all on one convenient device Large temperature numbers increase readability The weather station features a wireless transmission range of over 200 feet 60 meters in open air from the transmitter to the Weather Station Wireless Weather Station Outdoor Temperature Transmitter TX141...

Page 2: ...ry Icon 6 Temperature Alerts 6 Select Alert Value 6 Temperature Alerts ON OFF 6 Temperature Alert Sounds 6 Temperature Trend Arrows 7 Outdoor Temperature Flashes 7 Install Batteries in the Temperature Station 7 Install batteries in the Outdoor Transmitter 7 Care and Maintenance 7 Position Temperature Station 7 Position Outdoor Transmitter 8 Specifications 8 Indoor Temperature 8 Outdoor Temperature...

Page 3: ...own and lift off the front of the transmitter Insert two new AA batteries into the transmitter Observe the correct polarity Within three minutes the weather station will show readings in the outdoor temperature area on the LCD Note Allow the weather station and the transmitter to stay within 10 feet of each other for the first 15 minutes of set up Troubleshooting After the batteries are inserted t...

Page 4: ...7 Press the SETTINGS button to confirm and move to the date 8 The Date will flash 9 Use the MAX or MIN buttons to choose the date 10 Press the SETTINGS button to confirm and move to Fahrenheit Celsius Note The day of the week will set automatically once the year month and date are set 12 hour or 24 hour Time Format The Time may be displayed in 12 hour or 24 hour format Default is 12 hour time Note...

Page 5: ...no buttons are pressed for ten seconds the weather station will save the last change and default back to normal time mode Activate Deactivate Time Alarm In normal mode press and release the TIME ALARM button once to show alarm time Press and release the TIME ALARM button repeatedly to turn ON OFF alarm The alarm icon appears when alarm is activated Note The crescendo alarm will ring for 2 minutes ...

Page 6: ...tation When the low battery icon appears in the outdoor OUT readings section replace the batteries in the outdoor transmitter Temperature Alerts Alert values are set when they flash in the outdoor and indoor temperature areas Temperature alerts are turned on or off in the Temperature Alert box From normal time and temperature display mode press and release the TEMP ALERT button to select o Outdoor...

Page 7: ...urn Alert OFF In normal mode press and release the TEMP ALERT button to select the temperature alert to turn off With HI or LOW alert selected press the MIN button to turn that alert OFF Heat Index and Dew Point Temperature Heat Index Heat Index combines the effects of heat and humidity It is the apparent temperature of how hot it feels to a human being As humidity increases the body is unable to ...

Page 8: ...Moon occurs when the moon is between the earth and sun so the illuminated portion of the moon is on the back side facing the sun and we cannot see it After a new moon the illuminated portion will increase or wax until the full moon occurs Full Moon occurs when the earth moon and sun are in approximate alignment with the moon and the sun on opposite sides of the earth The illuminated portion of the...

Page 9: ...of electrical wires and plumbing within a wall Best reception is achieved when the front or the back of the weather station is facing the outdoor transmitter This allows a larger portion of the antenna to receive a signal Position the Outdoor Transmitter Once the weather station shows the outdoor temperature place it and the transmitter in the desired locations and wait approximately 1 hour before...

Page 10: ...d at no charge as stipulated herein with new or reconditioned parts or products if found to be defective during the limited warranty period specified above All replaced parts and products become the property of La Crosse Technology Ltd and must be returned to La Crosse Technology Ltd Replacement parts and products assume the remaining original warranty or ninety 90 days whichever is longer La Cros...

Page 11: ...ide a separation distance of at least 20 cm 8 inches from all persons and must not be co located or operating in conjunction with any other antenna or transmitter Statement according to FCC part 15 19 This device complies with Part 15 of the FCC Rules Operation is subject to the following two conditions 1 this device may not cause harmful interference and 2 this device must accept any interference...

Page 12: ...duced in any form even in excerpts or duplicated or processed using electronic mechanical or chemical procedures without written permission of the publisher This handbook may contain mistakes and printing errors The information in this handbook is regularly checked and corrections made in the next issue We accept no liability for technical mistakes or printing errors or their consequences All trad...

Reviews: