background image


29


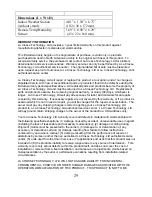
Dimensions (L x W x H) 

Indoor Weather Station 
(without stand): 

4.01” x 1.50” x 6.75”   
(102 x 36 x 172mm) 

Remote Temp/Humidity 
Sensor: 

1.69” x 0.90” x 6.29”  
 (43 x 23 x 160 mm) 


WARRANTY INFORMATION 

La Crosse Technology, Ltd provides a 1-year limited warranty on this product against 
manufacturing defects in materials and workmanship. 
 
This limited warranty begins on the original date of purchase, is valid only on products 
purchased and used in North America and only to the original purchaser of this product.  To 
receive warranty service, the purchaser must contact La Crosse Technology, Ltd for problem 
determination and service procedures.  Warranty service can only be performed by a La Crosse 
Technology, Ltd authorized service center.  The original dated bill of sale must be presented 
upon request as proof of purchase to La Crosse Technology, Ltd or La Crosse Technology, Ltd’s 
authorized service center. 
 
La Crosse Technology, Ltd will repair or replace this product, at our option and at no charge as 
stipulated herein, with new or reconditioned parts or products if found to be defective during the 
limited warranty period specified above.  All replaced parts and products become the property of 
La Crosse Technology, Ltd and must be returned to La Crosse Technology, Ltd.  Replacement 
parts and products assume the remaining original warranty, or ninety (90) days, whichever is 
longer.  La Crosse Technology, Ltd will pay all expenses for labor and materials for all repairs 
covered by this warranty.  If necessary repairs are not covered by this warranty, or if a product is 
examined which is not in need or repair, you will be charged for the repairs or examination.  The 
owner must pay any shipping charges incurred in getting your La Crosse Technology, Ltd 
product to a La Crosse Technology, Ltd authorized service center.  La Crosse Technology, Ltd 
will pay ground return shipping charges to the owner of the product to a USA address only. 
 
Your La Crosse Technology, Ltd warranty covers all defects in material and workmanship with 
the following specified exceptions: (1) damage caused by accident, unreasonable use or neglect 
(including the lack of reasonable and necessary maintenance); (2) damage occurring during 
shipment (claims must be presented to the carrier); (3) damage to, or deterioration of, any 
accessory or decorative surface; (4) damage resulting from failure to follow instructions 
contained in your owner’s manual; (5) damage resulting from the performance of repairs or 
alterations by someone other than an authorized La Crosse Technology, Ltd authorized service 
center; (6) units used for other than home use (7) applications and uses that this product was not 
intended or (8) the products inability to receive a signal due to any source of interference..  This 
warranty covers only actual defects within the product itself, and does not cover the cost of 
installation or removal from a fixed installation, normal set-up or adjustments, claims based on 
misrepresentation by the seller or performance variations resulting from installation-related 
circumstances. 
 
LA CROSSE TECHNOLOGY, LTD WILL NOT ASSUME LIABILITY FOR INCIDENTAL, 
CONSEQUENTIAL, PUNITIVE, OR OTHER SIMILAR DAMAGES ASSOCIATED WITH THE 
OPERATION OR MALFUNCTION OF THIS PRODUCT.  THIS PRODUCT IS NOT TO BE 

Summary of Contents for WS-9096U

Page 1: ...WS 9096U Wireless 433 MHz Radio controlled Sun Moon Weather Station Instruction Manual...

Page 2: ...2 Manual Time Setting 13 Calendar Setting 14 Snooze Setting 15 F C Setting 15 Weather Forecast Icon Sensitivity Setting 16 Features Alarm Setting 16 17 Sunrise set Moonrise set Information 17 18 Moon...

Page 3: ...e tape 5 Instruction manual and warranty card ADDITIONAL EQUIPMENT not included 1 Two fresh AA 1 5V batteries for indoor weather station 2 Two fresh AA 1 5V batteries for remoter temperature sensor 3...

Page 4: ...ther station However due to the nature of the earth s ionosphere reception is very limited during daylight hours The weather station will search for a signal every night when reception is best The WWV...

Page 5: ...es you can place your remote temperature humidity sensor outdoors and set your time The remote temperature humidity sensor should be placed in a dry shaded area The remote temperature humidity sensor...

Page 6: ...2 Observe the correct polarity and install 2 AA batteries 3 Replace the battery cover Note Immediately after the batteries have been installed each LCD Liquid Crystal Display will flash and a tone wi...

Page 7: ...panel of the weather station and 2 on the front 1 SET button Enter manual setting modes LCD contrast city location time zone DST ON OFF WWVB ON OFF 12 24 hour display manual time setting calendar sno...

Page 8: ...r is used Pressed together with MAX MIN R button for 3 sec allows temperature humidity channel reset Exit any set mode anytime during setting and to return to the normal display mode Stop the alarm du...

Page 9: ...forecast and outdoor data C Manual Setting Sequence The following manual settings can be changed when pressing the SET button LCD contrast setting City location setting Time zone setting DST Daylight...

Page 10: ...er station to see the 45 preset city names list Any city can be selected in order to view the sun moon data the default city is Washington D C To select a city 1 Open the left panel on the weather sta...

Page 11: ...highlights the selected time zone for 5hr EST 6hr CST 7hr MST and 8hr PST zones 5 Press and release the SET button to confirm and enter the DST Daylight Saving Time setting DST Daylight Saving Time Se...

Page 12: ...button to confirm and enter the 12 24 HOUR setting Note If the WWVB time reception function is turned OFF the clock will not attempt any reception of the WWVB time signal as long as the WWVB OFF funct...

Page 13: ...s and release the PLUS button or MINUS button to set the minutes 6 Press and release the SET button to confirm and enter the Calendar setting Note The unit will still try to receive the signal between...

Page 14: ...MINUS button to set the year 3 Press and release the SET button to confirm the year and to enter the month setting 4 The month starts flashing 5 Press and release the PLUS or MINUS button to set the m...

Page 15: ...OFF when the OFF digit is being displayed 3 Press and release the SET button to confirm and enter the Temperature setting Note If the snooze time has been set OFF the snooze function will not be activ...

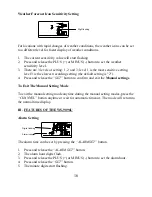
Page 16: ...t setting is 2 4 Press and release the SET button to confirm and exit the Manual settings To Exit The Manual Setting Mode To exit the manual setting mode anytime during the manual setting modes press...

Page 17: ...e snooze setting Otherwise the snooze function will not be activated To stop the alarm press any button during alarm ringing SUN MOON DATA AND MOON PHASES Sun Moon Data for Selected City 1 The sunrise...

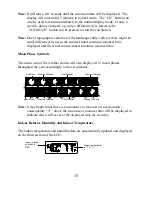
Page 18: ...unrise sunset moonrise moonset time Moon Phase Symbols The moon icon of the weather station will also display all 12 moon phases throughout the year accordingly to the set calendar Note It may happen...

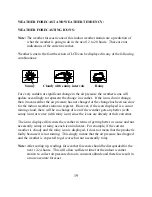
Page 19: ...egister However if the icon displayed is a sun or raining cloud there will be no change of icon if the weather gets any better with sunny icon or worse with rainy icon since the icons are already at t...

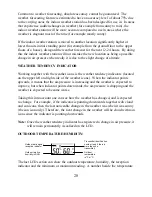
Page 20: ...indicators located on the upper left and right side of the weather icons When the indicator points upwards it means that the air pressure is increasing and the weather is expected to improve but when...

Page 21: ...m and minimum outdoor temperature humidity and the time at which they were recorded press and hold the MAX MIN R button for 4 seconds This will reset all minimum and maximum data recorded to the displ...

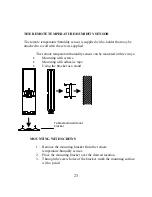
Page 22: ...Set Up Guide for programming and operating instructions MOUNTING Note Before permanently mounting ensure that the indoor weather station is able to receive WWVB signals from the desired location Also...

Page 23: ...humidity sensor can be mounted in three ways Mounting with screws Mounting with adhesive tape Using the bracket as a stand MOUNTING WITH SCREWS 1 Remove the mounting bracket from the remote temperatu...

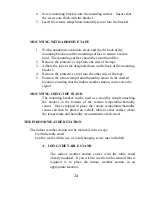
Page 24: ...sensor in the desired location ensuring that the indoor weather station can receive the signal MOUNTING USING THE STAND The mounting bracket can be used as a stand by simply attaching the bracket to...

Page 25: ...enver Colorado Washington D C Jacksonville Florida Miami Florida Atlanta Georgia Des Moines Iowa Boise Idaho Chicago Illinois Kansas City Kansas New Orleans Louisiana Boston Massachusetts Portland Mai...

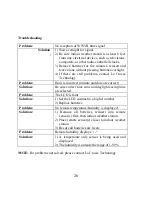
Page 26: ...date are correct Solution Be sure correct time zone and daylight saving time are selected Problem The LCD is faint Solution 1 Set the LCD contrast to a higher number 2 Replace batteries Problem No rem...

Page 27: ...displays and units with a soft damp cloth Do not use solvents or scouring agents They may mark the displays and casings Do not submerge in water Immediately remove all low powered batteries to avoid l...

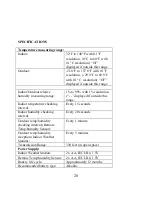
Page 28: ...99 with 1 resolution displayed if outside this range Indoor temperature checking interval Every 15 seconds Indoor humidity checking interval Every 20 seconds Outdoor temp humidity checking interval Re...

Page 29: ...by this warranty or if a product is examined which is not in need or repair you will be charged for the repairs or examination The owner must pay any shipping charges incurred in getting your La Cros...

Page 30: ...ER This device complies with part 15 of the FCC rules Operation is subject to the following two conditions 1 This device may not cause harmful interference 2 This device must accept any interference r...

Reviews: