


25
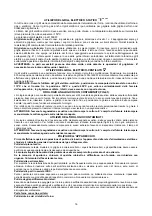
thermostat knob (this makes the gas start to flow) and keep it pressed, after the burner has been completely lit, for 10
seconds. Release the knob and make sure that the burner remains on, otherwise repeat the operation.
- Electric ignition
(only for the models equipped with this device):
In this case, first open the oven door, then push and turn the knob to the maximum temperature setting (number 8)
(fig.27-28). Then press the thermostat knob (models with ignition trough knob). Wait about 10 seconds after the burner
has been completely lit and then release the knob. Make sure that the burner remains on, otherwise repeat the operation.
As for cookers without ignition trough knob, press the thermostat knob and the key with the spark symbol, wait about 10
seconds after the burner has been completely lit and then release the knob. Make sure that the burner remains on,
otherwise repeat the operation.
The ignition device should not be used for more than 15 seconds. If after that period the burner still has not
been lit, do not use the device and open the door of the room or wait at least 60 seconds before trying to light
the oven again.
WARNING: when trying to light the oven, the door must always be open. When using the oven, leave the cooker
cover open to prevent it from overheating.
NOTICE: when using the oven for the first time it should be operated for 15-30 minutes at a temperature of
about 250° without cooking anything inside in order to eliminate any moisture and odours from the internal
insulation.
During normal oven use, after lighting the burner and setting the desired temperature, wait about 15 minutes before
putting in any food to preheat the oven.
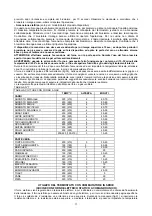
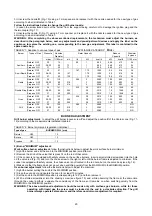
The oven is equipped with 4 guides at different heights (fig.30) which can be used to insert shelves or the tray. To keep
the oven as clean as possible it is recommended to cook meat on the tray or on the shelf that has been inserted inside
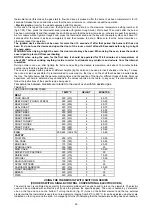
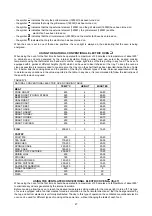
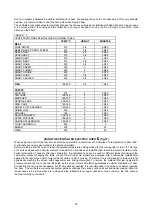
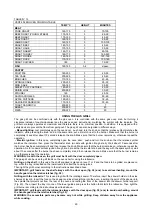
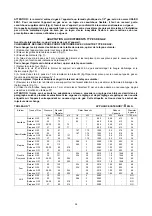
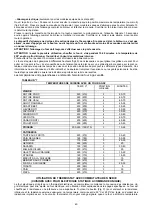
the tray. The table below lists the general cooking times and the position of the tray for different types of foods. Personal
experience will help to determine any variations in the values reported in the table. In any case, it is recommended to
follow the instructions of the specific recipe being used.
Temperatures between brackets are referred to the use of oven with fan assisted gas.
TABLE N°7
GAS OVEN COOKING TABLE
TEMP
°C
HEIGHT
MINUTES
MEAT
PORK ROAST
220 (210)
4
60-70
BEEF ROAST (YOUNG STEER)
250 (240)
4
50-60
BEEF ROAST
240 (230)
4
60-70
VEAL ROAST
220 (210)
4
60-70
LAMB ROAST
220 (210)
4
45-55
ROAST BEEF
230 (230)
4
55-65
ROAST HARE
235 (225)
4
40-50
ROAST RABBIT
220 (210)
4
50-60
ROAST TURKEY
235 (225)
4
50-60
ROAST GOOSE
225 (215)
4
60-70
ROAST DUCK
235 (225)
4
45-60
ROAST CHICKEN
235 (225)
4
40-45
FISH
200-225 (190-215)
3
15-25
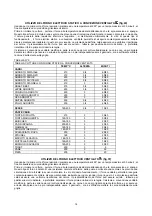
PASTRY
FRUIT PIE
200 (210)
3
35-40
TEA CAKE
190 (180)
3
50-55
BRIOCHES
175 (165)
3
25-30
SPONGE CAKE
235 (225)
3
20
RING CAKE
190 (180)
3
30-40
SWEET PUFF PASTRIES
220 (210)
3
20
RAISIN LOAF
220 (210)
3
15-20
STRUDEL
180 (170)
3
15-20
SAVOIA COOKIES
190 (180)
3
15
APPLE FRITTERS
220 (210)
3
20
SAZOIARDI SANDWICH
220 (210)
3
20-30
TOAST SANDWICH
250 (240)
4
5
BREAD
220 (210)
3
30
PIZZA
220 (210)
3
20
USING THE THERMOSTAT WITH SWITCH IN SERIES
(COOKERS WITH A SINGLE-CONTROL CONVENTIONAL ELECTRIC OVEN)
The electric oven is controlled by an electric thermostat combined with a switch used to turn on the elements. The electric
oven can be combined with an electric grill (to use the grill see the specific pages). The oven is heated by 2 elements:
one on the top and one on the bottom. Turning the knob (fig. 31) turns on the bottom element and the top external
element while the thermostat is used to set a temperature ranging from 50°C to 250°C. It can be adjusted using the scale
indicated on the ring around the knob. An orange light turns off indicating that the temperature setting has been reached.
Summary of Contents for AMN805GEVSWE
Page 47: ...47 Fig 3 Fig 4 Fig 5 Fig 6 Fig 7 Fig 8 Fig 9 Fig 10 Fig 11 Fig 12...
Page 48: ...48 Fig 13 Fig 14 Fig 15 T Fig 16 Fig 17 Fig 18 Fig 19 Fig 20 Fig 21 Fig 22 Fig 23 Fig 24...
Page 50: ...50 Fig 41 Fig 42 Fig 43 Fig 44 Fig 45 Fig 46 Fig 47 Fig 48 Fig 49 Fig 50...


