- 6 -
3.9
We recommend the use of an air exhaust tube which has
the same diameter as the air exhaust outlet hole. If a pipe with
a smaller diameter is used, the efficiency of the product may
be reduced and its operation may become noisier.
3.18 Warning:
if the bulbs are not working, ensure that they
are screwed in fully.
3.19 Installation:
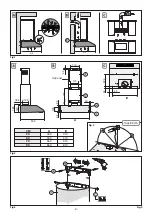
Prior to proceeding with the assembly operations (according
to the model that you have purchased), to facilitate handling
of the device, remove the grille as indicated in figure 8 or the
aluminium panels as indicated in figure 9.
3.20
The flange
D
, to which the air exhaust pipe is connected,
and a plug
B
, used to shut off the unused air outlet, are both
supplied with the product.
3.21
This device may be installed in two different ways:
1. Fixing the hood to the lower part of the wall cabinet
(Fig.2):
- Make 4 holes in the wall cabinet respecting the measurements
indicated in figures 2A-2C.
- Position the hood underneath the wall cabinet and fix it into
place using 4 screws (not supplied) suitable for the type of
cabinet.
2. Fixing the hood to the wall (Fig.2):
- Make 4 holes in the wall cabinet respecting the measurements
indicated in figures 2A-2B.
- Hang the hood on the wall, using the 2 holes
H
, align it in a
horizontal position and fix it definitively to the wall using the
two lower safety holes
I
(Fig.2B).
- For the various installations use screws and screw anchors
suited to the type of wall (e.g. reinforced concrete, plaster-
board, etc.). If the screws and screw anchors are provided with
the product, check that they are suitable for the type of wall
on which the hood is to be fixed.
3.22 Mounting decorative ducts (optional):
- This hood model may have decorative ducts as optional ac-
cessories - ask your retailer for information.
- Provide the electrical power supply within the space of the
decorative duct.
- If your appliance must be installed as an extractor version or
as a version with an external motor, make sure an air exhaust
hole is prepared (Fig.1B - Fig.1C).
- Adjust the width of the upper duct support bracket (Fig.4).
Then fix it to the wall so that it is on the same axis as the hood
using screws
A
(Fig.4) and adhering to the distance from the
ceiling shown in (Fig.2B). Connect the flexible hose (not sup-
plied) to the flange
D
(Fig.1B).
- Put the upper connector
F
into the lower connector
G
and
hang the decorative ducts on the wall, as indicated in figure 5.
- Connect the flexible hose to the air exhaust hole made previ-
ously (only in the extraction or external motor version).
- Pull out the top connector
F
as far as the bracket and fix it
using screws
C
(Fig.4).
- When carrying out the fixing procedures, use only screws
and screw anchors which are suited to the type of wall (e.g.
reinforced concrete, plasterboard etc.).
- If the screws and screw anchors are supplied with the ap-
pliance, make sure that they are suited to the type of wall to
which the hood must be fixed.
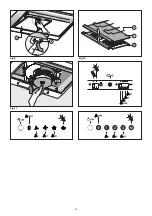
3.23
The hood is already prepared for the version with which
it was ordered. The versions may be:
- Extraction
(Fig.1B-6).
- Filter
(Fig.1A-7-11).
- If the hood is an
extractor
model, the lever
C
must be posi-
tioned as indicated in figure 6.
- If the hood is a
filter
model, the lever
C
must be positioned
as indicated in figure 7.
3.24 Extractor version:
The appliance expels the fumes through an outside wall or
a duct. It is necessary to buy a telescopic pipe in accordance
with the standards in use (inflammable) and connect it to
flange
D
(Fig.1B). The flange
D
is supplied with the product
and should be fixed above the air outlet hole of the hood as
indicated in figure 6.
3.25 Filtering version:
To transform an extractor hood version into a filter hood ver-
sion, contact your appliance dealer and ask for active charcoal
filters. The filters should be fitted to the extraction assembly
inside the hood, by centring them and rotating them 90
degrees, until they click into place (Fig.11). To do this, remove
the grille
D
or the panels
G
(Fig.8 - Fig.9). Close the air outlet
opening with the plug
B
, as indicated in figure 7.
USE AND MAINTENANCE
4.1
We recommend that the cooker hood is switched on
before any food is cooked. We also recommend that the ap-
pliance is left running for 15 minutes after the food is cooked,
in order to thoroughly eliminate all contaminated air. The ef-
fective performance of the cooker hood depends on constant
maintenance; the anti-grease filter and the active carbon filter
both require special attention.
4.2
The anti-grease filter
is responsible retaining the grease
particles suspended in the air, therefore it is subject to clogging
with variable frequency according to the use of the appliance.
4.3
To prevent the danger of possible fires, at least every 2
months one must wash the anti-grease filters by hand using
non-abrasive neutral liquid detergents or in the dishwasher
at low temperatures and on short cycles.
4.4
1
In the event that acrylic anti-grease filters are used,
hand-wash every 2 months, using neutral non-abrasive liquid
detergents and replace them after every 6 washes.
4.5
After a few washes, colour alterations may occur. This does
not give the right to claim their replacement.
4.6
The active carbon filters
are used to purify the air that
is sent back into the room and its function is to mitigate the
unpleasant odours produced by cooking.
4.7
The non-regenerable active carbon filters must be re-
placed at least every 4 months. The saturation of the active
charcoal depends on the more or less prolonged use of the
appliance, on the type of kitchen and on the frequency with
which anti-grease filter is cleaned.
4.8
Before remounting the anti-grease filters and the
regenerable active charcoal filters it is important that they
are completely dry.
4.9
Clean the hood frequently, both internally and exter-
nally, using a cloth dampened with denatured alcohol or
neutral liquid detergents that are non abrasive.
4.10
The lighting system is designed for use during cooking
and not for the prolonged general lighting of the room. The
prolonged use of the lighting system significantly decreases
the average duration of the bulbs.
4.11
Attention:
the non compliance with the hood cleaning
warnings and with the replacement and cleaning of the filters
entails risk of fires. One therefore recommends keeping to the
suggested instructions.
Summary of Contents for K60TU
Page 1: ...COOKER HOOD User instructions K60TU K80TU K90TU AR GB...
Page 3: ...3 Fig 7 Fig 6 Fig 8 Fig 5...
Page 4: ...4 Fig 11 Fig 9 Fig 10...
Page 8: ...8 4 28 D 10 B 8 B C 5 0 4 11 4 27 A 9 4 9 4 10...
Page 10: ...10 3 9 65 AR 1A 1B 1C 1 1 2 1 2 2 2 3 3 1 3 2 2 4 3 7 3 6 3 8...
Page 11: ......
Page 12: ...3LIK2250...


