5
Assembly Instructions
IMPORTANT - Remove any packaging before use, but retain the safety instructions and store them with this
product.
ASSEMBLY
STEP 1 -
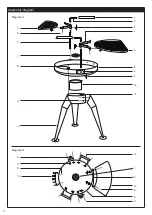
Attach the 3x legs (12) to leg ring (11) using 2x bolts (A) for each leg. (Note that holes are threaded
so no nuts are required).
STEP 2 -
Attach firebowl (8) to the tabs on the leg ring (11) using 3x bolt sets (B).
STEP 3 -
Insert the ash bowl (10) into the firebowl (8) and place in the vent (7) above.
STEP 4 -
Attach 2x grill bar brackets (9) and 2x handles (13) to the outside edge of the firebowl (8) using 8x
bolt sets (C).
Attach 2x side table brackets (15) to the outside edge of the firebowl (8) using 4x bolt sets (E).
Attach tool hooks (14) to the outside edge of the firebowl (8) using 2x bolts (D).
Please refer to diagram B.
STEP 5 -
Attach wood side table (16) to side table brackets (15).
STEP 6 -
Insert 2x grill bars (5) into the 2x grill bar brackets (9) located on the outside edge of the firebowl.
Secure the grill bars to the brackets by using 2x fixing bolts (F). Ensure that the ridged end of the
pole is facing upwards.
STEP 7 -
Fix the 2x cooking grills (3 & 6) to the 2x cooking grill brackets (4) using 4x bolt sets (E) per grill.
Site the cooking grill brackets (4) onto the grill bars (5) and secure them using 2x fixing bolts (F).
STEP 8 -
Screw 2x right-angle bars (2) into the cooking grill brackets (4). Ensure that they are facing in the
opposite direction to that of the cooking grill. Secure by tightening the preattached hex bolt using the
allen key provided.
STEP 9 -
Screw 2x grill handles (1) on the end of the right-angle bars (2).
Your product is now ready to use, but please ensure you have read these instructions thoroughly prior
to use.
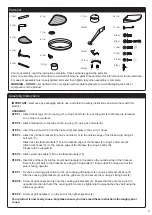
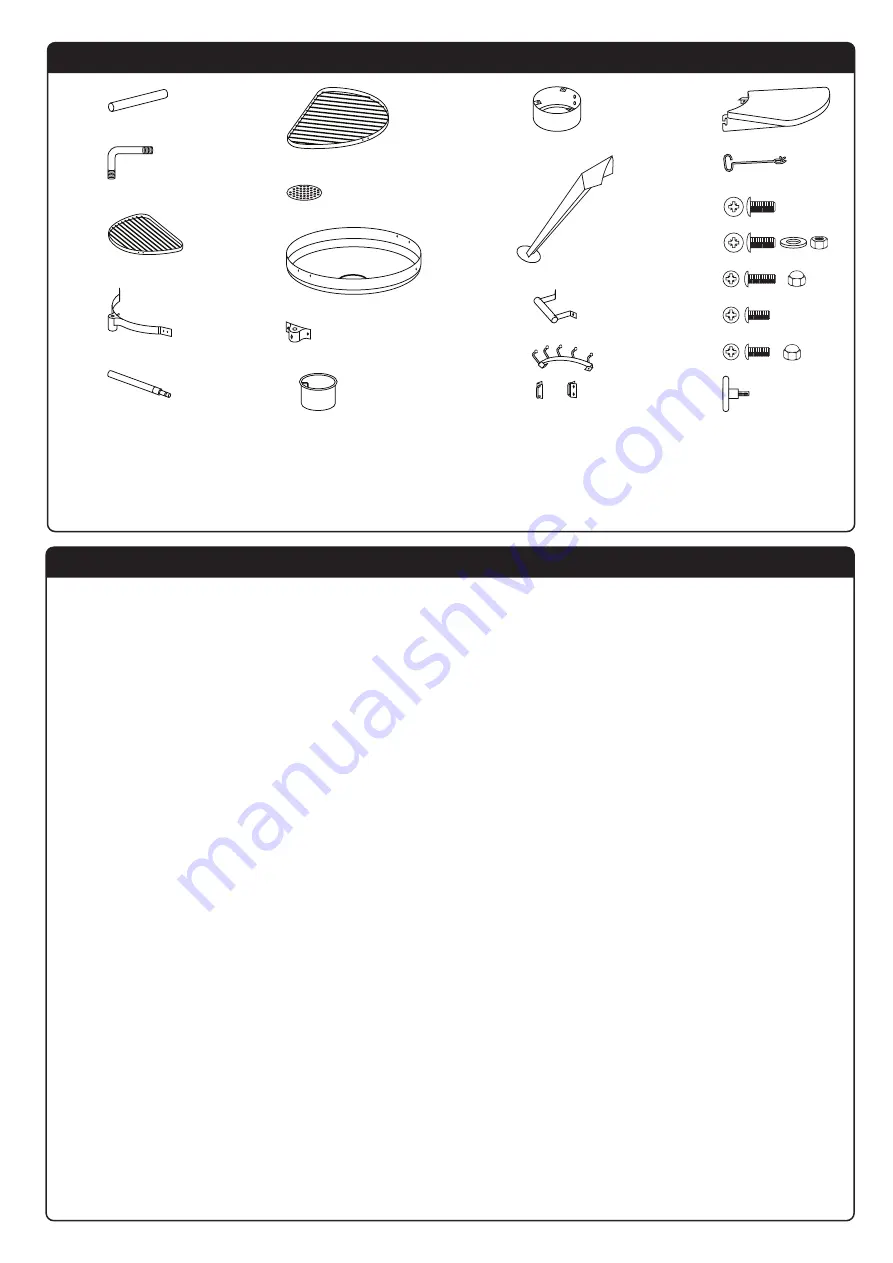
Parts list
WARNING - DO NOT over tighten bolts; only tighten with moderate pressure to avoid damaging the bolts or
components of the product.
Prior to assembly, read the instructions carefully. Check all parts against the parts list.
Carry out assembly on a soft surface to avoid scratching the paint. Please retain this information for future reference.
For ease of assembly only loosely tighten bolts and then tighten fully when assembly is complete.
16 (1x)
17 (1x)
B (3x)
1 (2x)
2 (2x)
4 (2x)
5 (2x)
3 (1x)
7 (1x)
6 (1x)
8 (1x)
9 (2x)
10 (1x)
11 (1x)
12 (3x)
13 (2x)
15 (2x)
C (8x)
A (6x)
E (12x)
F (4x)
D (2x)
14 (1x)
R
L


