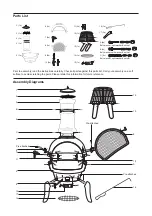
Assembly Instructions
IMPORTANT! - Remove any packaging before use, but retain the safety instructions and store them with this product.
STEP 1 - Attach the 3x legs (17) to bottom bowl (5) by firstly removing the pre-attached washer, split washer and nut
from each leg. Push the pre-attached bolts on the legs through the bottom bowl (5) and secure each leg with
the previously pre-attached washer, split washer, and nut.
STEP 2 - Stand on legs and align holes of top bowl (6) with holes in the bottom bowl (5). Attach bowls together with
2 x front brackets (10) and 2 x rear brackets (11) using 2 x bolts sets (A) per bracket. Make sure the
brackets are positioned correctly as these are also used to support the grill. The long edge of the brackets
should face towards the front of the chimenea.
STEP 3 - Attach the top flue section (3) to the bottom flue section (4) using 3 x sets of bolts, washers and nuts (B).
STEP 4 - Align the bolts holes on the bottom of the flue (4) with the holes in the top bowl (6) using three sets of bolts,
washers and nuts (C).
STEP 5 - Attach 1 x door latch (9) to the left side of the top bowl (6) and attach 1 x door latch (9) to the left of the vent
hole in the bottom bowl (5) using pre-attached bolts and nuts.
STEP 6 - Add flue grate (2) and rain lid (1) to the top of the flue (note rain lid to be removed when in use).
STEP 7 - Attach 1 x handle (7) to either side of the top bowl (6) using pre-attached bolts, washers and nuts. Attach air
vent (15) to bottom bowl (5) using pre-attached bolts, washers and nuts. Attach mesh door (8) to the right
side of the top bowl (6) using pre-attached bolts and nuts.
Note: a little pressure on the door handle may be needed to locate this within the door latch. This secure
fitting is to ensure the door can not accidentally be opened during use.
STEP 8 - Place the log grate (14) into the base of the chimenea.
STEP 9 - To use slide in grill (12), first attach grill handles (13) to the grill by locating the handle ends onto the bars at
the front of the grill. The grill can now slide into the chimenea on the left and right brackets (10) and slotted
over the rear brackets (11) to secure it.
The product is now ready to use but please ensure you have read these instructions thoroughly prior to use.


