29
ENGLISH
6.5 Electric cup warmer (Optional)
The on/off button 4 is used to heat the cup holding shelf; it can be switched on and off at will.
6.6 Steam delivery
This function is used to deliver steam from the boiler to heat liquids, or to foam milk for cappuccinos. Lower
or raise the lever 5 to obtain the maximum flow of steam. Move the lever sideways to the left of right to obtain
a reduced steam flow.
6.7 Hot water delivery
The lever-operated tap 11 is used to deliver hot water from the boiler for making tea, camomile herb tea, etc.
This lever operates in the same way as the steam delivery lever.
6.8 Preparation of ground coffee
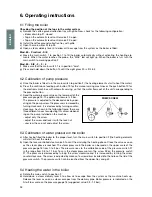
Make sure that the filter with the desired capacity has been installed in the filter holder. After the coffee has
been loaded and pressed into the filter, the coffee level in the filter must just touch the spray head on the
brewing unit. To check for correct coffee level, install the full filter holder onto the brewing unit and then remo-
ve the holder. Now, look at the surface of the coffee: if the level is correct, the coffee will contain the imprint
of the central mounting screw on the spray head of the brewing unit.
6.9 Brewing coffee
Semiautomatic models: 85 - S
Once the filter holder has been installed onto the machine, simply press the switch 19 to actuate the pump
and solenoid valve. When the coffee in the cup has reached the desired level, move the switch back to its
original position to terminate brewing.
Automatic models: 85 - E
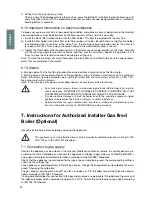
Once the filter holder has been installed onto the machine, press one of the five brewing buttons. The first two
buttons 6 and 7 are used to select the two pre-programmed single portions of coffee. The second two buttons
8 and 9 are used to select the two pre-programmed double portions of coffee. The fifth button 10 immediately
shuts down brewing if pressed during a coffee brewing cycle. Button 10 can also be used to brew the desired
quantity of coffee manually: press this button to start brewing, and presse the button a second time to stop
brewing when the desired quantity of coffee has been obtained.
6.10 Draining the boiler
If the boiler must be emptied, shut off the power to the machine by moving the main switch 1 to the “zero”
position. On gas-fired machines, extinguish the flame by closing the gas feed valve. Open the drain tap 21
until the boiler has been completely drained.
Important: be sure to close the tap before refilling the boiler.
6.11 Automatic operation - programming the coffee brewing cycles
Automatic models: 85 - E
A.
Entering the programming mode
Set the main switch 1 on the machine to position “zero” (machine switched off).
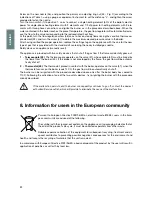
Hold down the fifth button 10 on the first brewing unit. Now, rotate the main switch 1 to position 1 (machine
switched on). After a few seconds, release the button 10. The indicator led for the button will now begin to
flash, as will the same led on all the other brewing units. The machine is now ready for programming.
B.
Programming
To program the four portions on brewing unit I, proceed as follows: place the single-portion filter into the
single-portion filter holder. Use the coffee dispenser to dispense a single portion of coffee into the filter.
Mount the filter holder onto brewing unit I.
Place an espresso cup under the spout on the filter holder.
Press the first button 6 whose portion is to be programmed. When the coffee in the cup reaches the
desired level, press the fifth button 10 to stop brewing.
Follow the same procedure to program the other portions on each group. Once the four portions on brew-
ing unit I have been programmed as desired, the relative data can be transferred to the other brewing
units by pressing the fifth button 10 on each unit. When each button 10 is pressed, the indicator led for
the button will stop flashing and remain steadily lit. This shows that the data on brewing unit I has been
transferred successfully.


