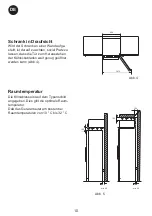
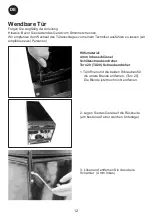
background image

GB


23


Temperature setting at the bot- 
tom of the appliance


Push SET2. Then the temperature at the 
bottom of the appliance can be adjusted up 
and down by means of 

the “up and down” 

buttons. The temperature can be adjusted 
from 5 to 22°C, however so that the tem- 
perature cannot be set at a higher tempera- 
ture than the actual set point for the upper 
temperature sensor


Alarm devices


There is a sub-alarm for the low-temper- 
ature sensor and an excess-alarm for the 
high-temperature sensor.


The alarm consists of a beeper and a warn- 
ing on the display.


Alarm for high temperature: beep sound


+ alternating display of 

“HtA” and actual 

temperature


Alarm for low temperature: beep sound


+ alternating display of 

“LtA” and actual 

temperature


The alarm temperature depends on the set 
points.


The beep sound can be cancelled by push- 
ing a random thermostat button. Push the 
on/off button to erase the display alarm,


first for cancelling the alarm, then again for


restarting the compressor.


Door alarm


When the door has been open for more 
than 2 minutes the door alarm is activated.


Light


To turn off the lights, press once


Permanent lighting


For presentation purposes of your wine,


you can turn the lights permanently. Please 
press the light switch image 

twice. To 

switch off the lights press on 

 again.


Two-zone setting for serving 
temperature


Typical serving temperature settings for the 
top and bottom sections are 16°C and 6°C 
respectively. With these settings, a suitable 
temperature gradient will be achieved in


the cabinet for the storage of various types 
of wine distributed from top to bottom as 
follows


●  heavy red wines +16 to +19°C


●  rosé and light red wines +12 to +16°C


●  white wines +10 to +12°C


●  champagne and sparkling wines +6 to


+8°C


It is recommended that wine be served at a 
temperature which is a couple of degrees 
lower than the desired drinking temperature 
as the wine will be warmed slightly when it


is poured into the glass


Single-zone setting for long- 
term storage


For long-term wine storage, the top and bot- 
tom sections should both be set at 12°C. 
With identical settings for the top and bot- 
tom sections, the controls will maintain an 
even temperature throughout the cabinet. 
However, the temperature in the room will 
gradually affect the temperature in the cabi- 
net through its door and sides, creating


a slight temperature gradient from top to


Summary of Contents for VIP 195 G

Page 1: ...VIP 195 N VIP 195 G FR Mode d emploi GB Instructions for use DE Bedienungsanleitung ...

Page 2: ...ge et l entretien par l usager ne doivent pas être effectués par des enfants sauf s ils ont plus de 8 ans et qu ils sont surveillés Conservez tous les emballages hors de portée des enfants car il existe un risque de suffocation Si vous décidez de mettre au rebut l ap pareil débranchez le de la prise murale coupez le câble de connexion aussi proche de l appareil que vous le pouvez et retirez la por...

Page 3: ...électrocu tion Sécurité électrique Nous ne pouvons pas être tenus pour responsables de tout incident causé par une mauvaise installation électrique Le cordon d alimentation ne doit pas être rallongé N utilisez ni prolongateur ni adaptateur ni prise multiple Vérifiez bien que la priser murale n est pas endommagée Une prise murale en mauvais état pourrait entrainer une sur chauffe de l appareil et s...

Page 4: ... et entretien Avant tout entretien débranchez l appa reil et coupez le courant Ne nettoyez pas l appareil avec des objets métalliques un système à vapeur des huiles volatiles des solvants orga niques ou des composants abrasifs N utilisez pas d objets tranchants ou pointus pour retirer la glace Utilisez un grattoir en plastique Information importante à propos de l installation Pour que les branchem...

Page 5: ... vo tre appareil en nettoyant périodiquement le condenseur voir chapitre Entretien courant de votre appareil Contrôlez périodiquement les joints des portes et assurez vous qu elles ferment toujours de manière efficace Si ce n est pas le cas adressez vous à votre service après vente Tout opération électrique doit être effec tuée par un technicien qualifié et compé tent Cet appareil doit être dépann...

Page 6: ...c de l isobutane R600a elles ne peuvent être placées dans une zone avec des sources d ignition par exemple descellé contacts électriques ou lorsque le fluide frigorigène pourrait rassembler en cas de fuite Le type de fluide fri gorigène est indiqué sur la plaque signalétique de l armoire Attention Ne pas utiliser d appa reils électriques dans les compar timents de l appareil sauf si elles sont du ...

Page 7: ...res conditions conformément à la directive européenne 2002 96 CE sur les déchets d équipements électriques et électroniques Adressez vous à votre mairie ou à votre revendeur pour connaître les points de collecte des appareils usagés les plus proches de votre domicile Nous vous remercions pour votre collaboration à la protection de l environ nement Sommaire ATTENTION 2 Pour apprendre à connaître vo...

Page 8: ...FR 8 Pour apprendre à connaître votre cave à vin Éclairage Panneau de commande Filtre à charbon Clayette en bois Joint d étanchéité Plaque signalétique Plinthe Serrure Pieds réglables fig 1 ...

Page 9: ...te installation de l appareil Ce dispositif est conforme aux directives de l U E le concernant y compris la Directive 2014 35 EU sur la Basse Tension et la Directive 2014 30 EU sur la Compatibilité Electromagnétique La prise de courant doit rester facilement accessible Brancher la fiche mâle de l ap pareil dans une prise secteur en 220 240 V 50Hz églementairement reliée à la terre La prise doit êt...

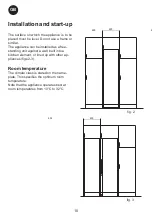
Page 10: ...à des températures ambiantes de 10 à 32 C Installation La surface sur laquelle l appareil est placé doit être plane et horizontale Ne pas utiliser de cadre ou autre support L appareil peut être installé comme unité in dépendante le long d un mur être encastré dans un élément de cuisine ou placé côte à côte avec d autres appareils fig 2 et 3 600 600 600 600 fig 2 fig 3 ...

Page 11: ...e être assez ouverte pour retirer les rayonnages fig 4 600 fig 4 1075 100 100 Ventilation Il est important que l appareil soit bien ven tilé et que l air puisse circuler librement au dessus en dessous et autour de l appareil Les schémas ci dessous illustrent la façon dont la circulation d air peut être assurée fig 5 100 min 30 min 30 fig 5 ...

Page 12: ...oit placé sur une surface parfaitement plane Pour ce faire ajuster les pieds réglables de devant en les tournant pour lever ou baisser fig 7 Contrôler à l aide d un niveau que l appareil est bien positionné Le poids indiqué sur le dessin ci dessous est pour une clayette fixe Sur une clayette coulissante vous ne pouvez mettre qu une seule rangée de bouteilles soit un poids maximal de 10 kg max 85 k...

Page 13: ... un technicien nous recomman dons deux personnes Matériel requis Clé Allen 4 mm Tournevis à tête plate Tournevis Torx 20 TX20 1 La porte s ouvre et les deux vis qui attachent le couvercle du bas sont enle vées Torx 20 N enlevez pas le cou vercle maintenant 2 Couchez l appareil sur le dos de préfé rence sur une surface douce 3 Desserrez la charnière du haut et enle vez la clé Allen 4 mm ...

Page 14: ...as noir noir bandes blanches Poussez vers le bas le mécanisme de déclenchement pour libérer les bouts des fils Remarque Le fil noir est le et cor respond au fil rouge du côté opposé Le fil noir bandes blanches est le 0 neutre et correspond au fil noir du côté oppo sé ceci est important pour le montage ultérieur des fils 7 Pour inverser le verre du bas les sup ports doivent être enlevés Desserrez l...

Page 15: ...t montez les supports sur le profilé en plastique à chaque bout Ne pas trop serrer les vis Remarque L écrou doit s insérer dans la rainure du centre 9 La porte doit être soulevée des char nières 10 Dévissez la goupille de serrure à l aide du tournevis à tête plate et retirez la 11 Tirez vers le haut le cylindre de serrure et réinstallez le cylindre de serrure et la goupille de serrure sur le côté ...

Page 16: ...sur le côté opposé Remarque La brousse doit également être déplacé 14 Tournez la porte pour que le côté verre soit en bas Remarque Mettez quelque chose entre le verre et l autre surface armoire afin de minimiser les rayures Desserrez alors la garniture sur le côté bas de la porte en tirant 15 Les fils de la DEL sont tirés vers le haut et sortis ...

Page 17: ...s fils doivent être replacés dans le trou oblong et sortir du nouveau trou de charnière Ceci peut s avérer difficile donc essayez de monter un seul fil d abord 18 Utilisez alors du ruban pour attacher les deux bouts de fil au premier et tirez les complètement enlevez ensuite le ruban ...

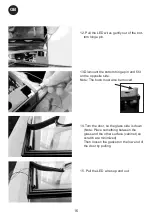
Page 18: ...e d un sèche cheveux Étirer ensuite doucement le joint vers l extérieur pour qu il assure une bonne étanchéité contre le cabinet En chauf fant le joint attention de ne pas le faire fondre 20 Le coussinet de charnière de porte est démonté et monté sur le côté opposé 21 Les fils sont tirés dans le coussinet avant qu il ne soit monté dans le trou de charnière de porte 22 La porte est inversée à nouve...

Page 19: ... dans le trou pour fils dans la colonne en plastique 25 Les fils sont montés à nouveau voir 6 assurez vous qu ils sont fixés ferme ment 26 La porte est poussée en place par des sus les goupilles de charnière et les fils sont tirés simultanément pour éviter qu ils ne se coincent ...

Page 20: ...uveau L appareil est remis en position verticale et les deux vis sont installées voir 1 Avant d utiliser votre cave à vin Avant de connecter votre cave à vin à une prise électrique laissez la reposer à la verticale environ 24 heures Ceci réduira toute possibilité de dysfonction nement dans le circuit frigorifique causé par la manipulation de l appareil Si les DEL de la porte ne s allument pas mais...

Page 21: ...artiments Le chiffre du haut indique la température régnant dans le haut de l appa reil Le chiffre du bas indique la température régnant dans la partie inférieure de l appa reil L indicateur de température est équipé d un filtre intégré simulant la température régnant dans les bouteilles C est pourquoi l indicateur ne réagit pas aux variations de courte durée de la température de l air Réglage des...

Page 22: ...nt Il est possible de régler le seuil de tempéra ture qui déclenchera l alarme Le bip peut être annulé par une pression sur n importe quelle touche du thermostat Pour faire disparaître l alarme de l écran Eclairage Pour éteindre appuyez sur Eclairage permanent Pour la présentation de vos vins vous pou vez opter pour un éclairage permanent en appuyant 2 fois sur le pictogramme de la lumière Pour ét...

Page 23: ...n à l aide du bouton marche arrêt lorsque l appareil doit être nettoyé Il est préférable et plus efficace d utiliser un mélange d eau tiède et d une faible quantité de liquide à vaisselle max 65 C Ne jamais utiliser de produits de nettoyage abrasifs Utiliser un chiffon doux Rincer à l eau claire et bien essuyer La goulotte destinée à l écoulement de l eau de condensation de l évaporateur se trouve...

Page 24: ...es récipients ou des bouteilles se touchent dans l appareil Mettre l appareil de niveau Écar ter l appareil des éléments de cuisine ou des appareils qui sont proches de lui Séparer les bouteilles ou les réci pients qui s entrechoquent Le compresseur tourne sans inter ruption Température ambiante élevée Assurer une bonne ventilation La commande af fiche P1 La sonde du haut ne fonctionne plus ou a s...

Page 25: ...t le fournisseur peut prouver qu ils sont dûs à d autres causes que des erreurs ou défauts de fabrication et de matériaux par consé quent ne sont pas couverts par la garantie Veuillez noter que lorsqu une intervention dans la construction ou une modification des composants de l appareil a été faite la garantie et la responsabilité du fournisseur cesse et l appareil ne peut pas être utilisé légitim...

Page 26: ...nts sur la collecte et le recyclage des piles et appareils usagés veuillez vous renseigner auprès de votre mairie du service municipal d en lèvement des déchets ou du point de vente où vous avez acheté les articles concernés Le non respect de la réglementation relative à l élimination des déchets est passible d une amende Pour les utilisateurs profession nels au sein de l Union euro péenne Si vous...

Page 27: ......

Page 28: ...ally sensorially or mentally handicapped or who have not learned to use the appliance providing they are supervised by a person familiar with the appliance and who is aware of the risks involved Children should not be allowed to play with the appliance User cleaning and servicing operations should not be carried out by children unless they are more than 8 years old and are supervised Keep all pack...

Page 29: ...ng and insulating systems contain inflammable gases When the appliance is scrapped it should be deposited at an accredited collection centre Do not expose the ap pliance to fire Refrigerating fluid The refrigerating circuit in the appliance uses refrigerating isobutane R600a which is a highly inflammable natural gas and is therefore dangerous for the environment When transporting or installing the...

Page 30: ... Do not attempt to replace a damaged power cable contact your after sales service The power socket must be easily ac cessible but out of reach of children In case of doubt contact your installation technician Daily utilisation Do not store inflammable substances or fluids inside the appliance This would create a risk of explosion Do not operate other electrical equipment inside the appliance mixer...

Page 31: ...void fire risk wherever pos sible ensure that the appliance is not in contact with walls or with any hot element compressor condenser Observe the installation recommendations The appliance should not be placed close to radiators or cooking hot plates or gas rings Check that electrical sockets remain ac cessible when the appliance is installed POWER SAVING To limit the electricity consumption of yo...

Page 32: ...ane R600a and should not be placed close to ignition sources for example electrical contacts that are exposed or open contacts that could be closed by the refrigerat ing fluid in the event of a leak The refrigerating fluid type is specified on the power cabinet identification plate Caution Do not use electrical equip ment in the compartments of the ap pliance unless they are of the type recommende...

Page 33: ...iance will be recycled by the manufacturer under optimum condi tions in compliance with European directive 2002 96 EC relating to Waste Electrical and Electronic Equipment Contact your local municipal offices or your retailer to identify the nearest collection points for scrapped appliances Thank you for helping to protect the environment CLASS 1 LED PRODUCT Contents Warning 2 Get to know your win...

Page 34: ...GB 8 Get to know your wine cooler Lighting Control panel Charcoal filter Wooden shelf Sealing strip Nameplate Kick plate Lock Adjustable feet fig 1 ...

Page 35: ...st been all applicable local and national electrical codes Consult these codes lengths and sizes prior to cabinet installation This device complies with relevant EU directives including Low Voltage Directive 2014 35 EU and Electromagnetic Com patibility Directive 2014 30 EU The socket should be freely accessible Connect the appliance only to 220 240 V 50Hz alternating current via a correctly insta...

Page 36: ...can be installed as a free standing unit against a wall built into a kitchen element or lined up with other ap pliances figs 2 3 Room temperature The climate class is stated on the name plate This specifies the optimum room temperature Note that the appliance operates best at room temperatures from 10 C to 32 C 600 600 6 fig 2 600 600 fig 3 ...

Page 37: ...de enough to allow the shelves to be pulled out fig 4 600 1075 fig 4 100 Ventilation It is important that the appliance be well ventilated and that air can circulate unhin dered above below and around it The figures below illustrate how the neces sary air circulation around the appliance can be ensured figs 5 100 100 min 30 min 30 fig 5 ...

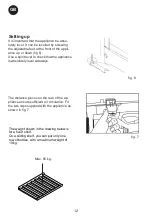
Page 38: ...irit level to check that the appliance is absolutely level sideways fig 6 The distance pieces on the rear of the ap pliance ensure sufficient air circulation Fit the two caps supplied with the appliance as shown in fig 7 The weight shown in the drawing below is for a fixed shelf On a sliding shelf you can put only one row of bottles with a maximum weight of 10 kg Max 85 kg fig 7 ...

Page 39: ...ge of door is done by a technician we recommend two persons Helping material 4 mm Allen key Flat headed screwdriver Torx 20 TX20 screwdriver 1 Open the door unscrew the two screws fixing the bottom cover Torx20 Do not remove the cover yet 2 Place the appliance on its back prefera bly on a soft foundation 3 Loosen the upper hinge and remove it 4 mm Allen key ...

Page 40: ...bottom cover pure black black white stripe wires Push the top release down to free the wire ends Note the pure black wire is and corresponds to the red wire on opposite side The black white stripe wire is 0 neutral and corre sponds to the black wire on the opposite side this is important when the wires are to be mounted later 7 To reverse the bottom glass the brackets need to be removed Loosen the...

Page 41: ...ass again and mount the brackets onto the plastic pro file in each end again Don t over tighten the screws Note The nut has to fit into the centre groove 9 The door has to be moved up from the hinge 10 Unscrew the lock pin using the flat hea ded screwdriver and remove it 11 Pull up the lock cylinder and refit both lock cylinder and lock pin in opposite side ...

Page 42: ...n 13 Dismount the bottom hinge pin and fit it on the opposite side Note The bush must also be moved 14 Turn the door so the glass side is down Note Place something between the glass and the other surface cabinet so scratch are minimized Then loosen the gasket on the low end of the door by pulling ...

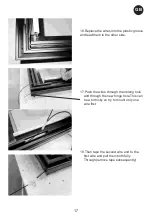
Page 43: ...em to the other side 17 Push the wires through the oblong hole and through the new hinge hole This can be a bit tricky so try to mount only one wire first 18 Then tape the second wire end to the first wire and pull them both fully Through remove tape subsequently ...

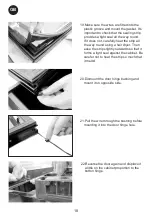
Page 44: ...ealing strip provides a tight seal all the way round If it does not carefully heat the strip all the way round using a hair dryer Then ease the strip slightly outwards so that it forms a tight seal against the cabinet Be careful not to heat the strip so much that it melts 20 Dismount the door hinge bushing and mount it on opposide side 21 Pull the wire through the bushing before mounting it into t...

Page 45: ......
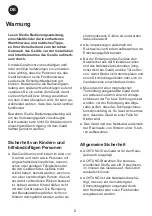
Page 46: ...inge pin 24 and through the wire hole in the pla stic column 25 Remount the wires se under 6 and make sure that they are firmly secured 26 Pusch the door back in place over the hinge pin and pull the wires simultane ously so the wire do not get stuck ...

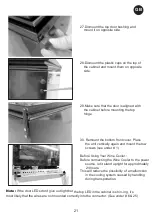
Page 47: ...he unit vertically again and mount the tow screws see under 1 Before Using Your Wine Cooler Before connecting the Wine Cooler to the power source let it stand upright for approximately 24 hours This will reduce the possibility of a malfunction in the cooling system caused by handling during transportation Note If the door LEDs don t give out light but the top LED in the cabinet is shin ing it s mo...

Page 48: ...ture indicator is equipped with fig 7 a built in filter which simulates the actual temperature in the bottles Consequently the indicator does not react on short term fluctuations of the air temperature Temperature setting The thermostat is equipped with a child lock device This device is activated by pushing the up and down buttons simultaneously After approx 3 seconds Pof flashes in the display T...

Page 49: ...o turn off the lights press once Permanent lighting For presentation purposes of your wine you can turn the lights permanently Please press the light switch image twice To switch off the lights press on again Two zone setting for serving temperature Typical serving temperature settings for the top and bottom sections are 16 C and 6 C respectively With these settings a suitable temperature gradient...

Page 50: ...m water max 65 C with a little mild detergent Never use cleaning agents that scour Use a soft cloth Rinse with clean water and dry thoroughly The defrost water channel in which condensa tion from the evaporator runs is located at the bottom of the rear inside wall of the cabinet and must be kept clean Add a few drops of disinfectant e g Rodalon to the defrost water drain a couple of times a year a...

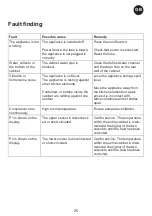
Page 51: ...es inside the cabinet are rattling against one another Level the appliance using a spirit level Move the appliance away from the kitchen elements or appli ances it is in contact with Move containers and or bottles apart Compressor runs continuously High room temperature Ensure adequate ventilation P1 is shown on the display The upper sensor is disconnect ed or short circuited Call for service The ...

Page 52: ...e will invalidate warranty and product liability and the appliance cannot be used lawfully The approval stated on rating plate will also be invalidated Transport damage discovered by the buyer is primarily a matter to be settled between the buyer and the distributor i e the dis tributor must ensure that such complaints are resolved to the buyer s satisfaction Before calling for technical assistanc...

Page 53: ...te waste handling For more information about collec tion and recycling of old products and batteries please contact your local municipality your waste disposal service or the point of sale where you purchased the items Penalties may be applicable for incor rect disposal of this waste in accord ance with national legislation For business users in the Euro pean Union If you wish to discard electrica...

Page 54: ...son die sich der damit verbundenen Risiken bewusst ist betreut werden Kinder dürfen nicht mit dem Gerät spielen Die Reinigung und Benutzerwartung dürfen nicht von Kindern durchgeführt werden außer sie sind mindestens 8 Jahre alt und werden dabei überwacht Alle Verpackungen außerhalb der Reichweite von Kindern aufbewahren da Erstickungsgefahr besteht Bei der Entsorgung des Gerätes den Netzstecker a...

Page 55: ... Schäden am Netzkabel können einen Kurzschluss und oder elektrischen Schlag verursachen Wir können nicht für Schäden haftbar ge macht werden die durch eine fehlerhafte Elektroinstallation verursacht werden Das Netzkabel darf nicht verlängert werden Kein Verlängerungskabel keinen Adapter und keine Mehrfachsteckdose verwenden Prüfen dass die Wandsteckdose nicht beschädigt ist Eine Wandsteckdose in s...

Page 56: ...nigung und Pflege Vor der Reinigung den Netzstecker aus der Steckdose ziehen und den Strom abstellen Das Gerät nicht mit metallischen Gegen ständen Dampfreinigern flüchtigen Ölen organischen Lösemitteln oder Scheuer mitteln reinigen Zum Entfernen von Eis keine scharfen oder spitzen Gegenstände verwenden Stattdessen einen Kunststoffschaber verwenden Wichtiger Hinweis zur Installation Zur ordnungsge...

Page 57: ...ofachkraft durchgeführt werden Das Gerät muss von einer zugelassenen Reparaturstelle repariert werden Für die Reparatur dürfen nur Originalersatzteile verwendet werden Das Gerät ist ausschließlich für den Haus gebrauch bestimmt Der Hersteller kann nicht für die unsachgemäße Verwendung haftbar gemacht werden Umweltschutz Die Verpackungsmaterialien des Gerätes sind recycelbar Leisten Sie einen Beitr...

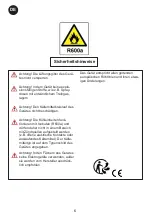
Page 58: ... Kühleinheiten funk tionieren mit Isobutan R600a und dürfen daher nicht in einem Bereich mit Zündquellen aufgestellt werden z B offene elektrische Kontakte oder auslaufendes Kältemittel Der Kälte mitteltyp ist auf dem Typenschild des Gerätes angegeben Achtung In den Fächern des Gerätes keine Elektrogeräte verwenden außer sie wurden vom Hersteller ausdrück lich empfohlen Das Gerät entspricht allen ...

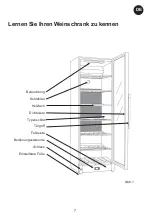
Page 59: ...DE 7 Lernen Sie Ihren Weinschrank zu kennen Beleuchtung Kohlefilter Holzfach Dichtleiste Typenschild Türgriff Fußleiste Bedienungselemente Schloss Einstellbare Füße Abb 1 ...

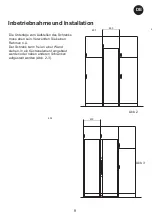
Page 60: ...chnische Daten Verkabelung und Anschlüsse in Stromver sorgungssystemen müssen allen örtlichen und nationalen Elektrovorschriften entspre chen Machen Sie sich vor dem Einbau mit den Angaben in diesen Vorschriften vertraut Dieses Gerät entspricht den einschlägigen EU Richtlinien einschließlich Niederspannungsrichtinie 2014 35 EU Elektromagnetische Kompatibilitätsrichtlinie 2014 30 EU Die Steckdose s...

Page 61: ...Unterlage zum Aufstellen des Schranks muss eben sein Verwenden Sie keinen Rahmen o ä Der Schrank kann frei an einer Wand stehen in ein Küchenelement eingebaut werden oder neben anderen Schränken aufgestellt werden Abb 2 3 600 6 Abb 2 600 600 Abb 3 ...

Page 62: ... lassen dass die Tür zum Herausziehen der Kühlschubladen weit genug geöffnet werden kann Abb 4 1075 Abb 4 Raumtemperatur Die Klimaklasse ist auf dem Typenschild angegeben Dies gibt die optimale Raum temperatur Daß das Gerät arbeitet am besten bei Raumtemperaturen von 10 C bis 32 C 100 100 100 min 30 Abb 5 min 30 ...

Page 63: ...rforderliche Luftzirku lation Die beiden Abdeckungen montieren die zusammen mit dem Schrank mitgeliefert werden siehe Abb 6 Zwei verschiedene Modelle Aufstellung Der Schrank muss waagerecht stehen Der Schrank kann durch Drehen der einstellba ren Füße ausgerichtet werden siehe Abb 7 Prüfen Sie mit einer Wasserwaage nach ob der Schrank waagerecht steht Das Gewicht auf der Zeichnung unten ist für ein...

Page 64: ...führen zu lassen wir empfehlen zwei Personen Hilfsmaterial 4 mm Inbusschlüssel Schlitzschrauben dreher Torx 20 TX20 Schraubendreher 1 Tür öffnen und die beiden Schrauben für die untere Blende entfernen Torx 20 Die Blende jetzt noch nicht entfernen 2 Legen Sie das Gerät auf die Rückseite am besten auf einer weichen Unterlage 3 Lösen und entfernen Sie das obere Scharnier 4 mm Inbus ...

Page 65: ...icht am Verbinder schwarzes und schwarz weißes Kabel drücken Sie auf die jewei lige Wippe Hinweis das schwarze Kabel ist 12V und ist verbunden mit dem roten Kabel vom Trafo auf der gegenüberliegenden Seite Das schwarz weiße Kabel vom LED Licht ist verbunden mit dem schwar zen Kabel vom Trafo wichtig wenn die Kabel später wieder verbunden werden müssen 7 Um die Glasscheibe zu drehen müssen beide Ha...

Page 66: ...h in der Blende liegen Montieren Sie die beiden Halterungen am Plastikprofil Nicht die Schrauben überdrehen 9 Die Tür aus dem Gelenk heben 10 Sicherungsstift mit dem Flachschrau bendreher entfernen 11 Ziehen Sie den Schließzylinder heraus und montieren Sie Zylinder und Stift auf der gegenüberliegenden Seite ...

Page 67: ...den unteren Scharni erstift und setzen ihn auf der gegenüber liegenden Seite wieder ein Hinweis Die Buchse muss auch bewegt werden 14 Drehen Sie die Tür das Glas zeigt nun nach unten Hinweis Legen Sie etwas Weiches zwi schen Glas und Gerät um die Gefahr von Kratzern zu vermeiden Ziehen Sie die Türdichtung am unteren Ende ab ...

Page 68: ...hrt 17 Die Kabel müssen nun in das Langloch eingeführt werden und kommen aus dem neuen Scharnierloch wieder heraus Dies ist ein wenig kompliziert Versuchen Sie es deshalb zuerst nur mit einem Kabel 18 Mit Klebeband befestigen Sie das zweite Kabel am ersten und ziehen dann beide ...

Page 69: ...erwärmen Sie die Türdichtung vorsichtig mit einem Haarfön und ziehen Sie die Dichtung leicht nach außen Seien Sie vorsichtig beim Erwärmen damit die Dichtung nicht schmilzt 20 Die Türanschlagbuchse demontieren und auf der gegenüberliegenden Seite wieder 21 nach Durchfädelung der Kabel durch die Buchse einsetzen 22 Die Tür wird zurückgedreht und ein wenig oberhalb zum unteren Scharnier plaziert ...

Page 70: ...arnierstift 24 und durch das Loch der Plastiksäule gezogen 25 Die beiden Kabel werden wieder mon tiert siehe unter 6 26 Die Tür wird nun auf den Scharnier stift geschoben gleichzeitig wird an den Kabeln gezogen damit diese nicht eingeklemmt werden ...

Page 71: ...lende wird wieder montiert Das Gerät wird aufgestellt und die beiden Schrauben in der Blende montiert siehe unter 1 Vor dem Verwenden des Weinkühler Bevor Sie das Weinkühler an die Strom quelle lassen Sie es aufrecht stehen etwa 24 Stunden Dies verringert die Möglichkeit einer Fehlfunktion in dem Kühlsystem durch die Handhabung während des Transports zu reduzieren Hinweis Wenn das Türlicht nicht f...

Page 72: ...raturanzege Das Display zeigt die aktuelle Temperatur Die obere Zahl im Display zeigt die Tem peratur oben im Gerät die untere Zahl die Temperatur unten im Gerät Die Tempe ra turanzeige hat ein eingebautes Filter mit dem die Temperatur in den Flaschen simuliert wird Deshalb reagiert die Anzeige nicht auf kurzzeitige Änderungen der Luft temperatur z B nach dem Öffnen der Tür Temperatureinstellung D...

Page 73: ...ckt werden zuerst um den Alarm zurückzusetzen und danach noch einmal um das Gerät neu zu starten Türalarm Wenn die Tür länger als 2 min offen steht wird der Türalarm aktiviert Beleuchtung So schalten Sie das Licht drücken Sie einmal Zu Präsentationszwecken ihres Weines können sie die Beleuchtung auch dauerhaft einschalten Dazu Lichtschalter zweimal drücken Zum Abschalten der Beleuchtung Lichtschal...

Page 74: ...nigen des Schrankinnern den Schrank am Ein Ausschalter ausschal ten Eine Mischung aus warmem Wasser und Spülmittel max 65 C ist dazu am besten geeignet Verwenden Sie keine Reinigungsmittel die Kratzer verursachen können Verwenden Sie ein weiches Tuch Mit klarem Wasser nachwischen und gut abtrocknen Die Tauwasserrinne durch die das Kondenswasser vom Verdampfer herab läuft befindet sich innen an der...

Page 75: ...nk berührt andere Küchen elemente Behälter oder Flaschen im Schrank berühren sich Schrank mit einer Wasserwaage ausrichten Schrank von den Küchenelemen ten oder Geräten abrücken die er berührt Für Abstände zwischen Flaschen und oder Behältern sorgen Der Kompressor läuft ständig Hohe Raumtemperatur Für gute Belüftung sorgen Steuerung zeigt P1 an Oberer Fühler ist unterbrochen oder kurzgeschlossen R...

Page 76: ...fallen nicht unter das Reklamationsrecht Transportschäden die der Anwender fest stellt sind primär eine Sache zwischen ihm und dem Händler d h der Händler hat den Anwender zufrieden zu stellen Bevor Sie den Kundendienst rufen prüfen Sie bitte ob Sie den Fehler selbst beheben können siehe Fehlersuche Ist Ihr Hilfver langen unberechtigt beispielsweise weil das Versagen des Geräts auf eine defekte Si...

Page 77: ... und zum Recycling alter Produkte und Batterien wün schen wenden Sie sich bitte an Ihre örtlichen Verwaltungsbehörden Ihren Abfallentsorgungsdienstleister oder an die Verkaufseinrichtung in der Sie die Gegenstände gekauft haben Gemäß Landesvorschriften kön nen wegen nicht ordnungsgemäßer Entsorgung dieses Abfalls Strafgelder verhängt werden Für geschäftliche Nutzer in der Europäischen Union Wenn S...

Page 78: ... highest temperature C Émissions acoustiques dans l air Airborne acoustical noise emissions 42 db A Intégrable Built in NO Cet appareil est destiné uniquement au stockage du vin This appliance is intended to be used exclusively for the storage of wine Catégories d appareils de réfrigération ménagers Household refrigerating appliances categories 1 Réfrigérateur comportant un ou plusieurs compartime...

Page 79: ... Pierre Lefaucheux 72230 ARNAGE France FR Nous nous réservons le droit d apporter toutes modifications à nos produits BG Reserving the right to alter specifications without prior notice DE Recht auf Änderungen vorbehalten 81 24 789 03 ...

Reviews: