background image

Mascot FT Floor Standing Combination Boiler

Page 1

SECTION 1

Product Accessories

1.1 Introduction

This manual provides information necessary for the 
installation, operation, and maintenance of the LAARS 
Heating Systems 

Mascot FT

.  All application and installation 

procedures must be read and reviewed completely before 
proceeding with the installation. Consult the LAARS Heating 
Systems factory, or your local factory representative, with any 
problems or questions regarding this equipment. Experience 
has shown that most operating problems are caused by 
improper installation. 
All installations must be made in accordance with  
1) American National Standard Z223.1/NFPA54-Latest 

Edition “National Fuel Gas Code” or  
2) CSA B149.1 “Natural Gas and Propane Installation Code” and 
with the requirement of the local utility or other authorities having 
jurisdiction. Such applicable requirements take precedence over 
the general instructions contained herein.
All electrical wiring is to be done in accordance with the local 
codes, or in the absence of local codes, with: 1) The National 
Electrical Code ANSI/NFPA No. 70-latest Edition, or 2) CSA 
STD. C22.1 “Canadian Electrical Code - Part 1”. This appliance 
must be electrically grounded in accordance with these codes. 

1.2  Included with the Appliance 

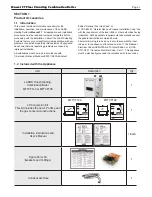
MFTCF140

MFTCF199

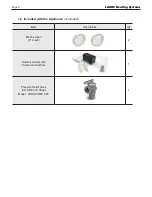
Item

Description

Qty

LAARS Floor-Standing,

Combination Boiler

MFTCF140 or MFTCF199

1

LP Conversion Kit.

This kit includes the new LP orifice and 

the gas conversion instructions.

1

 Installation Instructions and  

User’s Manual

1 Each

Spare Parts Kit

(Gaskets and O-Rings)

1

  Condensate Hose

1

This boiler was converted on ____/____/____/ to____  gas

organization making this conversion, who accepts the 

« Cette chaudière a été convertie le (annéemoisjour) ____ pour  

with Kit No._________ by _________ ( name and address of

responsibility for the correctness of this coversion)."

 fonctionner au gaz ____ à l’aide de la trousse n° par (nom et  

 adresse de l’organisme qui a effectué la conversion), qui 

 a effectué la conversion), qui accepte l’entière  

 responsabilité de la qualité de la conversion. »

 WARNING

This conversion shall be installed by a qualifi ed service 

agency in accordance with the manufacturer's instructions 

and all applicable codes and requirements of the authority 

having jurisdiction.  If the information in these instructions 

is not followed exactly, a fi re, an explosion or production 

of carbon monoxide may result causing property damage, 

personal injury or loss of life.  The qualifi ed service agency is 

responsible for the proper and complete installation of this kit.  

The installation is not proper and complete until the operation 

of the  converted appliance is checked as specifi ed in the 

manufacturer's instruction supplied with the kit.

 AVERTISSEMENT

Ce conversion doit être installé par un organisme de service 

conformément aux instructions du fabricant et tous les 

codes et les exigences de l’autorité compétente. Si les 

informations contenues dans ces instructions n’est pas suivi 

à la lettre, un incendie, une explosion ou de la production de 

monoxyde de carbone mais résultat causant des dommages 

matériels, des blessures ou des pertes de vie. Le service est 

responsable pour la bonne et complète l’installation de ce kit. 

L’installation n’est pas correcte et complète jusqu’à ce que 

le fonctionnement de l’appareil converti est vérifi ée comme 

spécifi é dans le manuel d’instruction fourni avec le kit.

Customer Service and Product Support:  

800.900.9276 • Fax 800.559.1583

Headquarters: 

20 Industrial Way, Rochester, NH 03867  • 603.335.6300 • Fax 603.335.3355

1869 Sismet Road, Mississauga, Ontario, Canada L4W 1W8 • 905.238.0100 • Fax 905.366.0130

 www.Laars.com


Litho in U.S.A. © Laars Heating Systems 1607  Document  4290A

800.900.9276 

 Fax 800.559.1583 

(Customer Service, Service Advisors)

20 Industrial Way, Rochester, NH 03867 

 603.335.6300 

 Fax 603.335.3355 

(Applications Engineering)

1869 Sismet Road, Mississauga, Ontario, Canada L4W 1W8 

 905.238.0100 

 Fax 905.366.0130

www.Laars.com

Document 4290A

Mascot FT Floor-Standing Gas Conversion Kit

pg 1 of 4

The Laars Mascot FT condensing gas boiler is confi gured for 

Natural Gas (NG) from the factory.  If your gas supply is Propane 

Gas (LP), your boiler can be converted to burn propane gas.  Also, 

if your boiler is already converted to burn propane, it can be modifi ed 

back to burning Natural Gas, using these instructions. 

NOTICE

The Natural Gas to Propane Conversion Kit  (# R20771) included with the Mascot FT, is intended 

only for altitudes less than 3000 ft. If your installation altitude is greater than 3000 ft, then please 

refer to Section 4.12 of the Installation Manual (Doc 1320) 

The Kit is supplied in a bag attached to the combination boiler. If your Mascot FT does not have the 

bag containing the conversion kit, a replacement kit can be obtained.  Contact the manufacturer at 

the address below and request a replacement conversion kit.

WARNING

This conversion kit shall be installed by a qualifi ed service 

agency in accordance with the manufacturer’s instructions and 

all applicable codes and requirements of the authority having 

jurisdiction. The information in these instructions must be 

followed to minimize the risk of fi re or explosion or to prevent 

property damage, personal injury or death. The qualifi ed service 

agency is responsible for the proper installation of this kit. The 

installation is not proper and complete until the operation of the 

converted appliance is checked as specifi ed in the manufacturer’s 

instructions supplied with the kit.

Installation must conform to local codes and the latest edition 

of the National Fuel Gas Code, ANSI Z223.1 and CAN-B149.1. 

Failure to follow instructions could result in serious injury or 

property damage. 

The qualifi ed agency performing this work assumes

 responsibility for gas conversion.

CAUTION

This combination boiler has already been set to burn natural 

gas, but can be converted to burn LP gas. Before placing the 

combination boiler into operation, verify that your fuel source 

is natural gas. Or verify that your fuel source is propane if you 

are converting this combination unit to propane.   

Kit # R20771      H2373900A

Top Access Panel

Front Panel Knob

Front Panel

Figure A

ON / OFF

To convert from Natural Gas to Propane Gas

1.  

  Turn 

OFF

 the Mascot FT. 

  The 

ON / OFF

 button 

is located at the bottom left of the Control Display.

2. 

   Turn 

OFF

 the GAS and WATER supply to the 

Mascot FT (valves are located on the plumbing pipes.)

Table A

.18

Natural Gas 

(NG) Part #

Propane Gas 

(LP) Part #

MFTCF140

FT1722

FT1722P

MFTCF199

FT1780

FT1802

Nozzle

Orifi ce

This water heater applied to the ____ gas.

Gas conversion date : ____ / ____ / ____

Converted by the technicians : 

_________________________________

(Ce chauffe-eau appliquee au gaz ____.)

(Date de conversion de gaz :)

(Converti par les techniciens:)

Summary of Contents for MFTCF140

Page 1: ...could cause serious injury property damage or death Improper installation and or operation will void the warranty AVERTISSEMENT Assurez vous de bien suivres les instructions donn es dans cette notice...

Page 2: ...oor Combustion Air 27 4 8 Vent Air Pipe Termination 27 4 9 Gas Supply and Piping 29 4 10 Gas Supply Pressure 32 4 11 Gas Set Up and Adjustment 32 4 12 High Altitude Installations and Orifices 33 4 13...

Page 3: ...must conform to local codes and the latest edition of the National Fuel Gas Code ANSI Z223 1 and CAN B149 1 Failure to follow instructions could result in serious injury or property damage The qualifi...

Page 4: ...ting Systems Page 2 1 2 Included with the Appliance continued Items Descriptions Qty Mesh screen 3 mesh 2 Outdoor Sensor with Screws and Anchors 1 Pressure Relief Valve CH LINE 3 4 30psi Model CASH AC...

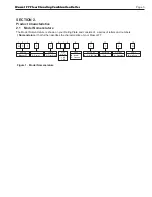
Page 5: ...1 9 9 FUEL N Natural P Propane CONFIG F Floor Stnd ALTITUDE A 0 10 000 Feet REVISION 1 First OPTIONS X Standard PUMP N with Pump 1 M SECTION 2 Product Characteristics 2 1 Model Nomenclature The Model...

Page 6: ...00 900 9276 Fax 800 559 1583 Headquarters 20 Industrial Way Rochester NH 03867 603 335 6300 Fax 603 335 3355 1869 Sismet Road Mississauga Ontario Canada L4W 1W8 905 238 0100 Fax 905 366 0130 www Laars...

Page 7: ...on readings At this point just record the CO2 readings at MAX Fire Do NOT attempt to adju CO2 at MAX Fire ONLY in MIN Fire so 18 Per Table B for MIN Fire change dip switch 6 to OFF and 7 to ON The uni...

Page 8: ...pter 3 4 NPT E DHW inlet Connection Adapter 3 4 NPT F Condensate Adapter 1 2 NPT G Drain Adapter 1 2 NPT 52 4 133 cm 15 7 40 cm 3 3 8 cm 9 2 23 cm 68 cm 9 3 2 7 4 3 4 3 5 8 9 2 3 7 12 9 18 7 23 27 3 3...

Page 9: ...NPT MFTCF199 53 7 137 cm 15 7 40 cm 4 0 10 4 cm 6 6 16 9 cm 68 cm 18 9 2 6 4 3 4 3 5 7 8 8 3 7 12 5 18 2 22 5 26 8 29 4 48 3 17 9 23 3 26 7 19 7 3 0 7 6 cm 5 0 13 cm A B C D E F G TOP SIDE FRONT 3 O...

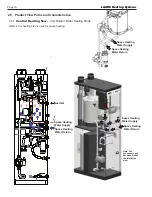
Page 10: ...ion Pump DHW 13 DHW Tank Assembly 14 Water Drain Valve 15 Water Drain Adapter 16 Condensate Trap Adapter NO Name of Component 17 Condensate Drain Hose 18 DHW Inlet Adapter 19 Condensate Trap 20 DHW Ou...

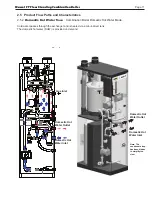
Page 11: ...ondensate Trap Adapter NO Name of Component 17 Condensate Drain Hose 18 DHW Inlet Adapter 19 Condensate Trap 20 DHW Outlet Adapter 21 Condensate Heat Exchanger Hose 22 CH Return Connection 23 CH Suppl...

Page 12: ...ng Mode acteristics ng mode Central Heating CH mode d for space heating Combustion Air Inlet Gas Inlet Space Heating Water Return Space Heating Water Supply Space Heating Water Supply Space Heating Wa...

Page 13: ...cteristics Operating Mode uct Characteristics r of Hot water mode Domestic Hot Water DHW mode e Sub heat exchanger then cold water transformed into hot water er DHW is controlled by the consumer It ca...

Page 14: ...FETY READ BEFORE OPERATING If you do not follow these instructions exactly a fire or explosion could result causing property damage personal injury or loss of life A This appliance does not have a pil...

Page 15: ...DO NOT use this Boiler if any part has been under water Immediately call a qualified technician for inspecting the Boiler and replacing any part of the control system and gas control which have been u...

Page 16: ...opened 5 Check the area around the appliance and remove any combustible or flammable materials Remove laundry or any other items that are on or near the boiler or vent pipe When in Operation CAUTION...

Page 17: ...egularly Do not shut off the Boiler When you leave home for a long time do not shut off Boiler The Boiler has a freeze protection function The ceramic heater is installed inside of the heater s intern...

Page 18: ...ted Service Clearance Minimum Clearances For installation Suggested From Non Combustibles Service combustibles Clearance Top of appliance 15 in 38 cm 15 in 38 cm Back of appliance 5 8 in 1 6 cm 5 8 in...

Page 19: ...during operation and service If new Combination boiler replaces an existing appliance check and correct system problems for example Do not install if System leaks causing oxygen corrosion or heat exch...

Page 20: ...nput rating of all equipment in the enclosure When communicating to the outdoors through horizontal ducts each opening shall have a minimum free area of not less than 1square inch per 2000 Btu hr 1100...

Page 21: ...lation Code CAN CSA B149 1 or applicable provisions of the local building codes CAUTION NOTICE The instructions for the installation of the venting system shall specify that the horizontal portions of...

Page 22: ...B149 1 and ULC S636 Failure to follow this manual and applicable codes may lead to property damage severe injury or death ___________________________________________ WARNING Use of cellular core PVC A...

Page 23: ...bited Do not apply an electric damper draft hood or vent damper with this Boiler Do not locate vent termination where exposed to prevailing winds Moisture and ice may fall on surface around vent termi...

Page 24: ...nded above meter regulator assembly 3 ft 91 cm within a height 15 ft 457 cm above the meter regulator assembly I Clearance to service regulator vent outlet 3 ft 91 cm J Clearance to non mechanical air...

Page 25: ...nce to inside corner H Clearance to each side of center line extended above meter regulator assembly 36 in 91 cm within a height 15 ft 4 57 m above the meter regu lator assembly I Clearance to service...

Page 26: ...zontally vented gas fueled equipment is installed in a crawl space or an attic the hard wired carbon monoxide with alarm and battery back up may be installed on the next adjacent floor level b In the...

Page 27: ...oivent tre prises pour chaque appareil toujours raccord au syst me d vacuation commun et qui fonctionne alors que d autres appareils toujours raccord s au syst me d vacuation ne fonctionnent pas 1 Sce...

Page 28: ...to the size of vent pipe 2 3 according to the installation conditions Push the pipe into the collar socket until it touches the bottom of the socket fitting For 2 installations install using the supp...

Page 29: ...ent Air Pipe Termination Note For using pipe more than 1 elbow reduce maximum allowable length 5 feet 1 5M for each additional 3 inch 90 degree elbow 2 5 feet 0 75M for each additional 3 inch 45 degre...

Page 30: ...oped Roof Horizontal Vent Termination cont Direct Vent Optional Sidewall Snorkel Terminations Concentric Vent Termination Direct Vent Optional Horizontal and Vertical Concentric Vent Side wall Vent 2...

Page 31: ...for the proper type of gas by checking the rating plate Mascot FT will function properly at elevations up to 10 000 feet 3050 m Refer to Section 4 12 for High Altitude Settings 2 The maximum inlet gas...

Page 32: ...d be installed close to the unit To facilitate any future maintenance it is also recommended that an approved gas union fitting be installed in the supply line between the shut off valve and the 3 4 f...

Page 33: ...nection pipe not less than a 1 2 MFTCF140 or 3 4 MFTCF199 Suggested Propane Gas LP Layout Suggested Natural Gas NG Layout Sediment Trap Other appliance Gas meter G Capacity Not less than total capacit...

Page 34: ...aximum Pressure 10 5 WC Minimum Pressure 8 0 WC Minimum Pressure 3 5 WC Inlet Gas Pressure Port MFTCF140 MFTCF199 The appliance and its individual shutoff valve must be disconnected from the gas suppl...

Page 35: ...the Modes button for one second to Save the number and to go back to initial status The Mascot FT is shipped with a Natural Gas Nozzle or Orifice that is designed for altitudes up to 3 000 ft Yet the...

Page 36: ...LP your boiler can be converted to burn propane gas Also if your boiler is already converted to burn propane it can be modified back to burning Natural Gas using these instructions NOTICE The Natural...

Page 37: ...e for LP propane Re use the packing from previous 9 Return the Gas Inlet Pipe to its original position and tighten the Brass Fittings 10 Per Table B set DIP Switch 5 to the OFF setting the 5 DIP switc...

Page 38: ...is may take up to 3 minutes depending on your combustion analyser Then check the CO2 measurement for MAX fire Refer to Table D for acceptable MAX fire combustion readings At this point just record the...

Page 39: ..._______ responsable ___________________________________ _____________________________________________ H2373900A Manifold Pressure Port Gas Valve Adjustment Port under the cap screw Figure E 22 It may...

Page 40: ...e guidelines could result in system problems CH pipe minimum size 1 DWH pipe minimum size 3 4 CAUTION SECTION 4 Installation Closed type Expansion tank Apply 1 pipe to the expansion tank to allow air...

Page 41: ...in a closed water supply system such as one having a backflow preventer in the cold water supply line it will control thermal expansion Pump for primary loop is included with Mascot FT for 15 ft Do no...

Page 42: ...hich runs when the zone needs it Each zone thermostat goes to a controller which controls the pumps SECTION 4 Installation PRIMARY LOOP SPACE HEATING 1 PIPE CH SUPPLY 1 PIPE CH RETURN 3 4 PIPE DHW OUT...

Page 43: ...not exceed 12 apart PRIMARY LOOP SECONDARY LOOP SPACE HEATING SPACE HEATING PRIMARY SECONDARY CONNECTION 1 PIPE CH SUPPLY 1 PIPE CH RETURN 3 4 PIPE DHW OUTLET Backflow preventer 3 4 PIPE DHW INLET ZO...

Page 44: ...V Heating Boilers Model CASE ACME F 82 This safety relief valve 30 psi is shipped loose for field installation An approved ASME HV Pressure Relief Valve must be installed on the DHW supply line as clo...

Page 45: ...months for depletion Apply only corrosion resistant materials for the condensate drain lines such as 1 2 PVC CPVC Polypropylene pipe or included plastic hose NOTICE For Category II and IV boilers be i...

Page 46: ...red under the warranty Manual Rocker switch maximum allowable current for each circulator is 16 amps at 125VAC Housing Nylon 66 UL 94V 2 Rocker Nylon 66 UL 94V 2 Terminal Copper Alloy Terminal block E...

Page 47: ...AX Fire 0 134 WC 0 173 WC MIN Fire 0 015 WC 0 015 WC Figure D 15 Setup your combustion analyser and place the sensor into the combustion test port 16 Per Table B for Max Fire change dip switch 6 to ON...

Page 48: ...LAARS Heating Systems Page 46 4 19 Control Board Electrical Diagram SECTION 4 Installation...

Page 49: ...High Limit Primary Secondary Relay 3 Relay 4 Ignitor Relay 5 Gas Valve DC 14 V DC 30V DC 5V F B FAN Power Detector Burner Limit Speed Control Fan RPM Sensor DHM Driving circuit Over Heat TEMP 2 A Pum...

Page 50: ...ral HT 120V 9 12 N AC Power COM Line HT 120V CN4 LWD1140 06D 1 FAN Unuse 2 GND SELV 26VDC 3 VDD SELV 14VDC 4 Fan power start coil SELV 26VDC 5 Fan power end coil SELV 26VDC 6 Fan speed feedback signal...

Page 51: ...re sensor SELV 5VDC 12 6 ST S Storage water temperature sensor SELV 5VDC 13 7 SP S Over heat temperature sensor SELV 5VDC 14 CN14 SMW250 09D 1 IWM GND SELV 14VDC 2 DHM Stepper motor position SELV 14VD...

Page 52: ...f Display Power was Off Installer Mode C Hot Water DHW Set Point LOW Range 95 120 F 35 49 C DHW Set Point HIGH Range 121 140 F 49 5 60 C D Central Heat CH set point mode boiler only Toggle C F E Scrol...

Page 53: ...l parameters DHW mode Combination boiler Set Point can be adjusted Outside temp or 0 10 V mode Operating by outside temperature or 0 10V Numeric Display Domestic Hot Water Mode Anti Freeze Mode Storag...

Page 54: ...splay will go through a Start Up checklist and briefly show a sequence of diagnostic codes before entering into the Operating Mode It will then display the following information Indicate Example Curre...

Page 55: ...rature Current Overheat temperature L rt 1 PH Burner Operation Time Supply power time Supply power time x 100 hour 2 rh Burner operation time Burner operation time x 1 hour 3 rH Burner operation time...

Page 56: ...ged Turn dial E clockwise to increase and counterclockwise to decrease until desired temperature is reached Press dial E to save setpoint changes and to Exit Indicate Example Current DHW set point tem...

Page 57: ...Set Point Change Mode Changing between Celsius and Fahrenheit When the button D is pressed for more than 5 seconds temperature unit will toggle between C and F To change Storage Mode Temp First turn...

Page 58: ...F the Power to the Display Control Then with the power to the Display Control OFF Press and HOLD more than 5 seconds the Button B to get into the Installer Mode Rotate Dial E until you find the Instal...

Page 59: ...ting operation Operate in burner ON temperature setting Range 12 7 C 9 F 2 7 C 27 F Default 2 7 C 27 F 15 OF Warm Weather Shutdown This warm weather temperature setting will shut down CH Mode 10 C 50...

Page 60: ...firing When the signal rises above 1 5 volts the appliance will ignite As the signal continues to rise towards its maximum of 10 volts the appliance will increase in set point temperature Adjust 16 cH...

Page 61: ...Page 59 5 11 Error Mode Flashing Indicate Example Error Er will flash Er 11 Error Code Er 11 Display and Controller are communicating NOTE When communication between the Control Display and the main c...

Page 62: ...ance 3 Check Operating Temperature sensor at CH heat exchanger outlet If resistance is zero replace the sensor 4 If the problem persists replace the main control Hard Lock 20 Condensate Closed is Norm...

Page 63: ...persists replace the main control Hard Lock 41 Fan Speed too High with Flame On Press the Power button to clear the Error Code If Error happens again 1 Check the vent connections for blockages 2 Check...

Page 64: ...nd or the main control Soft Lock 80 Low Water Level Sensor Low Water Level Detected Four 4 Consecutive times This Error Code will go away when the condition is remedied If Error happens again 1 Ensure...

Page 65: ...Mascot FT Floor Standing Combination Boiler Page 63 6 2 Fault Tree Analysis 1 Flame detection...

Page 66: ...t Tree Analysis 2 Gas Detection 3 Storage DHW OP CH overheat Exhaust heat Sensor detects Error code contents E30 DHW Storage Temperature Sensor open or short E32 DHW NTC open or short E33 OP NTC open...

Page 67: ...oo hot Make sure that the filter in the cold water supply line is not clogged with debris Make sure that the gas supply type is correct Hot water temperature fluctuates at the opened tap Make sure tha...

Page 68: ...Volts at the service switch Troubleshoot and correct the power supply to the manual switch Is the ON OFF POWER SWITCH inside boiler case turned on Turn ON the manual power switch inside the boiler cas...

Page 69: ...0 RPM when turned off Reset using manual reset screen on control panel Power button Check wire harness for loose connections and pin engagement at blower Connections Boiler in standby mode and blower...

Page 70: ...ealed Call your qualified service technician if you notice any problems Check the relief valve Inspect the Combination boiler relief valve and the relief valve discharge pipe for any signs of weeping...

Page 71: ...place of discharge avoiding any possibility of scalding from hot water If water flows freely release the lever and allow the valve to seat Watch the end of the relief valve discharge pipe to ensure t...

Page 72: ...ual water inside the combination boiler 2 Press Power button on the front control panel to turn OFF the electrical power to the combination boiler 3 Turn off the gas valve 4 Close water supply valve o...

Page 73: ...d on the wall Is there space for a drain which is close to the Boiler Are there any combustible materials near the Boiler and vent pipe Is the air supply sufficient for proper operation of the Boiler...

Page 74: ...pressure relief valve of CH Plumbing at least 1 in diameter Is the pressure relief valve of DHW Plumbing at least 3 4 in diameter Have you installed the pressure relief valve on the hot water outlet...

Page 75: ...Mascot FT Floor Standing Combination Boiler Page 73...

Page 76: ...Systems Page 74 SECTION 6 Parts List and Illustrations CASE 17 19 20 22 23 25 26 27 31 28 29 32 35 36 37 38 39 43 44 15 16 34 30 21 18 33 40 41 42 45 24 16 1 16 2 16 4 16 5 16 7 15 2 15 1 15 1 16 6 16...

Page 77: ...FT1616 21 PCB Bracket FT1617 22 Terminal Block FT1618 23 Bracket FT1619 24 Control Display FT1620 25 Power switch FT1020 26 DHW Tank Cover bracket FT1622 27 Casing Shelf FT1623 28 Front Cover upper FT...

Page 78: ...LAARS Heating Systems Page 76 Heat Exchanger MFTCF140...

Page 79: ...8 3 4 Packing FT1646 1 Jul 15 For IOM No Description Part Number 1 O Ring P7 FT1601 15 Air Inlet Duct Assembly FT1002 15 1 Air Inlet Duct FT1611 15 2 Air Inlet Adaptor FT1612 16 Exhaust Vent Duct Asse...

Page 80: ...racket FT1619 24 Control Display FT1620 25 Power switch FT1020 26 DHW Tank Cover bracket FT1622 27 Casing Shelf FT1623 28 Front Cover upper FT1624 29 Threaded Knob FT1625 30 Display cover window FT102...

Page 81: ...creen FT1720 91 Rubber gasket FT1721 92 Nozzle NG Natural FT1722 92 Nozzle LP Propane FT1722P 93 Gas pipe upper FT1723 94 Gas Valve Assembly FT1724 94 1 Gas Valve FT1725 94 2 Gas Valve bracket FT1726...

Page 82: ...7 B 23 35 B 23 B 3 B 23 15 16 B 26 12 1 12 2 12 5 12 3 12 6 12 8 13 1 12 13 12 4 12 7 No Description Part Q ty Pr 12 Exhaust Vent Duct Assembly FT1010 12 1 Stainless band 100 16 1 FT1603 1 7 12 2 Duct...

Page 83: ...Bracket FT1828 24 Air pressure switch FT1627 1 4 0 25 Front cover upper FT1829 26 Threaded Knob FT1830 27 Display cover window FT1024 28 Pressure gauge DHW 150 PSI FT1628 5 10 0 29 Pressure gauge 60...

Page 84: ...LAARS Heating Systems Page 82 MFTCF199 Heat Exchanger Heat Exchanger Pump_ Feature List No Description Part Q ty Price 1 O Ring P7 FT1601 3 O Ring P16 FT1643 5 O Ring P 22 FT1644...

Page 85: ...Ignitor FT1763 61 6 Burner gasket FT1663 61 7 Overheat sensor FT1310 61 8 Burner lower side case FT1764 61 9 Refractory FT1826 62 Flame detector FT1669 63 Flame sensor cover FT1069 64 Infrared light s...

Page 86: ...let pipe FT1834 1 5 5 50 Mixing valve FT1701 51 Cold water inlet pipe FT1835 1 5 5 52 Flow sensor FT1115 DHW Tank _ List No Description Part Q ty 2 O Ring P15 FT1685 3 O Ring P16 FT1643 4 O Ring P18 F...

Page 87: ...alve _ List No Description Part Q ty 9 1 2 Packing FT1710 10 80 Fan Guide FT1769 3 81 Flapper Packing FT1770 5 82 Damper Body FT1081 5 83 Air Blow Rubber Pad FT1082 5 84 Fan Guide Packing FT1772 5 85...

Page 88: ...W 1W8 905 238 0100 Fax 905 366 0130 www Laars com Litho in U S A Laars Heating Systems 1609 Document 1320B Dimensions and specifications subject to change without notice in accordance with our policy...

Reviews: