background image

Chapter 3: Getting Started


Product Service 1-800-522-7658 

12 

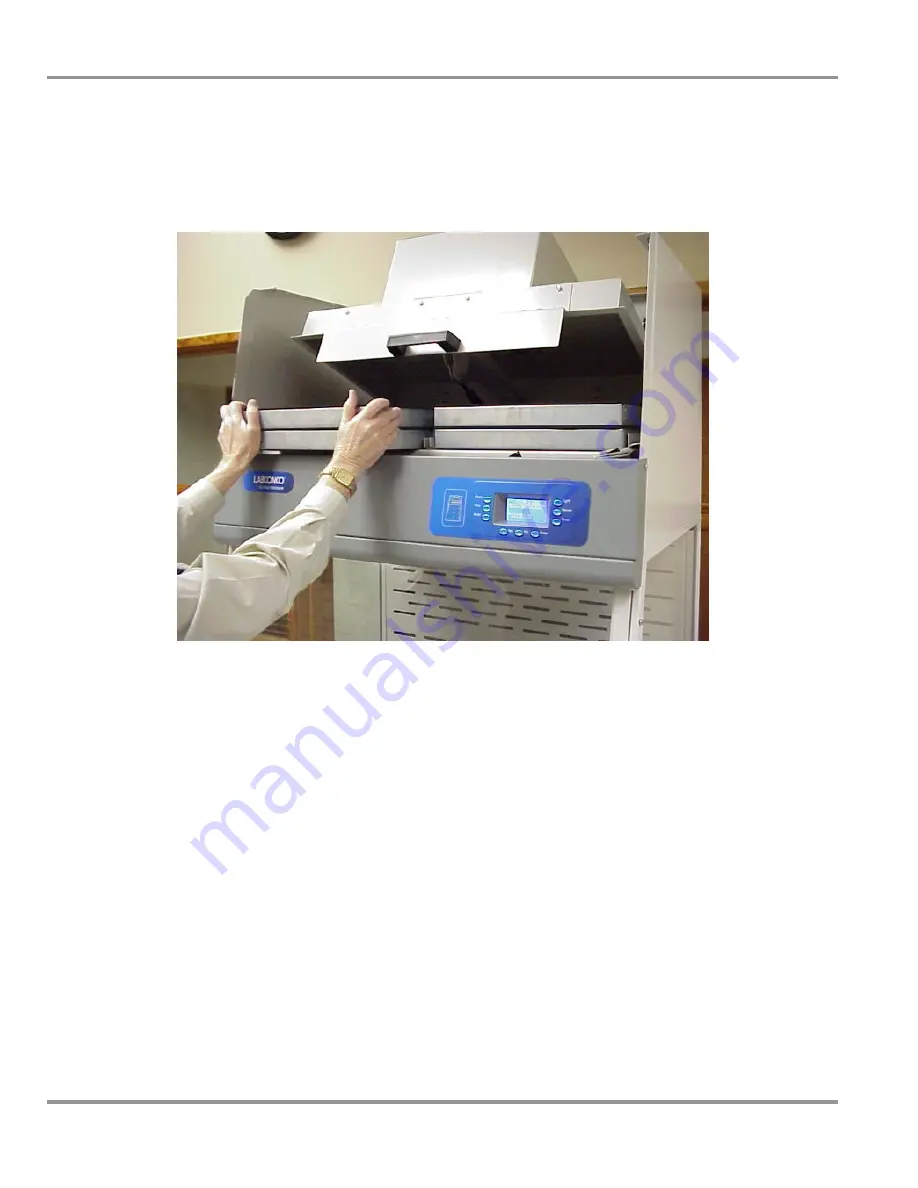
To install the filters, push the stacked filters to the stop in the rear of each 
filter compartment.  After loading the stacked filters into the compartments, 
close the gas spring cylinders by pulling the handle down and compressing 
the filter gaskets.  Filter installation is complete. 


Figure 3-2 

Filter Installation 


Connect the Electrical Supply 

Simply connect the 115V power cord supplied to the IEC electrical supply 
plug on the back of the enclosure.  For 230V, the same procedure applies 
except it is shipped without a plug.  Install the appropriate plug for your 
electrical specifications per local codes.  (See Appendix C for amperage.) 
 

Set Filter Life and Filter Check Timers 

Once the filters are installed and electrical power is connected, it is necessary 
to set the Filter Life Timers in the Filter Setup menus described in 

Chapter 5: 

Using the Ductless Enclosure

.  Consult the separate 

Paramount Chemical 

Guide

Appendix E: Estimated Filter Life Calculation

, and/or Labconco 

Specialist to determine the filter capacity.  Through the use of all three 
sources, set the Filter Life Timers. 

Summary of Contents for 69632 Series

Page 1: ...www labconco com To receive important product updates complete your product registration card online at register labconco com User s Manual Paramount Ductless Enclosures Models 69632 Series 2 Widths...

Page 2: ...of 7 00 a m and 6 00 p m Central Standard Time Part 6968600 Rev D ECO G099 Warranty Labconco provides a warranty on all parts and factory workmanship The warranty includes areas of defective material...

Page 3: ...et Filter Life and Filter Check Timers 12 Initial Safety First Vapor Sensor Warm Up Period 13 Reset or Change the Airflow Face Velocity If Necessary 13 Validate the Enclosure 14 Seal the Enclosure to...

Page 4: ...Measure 34 Security Lock 34 Filter Setup Display Options 35 Restoring Software Default Settings 35 Calibration 35 Diagnostic Test Operation 35 If a Check Airflow Activates 36 Resetting the Airflow Al...

Page 5: ...wers 56 Exhaust Dampers 57 Utility Shelf Kits and Holders 57 Syringe Pump Kit and Detector Tubes 57 Sash Closures 58 CHAPTER 8 TROUBLESHOOTING 59 APPENDIX A REPLACEMENT PARTS 62 APPENDIX B PARAMOUNT D...

Page 6: ...and alerts the operator to replace the filters The early warning provided by the Safety First Vapor Sensor provides the user ample time 5 10 remaining filter life to complete work in process before c...

Page 7: ...aramount Ductless Enclosure features so that you can use it efficiently and effortlessly The Paramount Ductless Enclosure ships without any filters Chapter 3 Getting Started and Chapter 6 Maintaining...

Page 8: ...ments The location and air current requirements The exhaust and blower requirements The electrical power requirements Space requirements Refer to Appendix B Dimensions for complete enclosure dimension...

Page 9: ...d exhausted out the top of the enclosure The filtered exhaust air is normally recirculated into the laboratory or may be exhausted outside with the addition of the Canopy Exhaust Connection and remote...

Page 10: ...100 175 235 295 53 57 62 6963401 100 115V 4 32 12 29 53 60 80 100 230 305 380 57 62 67 6963402 100 115V 4 32 x 360 12 29 53 60 80 100 230 305 380 57 62 67 6963403 100 115V 4 35 12 35 5 56 60 80 100 2...

Page 11: ...pendix C for amperage There is no provision for controlling a remote blower for exhausting air from the Paramount Ductless Enclosure If remote blower control is required a qualified electrician may co...

Page 12: ...change the face velocity if necessary Validate the enclosure Seal the enclosure to the work surface If applicable connect to an exhaust system Depending upon which model you are installing you may nee...

Page 13: ...ponsible for shipping damages Do not discard the packing material until you have checked all of the components and tested the enclosure Do not move the enclosure by tilting it onto a hand truck Set Up...

Page 14: ...rear edge 3 Secure the work surface to the base cabinet with a structural adhesive or silicone sealant 4 Before moving the enclosure insert the supplied mounting screws in the four holes Allow a mini...

Page 15: ...Chapter 3 Getting Started Product Service 1 800 522 7658 10 Figure 3 1 Paramount Ductless Enclosure Installation...

Page 16: ...er Ammonia Amine 11 lbs 6938203 Impregnated Carbon Filter Formaldehyde Formalin 10 lbs 6938204 Mixed Bed Carbon Filter Org Vap Acid Sul Ammon Form 25 Mix 10 lbs 6938205 Impregnated Carbon Filter Radio...

Page 17: ...supply plug on the back of the enclosure For 230V the same procedure applies except it is shipped without a plug Install the appropriate plug for your electrical specifications per local codes See Ap...

Page 18: ...ace velocity and then confirm the average face velocity through the enclosure sash opening Adjust the motor speed and airflow face velocity as necessary after confirmation Average face velocity measur...

Page 19: ...ures provide a safe working environment For copies of these validation reports contact Labconco at 800 821 5525 or 816 333 8811 Seal the Enclosure to the Work Surface When the enclosure has been set i...

Page 20: ...ce safety performance and ergonomics Carbon filters and or HEPA filters must be installed All Paramount Ductless Enclosures have the following performance features as illustrated in Figure 4 1 1 High...

Page 21: ...Chapter 4 Performance Features and Safety Precautions Product Service 1 800 522 7658 16 Figure 4 1 Performance Features...

Page 22: ...Sweep openings sweep the work surface and create a constant protective barrier from contaminants The radiused upper sash foil includes an open air passage directly atop the sash foil into the enclosu...

Page 23: ...s Acetone 0 5 1 0 ppm 4 58 250 2 OV Aromatic Hydrocarbons Toluene 0 5 1 0 ppm 0 16 100 20 OV Ethers Methyl Tert Butyl Ether 0 5 1 0 ppm 0 053 50 9 OV Sulfur Compounds Hydrogen Sulfide 0 5 2 0 ppm 0 00...

Page 24: ...80 fpm and most Paramounts run at or below 59 dbA at 80 fpm By design the ECM impeller is located after the filters assuring an intrinsically safe design where all contaminated air is filtered effect...

Page 25: ...ductless fume hoods and enclosures the Paramount Ductless Enclosure is manufactured with durable tempered safety glass and dry powder epoxy coated aluminum and steel The sides and sash are made from t...

Page 26: ...heck to make sure that the exhaust blower is operating and that air is entering the enclosure at its specified face velocity The airflow monitor will alert the user to a problem with airflow 2 Use goo...

Page 27: ...s manual for proper handling of filters 17 Saturated carbon filters and HEPA filters are to be disposed of as hazardous waste The user is responsible for recording the chemicals adsorbed or removed by...

Page 28: ...nco at 800 821 5525 or 816 333 8811 29 The surface of the HEPA filter is fragile and should not be touched Care must be taken to avoid puncturing the HEPA filter during installation or normal operatio...

Page 29: ...than the exposure limit TWA 2 the filter becomes saturated 3 the user continues to operate 4 and the ventilation of the room is insufficient to dilute the exhaust of the Paramount to below the exposu...

Page 30: ...os su ur re e Information Center The Information Center is an LCD display located on the control panel The center s display is divided into three screens that alternate in normal mode as shown below...

Page 31: ...ed Continuous audible alarm can be muted for 5 minutes Note The early warning signal that occurs with 5 10 remaining filter life is an intermittent audible alarm along with Replace Filter s Check Airf...

Page 32: ...the previous menu Filter Button Automatically goes to the filter setup menu which allows you to display and change the programmable filter parameters such as filter type filter location filter check...

Page 33: ...Chapter 5 Using The Ductless Enclosure Product Service 1 800 522 7658 28 All Program Screens...

Page 34: ...Chapter 5 Using The Ductless Enclosure Product Service 1 800 522 7658 29 Main Setup Screens...

Page 35: ...Chapter 5 Using The Ductless Enclosure Product Service 1 800 522 7658 30 Filter Setup Program Screens...

Page 36: ...Chapter 5 Using The Ductless Enclosure Product Service 1 800 522 7658 31 Calibration Program Screens...

Page 37: ...pressure sensor to maintain constant airflow face velocity Organic Sensor Diagnostic Notes Organic Sensor example represents sensor S1 calibrated in clean air at 1400 millivolts When sensor S1 sees a...

Page 38: ...main timer menu is shown on the LCD display Use the and buttons to highlight the Interval or Elapsed Timer Press the Enter button to select the highlighted timer function Interval Timer Operation 1 Wh...

Page 39: ...IGHT button is pressed or the BLOWER button is pressed Blower Operation This blower switch allows you to run the ductless enclosure and the face velocity will be displayed Note Always work in the duct...

Page 40: ...TER 2 In the Setup submenu select Restore Defaults Press ENTER Table of Default Settings Blower Smart Flow enabled Units of Measure fpm Security Lock OFF Non secure Timers Blower and Light Timers disa...

Page 41: ...e face velocity has increased and stabilized Working In the Paramount Ductless Enclosure Planning Thoroughly understand procedures and equipment required before beginning work Arrange for minimal disr...

Page 42: ...of the enclosure Final Purging Upon completion of work the enclosure should be allowed to operate for two to three minutes undisturbed to purge airborne contaminants from the work area Unloading Mate...

Page 43: ...Check Timers HEPA filter leak test Reset or change the inflow face velocity if necessary Initial Certification Re Certification Fluorescent light replacement Motorized impeller replacement Main contro...

Page 44: ...ected carcinogen These hazardous chemicals must be checked at a minimum of every 10 of the total estimated time Gas detector tubes for the specific chemicals that are being used in the enclosure can b...

Page 45: ...es the vapor sensor does not detect mineral acid gases such as hydrochloric acid nitric acid or sulfuric acid Consult the table in Chapter 4 for a partial listing of tested chemicals in order of sensi...

Page 46: ...er to Chapter 3 on how to Set the Filter Life and Filter Check Timers Detector tubes or analytical instrumentation should always be used to determine concentrations in the carbon filter It is recommen...

Page 47: ...r Reference Leak Testing and Photometer scanning from the Institute of Environmental Services IES RP CC001 3 Apparatus 1 An aerosol photometer ATI model 2D 2E 2G or equivalent Air Techniques Hamilton...

Page 48: ...e should be a strong vacuum at this port If the vacuum is weak contact Air Techniques Hamilton Associates 7 Turn the enclosure on and let it operate for a minimum of 5 minutes 8 Maintain the following...

Page 49: ...y for an inflow velocity of 75 80 fpm The ductless enclosure should be certified for the proper inflow velocity required by your Safety Officer Transport altitude or temperature differences may requir...

Page 50: ...flector located under the control panel shown in Figure 6 1 3 Remove the light reflector by removing two Phillips screws on the bottom of the light reflector 4 Remove the old fluorescent lamp from the...

Page 51: ...Chapter 6 Maintaining the Ductless Enclosure Product Service 1 800 522 7658 46 Figure 6 2 Light Replacement...

Page 52: ...he wiring diagram on the back of the front panel and disconnect all the wires of the motorized impeller from the quick disconnect connector Be sure to connect wires on the new motor in the same way th...

Page 53: ...o the main control board and remove the connectors per the wiring diagram 4 Label the two pressure hoses and remove the two pressure hoses from the control board The hoses must be installed properly w...

Page 54: ...er 1 Consult the wiring diagram on the back of the front panel and disconnect all power 2 Remove the organic sensor connector as shown in Figure 6 5 3 Remove the four Phillips screws that mount the or...

Page 55: ...ure operates with seven different filter types with at least one filter type required for successful operation Catalog Description 6938100 HEPA Filter 15 x 18 x 1 5 99 99 efficient particulate 6938200...

Page 56: ...on Dimensions W x D x H 3909900 Black 2 W x 29 Epoxy 24 x 29 x 1 3909901 Black 3 W x 29 Epoxy 36 x 29 x 1 3909902 Black 4 W x 29 Epoxy 48 x 29 x 1 3909906 Black 4 W x 35 5 Epoxy 48 x 35 5 x 1 3975504...

Page 57: ...Mounted Service Fixtures cannot be used with a Protector Solvent Cabinet Solvent Cabinets have a top that cannot be penetrated Catalog Description 6963800 3 w x 29 d Black Epoxy Work Surface w three...

Page 58: ...Stand 25 4 x 68 4 3857000 Seismic Support Bracket Kit N A 3780310 Portable 3 SoLo Hydraulic Lift Base Stand 115V 53 5 x 34 3 x 17 2 36 8 3780314 Portable 3 SoLo Hydraulic Lift Base Stand 230V 53 5 x...

Page 59: ...2100 9901100 30 9902200 9901200 24 9902300 9902400 9901300 9901500 18 9901400 9901600 48 w Self Closing Doors 9903000 36 w Self Closing Doors 9903100 30 w Self Closing Doors 9903200 24 w Self Closing...

Page 60: ...opy Exhaust Transition is available for 6 nominal duct 6 Paramount requiring two The Canopy Exhaust Transition should be sealed to the top of the enclosure with silicone sealant to prevent leaks Catal...

Page 61: ...er 115 V 60 Hz 4 4 amps 40 18 10 nominal ID inlet blower has a 1 4 hp or 1 3 hp adjustable belt drive motor and corrosion resistant epoxy coated steel housing and wheel with blower inlet of 10 87 ID O...

Page 62: ...r one shelf for spatulas and weigh brushes and one miscellaneous shelf The shelves hang from slots in the rear baffle Labconco also offers a 3927700 Bottle Holder with a 3 diameter opening and a 39278...

Page 63: ...Sometimes it is necessary to close the lower sash opening during operating procedures The Sash Closure consists of bi fold doors to close the opening Catalog Description 6963900 2 w x 9 4 h Sash Clos...

Page 64: ...place filters immediately A spare set of filters should always be on hand Consult Chapters 3 4 and 5 the Labconco Specialist and the Chemical Guide for estimated filter life based on specific chemical...

Page 65: ...unobstructed External factors are disrupting the enclosure airflow patterns or acting as a source of contamination See Location Requirements Chapter 2 Validate the Enclosure Chapter 3 and Safety Preca...

Page 66: ...utton Wrong alarm set point Airflow monitor alarm is preset at 60 fpm Repeat calibration steps outlined in this manual in Chapter 3 Chapter 5 and Chapter 6 Constant audible alarm Check airflow and cal...

Page 67: ...Assy 3 Short 22 7 IH 2C 1 6970100 Sash Assy 3 Tall 32 IH 2D 1 3991502 Sash Assy 4 Short 22 7 IH 2E 1 6970101 Sash Assy 4 Tall 32 IH 2F 1 Sash Assy 4 Extra Tall 35 IH 2G 1 6976300 Sash Assy 5 Tall 32 I...

Page 68: ...Lampholder 14 1 6964500 Main Control Board 15A 1 or 2 6965200 Organic Sensor Board 15B 1 6967800 Harness Organic Sensor 2 w 15C 1 6967900 Harness Organic Sensor 3 5 w 15D 1 6968000 Harness Organic Sen...

Page 69: ...Appendix A Components Product Service 1 800 522 7658 64 A 1...

Page 70: ...9 0 53 0 12 0 6963302 21 3 x 360 Visibility 36 0 32 0 23 4 29 0 53 0 12 0 6963400 20 4 Short 48 0 22 7 23 4 29 0 43 7 9 4 6963401 21 4 Tall 48 0 32 0 23 4 29 0 53 0 12 0 6963402 22 4 x 360 Visibility...

Page 71: ...d at altitudes above or below 900 feet 275 meters Ambient temperature range 41 to 104 F 5 to 40 C Maximum relative humidity 80 for temperatures up to 88 F 31 C decreasing linearly to 50 relative humid...

Page 72: ...9 0 16 0 16 0 26 Fluorescent Lights F15T8 SP35 F17T8 F17T8 F25T8 F25T8 F32T8 F40T8 Number of Filters 2 4 4 6 6 6 8 Paramount Ductless Enclosure Wattage Energy Use and Operating Costs Blower Power watt...

Page 73: ...e ml min Evap Rate 0 15 ml min 90 ml week 1 week 10 hours use 10 hours 600 minutes Evap Rate in g min 0 15 ml min 0 79 g ml 0 12 g min There are 30 pounds of activated carbon in a 3 Paramount which eq...

Page 74: ...t grams and volume milliliters which can be used to estimate Filter Life from a known usage For example you estimate that 37 hydrochloric acid is being used at 500 ml per week and want to know how to...

Page 75: ...y have a 30 percent to 40 percent filtration capacity of theoretical values for organic chemicals with higher carbon affinity The test results show a filtration efficiency of 33 39 percent for chemica...

Page 76: ...60 80 100 120 140 160 180 Mass Adsorbed grams Acetone Acetone Exhaust Concentration ppm Acetone Exposure limit 250 ppm Temp 22 C Hum 41 175 CFM 80 fpm face Evaporation by heated container Average eva...

Page 77: ...m Ethyl Alcohol or Ethanol 3 Paramount Model 6963300 Ethyl Alcohol Reagent Grade Test 10 01 08 SEFA 9 Method Exposure limit 1000 ppm Temp 20 C Hum 41 175 CFM 80 fpm face Evaporation by heated containe...

Page 78: ...1500 2000 2500 3000 Mass Adsorbed grams 2 Propanol 2 Propanol Exhaust Concentration ppm 2 Propanol or Isopropyl Alcohol Exposure limit 400 ppm Temp 20 C Hum 41 175 CFM 79 fpm face Evaporation by heat...

Page 79: ...0 0 500 1000 1500 2000 2500 Mass Adsorbed grams Toluene Toluene Exhaust Concentration ppm Toluene Exposure limit 100 ppm Temp 22 C Hum 40 175 CFM 79 fpm face Evaporation by heated container Average ev...

Page 80: ...02 08 SEFA 9 Method Exposure limit 5 ppm Temp 20 C Hum 41 175 CFM 79 fpm face Evaporation by heated container Average evaporation rate 1 72 ml min 100 ppm inlet conc 40 carbon 4x8 coconut shell impreg...

Page 81: ...ment Laboratory Equipment Model No Paramount Ductless Enclosures 69632 Series 2 Paramount 69633 Series 3 Paramount 69634 Series 4 Paramount 69635 Series 5 Paramount 69636 Series 6 Paramount Serial No...

Reviews: