background image

Chapter 6: Maintaining the Cabinet 


Product Service 1-800-522-7658


30 

Changing the UV Lamp (Model # 34000-00 thru -04, 34040-00 thru -04  
& 34050-00 thru -04): 

Note

: For optimum performance, the UV lamp should be changed on an annual 

basis.  

The UV lamp and the work area of the cabinet must be thoroughly 
decontaminated before removing the lamp. 

1.


Thoroughly surface decontaminate the UV lamp and the work area of the 
cabinet. 

2.


Unplug the cabinet, and open the door(s).  

3.


Remove the UV lamp by rotating it 90 degrees and lifting it straight up and out 
of its sockets. 

4.


Install new lamp by reversing the removal procedure. 


THE LAMP(S) IN THIS PRODUCT CONTAIN MERCURY 

Manage in accordance with local disposal laws. DO NOT place lamps in trash. 
Dispose as a hazardous waste.  For information regarding safe handling, 
recycling and disposal, consult www.lamprecycle.org 


CETTE LAMPE DANS CE PRODUIT CONTIENT DU MERCUE 

Éliminez ou recyclez conformément aux lois applicables.  Pour de l‘information 
concernant des pratiques de manipulation sécuritaires et l’élimination sécuritaire 
et le recyclage, veuillez consulter www.lamprecycle.org 

Summary of Contents for Protector 34000 Series

Page 1: ...Protector Evidence Drying Cabinets Models 34000 Series 3 34040 Series 4 34050 Series 5...

Page 2: ...7 30 a m and 5 30 p m Central Standard Time Part 3898400 Rev G ECO L479 Warranty Labconco Corporation provides a warranty to the original buyer for the repair or replacement of parts and reasonable la...

Page 3: ...ptions UV Lamp Models Models 34000 00 thru 04 34040 00 thru 04 34050 00 thru 04 only 9 Drain Options Wash Down Models Models 34000 10 thru 14 34040 10 thru 14 34050 10 thru 14 only 10 Water Supply Con...

Page 4: ...the Cabinet 23 CHAPTER 6 MAINTAINING THE CABINET 26 Routine Maintenance Schedule 26 Service Operations 27 Door Evidence Prefilter Replacement 27 Door Prefilter Replacement 27 Cabinet Evidence Prefilte...

Page 5: ...features to us The Evidence Drying cabinet models offer many unique features to enhance performance and flexibility To take full advantage of them please acquaint yourself with this manual and keep it...

Page 6: ...power requirements Exhaust requirements Service utility requirements Space requirements Drain requirements Water Supply Requirements Models 3400010 thru 14 3404010 thru 14 and 3405010 thru 14 Only Re...

Page 7: ...ctrical requirements Model Requirements 34000 00 10 34040 00 10 34050 00 10 115 VAC 60 Hz 6 Amps 34000 01 thru 04 11 thru 14 34040 01 thru 04 11 thru 14 34050 01 thru 04 11 thru 14 230 VAC 50 60 Hz 3...

Page 8: ...40 10 thru 14 34050 10 thru 14 Only If you intend to connect the water supply to wash down the cabinet locate the cabinet within 6 feet 1 8 m of a domestic water line equipped with a water shut off va...

Page 9: ...and follow safe lifting guidelines All of the cabinets are very heavy use a mechanical lift and safe moving practices at all times Unpacking the Cabinet Carefully remove the outer carton and inspect t...

Page 10: ...remove the screws securing the brackets discard the brackets and reinstall the screws 4 5 Cabinet Sizes The 4 5 Cabinets are secured to the pallet using four transport bolts securing the cabinet to t...

Page 11: ...cinder block concrete etc you will need to attach the wall bracket to the wall using an anchor or fastener approved for that type of construction 3 Position the bracket centered on the stud with the...

Page 12: ...Chapter 3 Getting Started Product Service 1 800 522 7658 8 Figure 3 1 79 0 2400 cm from the floor to the top of the strap slot Secure bracket to wall stud...

Page 13: ...cket is in its correct position under the drain To install the Drain Kit 3928200 NOTE The drain line should be routed to a floor drain with an air gap only NEVER directly connect the drain line to a s...

Page 14: ...moving Water Supply Connection Wash Down Models Model 34000 10 thru 14 34040 10 thru 14 34050 10 thru 14 only NOTE This model has a cabinet water shut off valve located behind the lower front door The...

Page 15: ...the lower storage space User s Manual Power Cord Product Registration Card UV Security Lock Key s model s 34000 00 thru 04 34040 00 thru 04 34050 00 thru 04 only Drain Strainer Cup Grid Rubber Drain S...

Page 16: ...n turn on Open the door and the UV light will turn off Close the door and the UV light should relight Turn the UV Security Keylock to the OFF position and the UV light will turn off If the UV light do...

Page 17: ...Directional airflow Prefiltration of large particulates by an inlet prefilter in the door and an exhaust prefilter in the top of the liner Filtration and retention of particulates by a High Efficienc...

Page 18: ...the liner passing over the evidence to be dried Before leaving the liner the air then passes through the exhaust prefilter that is designed to protect the HEPA filter from large particulates and may b...

Page 19: ...y type particulate filters The filter material or media is typically made of borosilicate microfibers formed into a thin sheet in a process similar to the production of paper This sheet is folded or p...

Page 20: ...lor while operating UV light with a wavelength of 254 nm is biocidal primarily by creating thymine dimers in DNA These dimers prevent the correct transcription of the DNA into RNA resulting in cellula...

Page 21: ...for more than 5 minutes UV Lamp Models Model 34000 00 thru 04 34040 00 thru 04 34050 00 thru 04 only NEVER expose ANY EVIDENCE plastic or coated materials to ultraviolet UV radiation Never bypass the...

Page 22: ...t of the granular activated carbon it needs to be replaced The weight limit for the fold down shelves is 15 lbs 6 8 kg and the floor of the cabinet and lower storage area is 20 lbs 9 1 kg When surface...

Page 23: ...lockout the UV preventing its operation Before evidence is loaded into the cabinet it is recommended that the lock be turned to the OFF position and the key removed This will prevent the accidental ac...

Page 24: ...ing clip on the back wall of the liner The shelf is now ready to use To fold the shelf down vertical position 1 Lift up on the rear frame of the shelf to release it from the rear retaining clip 2 Pull...

Page 25: ...of the cabinet Large objects should not be placed close together Slowly close the door s and use a padlock not supplied or secure it with a chain of custody seal Unloading Evidence Wear a long sleeve...

Page 26: ...witch is located on the upper front of the cabinet as shown in Figure 5 1a Turning the switch to the Fan position starts the blower drawing air into through the cabinet Turning the switch to the Drain...

Page 27: ...The shelf is now ready to use To fold the shelf down vertical position 3 Lift up on the rear frame of the shelf to release it from the rear retaining clip 4 Pull the shelf towards the front of the li...

Page 28: ...tody seal Unloading Evidence Wear a long sleeved lab coat with knit cuffs and over the cuff rubber gloves Use protective eyewear Wear a protective mask if appropriate Carefully remove objects in the c...

Page 29: ...ump Turn the cabinet water shut off valve off Remove and clean out the drain strainer Inspect and clean the prefilters at the bottom of the door and at the top of the liner Dispose of rubber gloves ap...

Page 30: ...olutions Glass Surface Wipes Labconco part 1570000 clean the door and the surface of the UV lamp Operate the cabinet blower noting if the Filter System Light turns on Ensure the cabinet water shut off...

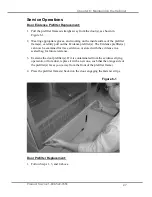
Page 31: ...dence prefilter s The Evidence prefilter s can now be examined for trace evidence or stored with the evidence in a sealed bag for future reference 3 Examine the door prefilter s If it is contaminated...

Page 32: ...rame up slightly and then gently pull the frame straight out of the cabinet 3 Wearing appropriate gloves and working on the prefilter frame carefully lift out the prefilter and then the evidence prefi...

Page 33: ...r appropriate personnel protective equipment 3 Lift the granular activated carbon and HEPA filters straight up and out of the cabinet top 4 Install the replacement filters with the HEPA filter below t...

Page 34: ...3 Remove the UV lamp by rotating it 90 degrees and lifting it straight up and out of its sockets 4 Install new lamp by reversing the removal procedure THE LAMP S IN THIS PRODUCT CONTAIN MERCURY Manag...

Page 35: ...the volume of air drawn through the liner while the unit is operating Ideally smoke released into the intake prefilter should traverse the liner and be drawn into the exhaust prefilter in approximatel...

Page 36: ...t into appropriate electrical service Check connection to the top of cabinet Circuit breaker s tripped Reset circuit breakers UV light not working Door s are open Close door s UV light will not work w...

Page 37: ...3 PROBLEM CAUSE CORRECTIVE ACTION Filter System Light turns on Blockage of the intake prefilters Check the inlet prefilters replace if needed Ensure that there is no obstruction of the exhaust on top...

Page 38: ...3951802 3 Door Evidence Prefilter 3FT package of 10 ea 2A 2 3951822 4 Door Evidence Prefilter 4FT package of 10 ea 2B 2 3951832 5 Door Evidence Prefilter 5FT package of 10 ea 3 1 3872700 3 4 5 Cabine...

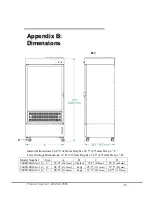
Page 39: ...0 1422mm Height x 26 5 673mm Deep x C Lower Storage Dimensions 12 4 315mm Height x 26 5 673mm Deep x D Model Number Size A B C D 34000 00 thru 14 3 36 0 1097mm Casters 32 3 820mm 25 5 648mm 34040 00...

Page 40: ...2000 meters Ambient temperature range 41 to 104 F 5 to 40 C Maximum relative humidity 80 for temperatures up to 88 F 31 C decreasing linearly to 50 relative humidity at 104 F 40 C Main supply voltage...

Page 41: ...prefilters with a MERV 11 rating Precut to fit the door of the cabinet 1 lb 0 5kg Cabinet Prefilters 3872700 Package of 6 polyester prefilters with a MERV 11 rating Precut to fit the inside top of lin...

Page 42: ...mm long 5 125 mm diameter flexible duct The exhaust system must be capable of exhausting 150 CFM 4 2 m3 min at a vacuum of 0 5 of H2O 125 Pa 10 lbs 5kg Floor Drain Connection Kit 3928200 Allows the c...

Reviews: