background image


A

S

S

E

M

B

LY

 G

U

ID

E

B

O

O

K

A

S

S

E

M

B

LY

 G

U

ID

E

B

O

O

K

EVOLUS

 AUTOMATED 

EQUIPMENT ASSEMBLY 

GUIDEBOOK

EVOLUS

EVOLUS

“EVOLUS” ASSEMBLY GUIDEBOOK - GB - Rel.1.2- 03/2010 - CD0500ITA_GI

GB

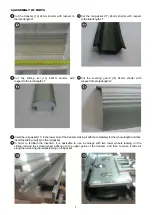
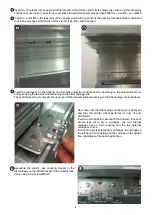
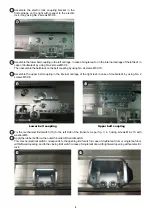
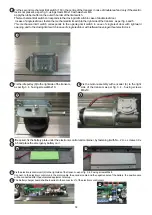
Summary of Contents for EVOLUS

Page 1: ...ASSEMBLY GUIDEBOOK ASSEMBLY GUIDEBOOK EVOLUS AUTOMATED EQUIPMENT ASSEMBLY GUIDEBOOK EVOLUS EVOLUS EVOLUS ASSEMBLYGUIDEBOOK GB Rel 1 2 03 2010 CD0500ITA_GI GB ...

Page 2: ......

Page 3: ...NTI DERAILMENT WHEEL 5 10 6 7 8 9 UPPER BELT COUPLING LOWER BELT COUPLING CABLE GLAND IDLE PULLEY MECHANICAL LIMIT SWITCH 9 1 3 5 6 8 10 4 7 2 4 KIT OF SCREWS 1 WARNINGS This assembly manual is addressed to professionally specialized personnel only Read carefully all the instructions before product assembly as a wrong assembly could be a source of danger Before assembling the product always check ...

Page 4: ... 3 4 5 6 7 8 9 10 1 10 4 11 2 1 3 4 side panel pair electronic control unit motor assembly with encoder cover links carriage with double wheel and third anti derailment wheel 5 10 6 7 8 9 upper belt coupling lower belt coupling cable gland idle pulley mechanical limit switch driving belt 11 FIG 1 FIG 2 2 COMPONENT ARRANGEMENT ...

Page 5: ...1508 1758 2008 2258 2508 2758 3008 3258 1913 2413 2913 3413 3913 4413 4913 5413 5913 6413 650 595 845 1095 1345 1595 1845 2095 2345 2595 2845 900 1150 1400 1650 1900 2150 2400 2650 2900 TRANSOM LENGTH LT LT 2PL B S 24 FREE PASSAGE PL PL LT B S 2 12 LEAF WIDTH LM LM LT B S 2 12 IDLE PULLEY F LT 87 MOTOR M LT LM 342 CONTROL UNIT C LT LM 397 S LT PL B LM S S B LM LM PL LT S LT PL B LM F M C F M C M C...

Page 6: ...OOR LEAF WITH SLIM ELECTRIC LOCK F E M C TRANSOM LENGTH LT LT 2PL B 2S 12 FREE PASSAGE PL PL LT B 2 S 6 LEAF WIDTH LM LM LT B 4 S 2 6 IDLE PULLEY F T 3 4 100 MOTOR M CONTROL UNIT C ELECTRIC LOCK E T 2 5 2000 2500 3000 3500 4000 4500 5000 5500 6000 6500 968 1218 1468 1718 1968 2218 2468 2718 2968 3218 1008 1258 1508 1758 2008 2258 2508 2758 3008 3258 2188 2688 3188 3688 4188 4688 5188 5688 6188 668...

Page 7: ... the total length LT Insert the rail gasket 17 in the lower slot of the transom making it adhere completely for the whole length and then insert the sliding rail 14 on the rail gasket In order to facilitate the insertion it is advisable to use a carriage with two lower wheels leaning on the sliding rail and the central wheel adhering to the upper guide of the transom and then to make it slide all ...

Page 8: ...ls leaning on the lower sliding guide The central wheel must only skim the upper part of the transom without pressing so that the carriage can slide freely Now take care that the carriage cannot get out of its seat and that the central wheel performs its duty of anti derailment Insert two carriages for each leaf in the transom In case of double leaf there are 4 carriages the two internal carriages...

Page 9: ...pper belt coupling in the internal carriage of the right leaf in case of double leaf by using No 2 screws M5 X 8 Lower belt coupling Upper belt coupling Fix the mechanical limit switch 10 to the left side of the transom as per fig 3 4 5 using screws M6 x 10 with washers M6 Apply the rubber buffer on the outer rh border of the limit switch This mechanical limit switch corresponds to the opening lim...

Page 10: ...af door with leftward opening without electric lock Fix the idle pulley 9 to the right side of the transom as per fig 3 4 5 using screws M6x10 16 17 Fix the motor assembly with encoder 3 to the right side of the transom as per fig 3 4 5 using screws M6x10 18 If required fix the battery plate under the electronic control unit container by fastening it with No 2 t c c screws 3 9 x 6 5 and place the ...

Page 11: ...iculation upwards towards the link in order to close it Install the driving belt 11 rolling it up around the idle pulley the belt tensioning screw of the pulley shall be loosened Insert the driving belt in the bracket of the lower belt coupling taking care to make it adhere thoroughly to the eyelets provided in the bracket and lock it by tightening the screw slightly Pull manually the belt from th...

Page 12: ...s Adjust the belt tensioning by screwing the side screw of the idle pulley and once the required tension has been reached tighten the front screw Apply in the upper part of transom No 10 the black plastic cable glands 8 inserting them as per figure and place them at regular spacings along the whole length of the transom 12 29 30 31 32 33 34 23 30 29 31 32 33 34 ...

Page 13: ...e of single leaf door with rightward opening The electric lock lever shall hitch to the bracket provided on the carriage Comply with the fastening dimensions on fig 3 E 4 E 5 E and fasten the electric lock by using screws M6 x 10 36 Roll the electric lock connecting cable up around the cable gland so that it cannot get entangled in the moving devices then connect it to the electric lock cabling by...

Page 14: ...as the control unit buzzer emits the fast beeps then release it when the control unit emits the 4 final beeps preceding motor starting 6 The electric lock if any will free the hooking bracket on the carriage and the motor will run slowly in the closing direction until when the carriages with belt coupling shall arrive at the end of stroke afterwards the motor will run slowly in the opening directi...

Page 15: ...15 Place the covering guard on the transom and fasten it with a TBEI screw 5 X 20 44 45 Finally apply the label with the logo Label on the lower right side of the guard 44 45 ...

Page 16: ...ASSEMBLY GUIDEBOOK ASSEMBLY GUIDEBOOK LABEL S p A Via Ilariuzzi 17 A S Pancrazio P se 43126 Parma Italy Tel 39 0521 6752 Fax 39 0521 675222 www labelspa com ...

Reviews: