

SETUP
1. Using the set screws provided, affix a Core Holder onto the Upper and
Lower Spindle Motors.
2. Rotate each Core Holder by hand to ensure that there is no interference with
the Drive Unit.
3. Set the unit in place where you want it. CAUTION: Avoid accidents. The
TWIN-CAT-3 weighs approximately 35-pounds (16-kg), so choose only a
sturdy surface on which to place it. The TWIN-CAT-3 is bi-directional. Either
Spindle can wind labels in either direction.
4. Verify that the “DIRECTION” Switch on the TWIN-CAT-3 Control Panel is in
the “OFF” position.
5. Plug the Power Plug at the end of the wire on the Power Supply Module into
the TWIN-CAT-3 Power Input Jack. Plug the Power Supply Line Cord into
an appropriate AC power outlet. The unit is now ready for use.
LABEL REWINDING
1. Place the “DIRECTION” Switches on the TWIN-CAT-3 Control Panel in the
center “OFF” position.
2. Slide an empty label core over the desired Core Holder until the core is
against the inner Flange Plate.
3. Feed the label web from the printer or Slitter and secure it to the take-up roll
core with tape. Rotate the take-up reel a couple of turns.
4. Check that the TWIN-CAT-3 Unit is square with the printer or Slitter.
5. Rotate the “TORQUE” Control Knob to the minimum position (fully counter-
clockwise).
6. Place each TWIN-CAT-3 “DIRECTION” Switch in the position desired to run
left or right.
7. Start the printer and adjust the “TORQUE” Control Knob for the desired
tension. The Upper and Lower Spindles are controlled independently and
together can be set to control the rewind / unwind tension and speed.
8. Use the minimum “TORQUE” setting needed to rewind labels properly.
Excessive torque might pull the labels too hard and cause the printer to lose
registration.
WIND-IN / WIND-OUT
You can use the Dual Spindles to reverse the direction the labels are facing.
You can also rewind the labels so that they are in the original (serialized
order) they came out of the printer. An optional Adjustable Paper Guide
(APG-CAT) can be fitted to help guide the outer edge of the lower label roll
as it rewinds. Quick-Chucks are provided with Outer Label Flanges.
WARNING
This product is for indoor use only.
Not for use in wet locations.
Unplug unit before removing waste material or
performing any cleaning or maintenance services.
LABEL SLITTING
The TWIN-CAT-3 Label Rewinder (with “Quick-Chucks”) is ideal as part of a
setup to slit labels. If small labels are printed several “up” (across) and
then slit to their desired width, you realize much greater effective print
speed and print head and ribbon efficiency. LABELMATE’s Model S-100
uses the power of the TWIN-CAT-3 to pull the labels through the slitting
blades. Slitting can take place either “in-line” with one or two blades
directly after exiting the printer, or “off-line” for greater efficiency where a
roll of printed labels is unwound from a LABELMATE Label Unwinder.
Three or more blades can be used in an “off-line” setup.
SLITTER SETUP
1. Position the TWIN-CAT-3 near the exit path of the Slitter Unit.
2. Verify that the “DIRECTION” Switch on the TWIN-CAT-3 Control Panel is
in the “OFF” position.
3. Thread the label web to be slit through the Slitter to begin the cuts.
4. Tape alternate slit webs alternately onto the lower and upper “Quick-
Chuck” Core Chucks and tape them onto the rewind cores you have
placed on the upper and lower Spindles. See the Slitter User Manual for
full instructions.
5. Rotate the “TORQUE” control to its minimum (fully CCW) position.
6. Place the “DIRECTION” Switch in the desired position for label transport.
7. Observe the movement of the labels through the Slitter and increase the
“TORQUE” setting as required.
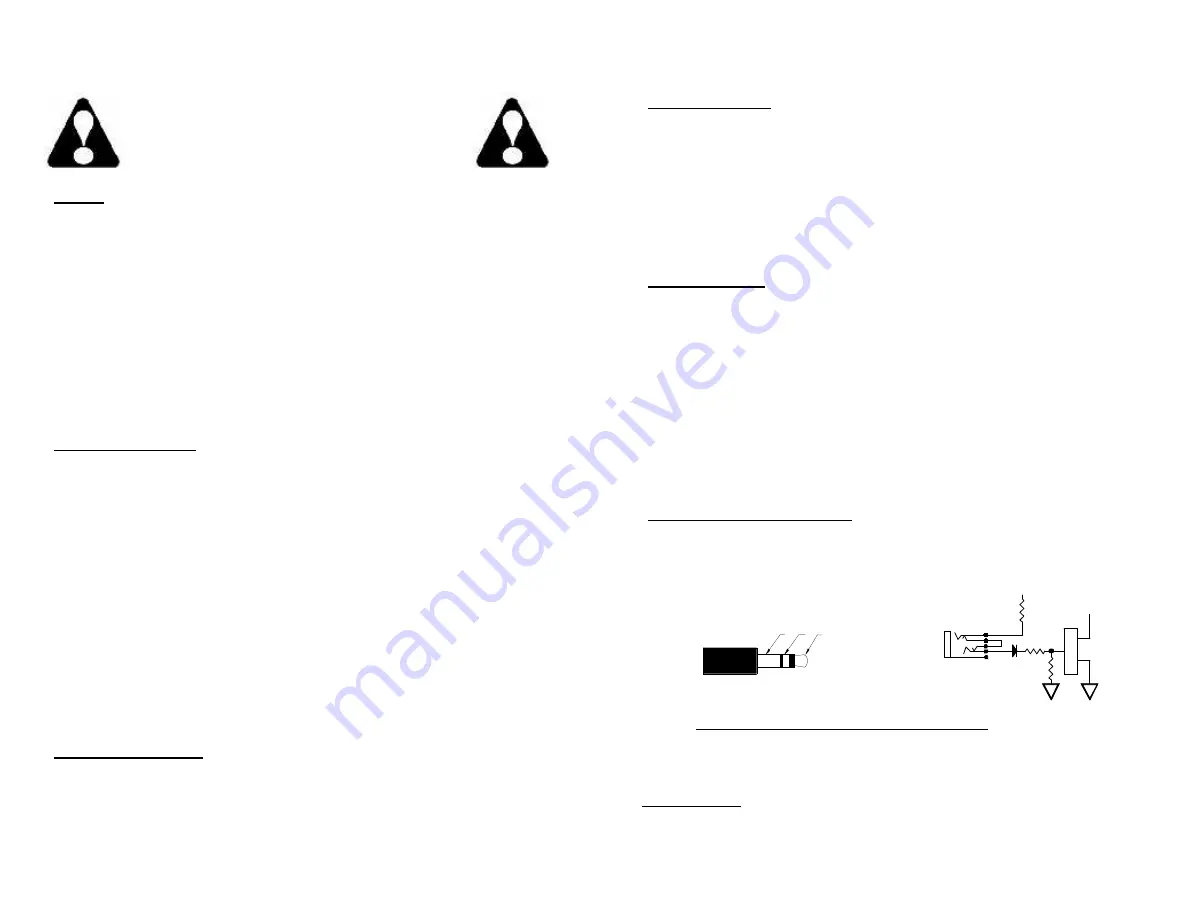
EXTERNAL HALT CONTROL (Use is optional)
The External Halt Control jack is for use with external devices capable of
using an open circuit halt command. A 3.5mm control cable is required
(not included).
3.5mm Dual Circuit Plug
Contact CLOSED=RUN
Contact OPEN=HALT
Pin 1 - No connection (NOT USED)
Pin 2 - Normally Closed (NC) contact
Pin 3 - Normally Closed (NC) contact return
MAINTENANCE
Your TWIN-CAT-3 Dual Spindle Rewinder/Unwinder requires no
maintenance.
SETUP
1. Using the set screws provided, affix a Core Holder onto the Upper and
Lower Spindle Motors.
2. Rotate each Core Holder by hand to ensure that there is no interference with
the Drive Unit.
3. Set the unit in place where you want it. CAUTION: Avoid accidents. The
TWIN-CAT-3 weighs approximately 35-pounds (16-kg), so choose only a
sturdy surface on which to place it. The TWIN-CAT-3 is bi-directional. Either
Spindle can wind labels in either direction.
4. Verify that the “DIRECTION” Switch on the TWIN-CAT-3 Control Panel is in
the “OFF” position.
5. Plug the Power Plug at the end of the wire on the Power Supply Module into
the TWIN-CAT-3 Power Input Jack. Plug the Power Supply Line Cord into
an appropriate AC power outlet. The unit is now ready for use.
LABEL REWINDING
1. Place the “DIRECTION” Switches on the TWIN-CAT-3 Control Panel in the
center “OFF” position.
2. Slide an empty label core over the desired Core Holder until the core is
against the inner Flange Plate.
3. Feed the label web from the printer or Slitter and secure it to the take-up roll
core with tape. Rotate the take-up reel a couple of turns.
4. Check that the TWIN-CAT-3 Unit is square with the printer or Slitter.
5. Rotate the “TORQUE” Control Knob to the minimum position (fully counter-
clockwise).
6. Place each TWIN-CAT-3 “DIRECTION” Switch in the position desired to run
left or right.
7. Start the printer and adjust the “TORQUE” Control Knob for the desired
tension. The Upper and Lower Spindles are controlled independently and
together can be set to control the rewind / unwind tension and speed.
8. Use the minimum “TORQUE” setting needed to rewind labels properly.
Excessive torque might pull the labels too hard and cause the printer to lose
registration.
WIND-IN / WIND-OUT
You can use the Dual Spindles to reverse the direction the labels are facing.
You can also rewind the labels so that they are in the original (serialized
order) they came out of the printer. An optional Adjustable Paper Guide
(APG-CAT) can be fitted to help guide the outer edge of the lower label roll
as it rewinds. Quick-Chucks are provided with Outer Label Flanges.
WARNING
This product is for indoor use only.
Not for use in wet locations.
Unplug unit before removing waste material or
performing any cleaning or maintenance services.
LABEL SLITTING
The TWIN-CAT-3 Label Rewinder (with “Quick-Chucks”) is ideal as part of a
setup to slit labels. If small labels are printed several “up” (across) and
then slit to their desired width, you realize much greater effective print
speed and print head and ribbon efficiency. LABELMATE’s Model S-100
uses the power of the TWIN-CAT-3 to pull the labels through the slitting
blades. Slitting can take place either “in-line” with one or two blades
directly after exiting the printer, or “off-line” for greater efficiency where a
roll of printed labels is unwound from a LABELMATE Label Unwinder.
Three or more blades can be used in an “off-line” setup.
SLITTER SETUP
1. Position the TWIN-CAT-3 near the exit path of the Slitter Unit.
2. Verify that the “DIRECTION” Switch on the TWIN-CAT-3 Control Panel is
in the “OFF” position.
3. Thread the label web to be slit through the Slitter to begin the cuts.
4. Tape alternate slit webs alternately onto the lower and upper “Quick-
Chuck” Core Chucks and tape them onto the rewind cores you have
placed on the upper and lower Spindles. See the Slitter User Manual for
full instructions.
5. Rotate the “TORQUE” control to its minimum (fully CCW) position.
6. Place the “DIRECTION” Switch in the desired position for label transport.
7. Observe the movement of the labels through the Slitter and increase the
“TORQUE” setting as required.
EXTERNAL HALT CONTROL (Use is optional)
The External Halt Control jack is for use with external devices capable of
using an open circuit halt command. A 3.5mm control cable is required
(not included).
3.5mm Dual Circuit Plug
Contact CLOSED=RUN
Contact OPEN=HALT
Pin 1 - No connection (NOT USED)
Pin 2 - Normally Closed (NC) contact
Pin 3 - Normally Closed (NC) contact return
MAINTENANCE
Your TWIN-CAT-3 Dual Spindle Rewinder/Unwinder requires no
maintenance.
10K
12V
1K
D
S
G
10K
"EXT. HALT CONT."
3.5 mm Jack
Dual Circuit
2 3
1


