- 17 -
5.
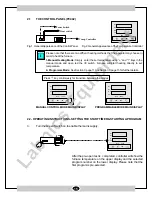
You will observe the actual temperature at upper display of the furnace and the program
number and stage (segment) number at the lower display.
6.
Program will start from the process value and carry on according the program data.
7.
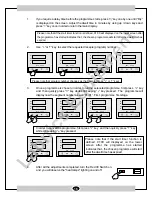
During the program is running, by pressing "
" key one by one ,you can reach certain
information regarding the program which are all read only except "Dly" and "StSP”.
8.
These are : "StSP" determines the set point value during any of the programmes is not
running, "Dly" determines the delay time at the start of a programme, nor" number of
repeats , "rst" remaining set time (Is the start timer is defined shows the remaining dwell
time) , "psp" program set point, “coL" control out put limit , "setn" over temperature alarm
limit and "Hys" set point hysterisis .
9.
To "cancel" the program press * and down key again and the program will be cancelled.
10.
When activated Protherm PC442 does not stop even at power cut offs ,it will simply start to
follow the programme when the power is reinstated . In that case you will see the "appr" sign
on the lower display.
11.
Please note that ,you can not change the programme data during operation.
E.
Sample Program (Honeywell UDC2500)
There are four different alternatives in order to heat up the furnace with UDC2500 Temperature Controller:
1.
Standard Heating
2.
To define a ramp rate to reach a set point.
3.
To define a time period to reach a set point.
4.
Programming.
In
"Standard Heating",
the set point can be adjusted by the operator by using the “
▲
" and “
▼
” keys on the
Controller Panel and the furnace heats up this temperature with maximum power (uncontrolled) after the
"heat"
swith turned on .
Operator may either choose SPRate or SPRamp defines to heat up the furnace. However, SPProg can
easily perform the function of SPRate and SPRamp.
4.
Programming
Programming Steps
1.
When you are in main display, press the
"SETUP"
button one by one until
SPRAMP
displays on
the screen.
2.
Press
"FUNCTION"
button to enter the sub-menu of the
SPRAMP
.
3.
Keep pressing
"FUNCTION"
button until the
SPPROG
displayed on the screen.
4.
Press “
▲
" or “
▼
" button and enable the
SPPROG
function. And make sure that the
"SPRATE"
and
"SPRAMP"
functions are disabled.
5.
After you have enabled the
SPPROG
press
"FUNCTION"
button.
6.
Now you are in the sub menu of the
SPPROG.
7.
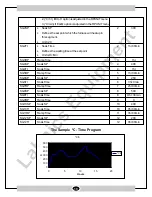
In this menu, the functions which are listed at the
Prompt
column of the table will be displayed
respectively if you press
"FUNCTION"
button step by step.


