Multiplexing
139
To test the new multi-cycle settings:
1.
On the multiplexed switch panel press the
MULTI
-
CYCLE
switch and the green
START CYCLE
2.
Once the packer has completed its cycles and come to a stop, switch off the hydraulic pump and
turn off the engine (see Figure 9-7).
The number of cycles needs to be adjusted depending on the type of collection route used by the
vehicle. For example, in a residential area, if the houses are numerous and close one to another, it may
be required to increase the number of cycles. This will allow the hopper to be clear for the next house
pickup.
Each time the packer completes a full cycle, the limit switch located on the right-hand side hopper
front wall, just behind the cab (see Figure 9-8), sends a signal to the IFM electronic controller. The
controller then counts the amount of cycles that the packer does. The IFM controller will stop the
packer after the preset amount of cycles has been reached.
Figure 9-8 Fully retract limit switch
I/O Status
In this section, you will find helpful information to troubleshoot body-related problems that you may
face during your day-to-day tasks. These problems can be of any nature, from hydraulic to
mechanical, electrical or pneumatic.
Select the control module corresponding to the part of the truck that needs to be checked.
Caution
Make sure the ball valve on the suction line is fully open before starting the vehicle.
Danger!
Never enter the hopper while the packer is moving.
Summary of Contents for MINIMAX
Page 1: ...MINIMAX TM MAINTENANCE MANUAL...
Page 2: ......
Page 3: ...MINIMAX MAINTENANCE MANUAL...
Page 8: ...vi Table of Contents Adjusting Arm Speed 164...
Page 30: ...22 Safety Figure 2 17 Drain valve on air tank...
Page 72: ...64 Lubrication Figure 4 10 Lubrication chart Helping Hand arm...
Page 80: ...72 Lubrication...
Page 90: ...82 Hydraulic System Figure 5 8 Oil temp level gauge Figure 5 9 Steel hydraulic tank...
Page 102: ...94 Hydraulic System Figure 5 21 Strainer assembly Strainer...
Page 106: ...98 Hydraulic System Figure 5 25 Detecting cylinder internal leaks 1 2 3 4 5 A A A...
Page 108: ...100 Hydraulic System...
Page 113: ...Electrical System 105 Electrical Schematics Cab Adaptation...
Page 114: ...106 Electrical System Cab Console Controls...
Page 115: ...Electrical System 107 Cab Controller...
Page 116: ...108 Electrical System Chassis...
Page 117: ...Electrical System 109 Body Module rear side...
Page 118: ...110 Electrical System Body Module front side...
Page 119: ...Electrical System 111 Tailgate Lighting...
Page 120: ...112 Electrical System Panic Bars Crusher Panel Tipper Interlocks...
Page 121: ...Electrical System 113 Cameras Switchpack Details Interlocks AUTO 10 SEC INHIBIT AUTO N AUTO ON...
Page 122: ...114 Electrical System...
Page 127: ...Troubleshooting 119 Figure 8 4 Ball end hex wrench metric and SAE...
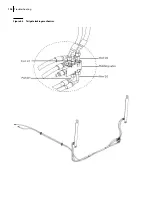
Page 134: ...126 Troubleshooting Figure 8 6 Tailgate locking mechanism...
Page 156: ...148 Multiplexing...
Page 162: ...154 Multiplexing...
Page 164: ...156 Lifting Arm Figure 10 1 Mounting bolts Figure 10 2 Helping Hand gripper Figure 10 3 Hoses...

